The IR (Infrared) remote control is a great way to incorporate wireless control of your project. Infrared receiver modules are simple and easy to use.
In this post, we will be connecting the IR receiver to the UNO, and then use a Library that was designed for this particular sensor. In our sketch we will have all the IR Hexadecimal codes that are available on this remote, we will also detect if the code was recognized and also if we are holding down a key. Let’s get started.
A full list of posts in this series can be obtained at the following location:
Arduino Uno Software Super Starter Kit
Previous posts in this Arduino Uno Super Starter Kit Series:
Hardware and Powering – Video
Software – Video
LEDs – Video
Digital Inputs – Video
Analog Inputs – Video
Buzzers – Video
Tilt Ball Switch – Video
Servo – Video
Ultrasonic Sensor – Video
Temperature and Humidity – Video
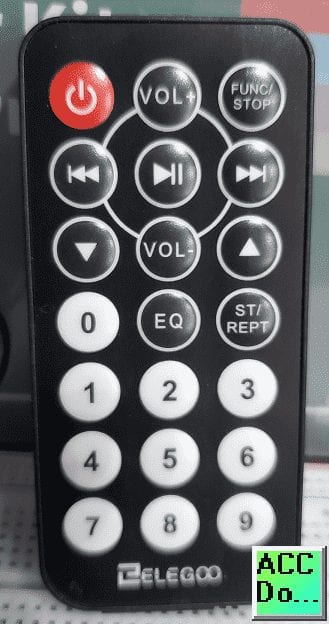
Watch the video below to see the IR remote control in action on our Arduino Uno Kit. Elegoo Super Starter Kit UNO R3.
How do IR circuits work?
IR detectors (receivers) are little microchips with a photocell that are tuned to pick up infrared light. They are almost always used for remote control detection – every TV and DVD player has one of these in the front to see the IR signal from the clicker (sender). Inside the remote control is a matching IR LED. It emits IR pulses to tell the TV to turn on, off, or change channels. IR light is not visible to the human eye so it is ideal for this type of application.

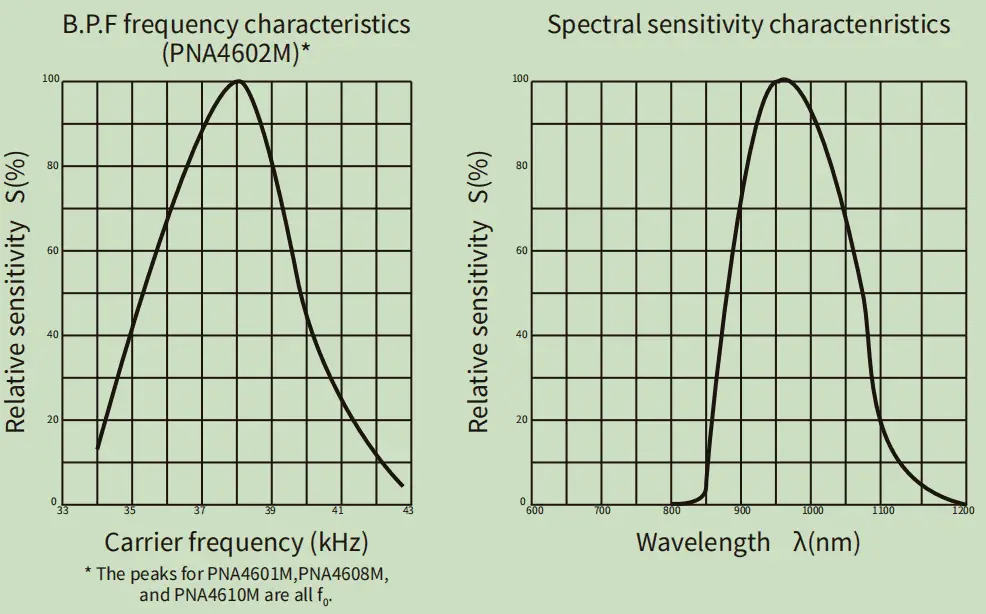
IR detectors have a demodulation circuit inside that looks for modulated IR at 38 kHz frequency. The IR sending LED has to be PWM blinking at 38KHz. IR detectors are digital outputs. They detect 38KHz IR signal and output low (0V) or they do not detect any and output high (5V). Controlling the spacing between the transmitted modulated signals, the waveform can be read by an input pin on a microcontroller and decoded as a serial bit stream to tell what key has been pressed.
As you can see from these data sheet graphs, the peak frequency detection is at 38 kHz and the peak LED color is 940 nm. IR or Infrared wavelengths are measured in ‘nm’ or nanometers, which are used to specify the wavelength of electromagnetic radiation near the visible part of the light spectrum. Infrared LEDs and detectors are matched to work at the same KHz frequency!
IR Communication Tutorial
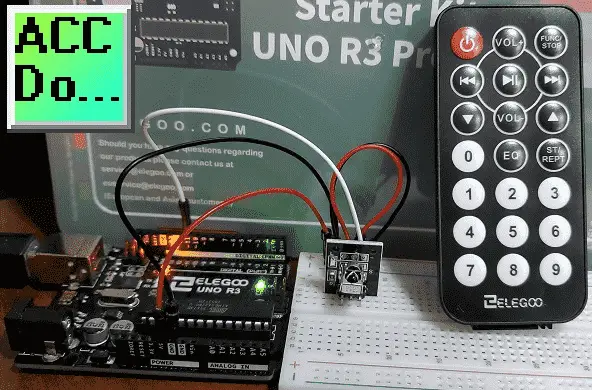
Wiring the IR Receiver Module to our Arduino UNO
There are three connections to the IR receiver module. The connections are Signal, Voltage, and Ground.
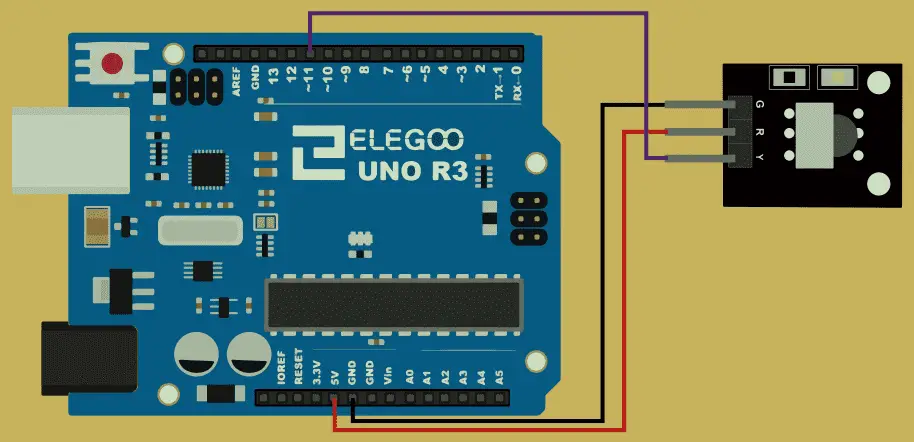
The “G” is the Ground (GND), “Y” is the signal (Pin11), and “R” is Voltage +5V.
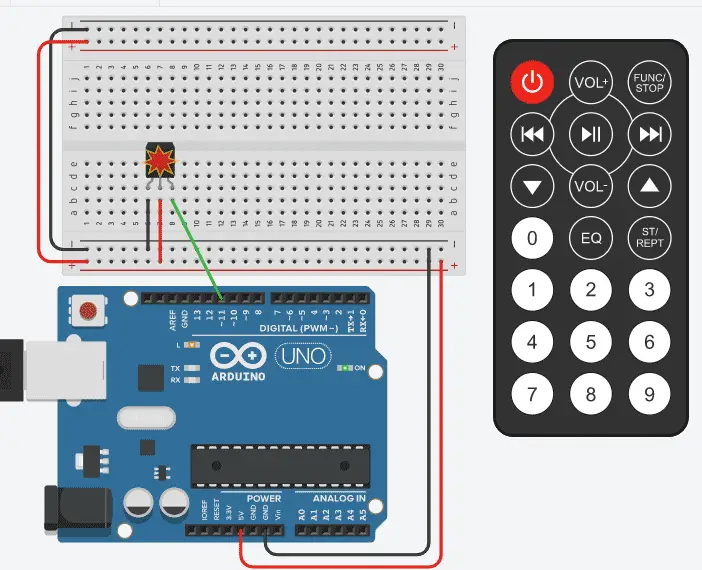
The remote clicker is usually powered by a coin cell battery.
Arduino UNO IR Remote Control Program
We will use a ZIP library for the IR remote control.
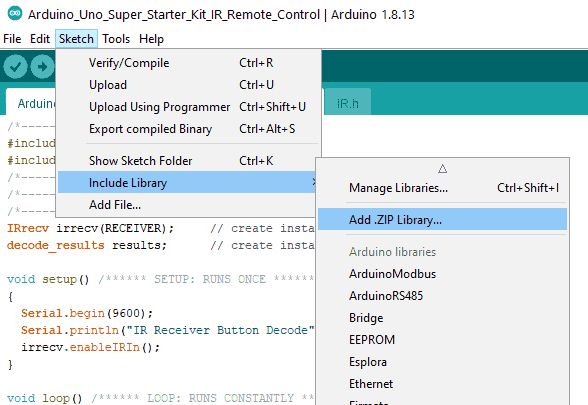
Select “Add ZIP Library…” from the main menu | Sketch | Include Library.
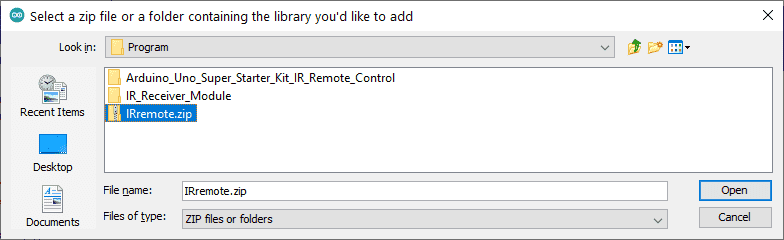
The IRremote.zip file came on the disk with the Arduino UNO R3 super starter kit. It can also be downloaded from the link below with the program. Select this library and then select open. This will add the library to the Arduino IDE (Integrated Development Environment).
This first part will set up the library and declare the variables for the IR receiver unit. The IR.h library will determine the pin that is used for the digital input. In our case, this is set for pin 11. (#define RECEIVER 11)
/*-----( Import needed libraries )-----*/
#include "IRremote.h"
#include "IR.h"
/*-----( Declare Constants and Pin Numbers )-----*/
/*-----( Declare objects )-----*/
/*-----( Declare Variables )-----*/
IRrecv irrecv(RECEIVER); // create instance of 'irrecv'
decode_results results; // create instance of 'decode_results'
The serial port monitor will be used to display the press of the buttons on the IR remote control. We will open the port.
void setup() /****** SETUP: RUNS ONCE ******/
{
Serial.begin(9600);
Serial.println("IR Receiver Button Decode");
irrecv.enableIRIn();
}
The program will determine if we have received an IR signal. If we did then loop through the values until the matching signal is found. Once found print out the key description. If the key has been constantly pressed, then print out the word “Repeat…”
void loop() /****** LOOP: RUNS CONSTANTLY ******/
{
int tmpValue;
if (irrecv.decode(&results)) // have we received an IR signal?
{
for (int i = 0; i < 23; i++)
{
if ((keyValue[i] == results.value) && (i<KEY_NUM))
{
Serial.println(keyBuf[i]);
tmpValue = results.value;
}
else if((results.value==4294967295) && (REPEAT==i))
{
Serial.println("Repeat...");
}
}
irrecv.resume(); // receive the next value
}
delay(200); //Delay to ensure that a repeat is not issued for every button press
Note: Here is another way to get the same information from the IR receiver module. Everything is commented out, but you can see that it will use the case instruction.
//The implementation effect of the above program is
//the same as that of the following, but it is more concise

// switch(results.value)
// {
// case 0xFFA25D: Serial.println("POWER"); break;
// case 0xFFE21D: Serial.println("FUNC/STOP"); break;
// case 0xFF629D: Serial.println("VOL+"); break;
// case 0xFF22DD: Serial.println("FAST BACK"); break;
// case 0xFF02FD: Serial.println("PAUSE"); break;
// case 0xFFC23D: Serial.println("FAST FORWARD"); break;
// case 0xFFE01F: Serial.println("DOWN"); break;
// case 0xFFA857: Serial.println("VOL-"); break;
// case 0xFF906F: Serial.println("UP"); break;
// case 0xFF9867: Serial.println("EQ"); break;
// case 0xFFB04F: Serial.println("ST/REPT"); break;
// case 0xFF6897: Serial.println("0"); break;
// case 0xFF30CF: Serial.println("1"); break;
// case 0xFF18E7: Serial.println("2"); break;
// case 0xFF7A85: Serial.println("3"); break;
// case 0xFF10EF: Serial.println("4"); break;
// case 0xFF38C7: Serial.println("5"); break;
// case 0xFF5AA5: Serial.println("6"); break;
// case 0xFF42BD: Serial.println("7"); break;
// case 0xFF4AB5: Serial.println("8"); break;
// case 0xFF52AD: Serial.println("9"); break;
// case 0xFFFFFFFF: Serial.println(" REPEAT");break;
// default:
// Serial.println(" other button ");

// }End Case
}
Upload the program sketch to the Arduino UNO R3 controller.

Start the serial monitor to watch the IR remote control readings.
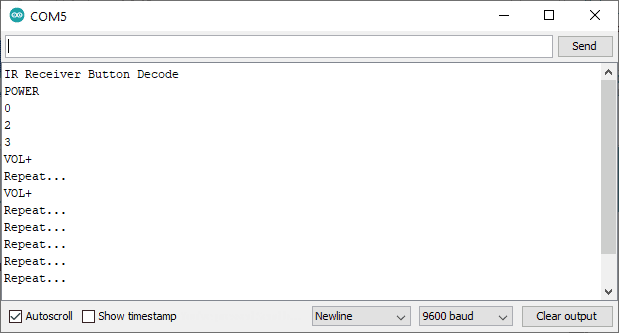
You will see the IR receiver button decode. As buttons are pressed the corresponding text will be displayed. If a button is held then the repeat is printed.
The above Arduino program sketch can be downloaded here.
Watch the video below to see the operation of our IR remote control with the Arduino Uno Super Starter Kit.
Elegoo Links:
Service
service@elegoo.com (USA and Canada)
EUservice@elegoo.com (Europe)
Arduino Compatible Links:
Product Hardware
Elegoo UNO Project Super Starter Kit
Elegoo Download Page
Amazon.com
Amazon.ca
Software
– Arduino IDE (Integrated Development Environment)
– Productivity Blocks (Development Timesaver)
– Productivity Blocks Documentation (Wiki)
Community
– Arduino Blog
– Arduino Forum
– Arduino UNO Facebook
Next time we will look at the LCD display on our Arduino Elegoo super starter kit UNO R3.
Watch on YouTube: Arduino Uno IR Remote Control
If you have any questions or need further information please contact me.
Thank you,
Garry
If you’re like most of my readers, you’re committed to learning about technology. Numbering systems used in PLCs are not difficult to learn and understand. We will walk through the numbering systems used in PLCs. This includes Bits, Decimal, Hexadecimal, ASCII, and Floating Point. To get this free article, subscribe to my free email newsletter.
Use the information to inform other people how numbering systems work. Sign up now. The ‘Robust Data Logging for Free’ eBook is also available as a free download. The link is included when you subscribe to ACC Automation.