The C-more headless EA9-RHMI is programmed using the C-more Programming Software, EA9-PGMSW. The developed project is transferred from the PC to the HMI by either a USB or an Ethernet connection between the two. Previously we used the Ethernet connection to establish communication.
We will be using the USB connection to establish communication, save the program and review the setup screens of the Headless C-more.
Troubleshooting of the USB connection and windows driver will also be discussed. Let’s get started.
Previously in this C-More EA9 HMI Panel series, we have done the following:
System Hardware
– Unboxing and Review Video
– Powering the Unit Video
Installing the Software – Video
System Setup Screens – Video
First Program
– Establishing Communication and Updating Firmware Video
– First Program Video
Panel to PLC and PLC to Panel Settings – Video
Common Screen Menu – Video
Simulate Project – Video
Object List Shapes – Video
Object List Buttons – Video
Object List Indicators – Video
Object List Entry – Video
Object List Meters and Graphs – Video
Object List Bitmaps – Video
Object List Recipe – Video
Define Custom Keypad – Video
Object List Alarms – Video
Object List Text – Video
Object List Clock – Video
Barcode Scanner Input – Video
Web Server and Remote Access – Video
Data Logging – Video
FTP File Transfer Protocol – Video
Sending Email – Video
Headless RHMI Panel
– Unboxing Video
– Establish Communication Video
Watch the video below to see the USB connection and setup screens of the C-More EA9-RHMI Unit.
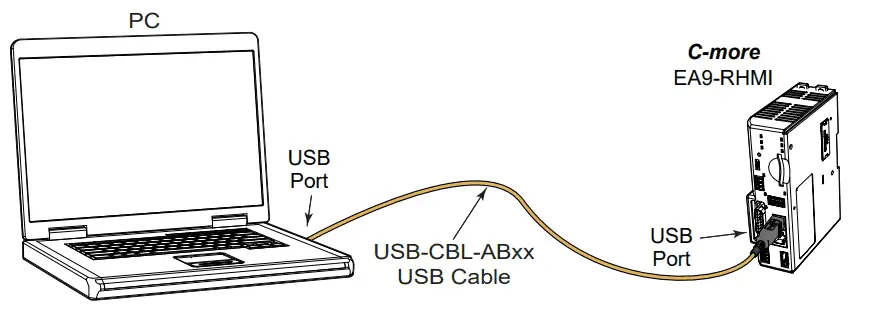
A USB type AB programming cable, such as p/n USB-CBL-AB15, should be used to make a connection between the panel’s USB Port, Type B, and a USB port on the PC. The C-more Programming Software will install a USB driver on the PC during the software installation.
C-More EA9 HMI Series Headless RHMI Panel Establish Communication
Start the C-More programming software and select the ‘Start a Project’ icon. The ‘start a project’ window will be displayed.
Connect the USB cable into the USB Port.
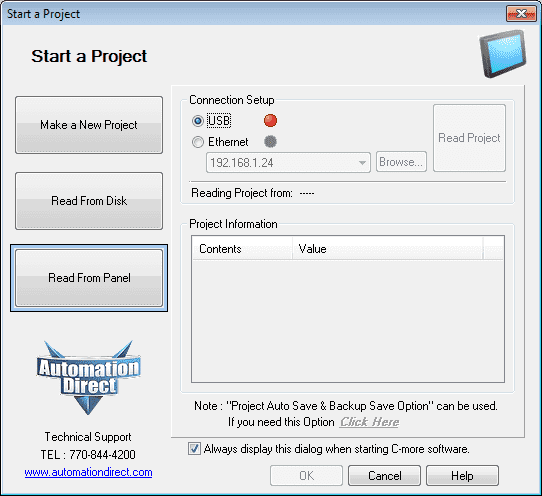
Once the USB cable driver has been initialized, the green indicator light will turn on under the connection setup.
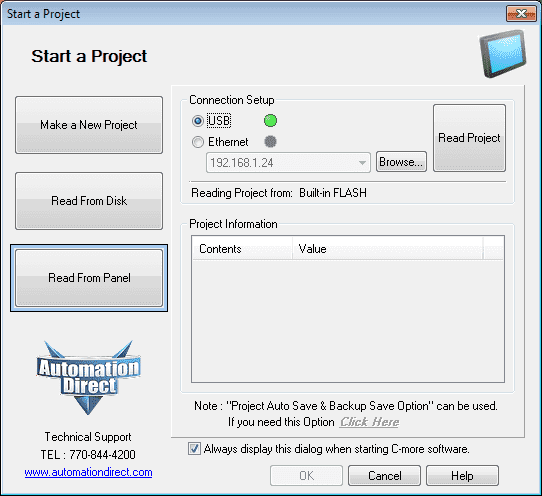
Select the Read Project button.
The current project will now be read from our headless cmore.
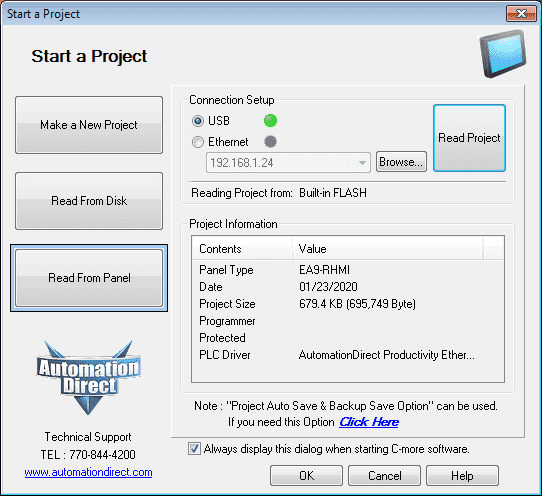
Once the project has been read, the project information will be filled out based on the information obtained. Select OK.
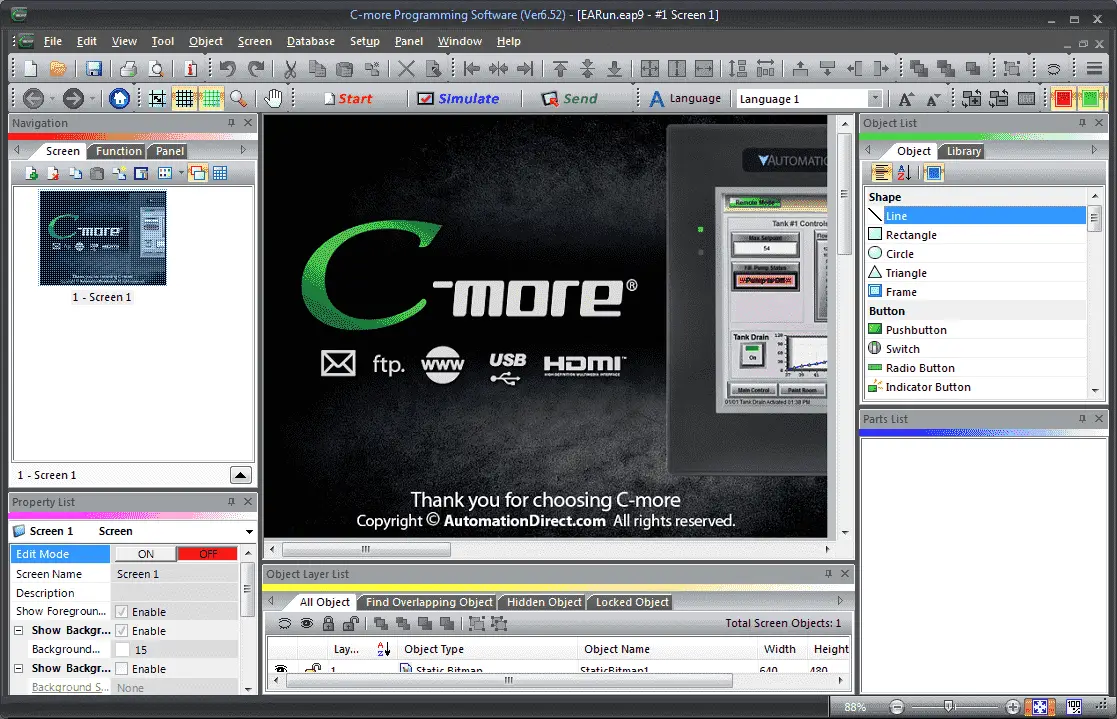
We can now save the project from the main menu icon or by using the main menu | File | Save Project. You can also use the keyboard shortcut Ctrl + S.
System Setup Screens
The C-more EA9-RHMI includes a series of built-in System Setup Screens similar to the entire EA9 Series that allow you to view detailed information about the HMI. This will allow you to adjust certain features, configure communications, test various functions of the HMI, backup and restore firmware, recipe, log and project memory, clear memory and reset all values and conditions back to the original factory defaults.
Accessing the system setup screens can happen with the USB connection to the computer.
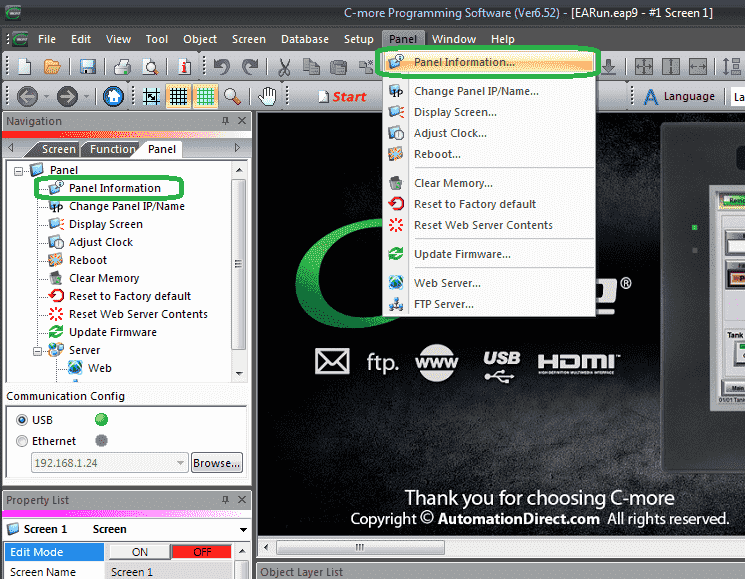
Select Panel Information under the Panel tab on the Navigation window or use the main menu | Panel | Panel Information…
Select RHMI USB Remote on the left side menu.
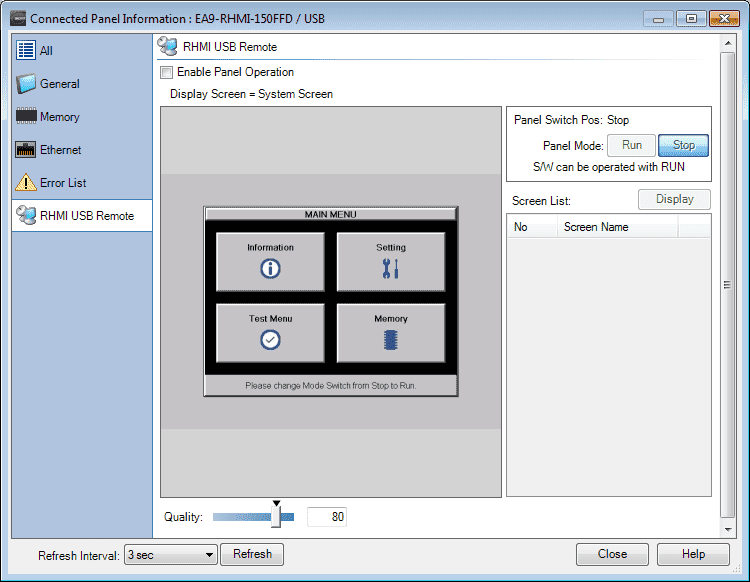
Select Enable Panel Operation.
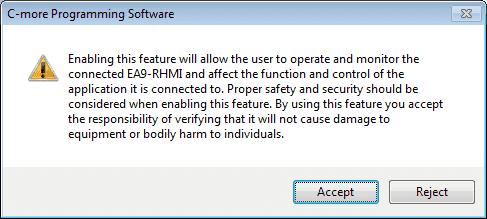
Accept the warning on enabling this feature.
Change the refresh interval to 1 sec. This will improve the responsiveness of the serial communication to the HMI.
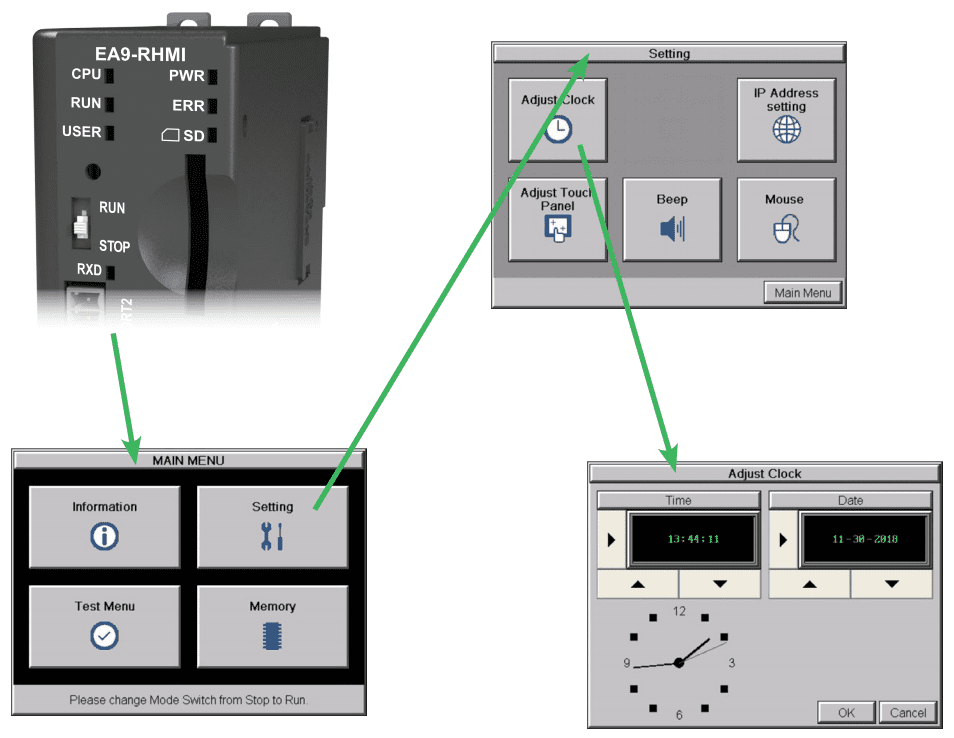
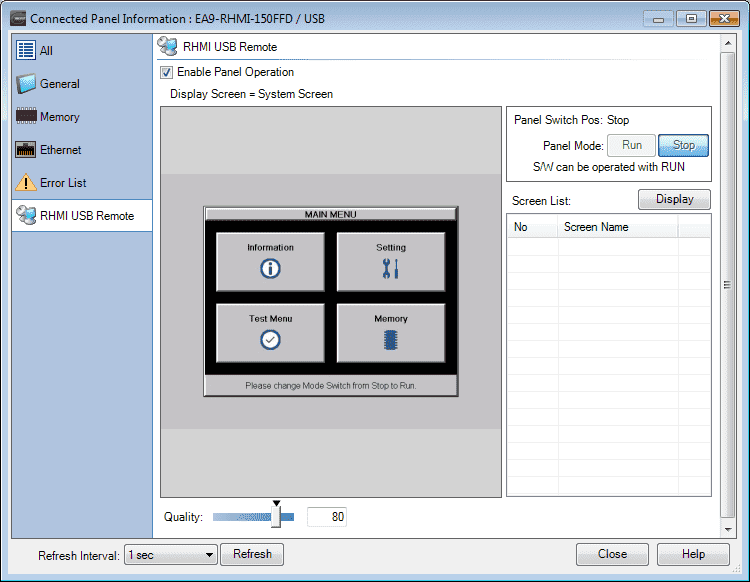
Note: The panel switch on the headless cmore HMI is in the Stop position. (Enable the setup screens to be displayed.)
We can now select from the four different options with our mouse by double-clicking.
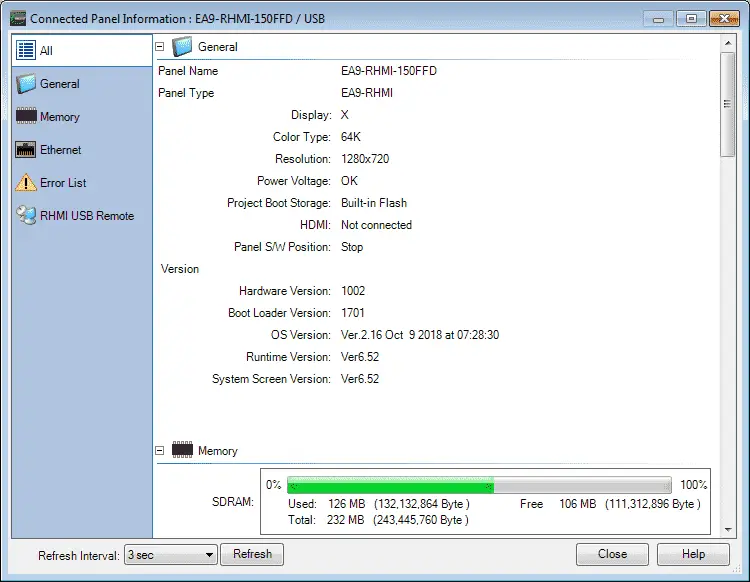
Information
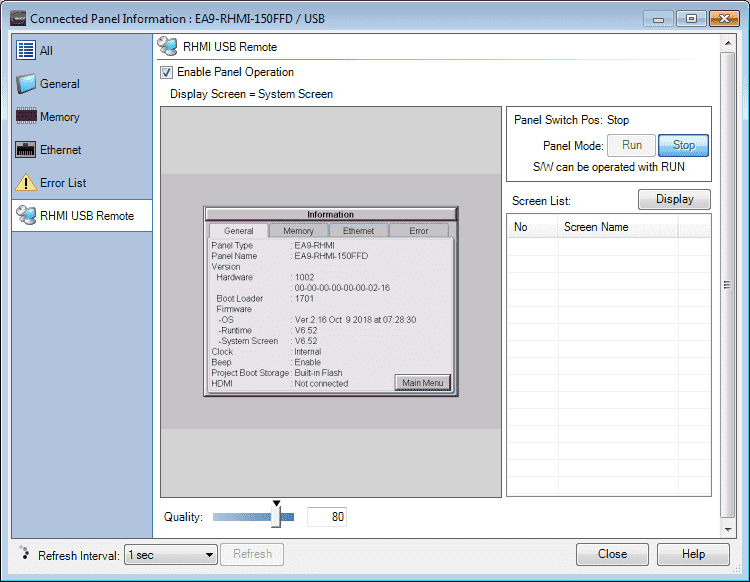
The information tabs display details about the HMI model; the HMI’s name; version information for the hardware, boot loader and firmware; clock source, and beeper status. Other tabs display details on the HMI’s internal memory and the status of any external memory devices. Communication port details are available in this area, as well as an error log to help in troubleshooting the system
Setting
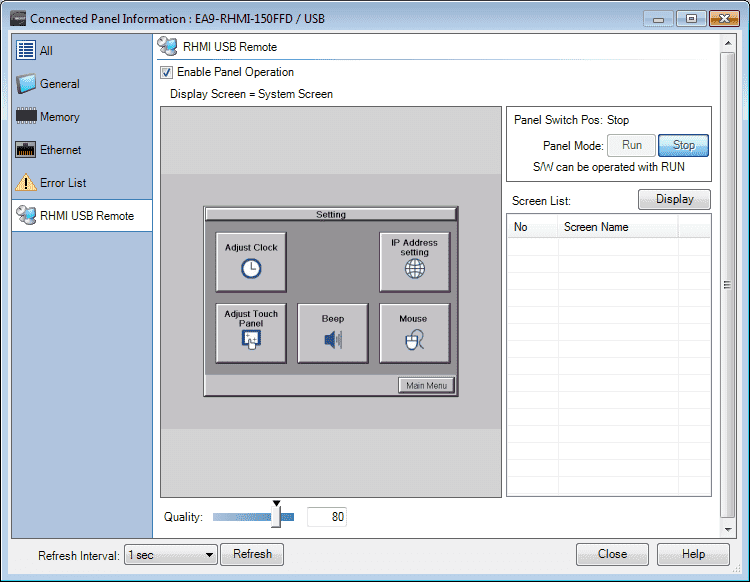
This is the area for (1) making adjustments to the internal clock, (2) setting the IP addresses (3) adjusting (calibrating) a connected touch screen, (4) enabling or disabling the internal beep, and (5) enabling or disabling a mouse pointer.
Test Menu
From this sub-menu, the user can (1) test the connected touch screen, (2) test a connected display, (3) test the user LED (4) test the communication ports, and (5) test both the internal beeper. A WAV sound file is a system provided for the audio output test.
Memory
Select the Memory menu item to either backup or restore your project, log data, recipe data and/or system memory. Selections can be made to backup to optional SD card memory or USB pen drive memory. The menu selections also give the user the ability to clear the memory, and there is also a selection to reset all of the HMI settings back to the original factory defaults.
Troubleshooting the USB Connection
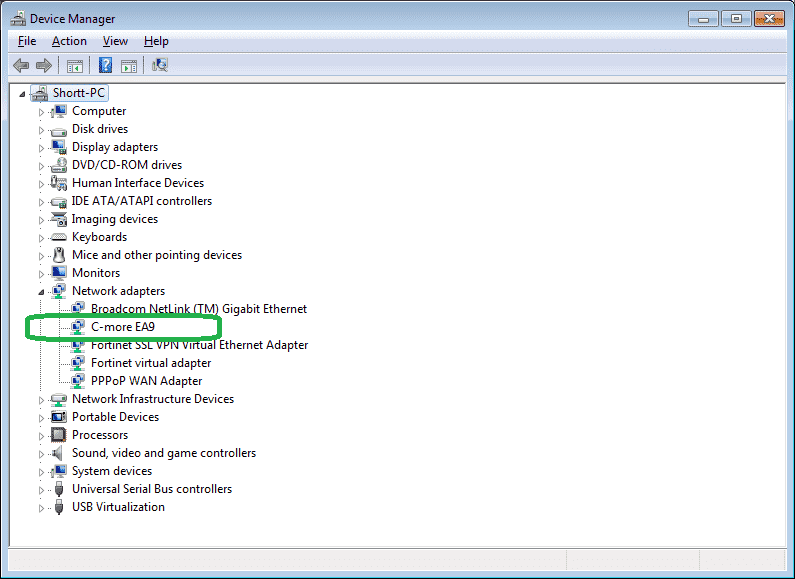
Check the USB driver using the Windows Device Manager:
With the C-more panel connected to the PC, on the PC, open Control Panel –> System
–>Hardware tab –> Device manager. Next, expand “Network adapters”.
The C-more driver is named C-more EA9 as shown below:
If the C-more programming software Communication Config dialog USB indicator is red,
and the driver does not appear in Device Manager,
1) Unplug both ends of the cable and plug them in again.
2) If that does not establish communication, plug into a different USB port on the PC.
3) If there are any USB hubs or other devices being used, temporarily eliminate them to see if this solves the problem.
4) Reinstall the C-more HMI USB driver
5) If you are still having problems try another USB cable.
Reinstall the C-more HMI USB Driver
The C-more USB driver installation utility is bundled with the C-more software installation files. If you have a C-more software CD, the file is in the root, called EA9USBDriver.exe.
If you downloaded the software, when you extracted the files, the EA9USBDriver.exe was extracted to the location you chose. First, close the C-more software and disconnect the USB cable from the PC. Then, browse to EA9USBDriver.exe.

Run the EA9USBDriver software.
The preparing setup window will be displayed.
A welcome window will now be displayed. Select Next.

Windows security window may appear. Click the Install button to install the drivers.
An installation (Maintenance) complete window will now be displayed. Select Finish.
Plug the USB cable into the PC and the C-more panel.
The Found New Hardware Wizard will prompt you to search for the driver. Select “No not this time” and click Next. Select “Install the Software automatically (Recommended)” and click Next. Click Continue Anyway in the Windows Logo warning popup. Click Finish.
Open the project in the C-more software. The Communication Config (and Transfer Project) USB indicator should be green.
Watch the video below to see the Headless C-More EA9 HMI Panel connected to the computer via a USB cable. This will also show using the setup screens of the headless C-More unit.
C-More EA9-RHMI Features
C-more EA9 series headless HMI supports HD 1280 x 720 (60Hz) pixel screen
resolution HDMI output, 800MHz CPU, 12-24 VDC powered, includes (2) serial ports, USB 2.0 Type A and B ports and one Ethernet port. Supports (1) SD memory card. Compatible withEA9-PGMSW programming software version 6.50 or later.
• Ethernet 10/100 Base-T port
(program/download & PLC
communication)
• Expansion Module Support
• Use EA-ECOM for second Ethernet Port
• Remote Internet access
• Serial PLC interface (RS-232/422/485)
• One built-in SD memory card slot
• 12–24 VDC powered
• HDMI audio/video out
• 82MB project memory
• Data logging
• 0 to 50°C [32 to 122°F] operating
temperature range
• DIN rail mountable
• UL, cUL & CE agency approvals
• 2-year warranty from date of purchase
C-More EA9 Panels from Automation Direct
https://www.automationdirect.com/adc/overview/catalog/hmi_(human_machine_interface)/c-more_touch_panels_ea9_series
C-More – Graphic Panel (EA9 Series) User Manual and Quick Start Guides
https://cdn.automationdirect.com/static/manuals/ea9userm/ea9userm.html
C-more Headless HMI (EA9-RHMI) Manual and Quick Start Guide
https://cdn.automationdirect.com/static/manuals/ea9rhmim/ea9rhmim.html
EA9-T10CL C-More Specifications
https://cdn.automationdirect.com/static/specs/ea9t10cl.pdf
C-More EA9 Programming Software (Current Version V6.42)
https://support.automationdirect.com/products/cmore.html
This software will enable you to program all of the C-More EA9 HMI units. It includes a simulator for your application.
Next time we will look at the remote programs to the Headless C-More HMI.
Watch on YouTube: C-More EA9 HMI Series Headless RHMI Setup Screens
If you have any questions or need further information please contact me.
Thank you,
Garry
If you’re like most of my readers, you’re committed to learning about technology. Numbering systems used in PLC’s are not difficult to learn and understand. We will walk through the numbering systems used in PLCs. This includes Bits, Decimal, Hexadecimal, ASCII and Floating Point.
To get this free article, subscribe to my free email newsletter.
Use the information to inform other people how numbering systems work. Sign up now.

The ‘Robust Data Logging for Free’ eBook is also available as a free download. The link is included when you subscribe to ACC Automation.