
We will now look at the data logging capability using our Click plus PLC.
Data logging is the collection of data over time. This is usually used for data analysis at a later time. The amount of data (System Information) stored and the frequency of the storage will depend on your specific application.
The hardware used to store the data is usually called a data logger. Using the information from our last post, the MQTT information collected (Temperature in Atlanta and Click Analog) will now be logged in two different ways. A micro SD card on the Click Plus will be used to store the data every minute in a CSV (Comma Separated Value) file. Node-RED will also be used to store the same data in a SQL database. Let’s get started on how to use these data loggers.
Our entire Click series can be found here. All of the previous information for the Click PLC can be applied to the Click PLUS.
Previously we looked at the following:
Software Installation – Video
Click Software Establish Communication – Video
MQTT Communication – Video
The programming software and manuals can be downloaded from the Automation Direct website free of charge.
Watch the video below to see data logging on the Click Plus PLC. (C2-03CPU)
Click Plus Data Logging
The C2-03CPU in the Click Plus PLC line has a Micro SD card that can log data. Data is stored in a CSV (comma-separated value) format using this method.

The Data Logging Setup provides the configuration tools for setting up the frequency of logging, data to be logged, and file management.. The PLC can log data from any address except TXT data types. It can log up to 16 data points, at an interval set by the Trigger tag, to the inserted micro SD Card.
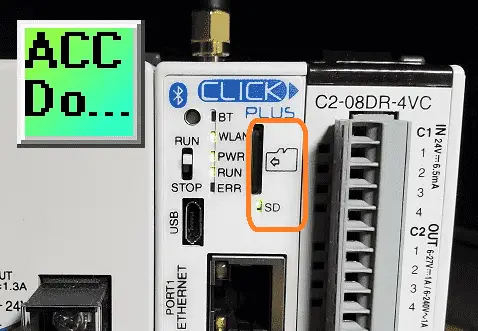
Once the card is fully installed, the SD light on the CPU will be lit. Insert the card until you hear it clicks. Removing the card is done by pushing on the card and then releasing it. The card will extend out enough so you can remove it.
Click Plus Data Logging Setup
Call up the data logging setup by using the main menu | Setup | Data Logging Setup…
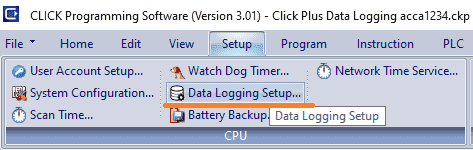
Alternately you can call it up by selecting data logging setup under the SD slot in the CPU configuration menu. This is on the function tab in the navigation window.
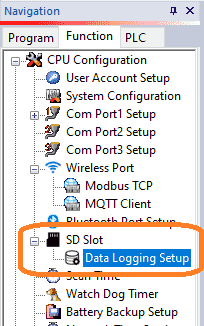
This will now display the data logging setup window.

Select the enable data logging. This will allow the rest of the options on the page to be enabled.

This window is broken down into three categories.
Data Log Trigger Setting
The log trigger bit is used to log the values when the trigger transitions from off to on or vise versa. There are also 14 System addresses listed in the dialog to aid in the control and monitoring of the data logging process.
In our case, we are using the one minute (SC8) on the rising edge to trigger our logging.
File Configuration
The File Configuration relates to file creation interval, file deletion Interval, and the file location path. We will use one file for our application. The CSV file will be stored in the default location of \CLICK_PLUS\LOG\LOG.CSV on the CPU SD card.
Data to Log
The items that can be logged are the Date, Time, and up to 16 Data Points. Date and time are usually always part of data logging. It is important to know when the data was recorded. (collected) We are logging the Click analog value in DF1 with two decimal places. The second data point is the temperature in Atlanta that we are receiving from our Node-RED MQTT application. This is also stored in two decimal places.
Once all of the parameters are set. Select OK. Then transfer the program to the Click PLC. The logging will automatically start.
Click Plus Data Logger Program
Although you do not need any ladder code to use the micro SD logging, we have used the ladder to convert the TXT MQTT information to DF10.
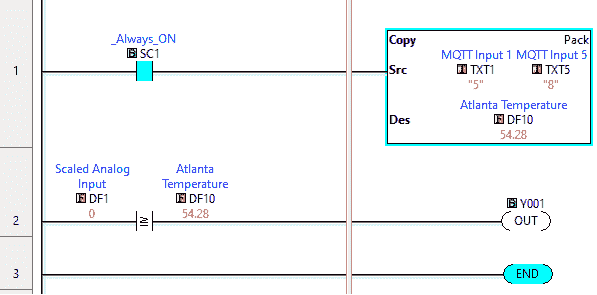
Note: TXT files cannot be logged in the file. The ladder logic will use the copy command to convert the text value to floating-point.
Click Plus Data View – Logger Monitor / Control
The data view can be used to monitor the control and information on the SD card.
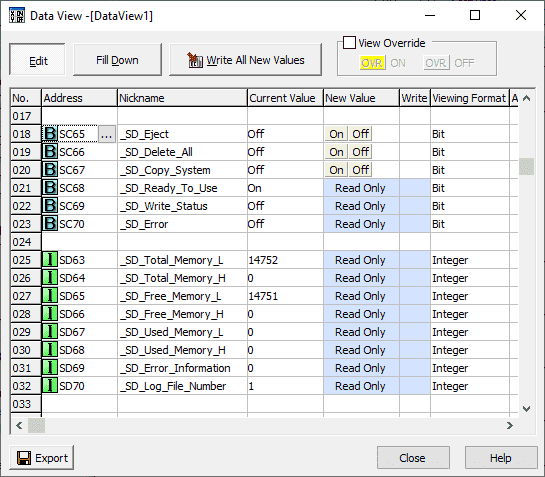
You can see that the SD ready-to-use bit is on. This means that the card is working correctly. To eject the card turn on the SD Eject bit.
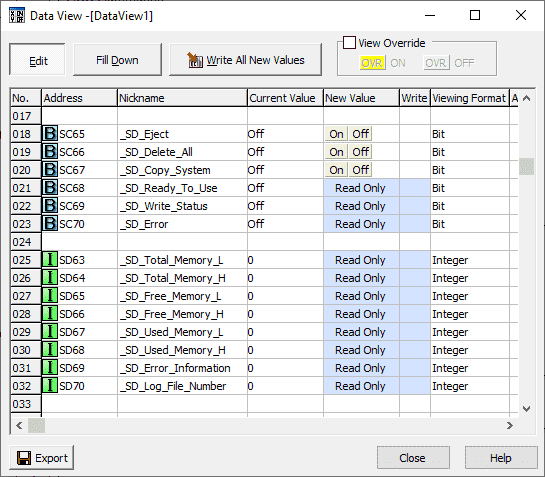
When you do the SD ready-to-use bit is off. The card can now be safely removed.
Note: Removing the card without using the eject bit control may cause damage to your data on the card.
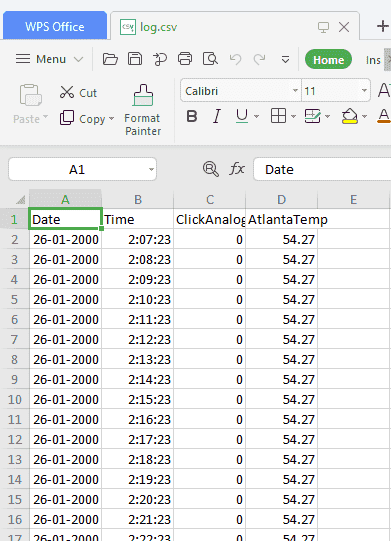
After removing the card you can then view the data with any spreadsheet program like excel. Programs like this are ideal for data analysis. In the above example, I am using the WPS Office spreadsheet.
You will notice that the calendar and clock are not correct. This can be set to the same time as the computer.
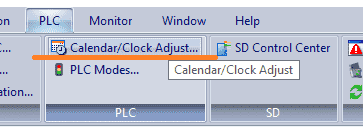
Call up the Calendar/Clock Adjustment by using the main menu | PLC| Calendar/Clock Adjust…
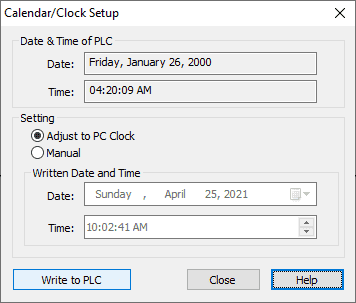
Select adjust to PC clock. Then select write to PLC.
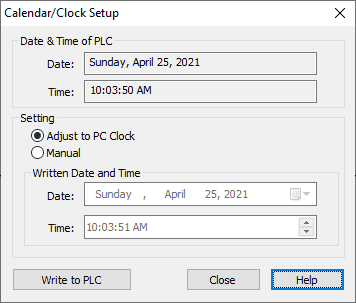
The PLC and PC clocks are now set for the same time and date.
An SD Control Center is also included in the Click Programming Software Version 3.00 or higher.
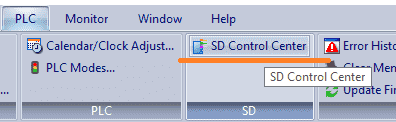
Select SD Control Center from the main menu | PLC.
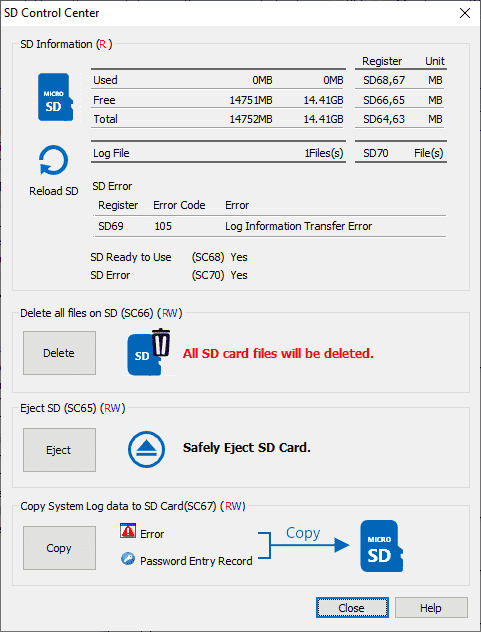
This will call up the SD control center window. You can use this to safely eject the SD card, copy error and password entry records, delete all data or reload (refresh) the SD card.
Watch the video below to see the operation of this SD Control Center.
SQLite Node-RED Database
SQLite is a fast, self-contained SQL (Structured Query Language) database. SQLite Studio can be used to create, edit, query, and browse SQLite databases. Installation instructions can be found here for SQL and SQLite Studio.
Start the studio by double-clicking on the SQLiteStudio.exe file. W3Schools.com has a good tutorial on SQL.
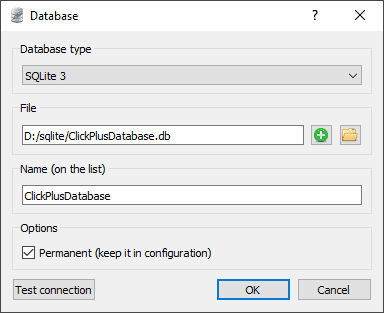
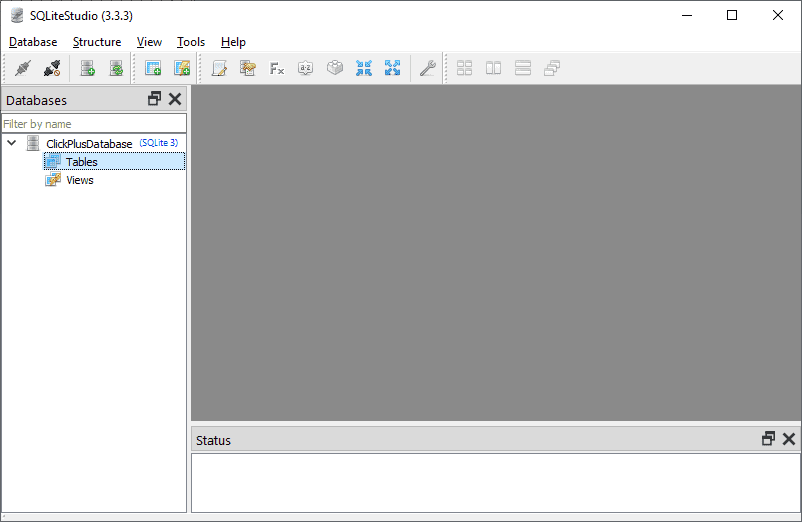
Create a database by using Ctrl+O or selecting “Add a Database” under the Database heading in the main menu. We will call this database ClickPlusDatabase.db. Select OK.
We will now add a table by selecting “Create a Table” under the Structure heading in the main menu.
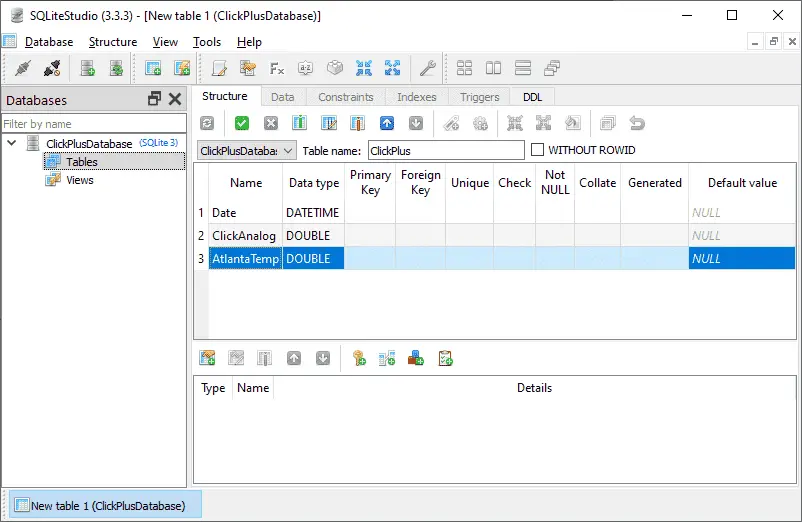
Columns can be added by selecting the icon or hitting insert. Add the following three columns.
Date – Data Type – DATETIME – This will store when the data was logged.
ClickAnalog – Data Type – DOUBLE
AtlantaTemp – Data Type – DOUBLE
The double data type is a double-precision 64-bit IEEE 754 floating-point.
Select the checkmark icon to commit the structure change.
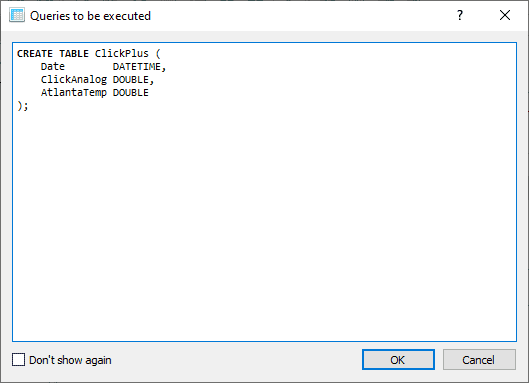
The SQL query that will be executed is displayed. Select OK.

The columns are now part of the SQL database. Our database is now set up. We can now use Node-RED to populate the database at a set interval.
Node-RED SQL Database Logger
We will be using the Node-RED MQTT program that we developed last time.
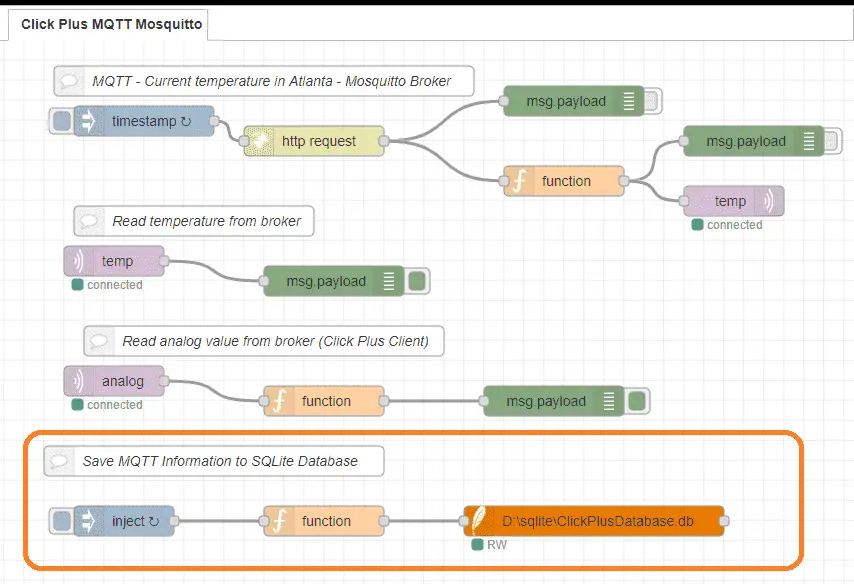
The inject node will set the frequency that the information will be stored in the SQL database. SQL commands to set up the query will be in the function node. The SQLite node specifies the database location that the information is stored.
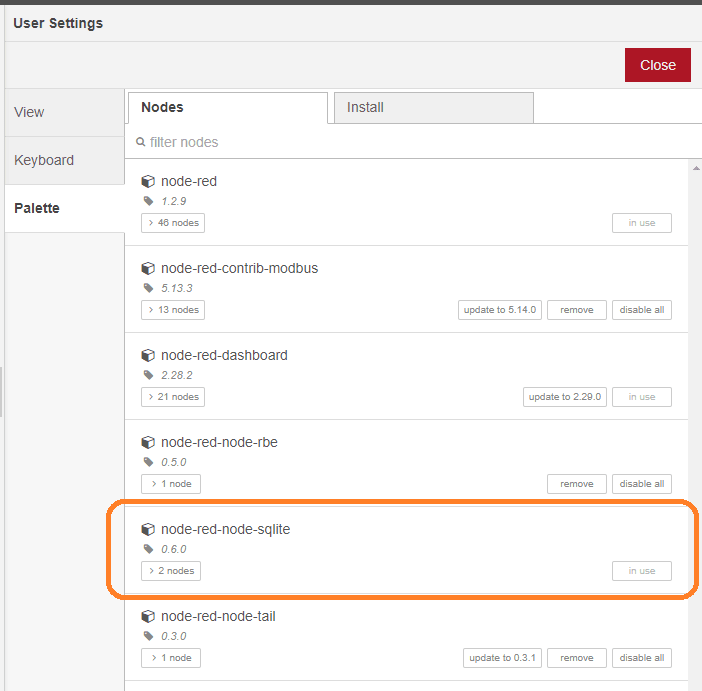
Using the manage palette menu, install the node-red-node-sqlite. This will allow us to use the SQL database that we created above.
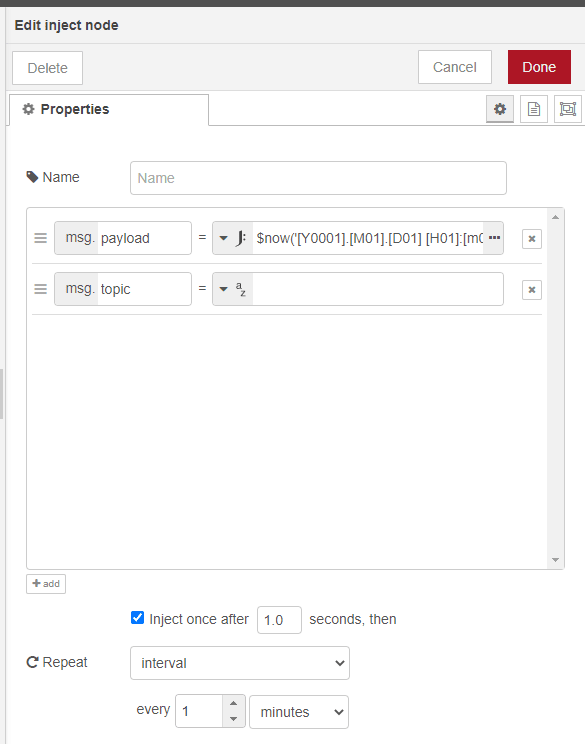
The inject node will use a JSON express to set the date and time in the msg.payload. Formatting will be YYYY.MM.DD HH:MM:SS for the date column in the database.
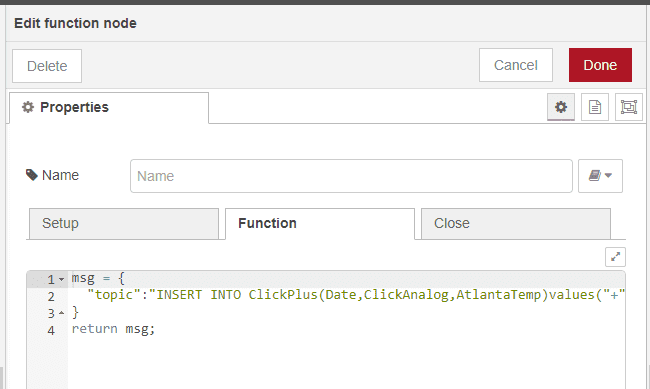
The function node will use the SQL command of INSERT INTO to set the date, click analog, and Atlanta temperature into the database.
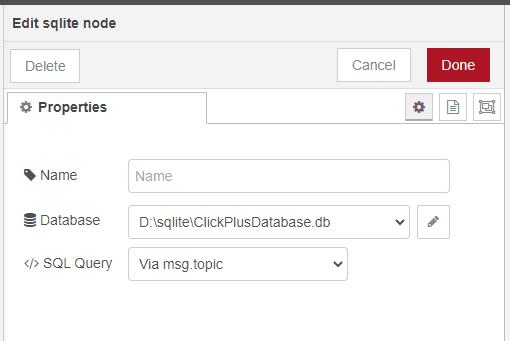
The SQLite node will specify the database location.

Our Node-RED program is set. Deploy the program and we will then run the program to start logging the information every minute into our SQL database.
Watch the video below to see data logging using Click Plus. Micro SD card with a CSV format and using Node-RED to a SQL database.
Click PLC Support Links
The Click PLC can be programmed using free Click programming software from Automation Direct. Here is a link to the software.
Version 3.00
Version 2.60
The entire Click PLC series prior to the Click PLUS release can be found here.
All previous posts and information are still valid with the Click PLC line-up.
YouTube Click Playlist
YouTube Click PLUS Playlist
Click and Click PLUS PLC Overview
Click and Click PLUS PLC Videos from Automation Direct
Watch on YouTube: Click Plus Data Logging
If you have any questions or need further information please contact me.
Thank you,
Garry
If you’re like most of my readers, you’re committed to learning about technology. Numbering systems used in PLCs are not difficult to learn and understand. We will walk through the numbering systems used in PLCs. This includes Bits, Decimal, Hexadecimal, ASCII, and Floating Point.
To get this free article, subscribe to my free email newsletter.
Use the information to inform other people how numbering systems work. Sign up now.

The ‘Robust Data Logging for Free’ eBook is also available as a free download. The link is included when you subscribe to ACC Automation.