
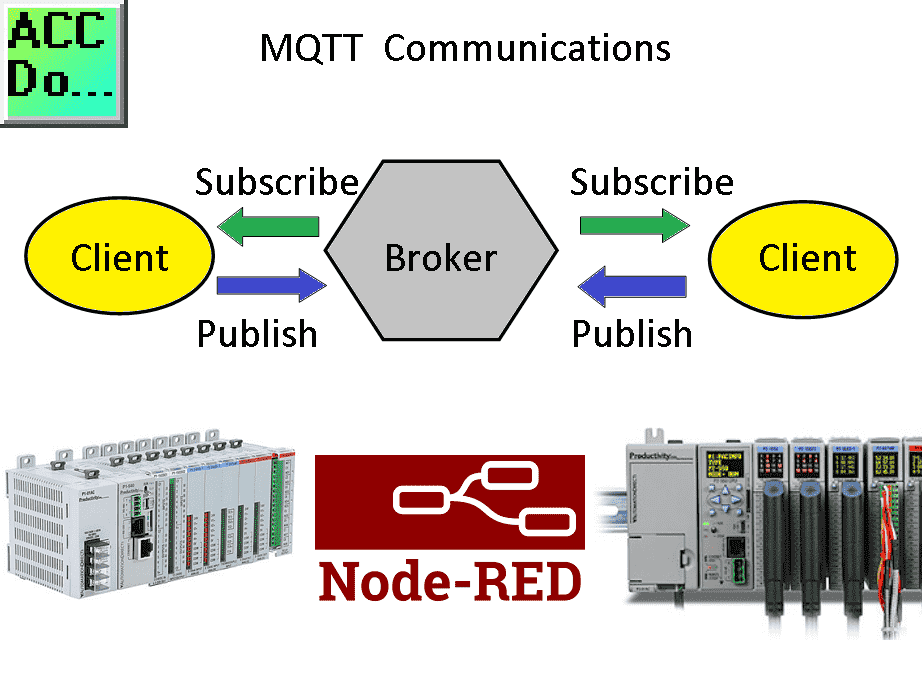
We will use an MQTT broker in Node-RED to communicate to the productivity PLC clients. MQTT stands for Message Queuing Telemetry Transport. This simple ‘publish and subscribe’ communication protocol does not take too many resources.
Constrained devices with low bandwidth are ideal for MQTT. This protocol provides machine-to-machine (M2M) connectivity, perfect for the Internet of Things. (IoT) This protocol is not for remote IO or real-time (deterministic) applications. MQTT is a good solution for applications that move data from hundreds or thousands of machines (sensors) to clients in many networks.
 We will be installing and programming the AEDES MQTT Broker in Node-RED. A productivity P2000, P1000, and Node-RED will be the clients communicating to the broker. The PLC simulator inputs on each controller will control the outputs on the other controller. This will demonstrate the communication capability for publishing and subscribing to this IoT platform. Let’s get started.
Additional links and references are listed at the end of this post. The entire Node-RED Series can be found here. Most posts will have a video at the end of the post.
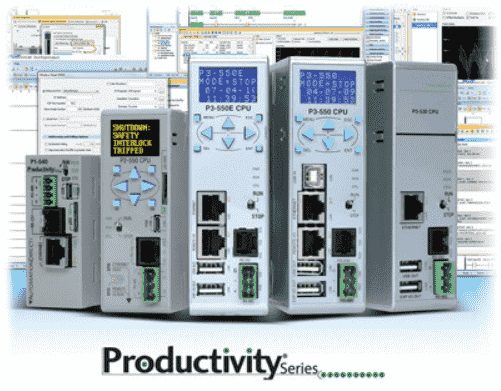
Productivity 1000 Series PLC
Productivity 2000 Series PLC
In this series we used Node-RED in some of the following ways:
Installing the Windows Software – Video
Modbus Communication – Video
User Interface – Dashboards – Video
SQL Database Log – Video
SQL Database Spreadsheet Connection – Video
Install Node-RED on Raspberry Pi – Video
Do-More PLC Node-RED HTTP Request – Video
Simple Click Data Logging – Video
Node-RED Modbus TCP Handling Errors –Video
Raspberry Pi Serial Port Programming – Video
Omron PLC Node-RED Serial Communication – Video
What is MQTT?
Invented in 1999 by engineers Andy Stanford-Clark and Arlen Nipper, the MQTT communication protocol has become the leader in IIoT communication.
 This Ethernet media has the following features that make it the leader with IoT.
– Report by exception protocol – Information can be published when changes occur. This means less traffic on your communication network.
– It is a stateful protocol – Always know they are connected and to who. This way, you will know if the information is valid or not.
– Lightweight protocol – Small payloads of binary data will simplify the network and make it more robust.
– Flexible – MQTT Brokers can be expanded easily to create more extensive robust networks.
MQTT System Configuration
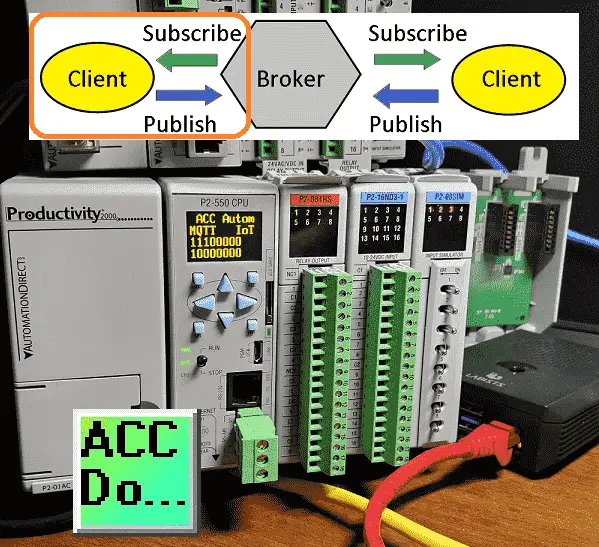
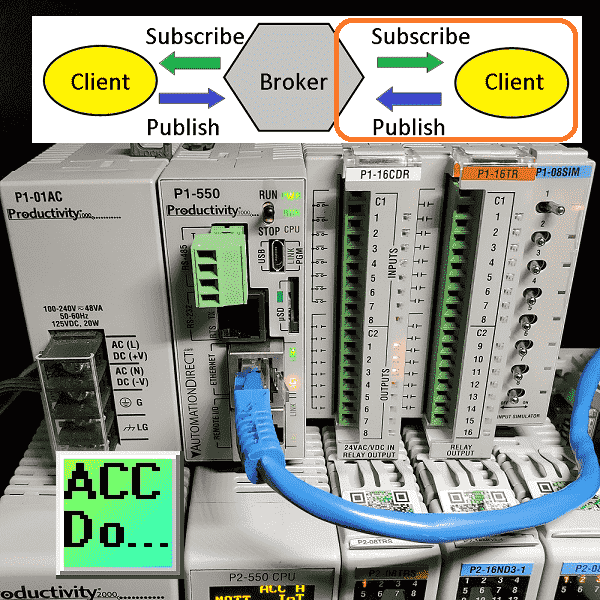
As mentioned above, MQTT uses a subscribe and publish protocol. A client (Device) on the network can subscribe (read) or publish (write) to a Broker. The brokers’ primary job is to control the namespace of the network. When new data is published, it will update the value and send out the information to all that have subscribed.
 In our system, we will have the inputs of the Productivity 1000 and 2000 PLCs published to the MQTT broker. Then the P1000 and P2000 will subscribe to the published inputs of the other controller and update the outputs.
MQTT Unified Namespace
A unified namespace is a central location in the system with data, information, and context. All contents are available for any device or application to consume or publish for the specific application. The namespace will organize into logical groups for your system. This makes the content easier to find and manage as the system grows.
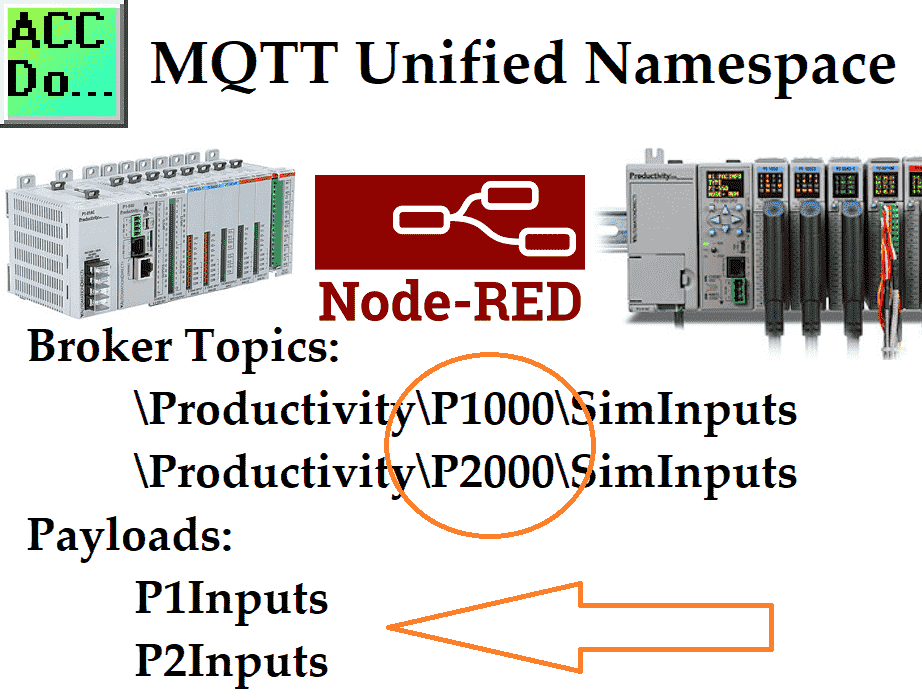 Here are the parameters that our MQTT broker will have.
Plan your information for the network. Think about it in logical steps. Productivity / Machine / Location is the system I chose for end dragon on two examples.
Note: We do not have to prearrange to set these parameters up. Once the information is sent to the broker, it will understand the namespace.
Installing MQTT Broker on Node-RED
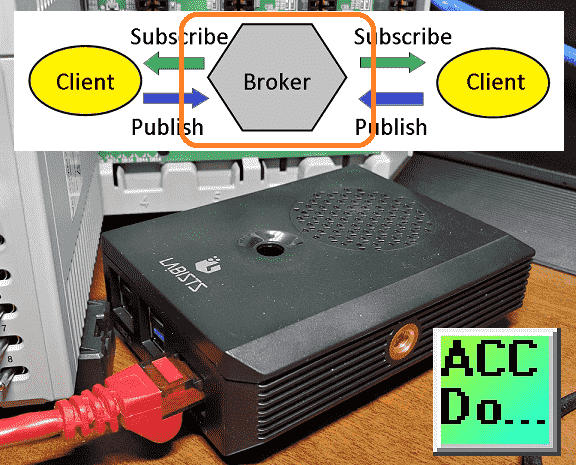
We will be using a Raspberry Pi 4 with Node-RED as the MQTT broker and client.
 We will be using the AEDES broker.
 Call up the terminal mode on our Raspberry Pi. Type “ifconfig” at the prompt. IP addresses on our MQTT broker must be known.
 Under the heading of eth0, the IP address of the physical Ethernet port will be displayed. The WiFi IP address will be under the title of wlan0.
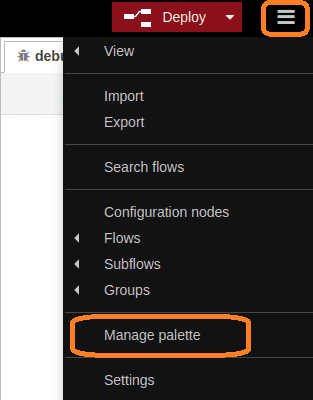
Select Manage palette from the main menu of Node-RED.
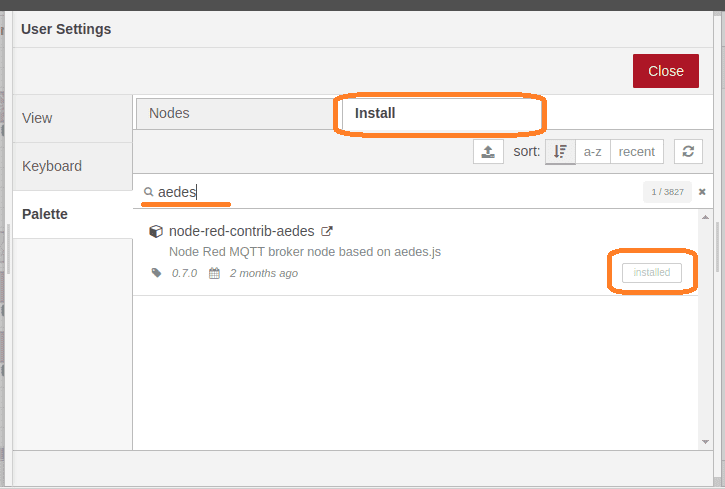
 The user settings window will be displayed. Select the install tab—type “a e d e s” to search for the node-red-contrib-aedes node. Select the install button to install the node.
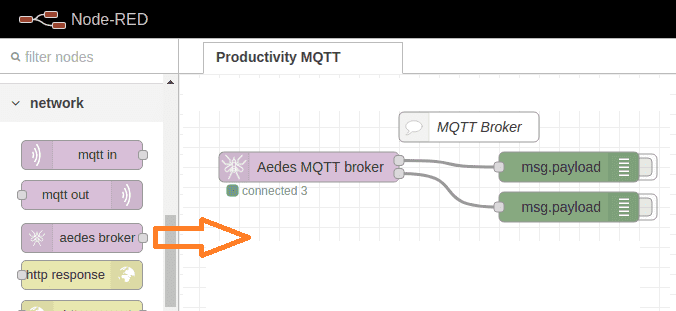
 The Aedes broker node will be under the network heading in the node-red software package. Select this and drag it onto the Node-RED workspace.
 Double click on the Aedes MQTT broker node in the workspace. We will now configure this MQTT broker.
 Set the MQTT port as 1883 and the WS port as 8080. Select the Security tab.
 This is where we can set our username and password settings. We will leave this as a default which is no username or password. Select the done button on the top right-hand side.
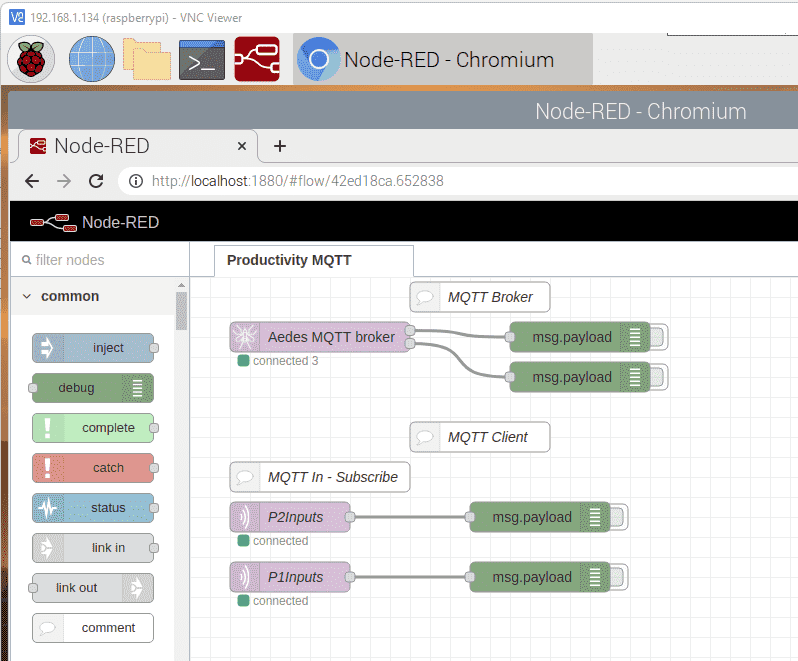
We have placed a debug node on each of the outputs for the Node-RED MQTT Broker. This can be used for troubleshooting if required.
Node-RED MQTT Subscribe
MQTT in Node-RED will also be a client and subscribe to the productivity 1000 and 2000 inputs.
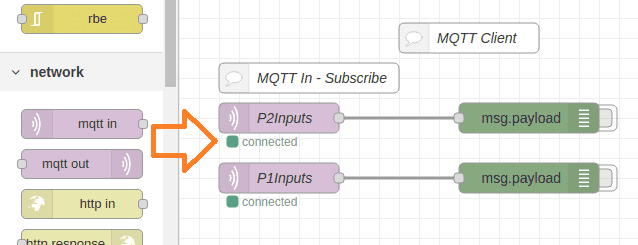 The MQTT In node is used to subscribe, and the MQTT Out node is used to publish. We will just be subscribing to the P2 and P1 inputs.
We can see the setup by double-clicking on the P2Inputs (MQTT In) node.
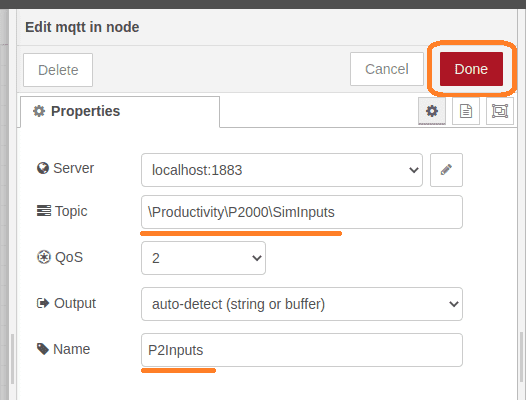 In the edit MQTT, In the node window, you can see that the server has been set for the localhost on port 1883. Port 1883 is the default port for MQTT. Our topic location path is indicated as per our configuration discussed above. The name is the parameter that we want to read. In our case, this is P2Inputs. Select the done button. Double click on the P1Inputs (MQTT In) node.
 Our name and path of the productivity 1000 inputs can be specified just like the 2000 inputs. Select the done button.
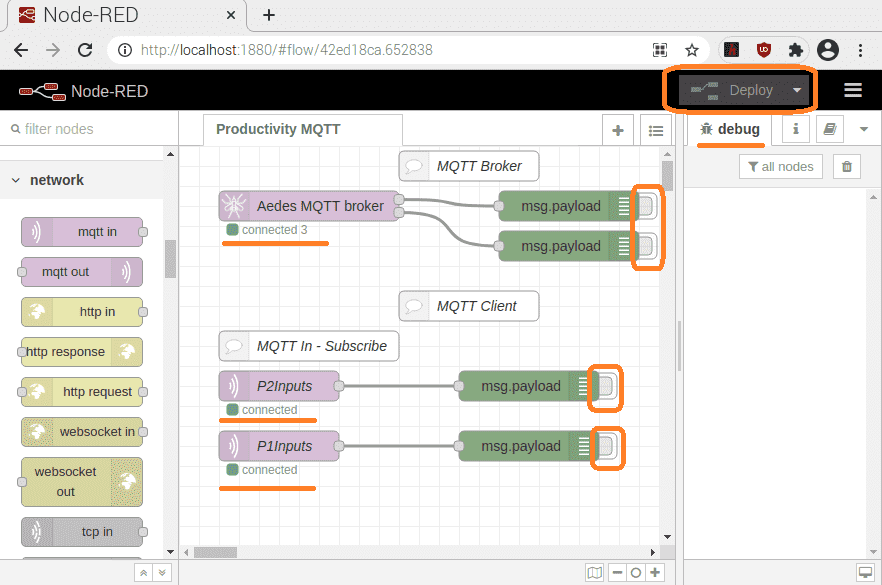 Our node-red program is now complete. Select the deploy button to activate the program.
The AEDES MQTT broker will display the number of connected devices below the broker node. MQTT inputs for our subscription will show if they are connected or not to the broker. In our case, we are currently connected to the broker.
The debug nodes can be turned on or off to see the information from the selected node. This information will appear in the debug window when selected. See the video below to demonstrate the MQTT broker and client in Node-RED.
Productivity Series MQTT Client
All three controllers (P1000, P2000, P3000) can now communicate MQTT as a client only.
 This means we must have an MQTT broker like the one we set up above in Node-RED. Here is a link that will describe the various MQTT servers (brokers).
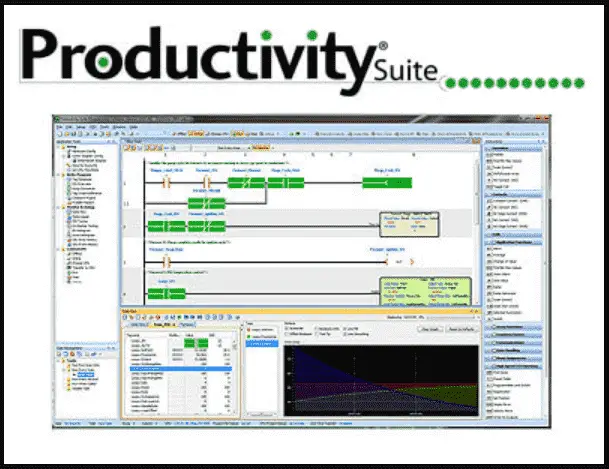 The productivity suite programming software will program the entire productivity family of controllers. You must have version 3.11 or higher to utilize the MQTT client on the PLC controllers.
Productivity 2000 MQTT Client – Publish-Subscribe
We will now set up the P2000 as a client on our MQTT system.
 The P2000 will publish to the MQTT payload P2Inputs. It will also subscribe to the P1Inputs. The subscribed information will then turn on bits in an output channel.
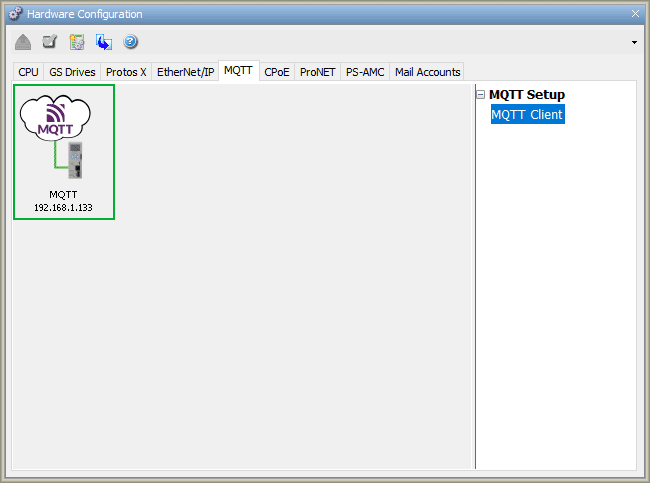
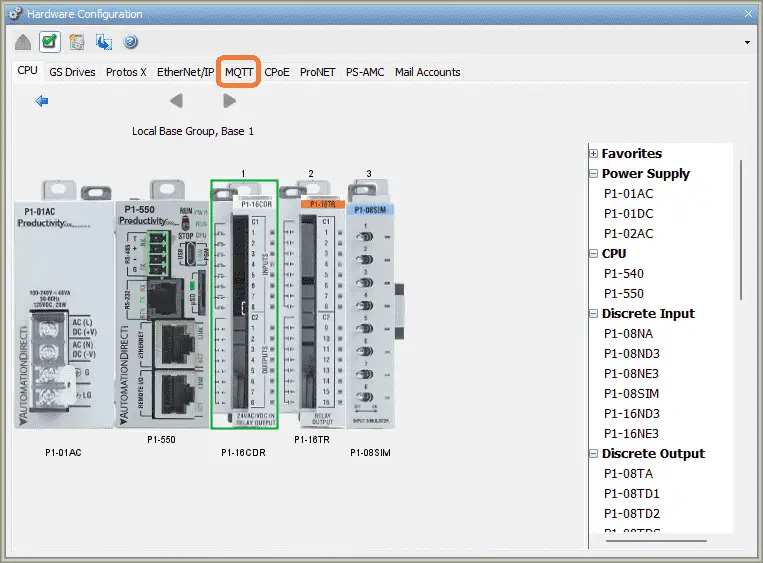
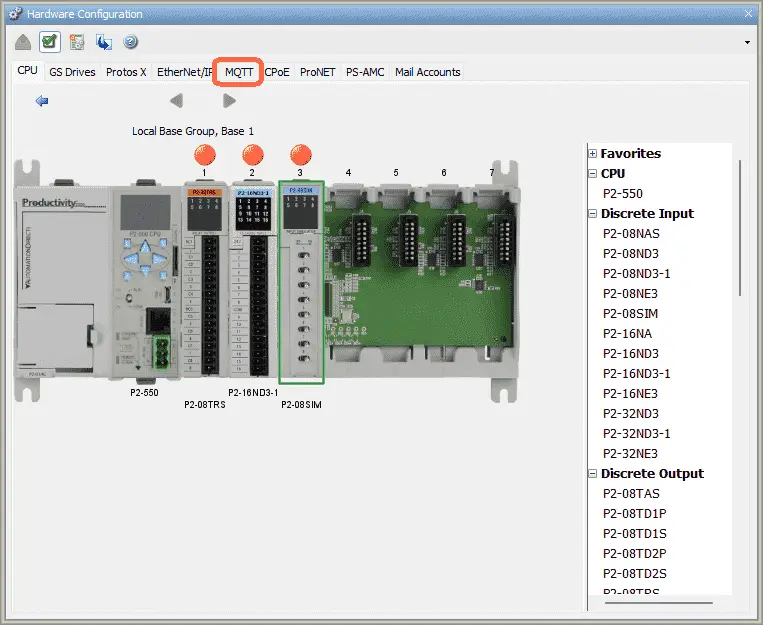 Call up the hardware configuration window. This can be done by selecting Hardware Config under setup in the application tools or using the main menu | Setup | Hardware Config. Select the MQTT tab.
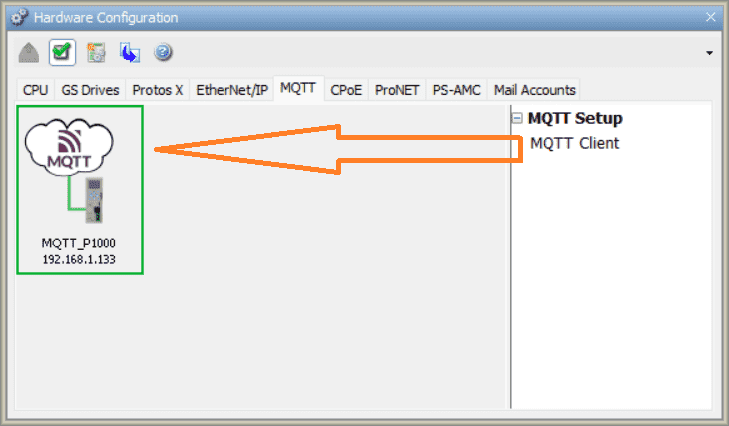
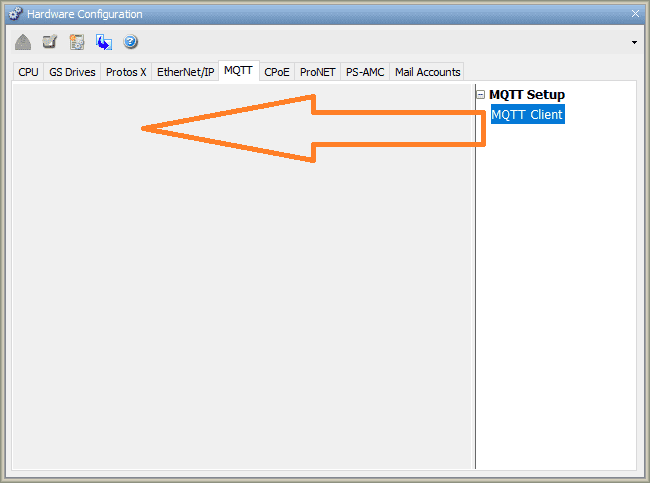 Click and drag the MQTT Client under the MQTT Setup to the workspace window. You can have a maximum of 4 MQTT clients per productivity CPU.
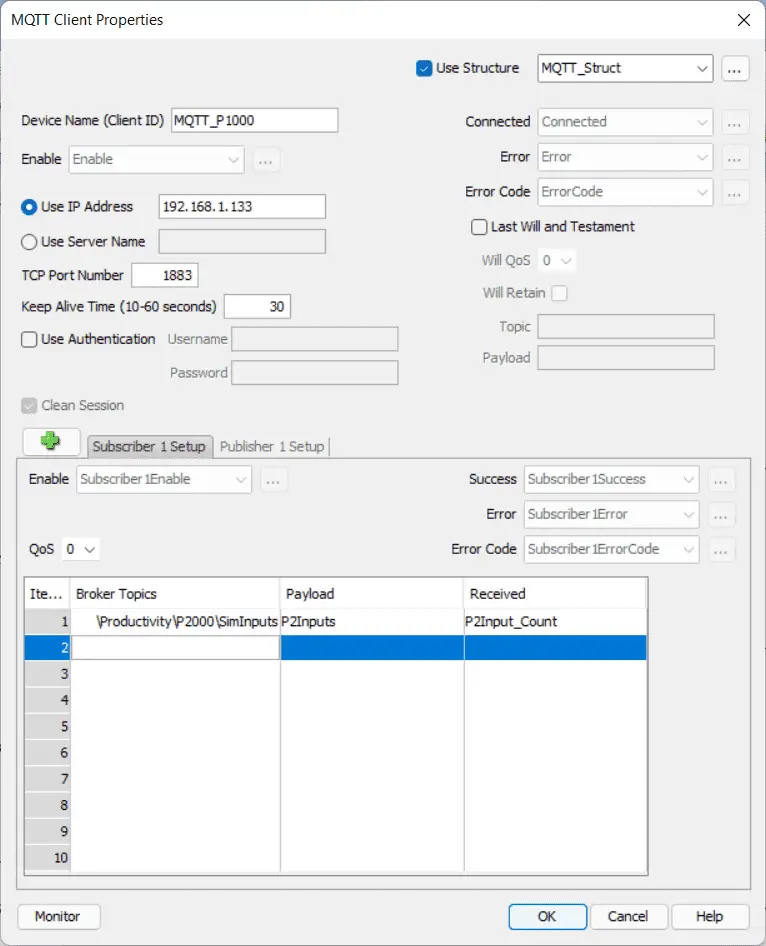
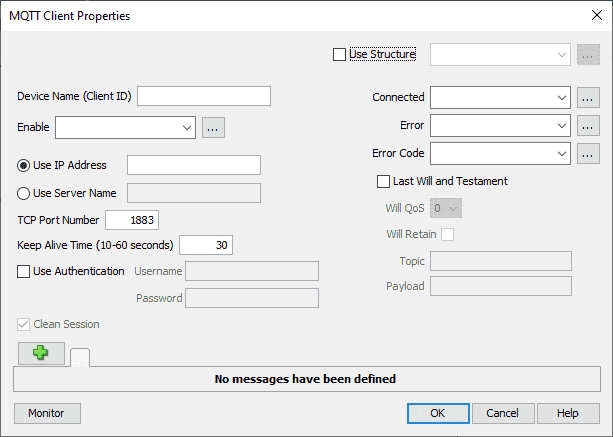 The MQTT client properties window will now be displayed. The device name (Client ID) will identify this PLC on our MQTT system. It must be unique, so we will call it MQTT_P2000. Select the use structure box and put in a name for the structure. We will use MQTT_Struct. This will be used for the enable, connected, error, and error code variables.
The IP address is for the MQTT broker location on the network. This can be found in the information above. If you select to use a server name, the DNS servers must be specified on the productivity controller.
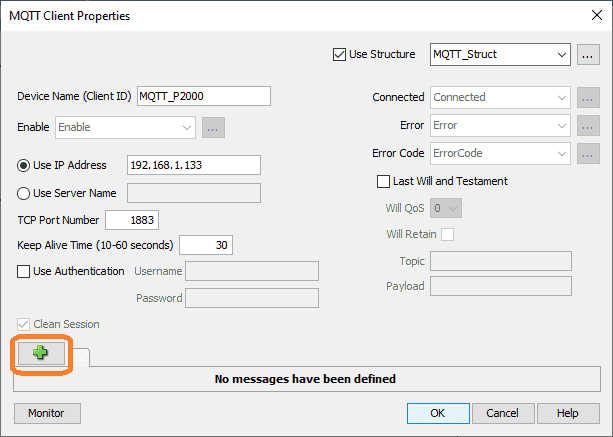 Click on the + sign at the bottom of the MQTT client properties window.
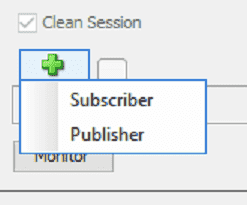 We can now choose subscriber or publisher. We will be doing both in our example program—select subscriber. You must have at least one publisher or subscriber selected.
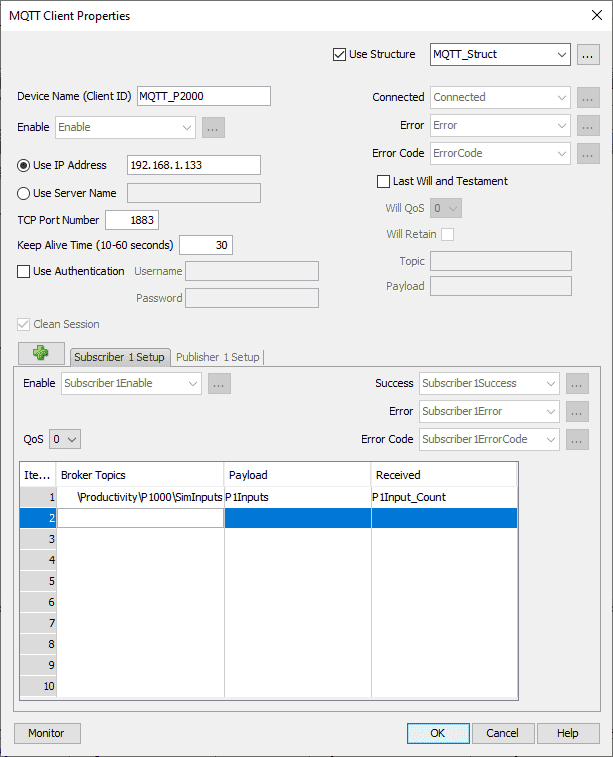 We will put in the broker topic path for the P1Inputs payload. The received column will have a variable that contains the number of text characters received. We can subscribe to up to 10 topics per MQTT client.
Quality of service (QoS) refers to how to guarantee the delivery of a message. QoS 0 (at most once) means no guarantee of delivery. It is often called “fire and forgets.” QoS 1 (at least once) means that there will be a resend if an acknowledgment is not received in a reasonable time frame. In our example, we will leave the QoS as the default of 0.
Select the + sign and add a publisher.
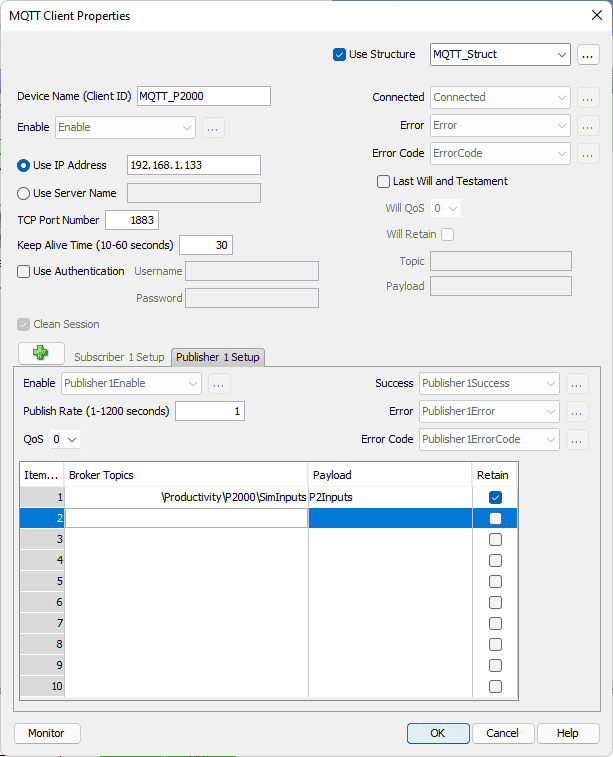 We can publish up to 10 topics per MQTT client. In our case, we will publish P2Inputs to the broker topics path.
The published rate will be 1 second, and the quality of service will be the default 0. Select OK on the MQTT client properties window.
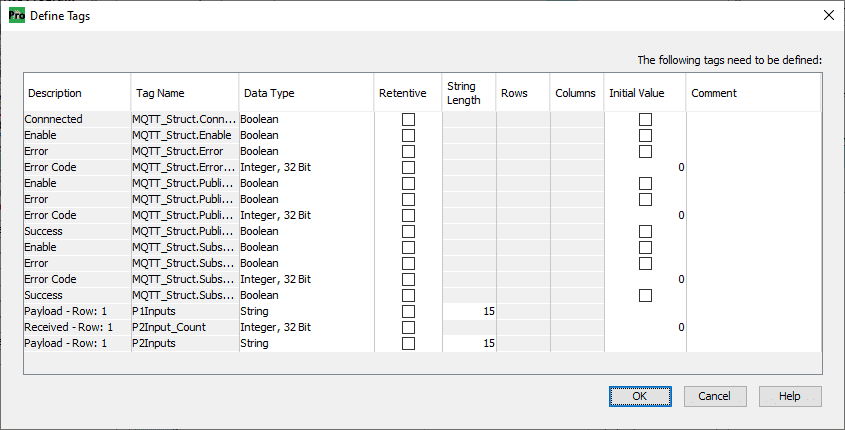 The define tag window will now be displayed. We will leave everything as their default values. Select OK.
 Our MQTT client has now been configured on the P2000 PLC. We will now look at the ladder logic programming.
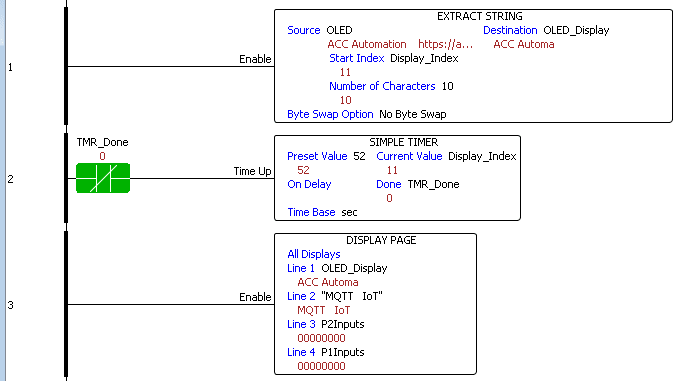 Using the OLED display on the CPU unit, we will display a scrolling message on the first line. This scrolls at the time base of the timer. Line 2 will be a fixed message of “MQTT IoT.” The MQTT P2Inputs and P1Inputs will be displayed on the following two lines.
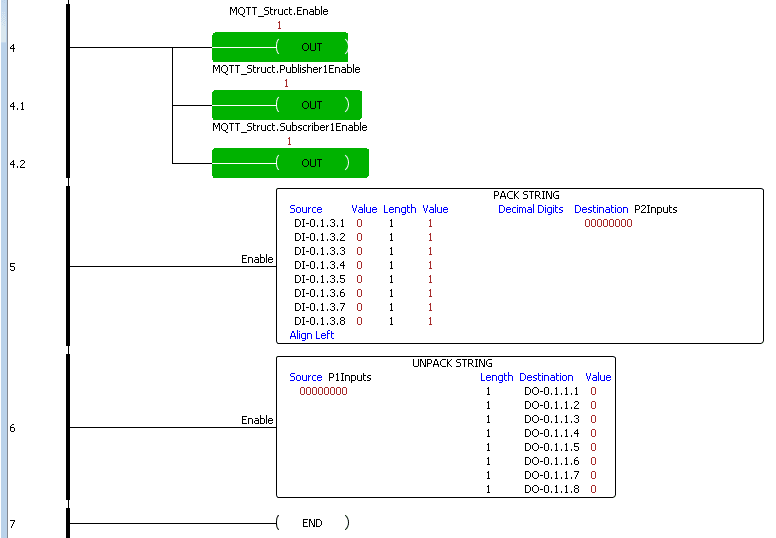 Rung 4 will enable the MQTT client bit and publish and subscribe.
The pack string instruction takes the simulator input card on our PLC and converts this to a string for the variable P2Inputs.
The unpack string takes the receiving P1Inputs, convert them to a binary, and turns on the corresponding output bits.
Verify, save, and download the program to the productivity 2000 controller. Ensure that it is in run mode.
Productivity 1000 MQTT Client – Publish-Subscribe
We will now set up the P2000 as a client on our MQTT system.
 The P1000 will publish to the MQTT payload P1Inputs. It will also subscribe to the P2Inputs. The subscribed information will then turn on bits in an output channel.
 Call up the hardware configuration window. This can be done by selecting Hardware Config under setup in the application tools or using the main menu | Setup | Hardware Config. Select the MQTT tab.
Click and drag the MQTT Client under the MQTT Setup to the workspace window.
 The MQTT client properties window will now be displayed. We will use the structure as we did in the P2000 above. The device name (Client ID) will be called MQTT_P1000 to identify it on the network.
The IP address is for the MQTT broker location on the network.
 We will put in the broker topic path for the P2Inputs payload on the subscriber tab. The received column will have a variable that contains the number of text characters received.
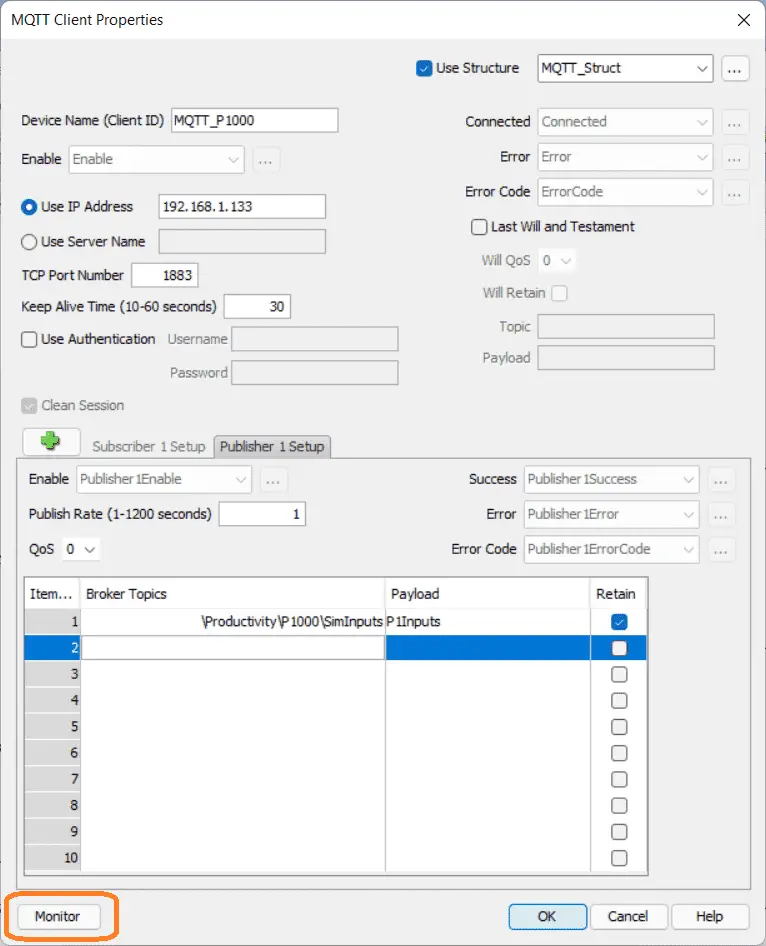 We will publish P1Inputs to the broker topics path.
The published rate will be 1 second, and the quality of service will be the default 0. Select the monitor button on the MQTT client properties window.
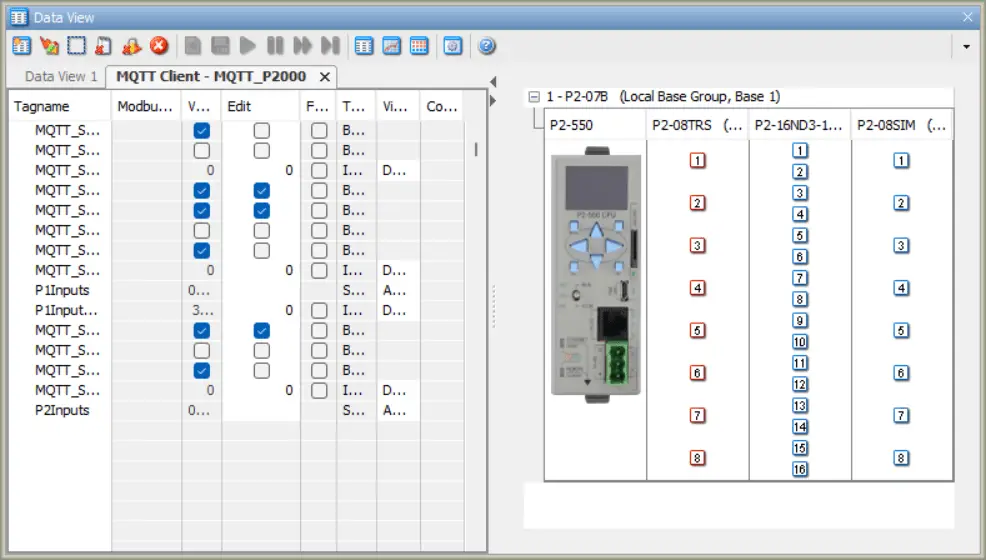
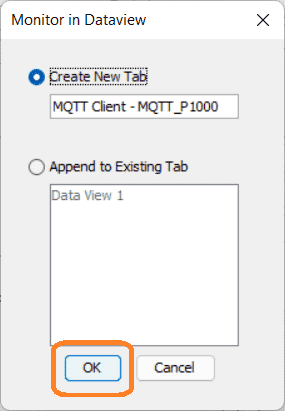 The monitor in the data view window will be displayed. We will leave this as the default of creating a new tab and select OK. This will show all the variables in the MQTT client in the data view when we monitor the program. Select OK on the MQTT client properties window. The define tag window will now be displayed. We will leave everything as their default values. Select OK.
Our MQTT client has now been configured on the P1000 PLC. We will now look at the ladder logic programming.
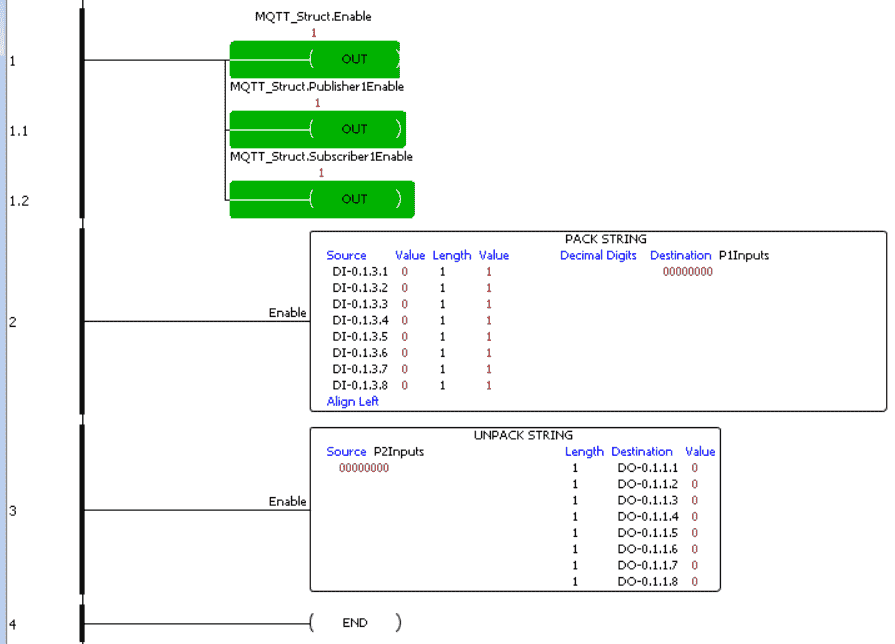 Rung 1 will enable the MQTT client bit and publish and subscribe.
The pack string instruction takes the simulator input card on our PLC and converts this to a string for the variable P1Inputs.
The unpack string takes the receiving P2Inputs, convert them to a binary, and turns on the corresponding output bits.
Verify, save, and download the program to the productivity 1000 controller. Ensure that it is in run mode.
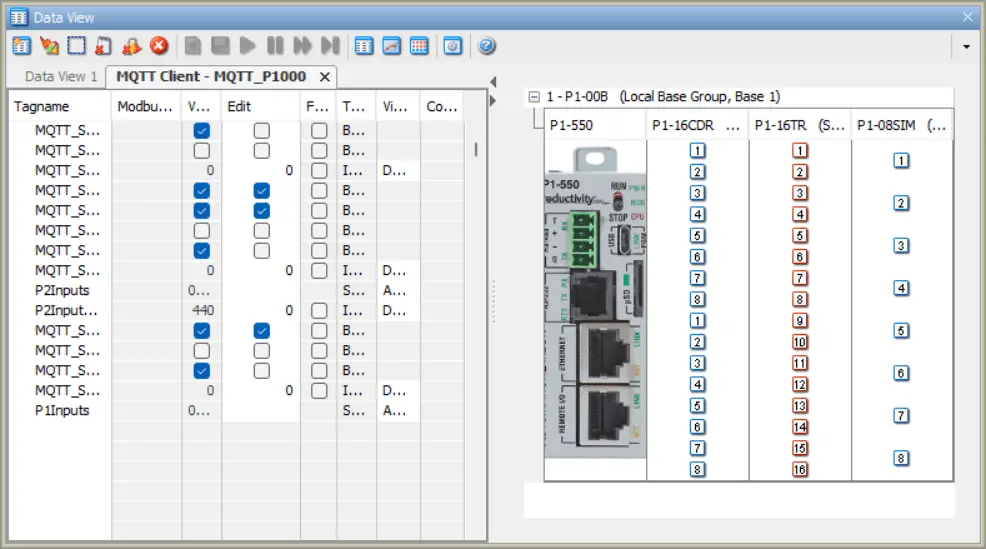
Using data view on the productivity 1000 and 2000 PLC controllers, we can monitor the running programs. Watch this in the video below.
Download the PLC and Node-RED programs here.
Watch the video below to see Node-RED MQTT Broker and Client communicate to the Productivity 1000 and 2000 series of PLC. (PAC)
Node-RED Links
Node-RED Organization Home Page
Getting Started – Run Locally
Node-RED running on Windows (Run at Startup)
Securing Node-RED
Node-RED Essentials Videos (Basics of the Editor)
Learn JavaScript Free
w3schools JavaScript Tutorial
learn-js.org
Node-Red JavaScript Primer
Modbus
Node-RED Modbus TCP and Serial
Dashboard – HMI
Node-RED Dashboard
Node-RED Dashboard extra nodes
SQL Database
Node-RED SQL Database
Node-RED SQL Plus – Execute queries and stored procedures
Modbus Learning Links:
Simply Modbus Frequently Asked Questions
Modbus TCP/IP Overview – Real-Time Automation
All You Need to Know About Modbus RTU – Video
Watch on YouTube: Productivity PLC Node-RED MQTT
If you have any questions or need further information please contact me.
Thank you,
Garry
If you’re like most of my readers, you’re committed to learning about technology. Numbering systems used in PLCs are not difficult to learn and understand. We will walk through the numbering systems used in PLCs. This includes Bits, Decimal, Hexadecimal, ASCII, and Floating Point. To get this free article, subscribe to my free email newsletter.
Use the information to inform other people how numbering systems work. Sign up now. The ‘Robust Data Logging for Free’ eBook is also available as a free download. The link is included when you subscribe to ACC Automation.