
CLICK PLC C2-NRED Aedes MQTT: Revolutionizing Automation Communication
In the rapidly evolving world of industrial automation, efficient communication between devices is crucial for the success of any operation. Enter the CLICK PLC C2-NRED with its innovative Aedes MQTT Broker node. This Node-RED node revolutionizes how we perceive automation networking. You can now install an MQTT Broker in the industrial environment without using a server on your network. This will speed up your MQTT communication.
We will install the Node-RED Aedes MQTT broker on our Click PLUS PLC C2-NRED module. The clients will subscribe and publish to this broker. Node-RED nodes, MQTT In and Out, will be used in the C2-NRED. We will also use the BRX Do-More PLC and the Click PLUS MQTT communications to create three connections. Let’s get started.
Our entire Click series can be found here.
All of the previous information for the Click PLC can be applied to the Click PLUS. We are currently focusing on the new C2-NRED Node-Red module for the Click PLUS PLC slot. Here is what we have covered so far:
Introductory Video:
Unlock Your Creativity with the Click PLUS PLC C2-NRED – The Gateway to Node-RED Innovation!
– What is the C2-NRED Module? Node-RED?
CLICK PLUS C2-NRED: Easy Install for PLC Module! – Video
– Updating firmware software in Click and C2-NRED
– Setting up IP addresses and starting the flow editor
Unleash Innovation: Node-RED Flow in Click PLC – Video
– First Node-RED flow program in the C2-NRED module. Full control.
The programming software and manuals can be downloaded from the Automation Direct website free of charge. Watch the video below to see how to control our inputs and outputs with both our C2-NRED module and Click PLUS PLC.
Master Node-Red C2-NRED Control of Click PLC I/O – Video
Control of PLC outputs via inputs is key in automation. Discover how the C2-NRED module and Click PLUS PLC enhance efficiency and precision!
Faster NODES Install with C2-NRED Node-RED! – Video
Installing nodes on the Click PLUS C2-NRED module (Node-RED 3.0, Node.js 14.1) is simple, but compatibility with versions must be considered.
What is MQTT?
MQTT, or Message Queuing Telemetry Transport, is a lightweight messaging protocol for low-bandwidth, high-latency networks. MQTT is widely used in IoT (Internet of Things) systems, where it facilitates communication between different devices and applications, ensuring reliable data transfer and real-time monitoring. 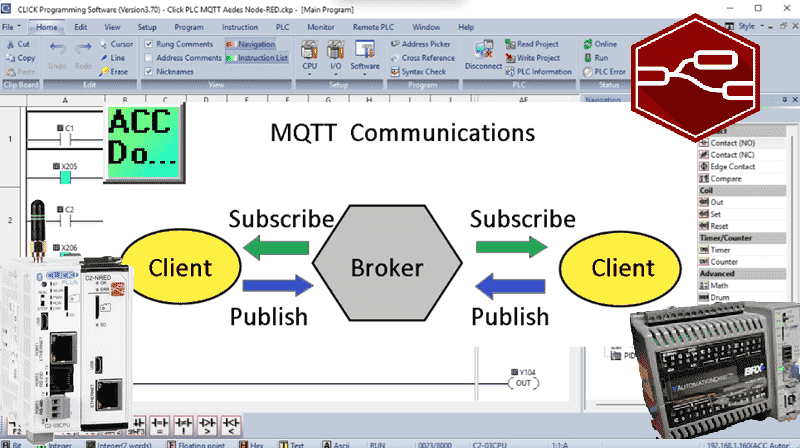
The Aedes MQTT broker can handle a considerable number of clients. While specific numbers can vary based on hardware and configuration, Aedes is designed to be highly scalable and can support tens of thousands, even potentially hundreds of thousands, of concurrent connections.
Integration of Aedes with CLICK PLC C2-NRED
Previously, we installed the Aedes Node on our C2-NRED module—the C2-NRED mounts in a PLC slot of the Click PLUS. Click MQTT can be implemented easily for real-time data transfers between different devices in your network. 
Open up our previous flow. This can be done by selecting the PLC menu option on the Click programming software. Select Ethernet and then choose Connect.
Double-click on the tab Flow 1. We will name this Click IO. We previously covered how the Node-RED flow interacts with the Click PLUS PLC inputs and outputs.
Click the plus icon on the top right side of the workspace. A new flow tab will be displayed. Double-click on this tab and name it AEDES MQTT. Separating different flow tabs will enable you to organize your work and document the process effectively. Select Done on the Edit flow window pop-up.
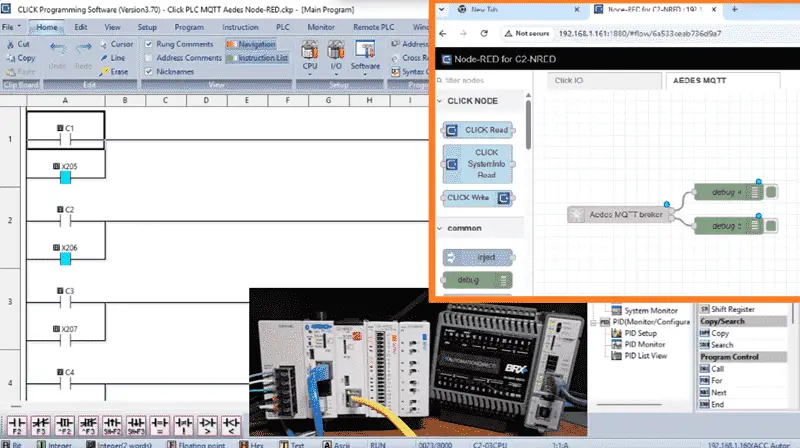
Click and drag the Aedes broker node onto the workspace. Also, click and drag two Debug nodes on the two outputs for the Aedes broker node. 
Double-click on the Aedes broker node to view the default parameters. Our port number is the default 1883 for MQTT communication. Select Done.
We must enable the port using the Click PLC programming software to allow traffic in and out of the port. Select C2-NRED… under the main menu | Setup | Slot0 Setting. 
The C2-NRED Module Configuration window will be displayed. Under the Port Management area, select Port Management Setup…
The Port Management Setup (C2-NRED) window will be displayed. Select Add…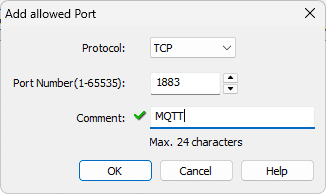
We can now add the port required for the MQTT Broker. Under the Add Allowed Port window, choose the following:
Protocol: TCP
Port Number (1-65535): 1883
Comment: MQTT
Select OK. 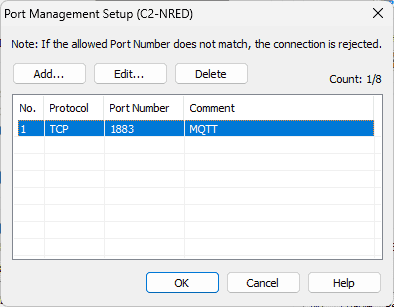
We can now see our added port in the Port Management Setup window. Select OK.
On the C2-NRED Module Configuration window, select OK.
Returning to the main page of the Click Programming Software, save and write the program to our Click PLUS PLC.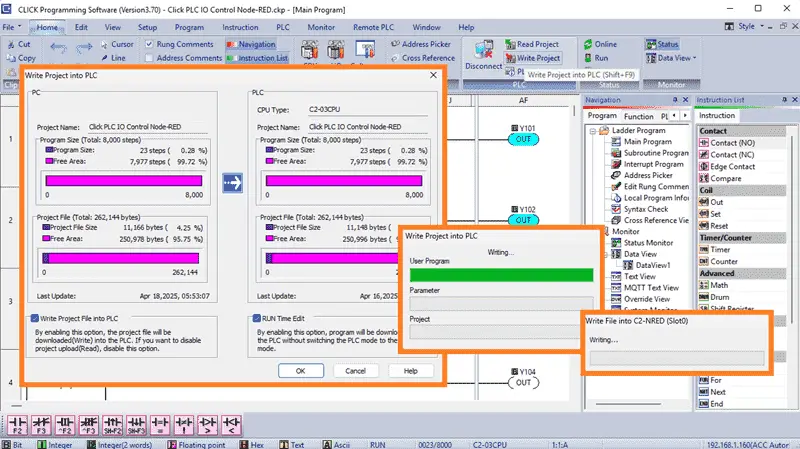
Our Aedes MQTT Broker is now set up on the C2-NRED module. Think of the broker as a filing cabinet. This is a storage device for information. If information is placed in the cabinet, the clients who want it will automatically receive it when it changes. In MQTT, this is referred to as subscribing and publishing.
MQTT IN / OUT in Node-RED (Client)
We will publish the 8-point outputs of address 101 of our Click PLUS PLC.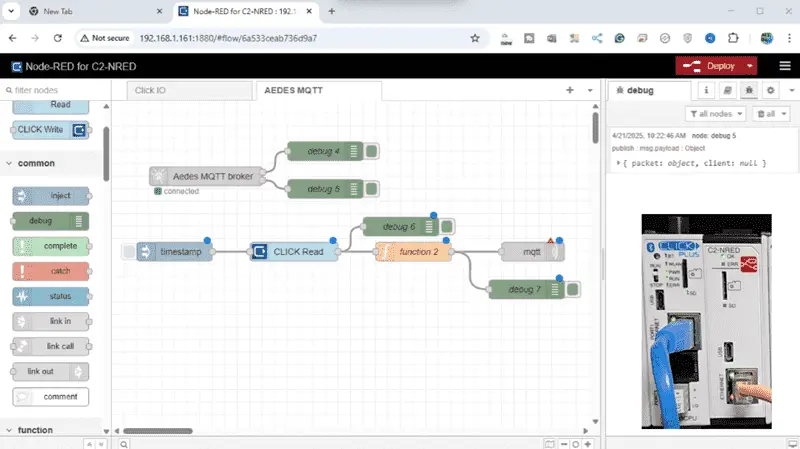
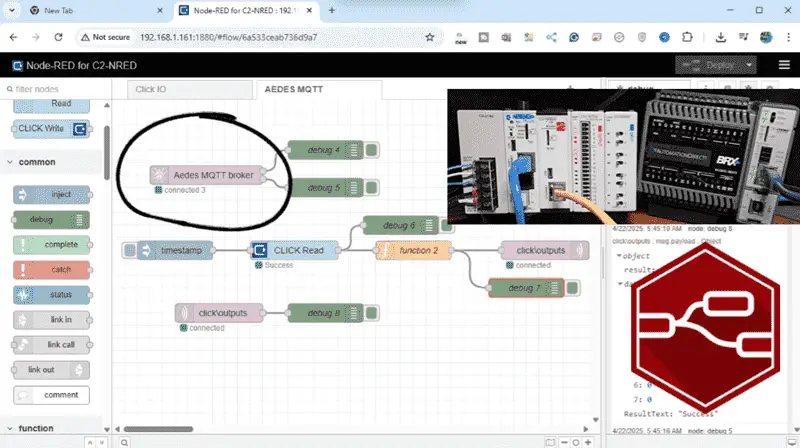
Click and drag an inject, CLICK Read, function, and mqtt out nodes onto our workspace. We will also add debug nodes between the CLICK read and the function and between the function and the MQTT out nodes.
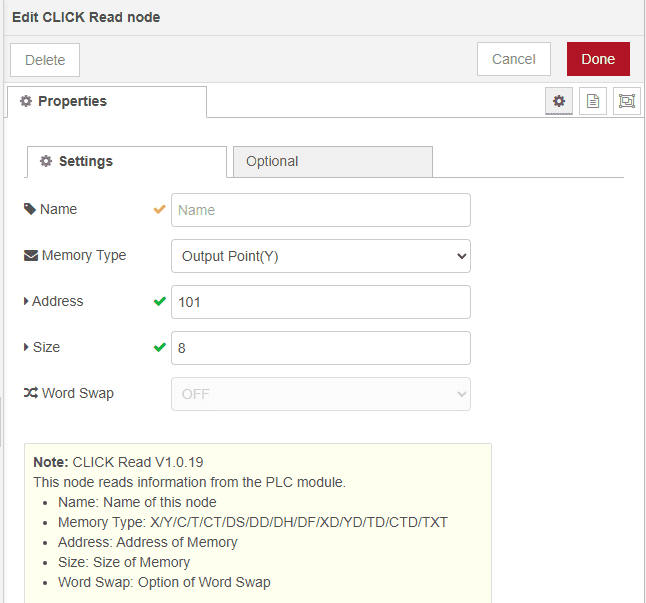
Double-click on the CLICK Read node. Set the memory type as Output Point (Y). The Address will be 101, and the Size will be 8. Select Done.
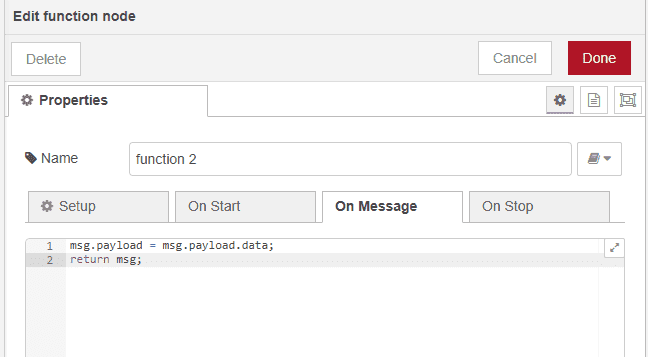
Double-click on the function node. We will change the On Message code to the following:
msg.payload = msg.payload.data;
return msg;
This separated the status of the read information in the Click PLC to just the data. Select Done.

Double-click on the MQTT out node. Our server will be set up for the Aedes server we just configured. The topic we chose is similar to our filing cabinet example. In our case, we will make it click\outputs. When setting up your network, consider future expansion and how this information will be utilized. The unified namespace can be used for your organization.
QoS (quality of service) corresponds to increasing levels of reliability for message delivery. We will set ours for 2. This ensures that the messages are delivered exactly once without duplication. We will also set the retain to true to ensure that our values are remembered. Select Done.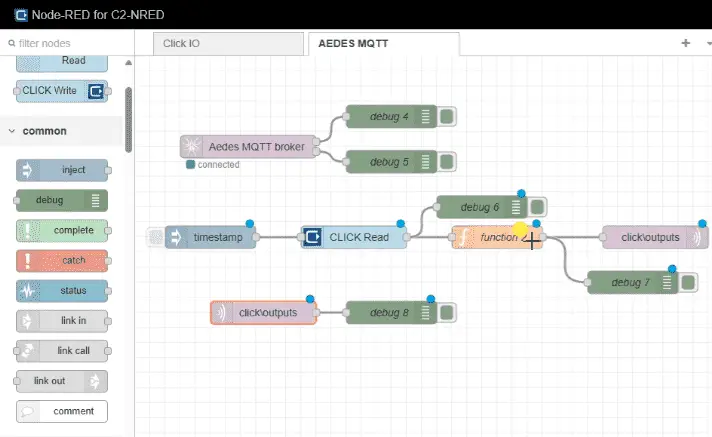
Click and drag an MQTT in and a debug node onto our workspace. Join them together and double-click on the MQTT in the node. 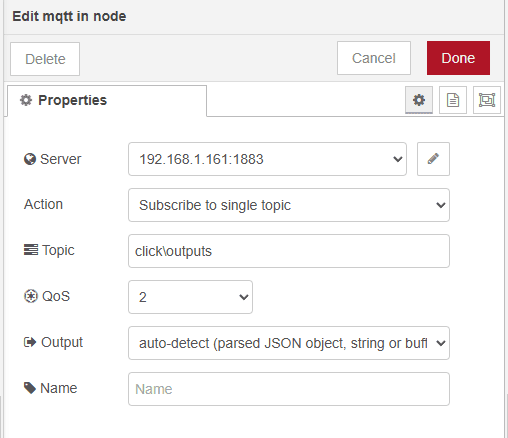
Our server will be populated with our Aedes Broker address. We will subscribe to a single topic, “click\outputs”. Ensure that the topic matches the one specified in the MQTT output node. We will set our QoS to 2 and use the auto-detect for the output. Select Done.
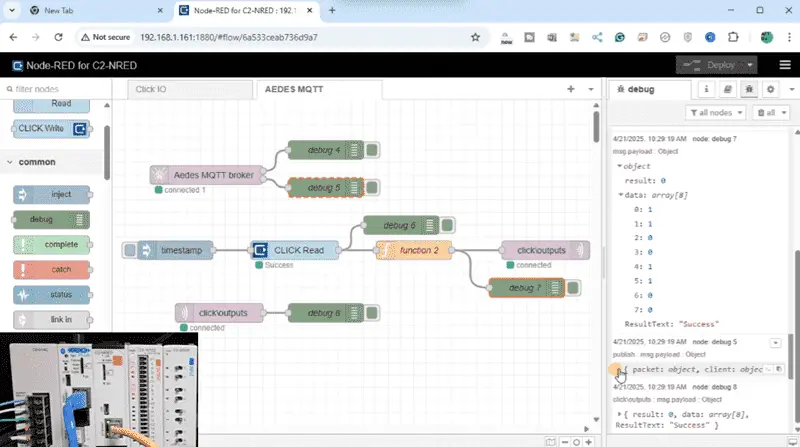
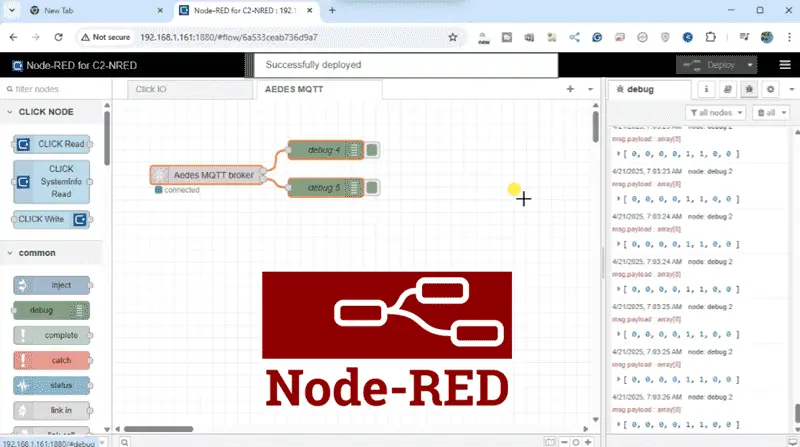
Select Deploy to write our flow program into the C2-NRED module. Select the inject node to test our flow. You will see our output array from the Click Read going to the MQTT Out node (Publish). The MQTT Broker will then send the information out to the MQTT In nodes that are subscribing. You will also notice that the Aedes MQTT sends out a heartbeat, allowing us to know that it is still active.
MQTT communication employs a report-by-exception approach, resulting in a quick communication method due to its low network traffic.
BRX Do-More MQTT
Let’s now set up our MQTT client in the BRX Do-More PLC. We are currently online with just an END statement for our ladder logic diagram.
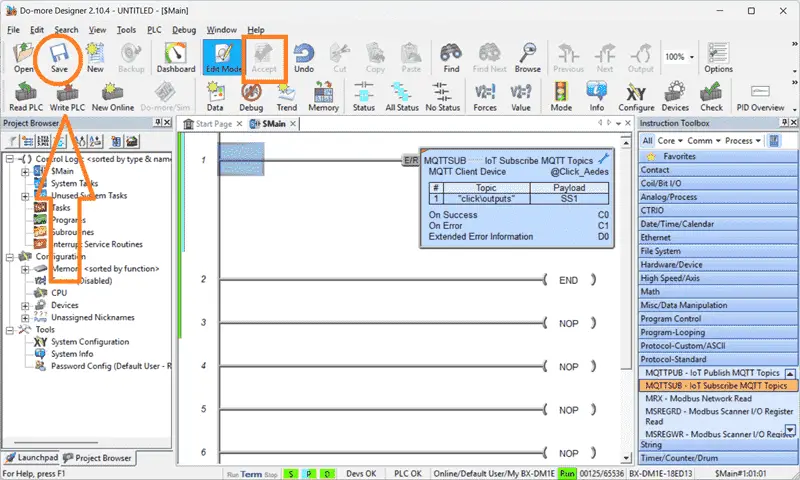
Ensure that we are in Edit Mode in the Do-More Designer software. Insert a rung before the END statement. In the instruction toolbox, select MQTTSUB under the standard protocols.
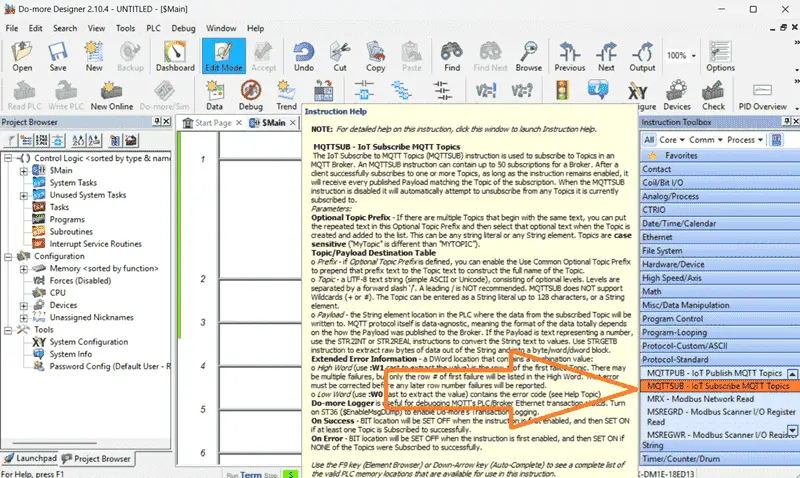
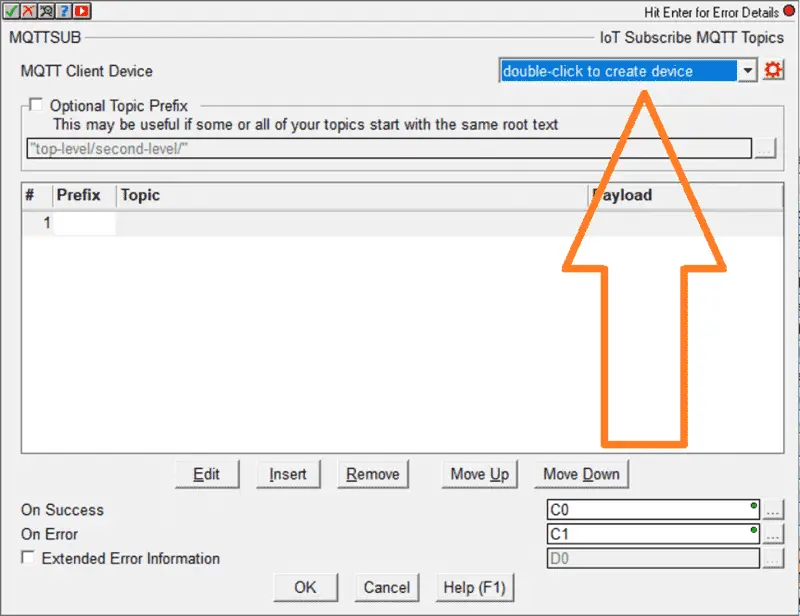
The MQTTSUB window will be displayed. Double-click to create a device.
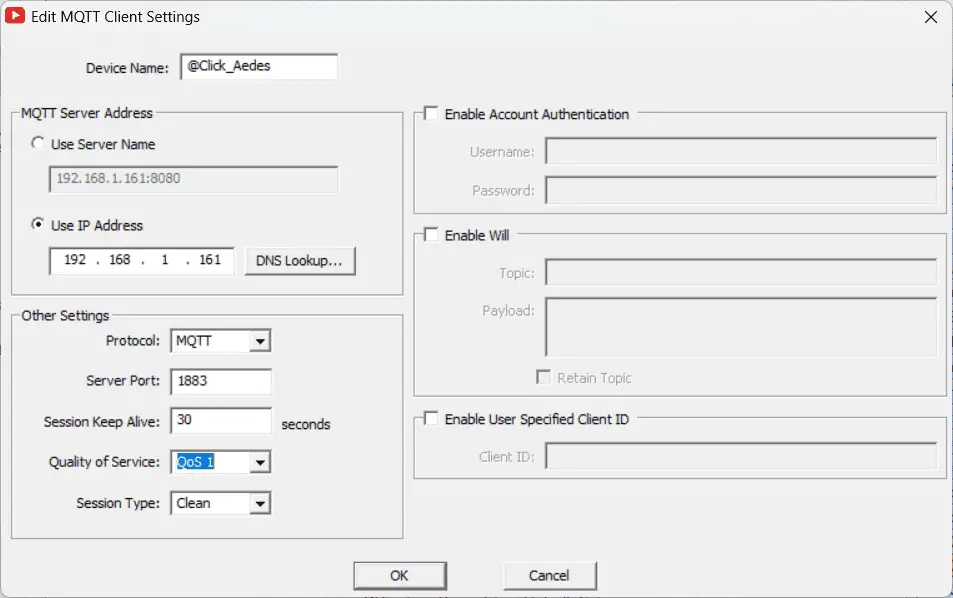
The Edit MQTT Client Settings window will be displayed. Name the device Click_Aedes. Select Use IP Address and enter the address for our C2-NRED module on our Click PLUS PLC.
The protocol will be MQTT at server port 1883. We will leave the session keep-alive at its default of 30 seconds and set the quality of service to QoS1. This is the highest we can set. Our session type will be clean.
Select OK
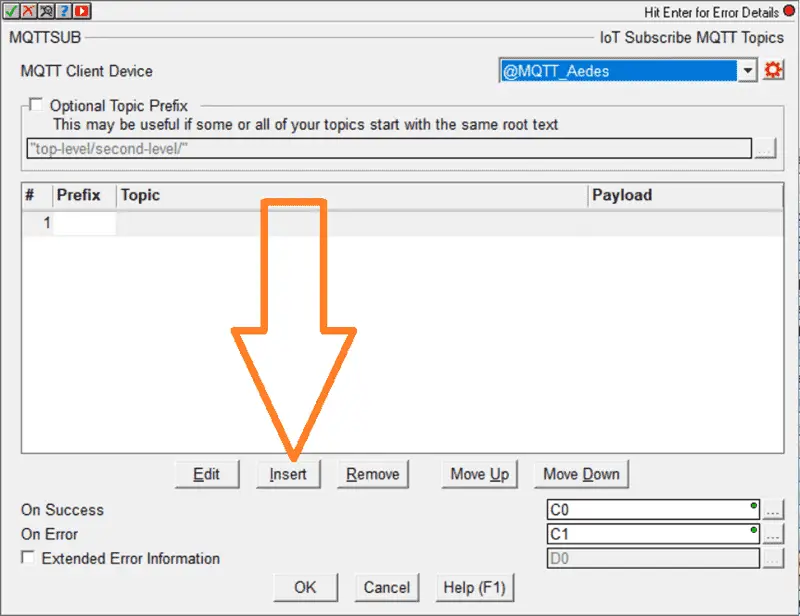
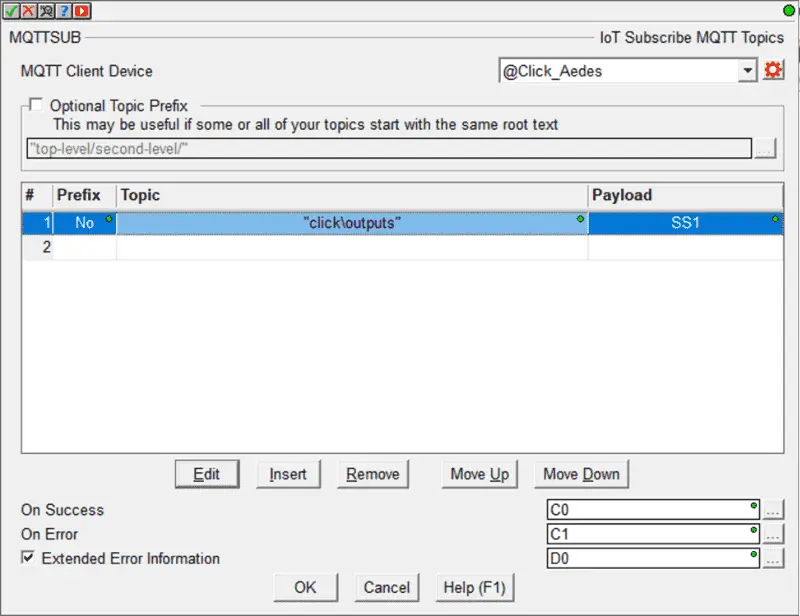
We will return to the MQTTSUB window, and the @MQTT_Aedes device is now set. Select the Insert button to subscribe to our topic.
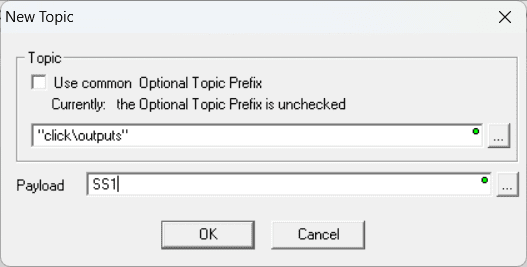
A new topic window will be displayed. Enter the topic value of “click\outputs” and the payload of SS1. The value transmitted via MQTT communication will be in ASCII format. Select OK.
We will now see the topic and payload location back on our MQTTSUB instruction window. Set the On Success, On Error, and select the Extended Error Information. The corresponding bits will be C01, C02, and word D0. Select OK.
Accept and save the program to your computer. Please give it a name that you will remember. Select Write PLC to transfer the program to the BRX Do-More PLC.
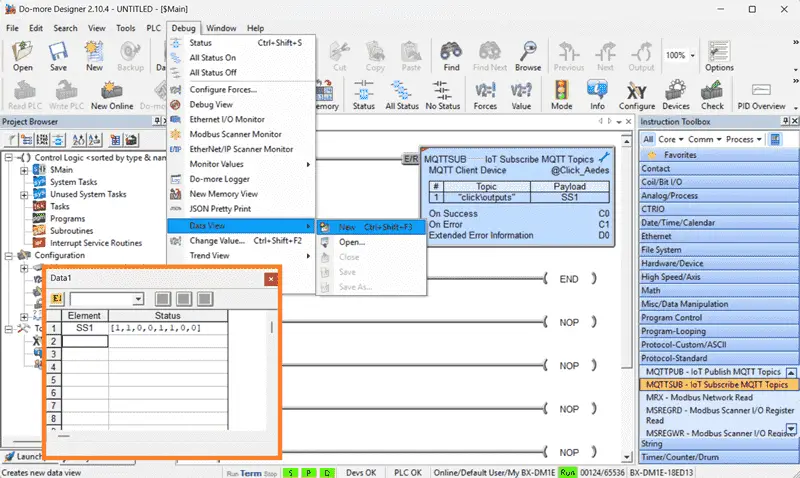
We can monitor the MQTT topic by using the Data View in the Do-More Designer programming software. This can be selected under the main menu | Debug | Data View | New…
Enter the payload parameter of SS1 to monitor the data. If changes are observed, the Broker will automatically send the updated information.
As mentioned earlier, MQTT is designed to use minimal bandwidth, enabling efficient communication without overloading network resources. This is particularly beneficial in settings with constrained communication infrastructures.
Click PLUS PLC MQTT
Let’s now add an MQTT Client in the Click PLUS PLC. Return to the Click Programming Software. Select MQTT Client from the main menu | Setup.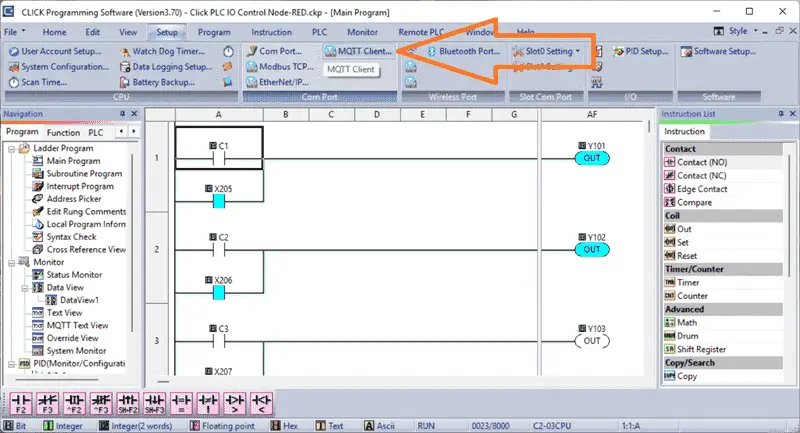
The MQTT Setup will be displayed. This is port 1 of the Click CPU. Select Enable MQTT and Use Subscriber. This will enable the tabs to implement the protocol independently of the PLC scan cycle automatically.
Under the Connect to MQTT Server (Broker) Configuration, enter the following:
IP Address: This is the address of the C2-NRED module Ethernet Port.
Protocol: MQTT
TCP Port Number: 1883
Keep Alive Time: 30 Seconds (Default)
Connected: C10 – This will be on when we are connected to the MQTT Broker.
The Last Will and Testament will be set as the default.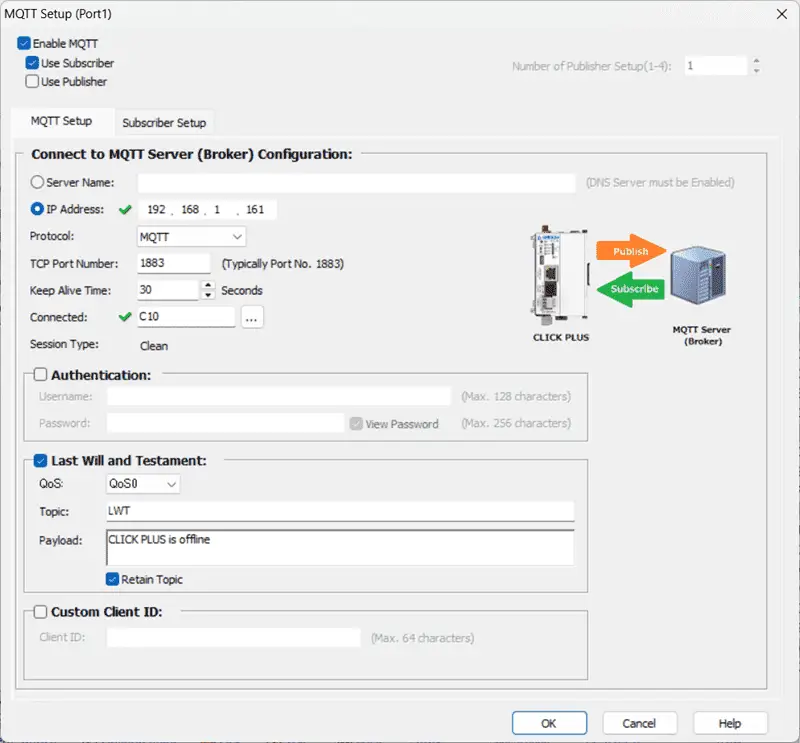
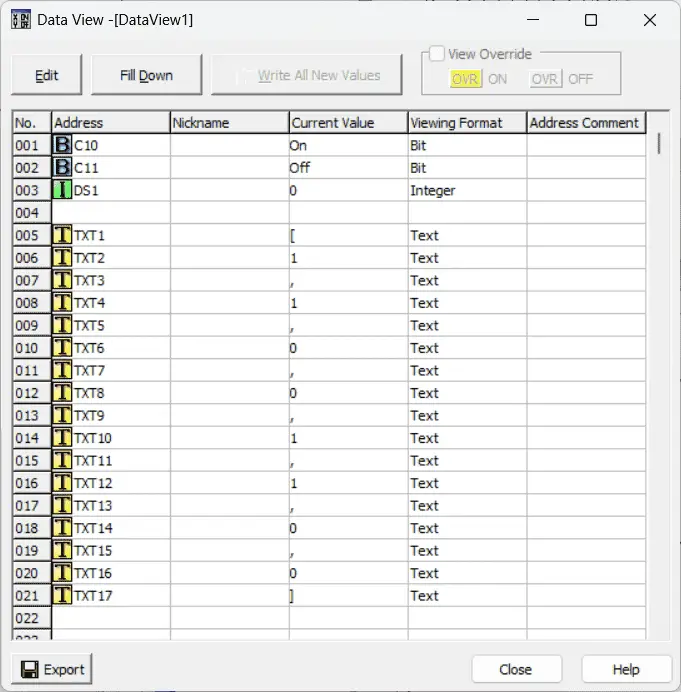
Select the Subscriber Setup tab. We will set the Enable as SC1. This is the Click PLC always on bit. The Enable when and Auto-Reconnect will be set to ON. The quality of service will be set to QoS1. We will put the Error to C11 and the Error Code to DS1.
Set the broker topic to “click\outputs”. The length will be 13, and the start payload address will be TXT1. Select OK.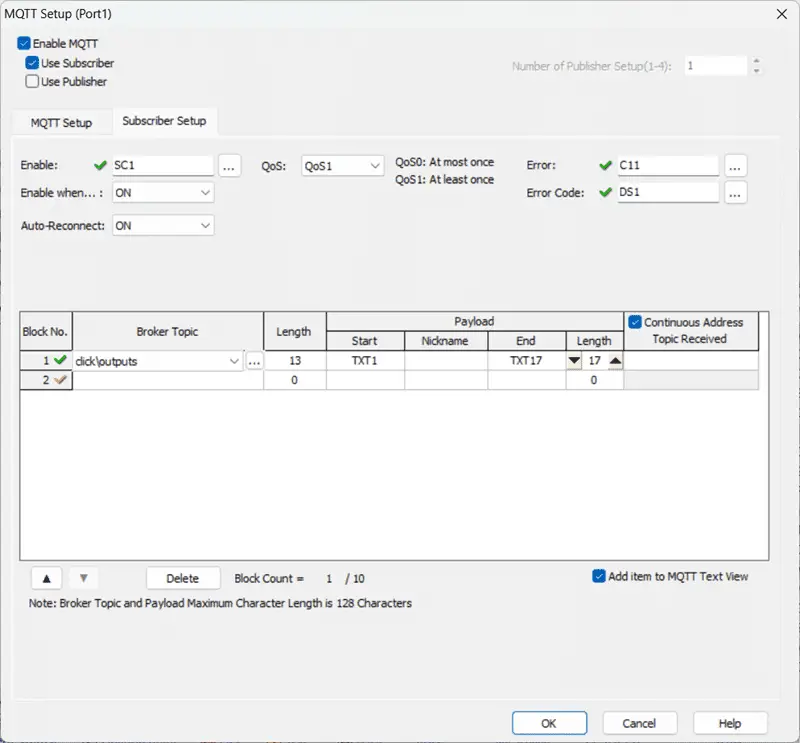
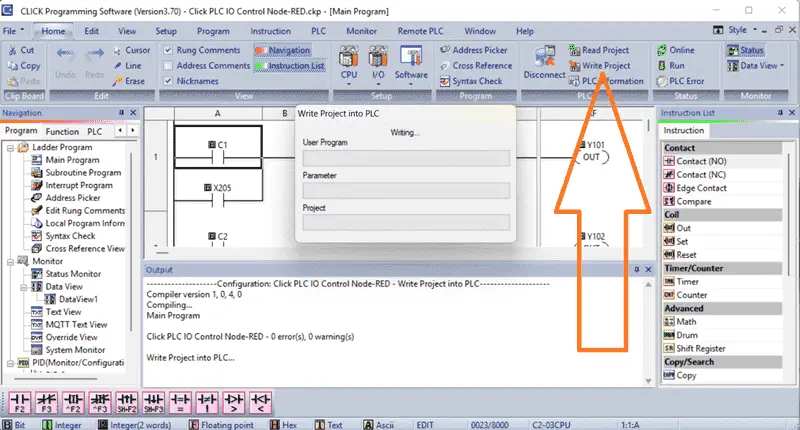
Our MQTT Click Client is now set. Save and write the project to the Click PLUS PLC.
Using the data view on the Home menu, we can monitor the status of our connection, errors, error information, and payload from our MQTT Client.
The Aedes Node-RED node in the CLICK PLC C2-NRED integrates the MQTT protocol. This enables efficient and effective communication under the operational framework. Aedes focuses on providing secure and reliable messaging, making it an ideal choice for automation systems that require real-time data acquisition and control.
As industries move toward more connected, automated environments, the CLICK PLC C2-NRED with Aedes MQTT stands out as a transformative solution.
To see the installation of our Aedes MQTT Broker node on the Click PLUS C2-NRED module, click here. Click here to learn more about the BRX Do-More PLC and all of the protocols available.
Our Node-RED series can be found here.
Download the Click PLUS PLC, BRX PLC Programs, and Flow here.
Watch on YouTube: Click PLC & AEDES MQTT: What is the Big Deal?
Click PLUS PLC C2-NRED Module
C2-NRED Applications Guide
https://cdn.automationdirect.com/static/manuals/c2appguide/c2appguide.pdf
Aedes Broker – Node-RED
https://flows.nodered.org/node/node-red-contrib-aedes
CLICK PLUS Hardware User Manual (C2-USER-M) chapter 5
https://cdn.automationdirect.com/static/manuals/c2userm/ch5.pdf
Node-RED Links
Node-RED Organization Home Page
Getting Started – Run Locally
Node-RED running on Windows (Run at Startup)
Securing Node-RED
Node-RED Essentials Videos (Basics of the Editor)
Learn JavaScript Free
w3schools JavaScript Tutorial
learn-js.org
Node-Red JavaScript Primer
Our entire series on the Click PLC can be found here.
The Click PLC can be programmed using free Click programming software from Automation Direct.
Here is a link to the software. Version 3.70
The entire Click PLC series before the Click PLUS release can be found here.
All previous posts and information are still valid with the Click PLC lineup.
YouTube Click Playlist
YouTube Click PLUS Playlist
Click and Click PLUS PLC Overview
Click and Click PLUS PLC Videos from Automation Direct
If you have any questions or require additional information, please do not hesitate to contact me.
Thank you,
Garry
If you’re like most of my readers, you’re committed to learning about technology. The numbering systems used in PLCs are not difficult to learn and understand. We will walk through them, including Bits, Decimal, Hexadecimal, ASCII, and Floating Point.
To get this free article, subscribe to my free email newsletter.
Use the information to inform other people how numbering systems work.
Sign up now.

The ‘Robust Data Logging for Free’ eBook is also available as a free download. The link is included when you subscribe to ACC Automation.