
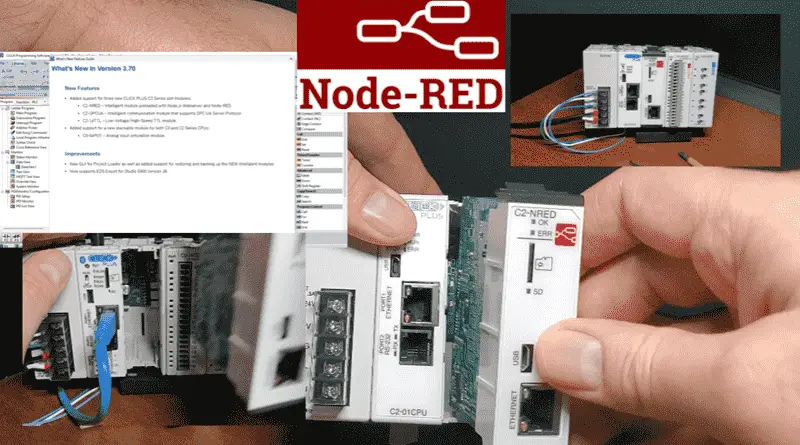
Click PLC and Node RED combine to make a powerful automation system. This step-by-step guide teaches how to install a PLC C2-NRED module in the CLICK PLUS option slot. We will cover the basics of PLC module installation, making it perfect for beginners or those new to the CLICK PLUS series. Get ready to upgrade your automation system with ease!
Node-RED is a visual programming tool for connecting physical hardware devices, APIs, and online services as part of the Internet of Things. Node-RED’s low-code, drag-and-drop interface makes it easy to create complex flows with minimal code.
Whether you’re an industrial automation professional or a DIY enthusiast, we will walk you through installing the Node-RED PLC module in the CLICK PLUS option slot. From preparation to installation, we’ve got you covered. Let’s start now and take your automation skills to the next level! Our entire Click series can be found here.
All of the previous information for the Click PLC can be applied to the Click PLUS. Previously, here are some of the things we covered:
Software Installation – Video
Click Software Establish Communication – Video
MQTT Communication – Video
Data Logging – Video
Real-Time Clock with Network Time Service – Video
Click Remote PLC Mobile App – Video
Mastering Click PLC Communication Modbus RS485! – Video
Unlock Click PLC & Machine Simulator Integration – Video
The programming software and manuals can be downloaded from the Automation Direct website free of charge. Watch the video below to see how to update and install our C2-NRED module on our Click PLUS PLC.
What are Node-RED and the Click C2-NRED Module?
The CLICK PLUS family of controllers now has an intelligent option slot module that combines time-tested CLICK hardware with the popular Node-RED open-source tool that has already been installed. Node-RED has an extensive library of built-in nodes for various tasks, including input/output, data processing, logic, and social media functions.
The C2-NRED module has its independent processor, ensuring the main Click CPU remains unburdened but has direct access to the memory of the PLC and all the data exchanges needed to create a working application easily. You can even determine which controller (PLC or C2-NRED or both) will control the process, and several Node-RED nodes are available for working specifically with the CLICK PLUS PLC.
Download and Install Click PLC Programming Software Version 3.70
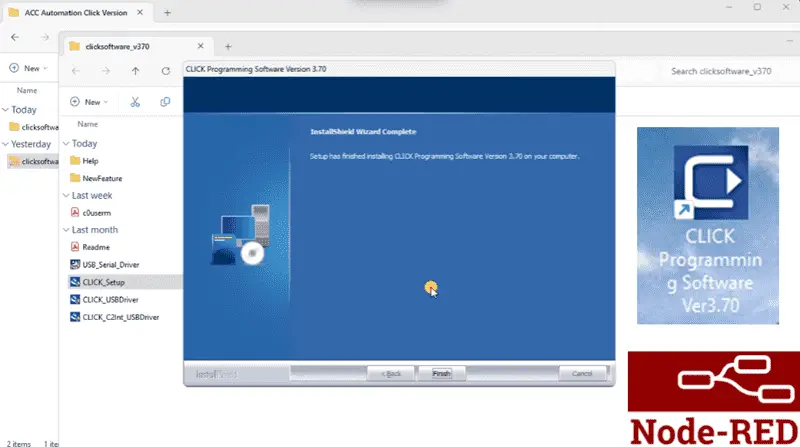
Our Click C2-NRED module will operate with Click PLC Programming Version 3.70 or higher. Download the software from the automation directs website. Unzip the file by right-clicking and selecting Extract All…
Double-click on the setup.exe file to start the installation process.
An information window will appear, asking you to disable anti-virus software before proceeding. Select OK.
The Licensing Agreement must be accepted before you can continue the installation of the Click PLC programming software. Select I accept terms of the license agreement. Select Next.

You will be given the choice of where to install the software on your computer. Hit the change button to modify or use the default displayed and select Next.
The ready-to-install message will now be displayed. Select Next to start the installation.
When the setup type is displayed, select create a desktop icon, launch USB drivers installer, and launch C2-Intelligent USB driver installer. Select Next.
The USB drivers will be checked and updated if required. Maintaining the drivers to ensure that your software is up to date is always a good idea. Click the Finish button when the Click PLC Programming Software has completed installing.
Double-click the icon on the desktop to start the new version of our Click PLC programming software. We will be shown the latest features of this new software. Click Next. Additional new features and improvements will be displayed. Click Next. Software and Firmware fixes will now give you insight into this software package. Select Don’t display this dialog next time. Select it from the system menu if you want to see this again. Select Close.
Update the Click PLUS PLC Firmware
If you update from a Click PLC Programming Software version less than 3.70, like we are. Ensure that the C2-NRED module is NOT installed in the controller.
We will connect to our existing controller. This can be done using the connect icon on the main screen or the “Connect to PLC” selection on the Start window.
Under the port type, select Ethernet. Select refresh to have the software check the network. Select connect to communicate with the Click PLC controller on the network. We will “Read the project form the PLC” and select OK.
The software will recognize that the connect PLC has been programmed with a different version and prompt you to make a copy of the original Click PLC program. Select Yes. We can then name this project or use the default and select Save.
We are now communicating with our Click PLUS PLC.
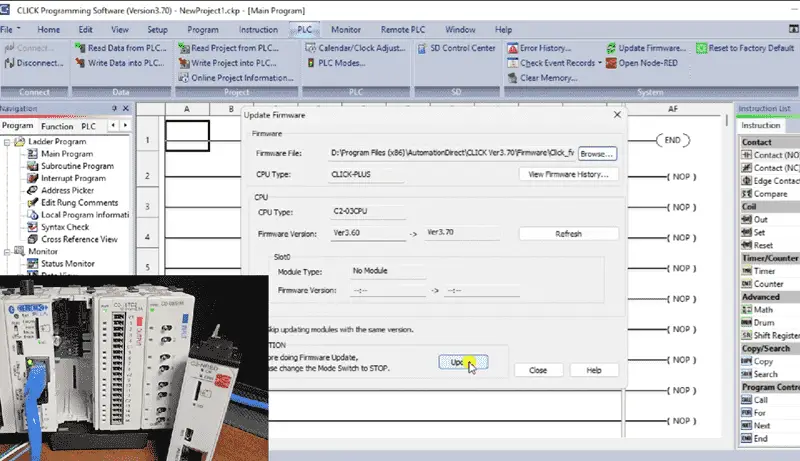
Select Update Firmware under the main menu | PLC.
The update firmware window will be displayed. Under the CPU, you will see that we will be updating from version 3.60 to 3.70. Ensure that the mode switch on the PLC is set to STOP. Select Update.
Since we have already saved the program in the PLC, we can install the new firmware without making a backup copy of the Click program. Select OK.
Select Yes when asked to update.
Our Click PLUS PLC CPU firmware will be updated. We do this without the Node-RED module because the older version does not have existing software for this intelligent module.

A success message will be displayed when the Click PLC CPU firmware has been updated. Select OK. We can see that the CPU firmware version has been updated to 3.70. Close the update firmware window. Select the disconnect icon on the home tab of the Click programming software.
Install the C2-NRED Click PLUS Slot Module
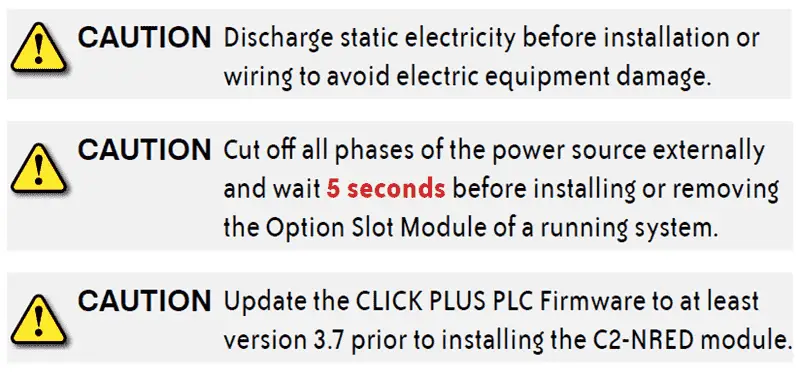
Ensure the CPU controller is powered off when installing modules and PLC cards for the Click or Click PLUS PLCs. See the note above.
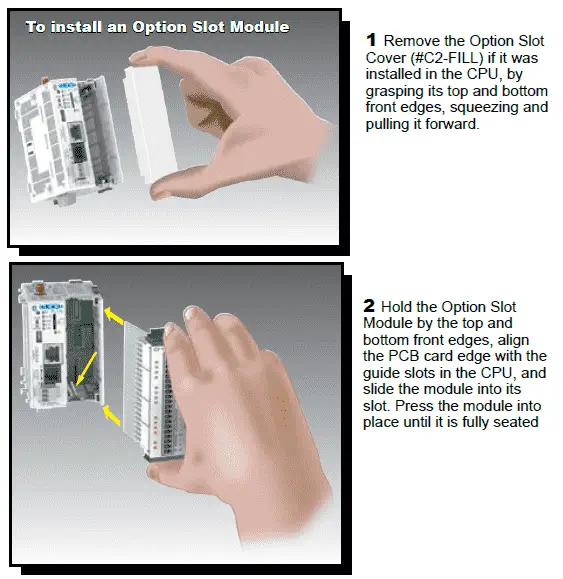
– Remove the option slot cover if installed by grasping its top and bottom front edges, squeezing and pulling it forward.
– Hold the option module by the top and bottom front edges. Align the card edge with the guide slots in the CPU and slide the module into its slot. Press the module into place until it is fully seated.

– Push the top and bottom locking clips backward until they click into place.
– To remove the option card module, lift slightly on the locking clips until they release. Then, slide each clip forward. Reverse the procedure.
Watch the video below to see this card mounted.
Update the C2-NRED Module Firmware
We can now update the firmware on the Node RED click card. This module runs independently of the PLC scan and can share information on the controller’s communication bus. Power up the Click PLUS PLC and select connect in the programming software. Select the found PLC controller on our network and select connect.
The login window will appear. Since we do not have a program in the PLC, enter “click” for the password and select OK.
We are communicating with Click PLC with the node red module in the slot. Under the setup on the main menu, select user account setup. We will ensure that we disable our password requirement.
On the home tab, select write project. This will write our existing program into the PLC. Once the transfer is complete, select OK.
We will now update our C2-NRED node red module. Select PLC from the main tab and select Update Firmware…
Our update firmware window will be displayed. Under the Slot 0 heading, our C2-NRED module will show that our firmware needs to be updated. Select Update.
A caution message is displayed indicating that any program in our node red module will be deleted. Select Yes.
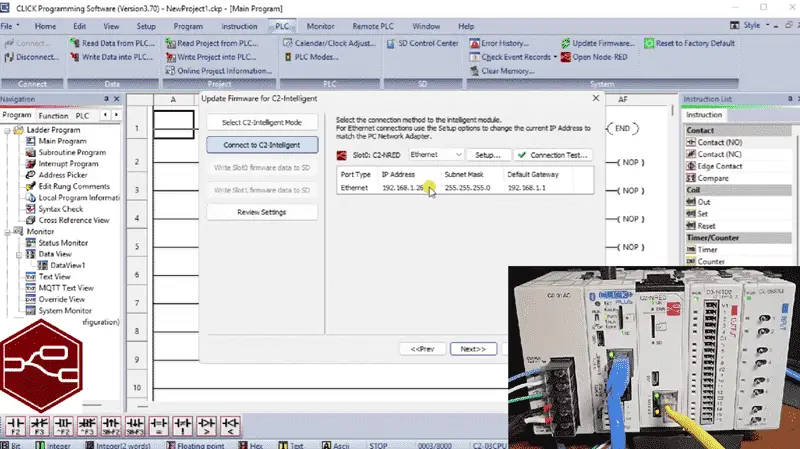
There are two methods of updating our C2 intelligent modules: USB and Ethernet. In our case, we will connect an ethernet cable to our C2-NRED module. Select Next.
Select the ethernet option for the C2-NRED card and select connection test… Select OK to acknowledge the test passed. Select Next.
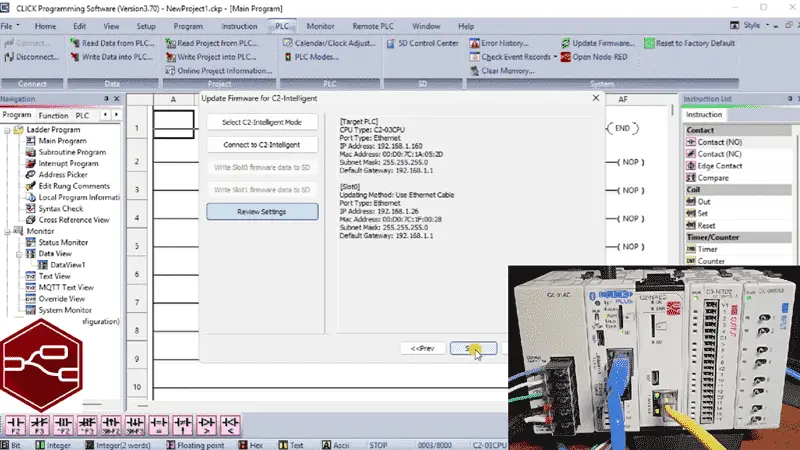
We can now review our firmware update settings. Select Start.
Our firmware will now be updating on our node red card. Do not remove power to the PLC or computer during this process.
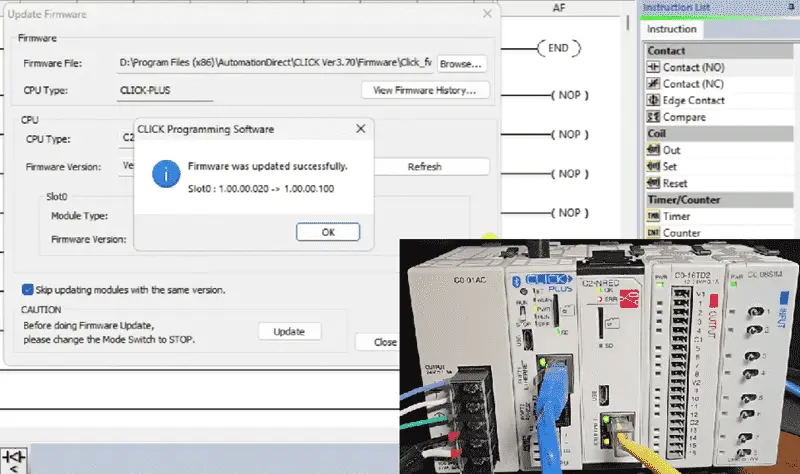
Select OK once the firmware has been updated successfully on our C2-NRED node red module. Select Close to close the firmware update window.
Configuring the C2-NRED Module
Enabling the Click Node RED module will allow it to function. On the setup tab of the main menu, select Slot 0 Setting. Select C2-NRED. This will call up the configuration window.
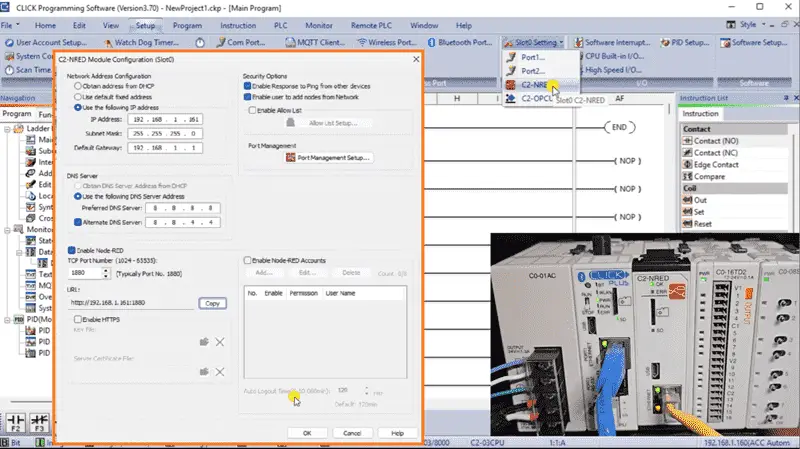
Select “Use the following IP address” and enter the static information you want to use on your network.
We will also set up the DNS server addresses.
Select the “Enable Node-RED” option to ensure we can use the module. We will leave the TCP Port Number as the default 1880.
All of the other items can be left at their default settings. You will see the URL address to view the programming of our node red module. Select Copy.
Select OK.
On the home tab, select write project. This will write our configuration of the node red module into the Click PLUS controller.
Select OK once the transfer is complete. Watch the video below to see the configuration of the C2-NRED module.
Programming the Click PLUS PLC C2-NRED Module
Our module can now be programmed. To start and program our node red module, select open Node-RED from the PLC tab of the main menu. Select the Ethernet option and select connect. Your default browser will open up, and we will see the node red programming screen for the C2-NRED module.
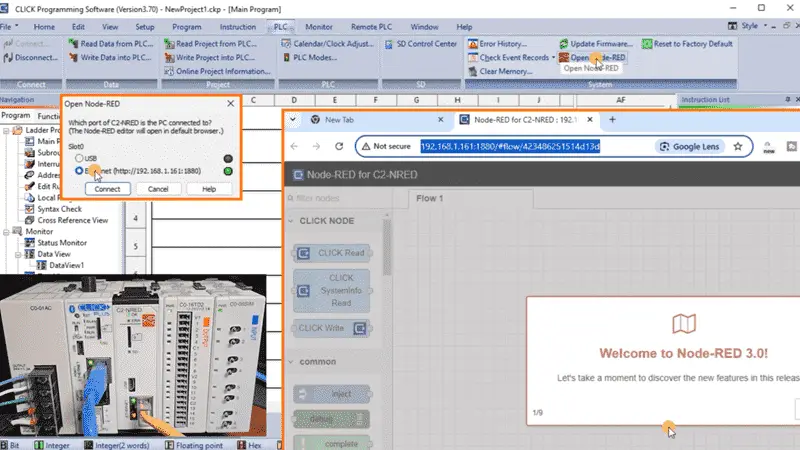
Another way to start the Node-Red interface is to start a new tab in the browser and paste the URL address we copied in the configuration.
We will be first presented with a welcome to Node-RED 3.0! Screen. This will take us through a series of screens about this version of Node-RED.
The latest version of Node-RED is 4.0, but this release is compatible with the Click PLUS module hardware.
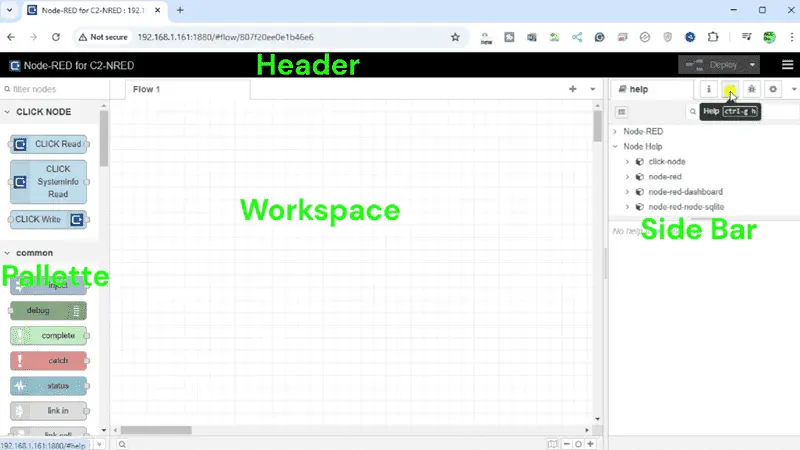
The nodes already preinstalled in the Click Node-RED module are on the screen’s left side. The right side of the screen will show information on the current configuration, help menu, debug, etc.
Programs will be written in flows in the center of the screen.
To learn more about Node-RED programming, click here to see our series. Click here to learn more about the Click PLUS PLC.
Our entire series on the Click PLC can be found here.
Click PLC Support Links
The Click PLC can be programmed using free Click programming software from Automation Direct.
Here is a link to the software. Version 3.60
The entire Click PLC series before the Click PLUS release can be found here.
All previous posts and information are still valid with the Click PLC lineup.
YouTube Click Playlist
YouTube Click PLUS Playlist
Click and Click PLUS PLC Overview
Click and Click PLUS PLC Videos from Automation Direct
Watch on YouTube: CLICK PLUS C2-NRED: Easy Install for PLC Module!
If you have any questions or need further information, please contact me.
Thank you,
Garry
If you’re like most of my readers, you’re committed to learning about technology. The numbering systems used in PLCs are not difficult to learn and understand. We will walk through them, including Bits, Decimal, Hexadecimal, ASCII, and Floating Point.
To get this free article, subscribe to my free email newsletter.
Use the information to inform other people how numbering systems work.
Sign up now.

The ‘Robust Data Logging for Free’ eBook is also available as a free download. The link is included when you subscribe to ACC Automation.