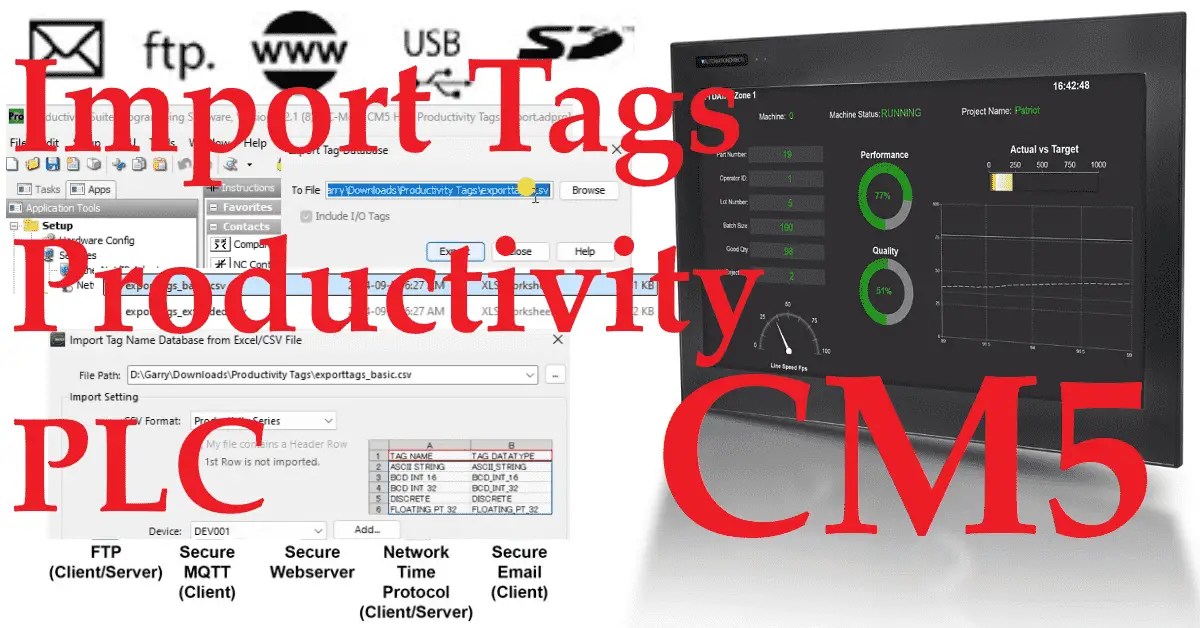
The C-More CM5 HMI programming software will allow tags to be imported. This can save you work hours when establishing communications with different PLC controllers. Instead of creating and labeling tags in the PLC and the HMI, we can export them from the PLC and import them into the HMI. This saves you time, money, and mistakes.
We will be exporting tags from a Productivity 2000 PLC start-stop jog circuit. Any productivity series of controllers like the 1000, 2000, or 3000 can export/import the programming tags. The export tags will then be imported into our HMI program. We will modify the program in our C-More CM5 HMI screen, where we import the Click PLC tags. Let’s get started.
Previously in this C-More CM5 HMI Panel series, we have done the following:
Latest C-More CM5 HMI Game Changer Post
– C-More CM5 Unboxing and Power Video
Installing C-more CM5 HMI Software Step by Step – Video
C-More CM5 HMI Series Panel System Setup Screens – Video
C-More CM5 HMI Communication Firmware Update – Video
First Program C-More CM5 Series HMI (Do-More) – Video
C-More CM5 HMI Click PLC Tags Import – Video
See the list of references for the CM5 HMI, including the frequently asked questions (FAQ) at the end of this post.
How to Import Tags from a Productivity PLC to C-more HMI
1. Open the Productivity Suite software and the C-more programming software. We are currently using Productivity Suite version 4.2.1 and C-more HMI version 8.14 software.
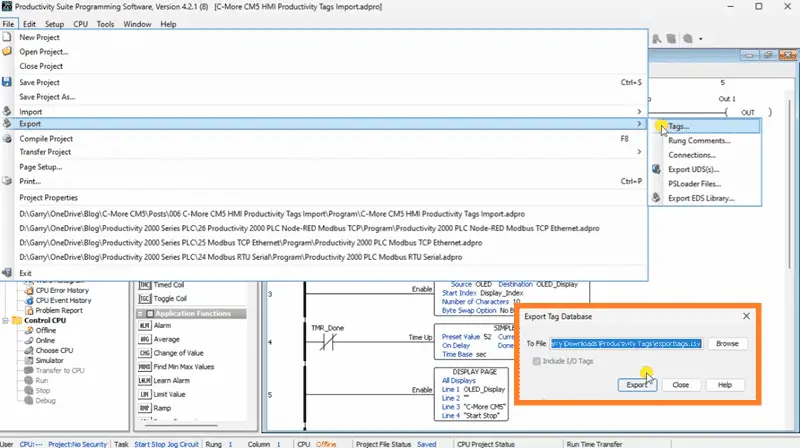
2. In the Productivity Suite software, go to File, then Export and Tags. Browse to where you want to save these files and then press Export.
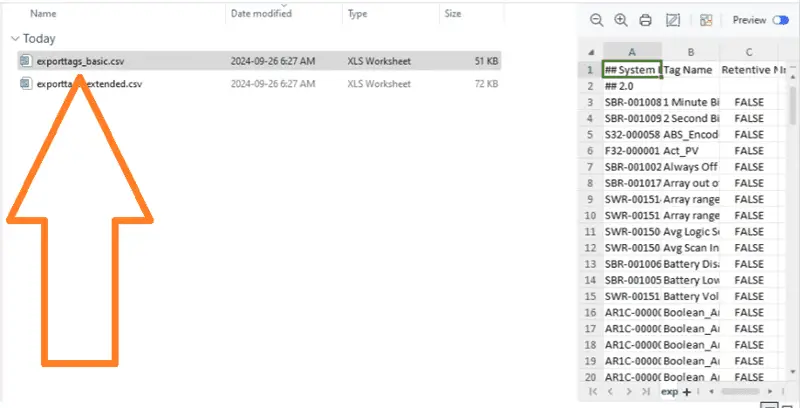
Now, this export has created two files. One file has basic at the end, and one has extended. We will use the file with basic for this C-more import.
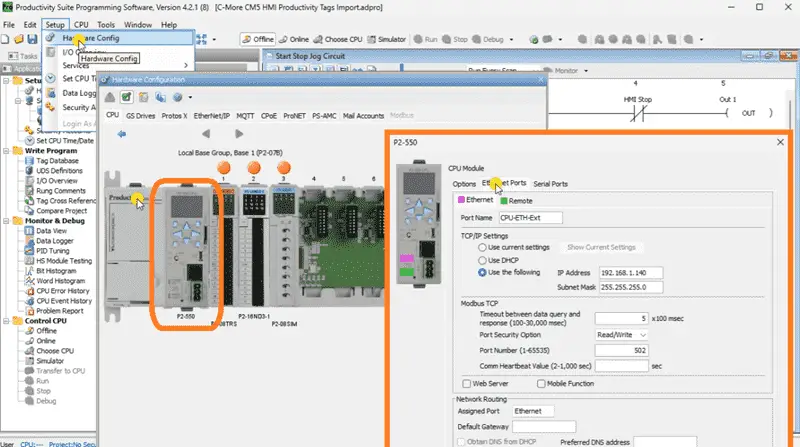
3. While still in the Productivity Suite software, go to hardware configuration under the setup heading in the application tools. You can also do this using the main menu | Setup | Hardware Config.
In the hardware configuration window, double-click on the CPU unit. In our case, this is the P2-550.
Select the Ethernet Ports tab on the CPU Module window. This will show you the IP address set for the Ethernet port for communications.
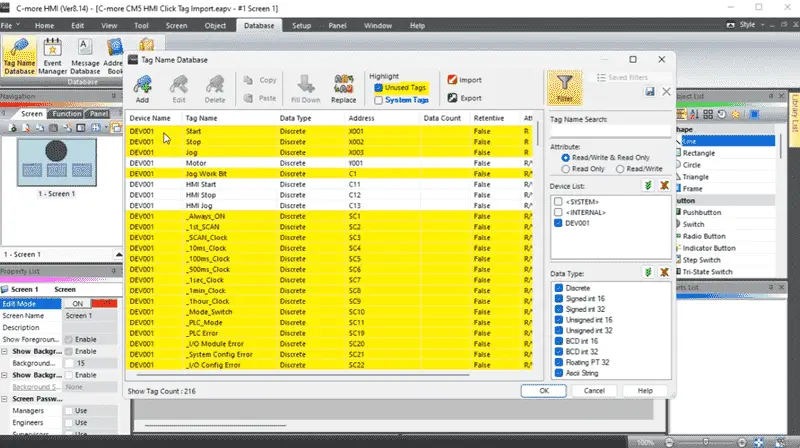
4. We can prepare our HMI program now for the new imported tags. We have called up our C-more CM5 HMI Click Tag Import program in the C-more programming software. We will delete all unused tags for the communication driver (DEV001) we imported previously. Select Tag Name Database under the database heading of the main menu. Select the filter icon in the Tag Name Database window. Under the device list, select DEV001 only. Select the “Unused Tags” under the highlight option. You will see that we have only the motor and three of the HMI control tags.
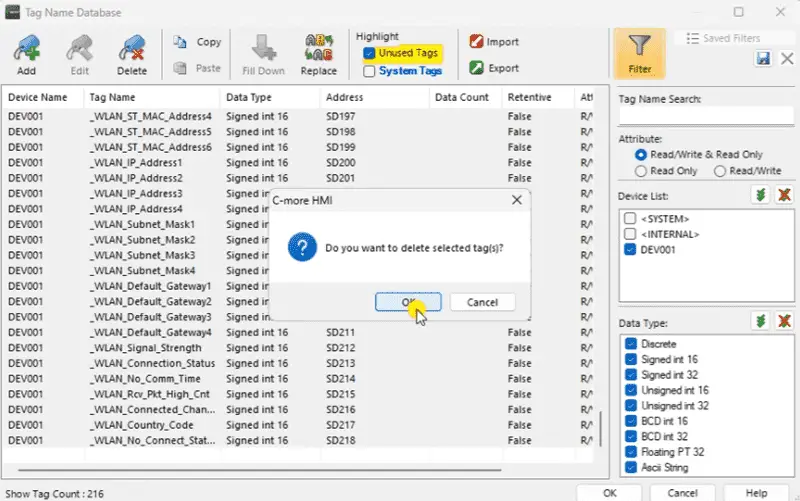
Select everything in the list. This can be done by left-clicking on the first tag, moving to the end of the list, and selecting shift + left click. Select the delete icon. A popup window will verify that you want to delete the selected tags. Select OK. If a tag is being used in the HMI program, the software will not allow the tag to be deleted. We are left with just the tags associated with items programmed on our screen.
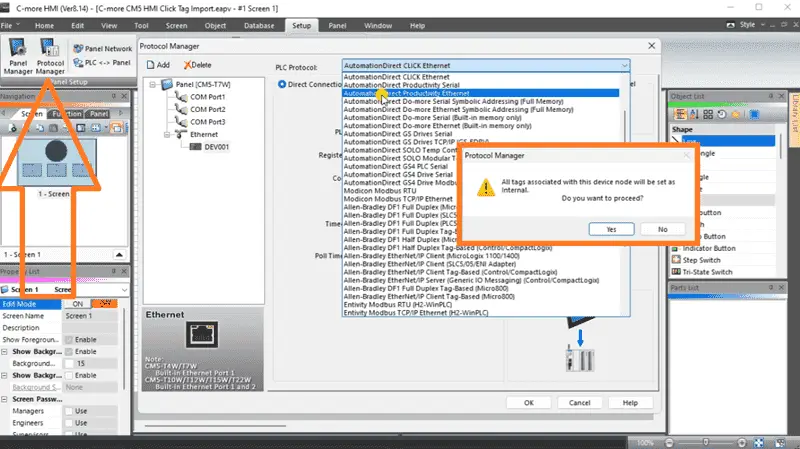
Select the Protocol Manager icon under the Setup on the main menu. The protocol manager window will now be displayed. Ensure that the DEV001 device is selected. Change the PLC Protocol to Automation Direct Productivity Ethernet. A popup window will indicate that all device node tags will be set for internal. Select Yes to proceed.
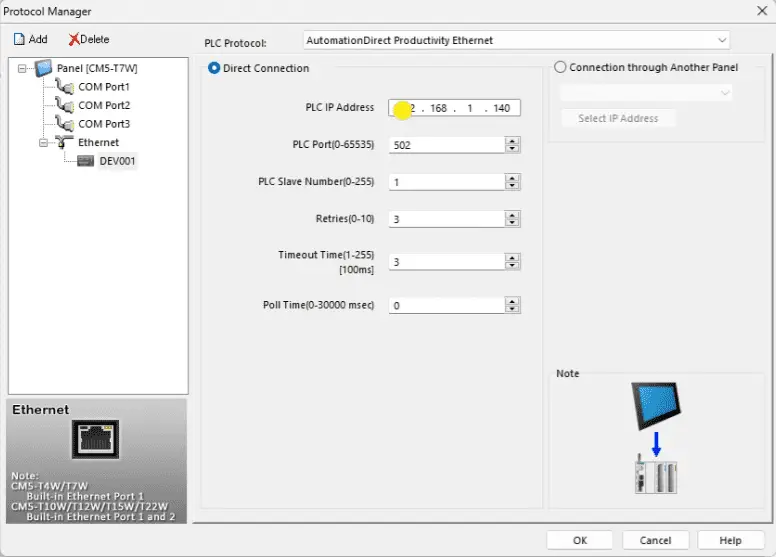
Set the productivity PLC IP Address for the DEV001 driver that we discovered previously. Select OK.
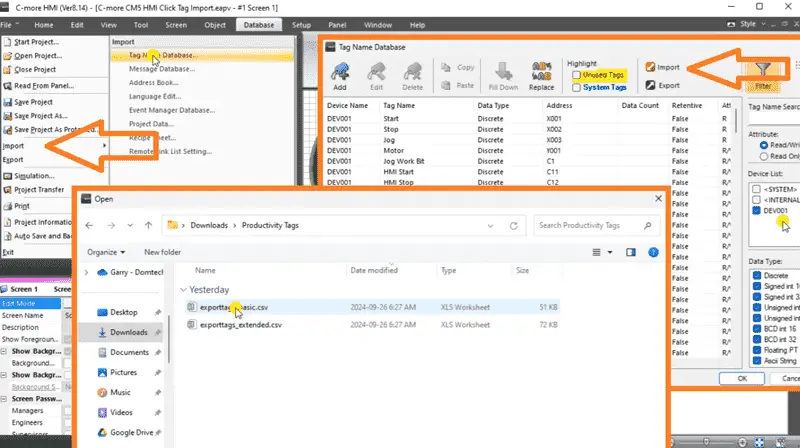
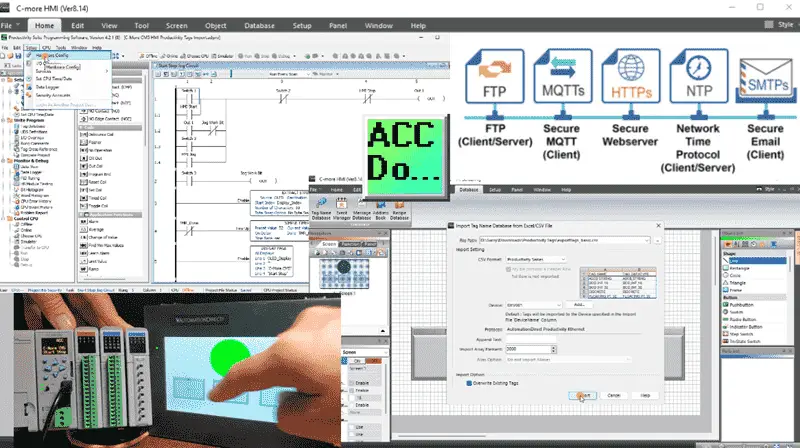
5. There are two ways you can import your tags. You can go to File, Import, and then Tag Name Database or open up Tag Name Database from here and then select Import. Please select the file we created earlier with basic at its end.
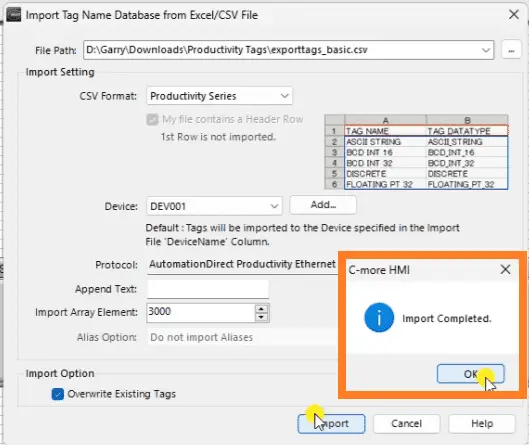
Select the device (DEV001) that you are connecting these tags with. If you would like to append the tags that you are importing with text so that you can identify them more quickly, place that text here. Import Array Element will limit the number of elements in a single array that will be imported. If we have a single array of 5000 elements in Productivity and leave this setting at 3000, then this will only import the first 3000 elements of that single array. If you would like to overwrite existing tags, select this option. This option is usually used if we are updating several times. Once you have these options set up, choose Import. A message will be displayed if the tags are imported without error. Save the program under a different name.
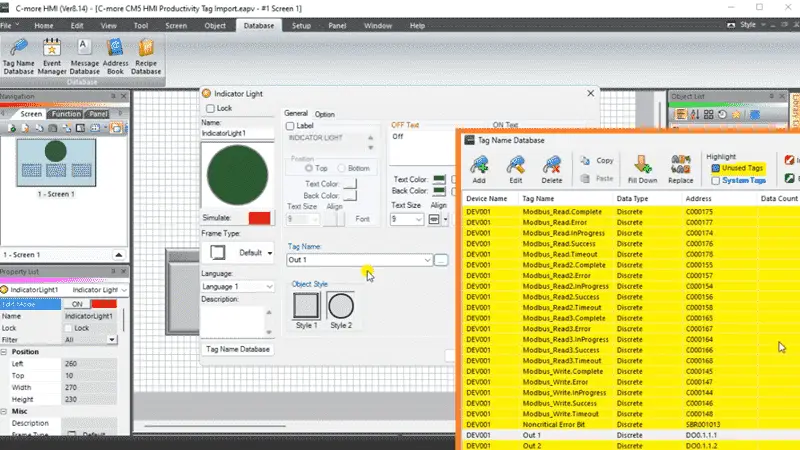
6. Review the imported tags to ensure they are correctly mapped within the C-more HMI project. Our stop, stop, and jog pushbuttons have the same name as the Click program. The indicator light had a tag named “Motor.” We can change this to “Out 1” to reflect the Productivity 2000 PLC program.
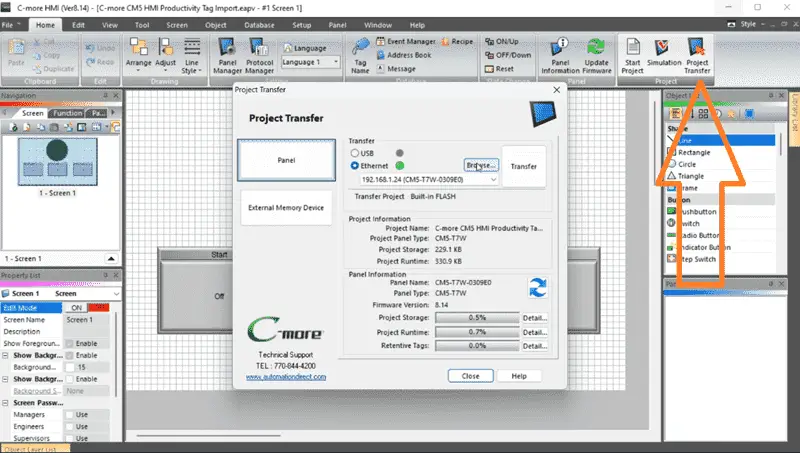
7. Transfer the C-more HMI project with our new tags and communication to the CM5 unit.
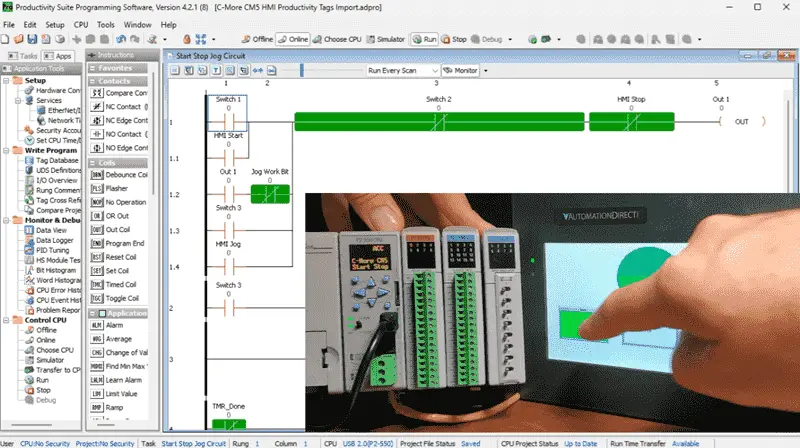
8. Test the communication between the C-more HMI and the Productivity PLC to ensure the imported tags function as intended.
These steps will allow you to effectively import tags from a Productivity PLC to C-more HMI.
Now that you know how to import Productivity PLC tags for your HMI, learn how to program the Productivity PLC quickly. We have compiled a list of posts and videos to assist everyone, from beginners to the most advanced programmers. See how this will transform your learning process for industrial automation. Click here.
Download the PLC and C-More Panel Programs here.
Watch the video below for the Click tag import in our C-More CM5 HMI Panel.
Watch on YouTube: C-More CM5 HMI Productivity PLC Tags Import
C-More CM5 Features:
- “4”, “7”, “10”, “12”, “15”, and “22” widescreen options
- 16.7M colors and LED backlights
- 800MHz (4″, 7″) or 1.6GHz Quad Core CPU (10″ or higher)
- 43MB project memory
- 12 to 24 VDC powered
- Built-in real-time clock with 30-day backup (no battery required)
- NEMA 4/4X (indoor use only), IP65
- FREE HMI programming software with powerful design tools and a project simulator
- CM5 series HMIs support any EA9 series project (created with V6.73 or later) for an easy panel upgrade
Frequently Asked Questions (FAQ)
Product Brochure
C-more CM5 Overview
CM5-T7W Cut Sheet – Tech Specifications / Protocols
CM5 User Manual – Hardware
CM5 Quick Start Guide
C-More Programming Software (CM5 Series)
CM5 User Manual – Software On-Line
AD C-More CM5 Sample Projects (CM5-T7W)
If you have any questions or need further information, please contact me.
Thank you,
Garry
If you’re like most of my readers, you’re committed to learning about technology. The numbering systems used in PLCs are not difficult to learn and understand. We will walk through the numbering systems used in PLCs, including Bits, Decimal, Hexadecimal, ASCII, and Floating Points.
To get this free article, subscribe to my free email newsletter.
Use the information to inform other people how numbering systems work. Sign up now.

The ‘Robust Data Logging Easily’ eBook is also available for free download. The link is included when you subscribe to ACC Automation.