
Programming an XGB PLC using a Structure Text (ST) can be efficient for control engineers and automation professionals. Structure Text is a low-level programming language commonly used for PLC (Programmable Logic Controller) programming. It offers a robust, structured approach to designing control logic for industrial automation systems. ST programming is sometimes a more straightforward method for those with a background in programming languages such as C, C++, Java, or Python over the more popular Ladder Logic Diagram.
In addition, ST can be used with artificial intelligence (AI) using the large language model (LLM). This is ideal for creating an example program to adjust to your application. This post will explore the fundamentals of programming an XGB PLC using Structured Text programming. We will be programming our lighted pushbuttons to control a start-stop circuit. Let’s get started.
Previously in this LS Electric XGB series, we have done the following:
Transform Automation with LS XGB PLC: The Solution
– Unboxing and Powering Video
Install & Com w/ XG5000 PLC – Video
LS Electric XGB PLC Variables and Scope – Video
Wiring Discrete I/O to an XGB PLC – Video
XGB PLC Ladder Logic First Program – Video
XGB PLC Simulator Ladder Logic Diagram – Video
See the list of references for the XGB PLC, including the frequently asked questions (FAQ) at the end of this post.
Start a New Project
Please start a new project with the free XG5000 programming software we installed previously. We can start a new project by selecting the icon on the main menu.
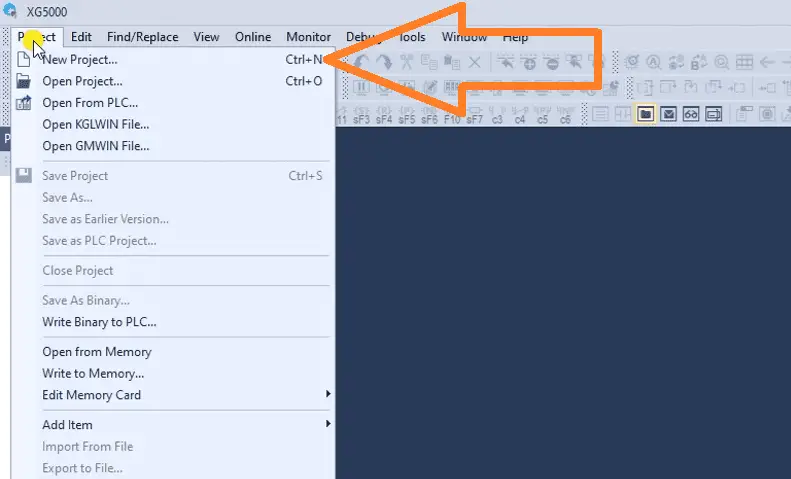
This can also be done by selecting the main menu | Project | New Project or by using the shortcut combination of Ctrl + N.
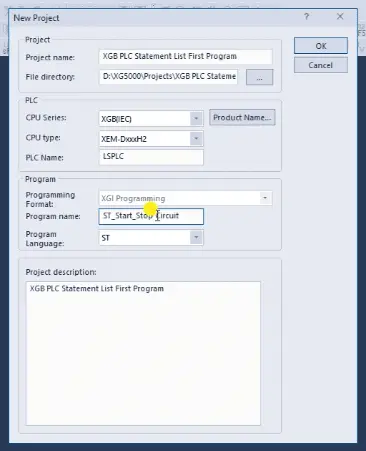
The new project window will now be displayed. Enter a name for the new project. You will see the default directory in which our program will be stored. Under the heading PLC, ensure we select the make and model of the LS Electric PLC we will be programming. This is the XGB (IEC) Series, XEM-DxxxH2 Type, and we will leave the LSPLC name as the default.
Under the program heading, we can select the program’s name and the programming language. We will name this program and ensure the language is set for Structured Text (ST). Select OK. Ensure that the name does not have any special characters or spaces. An error message will be displayed, and you must correct the name.
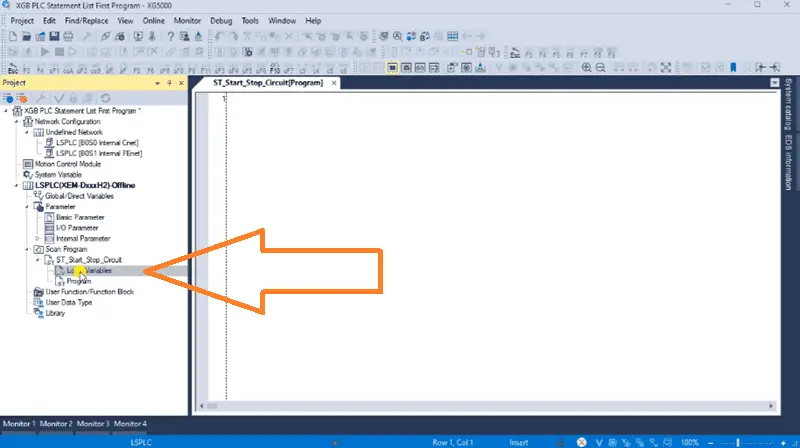
You will see the local variable list if we expand the program name under the project window.
Note: As we program, ensure that you select save often. This can be done with the main page icon or main menu | Project | Save…
Artificial Intelligence (AI) for programming ST PLC Structured Text code
Generative artificial intelligence (AI) can be used to create sample programs using ST. This is because ST is a structured language that follows a set of rules and guidelines, making it an ideal candidate for machine learning algorithms. ChatGPT is a powerful AI tool that can generate code in ST for a Start Stop circuit.
We can ask ChatGPT to “Create an ST plc program for a start-stop circuit.”
ChatGPT will respond with the following sample logic. This is very good to learn the structure methods of programming structured text in the PLC.
We can ask ChatGPT to “Create an ST plc program with green normally open and red normally closed pushbuttons. When the green pushbutton is pushed and not the red pushbutton, the green LED light will come on, and the red LED will be off. If the green LED light is on, the red LED is off, and vice versa.”
This is a little more detailed about what we are trying to accomplish with our ST PLC program.
GreenButton and RedButton) and two LED outputs (GreenLED and RedLED).Once we understand the structured text (ST) programming, we can program our PLC.
Create the Structured Text Program (XGB PLC)
Paste the sample structured text code that ChatGPT created in the program window.
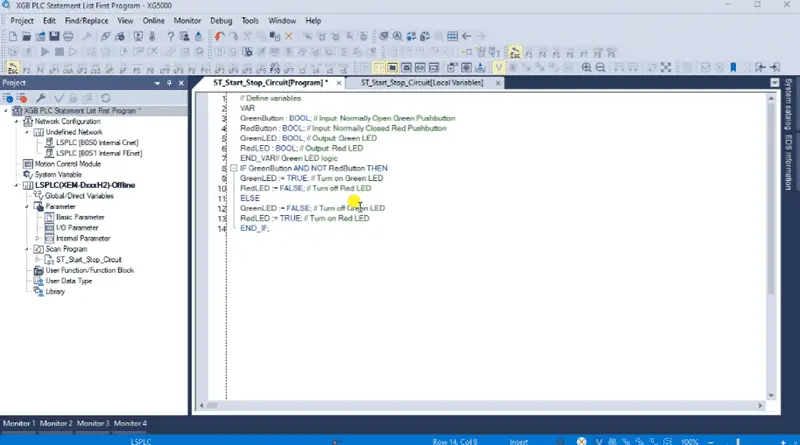
The program structured text code variables are entered in the local variables for the XG5000 programming software.
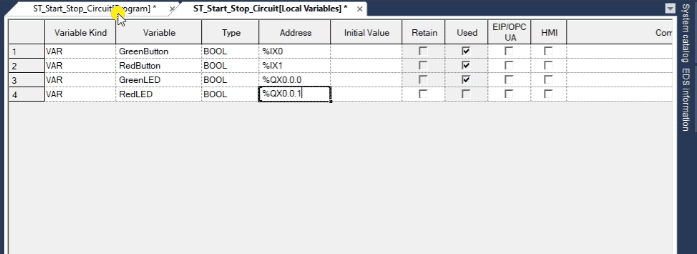
Enter the variables in this window for our sample code.
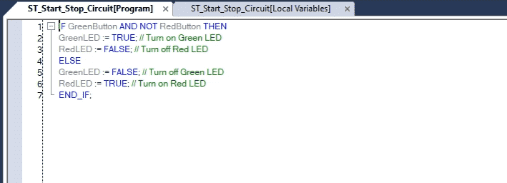
We will now remove the variable section in the AI-generated code.
IF GreenButton AND NOT RedButton THEN
GreenLED := TRUE; // Turn on Green LED
RedLED := FALSE; // Turn off Red LED
ELSE
GreenLED := FALSE; // Turn off Green LED
RedLED := TRUE; // Turn on Red LED
END_IF;
Save the program.
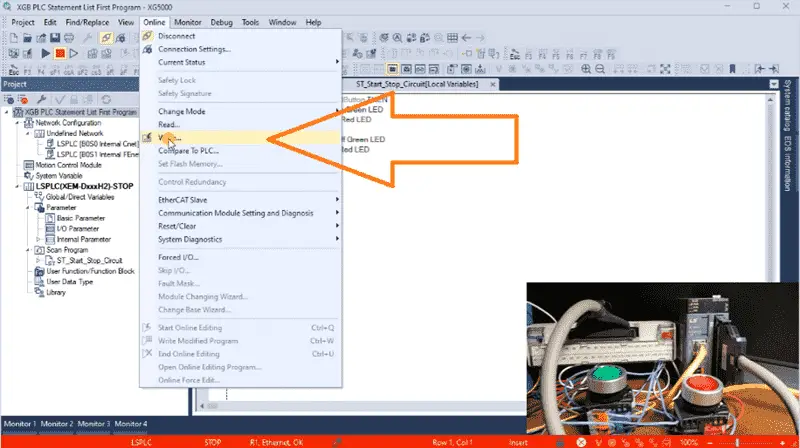
Check the program syntax by selecting the main menu | View | Check Program…

Note: Since ST programming duplicates outputs, we will disable this warning option when checking the program.
Watch the video below to see the program check.
Transfer the Program
We will transfer the structured text (ST) program to our XGB PLC.
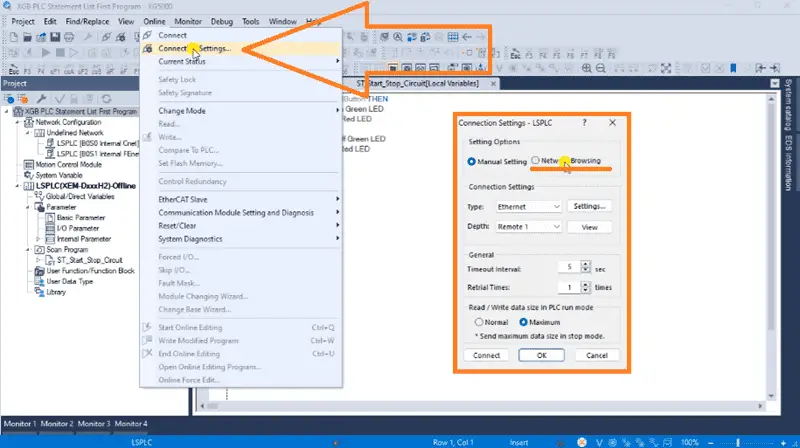
Select Connection Settings from the main menu | Online. The connection settings window will now be displayed.
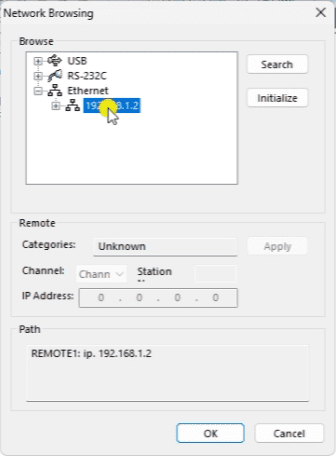
Since we do not know the IP address of the XGB PLC, select network browsing. On the network browsing window, expand the Ethernet option. This will instruct the software to look out onto the network and report back all of the IP addresses for the PLCs connected. Select the one found and select OK.
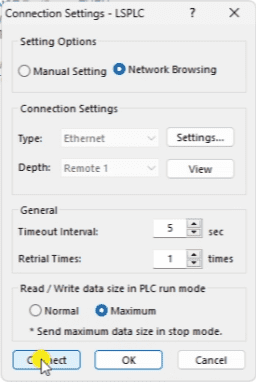
Returning to the connection setting window, we can now select connect.
The bottom of the XG5000 software will show red, indicating that the PLC has stopped scanning the program. It could also be green, indicating that the PLC is running and scanning the program.
Select Write… from the main menu | Online. The write-to PLC window will be displayed.
We will leave everything as their default and select OK.
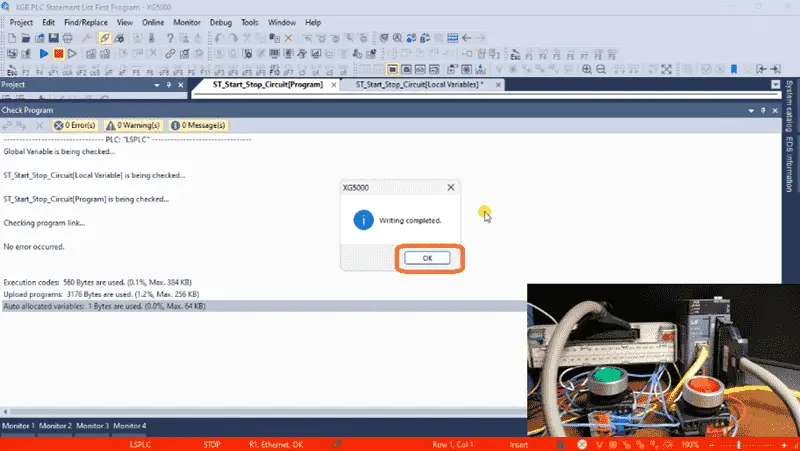
Our program will now transfer to the XGB PLC. Messages will indicate if any errors have occurred and when the writing is complete. Select OK.
Watch the video below to see the program transfer to the XGB PLC.
Monitor the Program
Once connected to the PLC, change the controller’s mode to RUN. This will execute our structured text code.
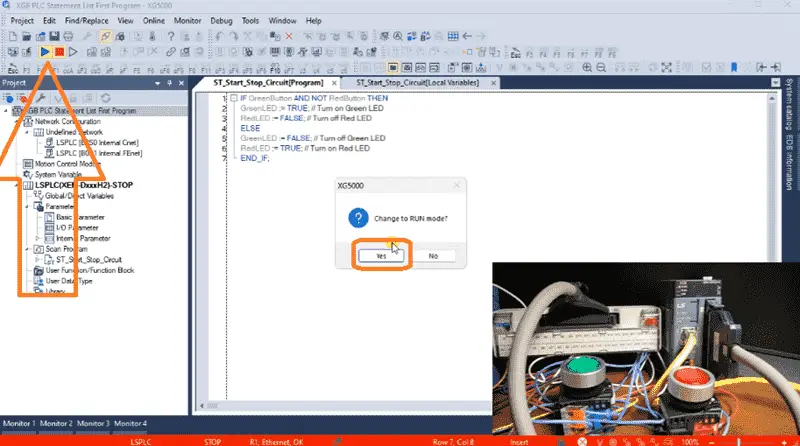
Select the run icon on the main menu. A message will be displayed asking if you want to change to run mode. Select Yes.
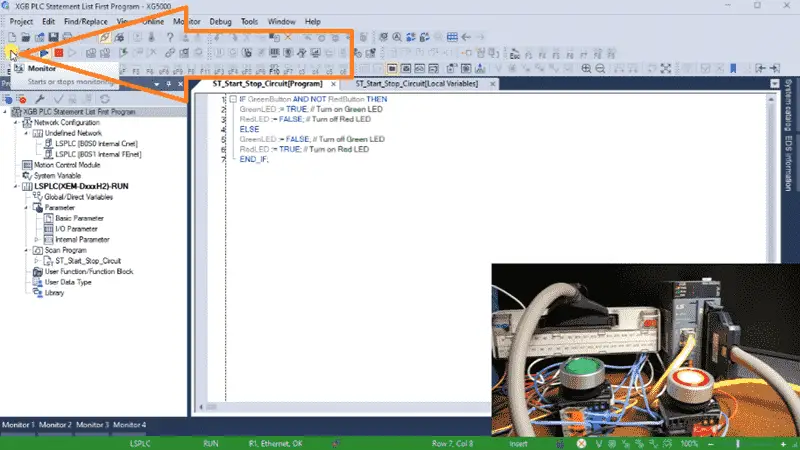
Our program is now running. Select the monitor icon on the main menu to monitor our structured text in the XG5000 programming software.
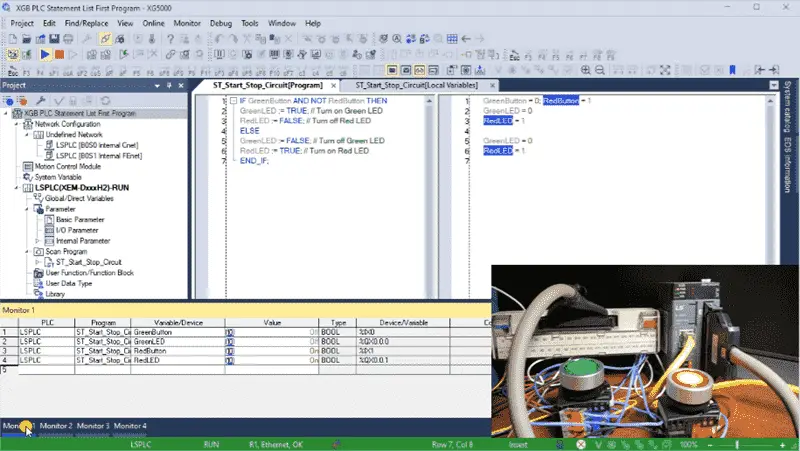
Use the monitor list to view the variables. An easy way to add the variables to the monitor list is to select the structured text or variables. Then select Add from the main menu | Monitor | Add to variable monitor…
Your selected variable will now be displayed.
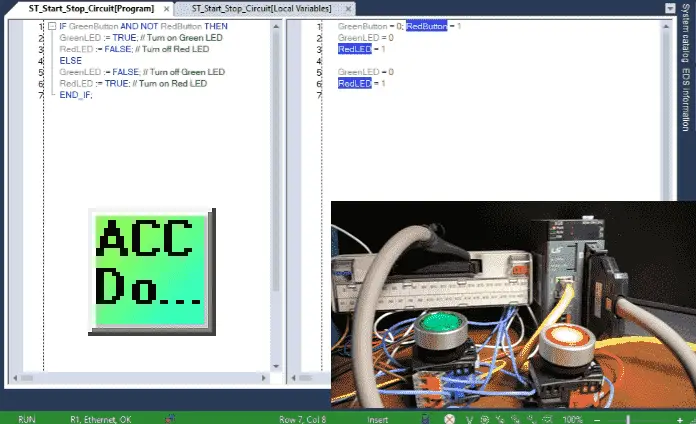
Operate the pushbuttons to ensure that our start-stop circuit is working as expected. We can monitor the conditions on the structured text and the “Monitor 1” display. This lets us catch any errors or issues before commissioning the PLC in the field.
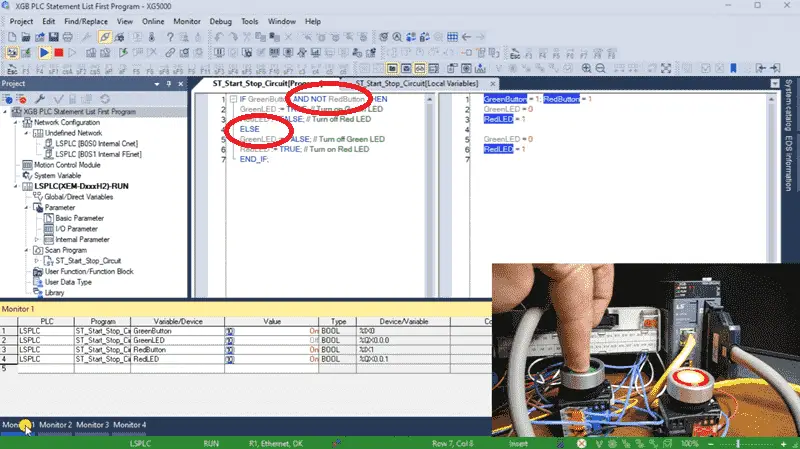
Our AI program is not working as expected because the RedButton is wired normally closed, so we need to remove the NOT condition. If the RedButton is not on, the GreenLED is off, and the RedLED is on. We must also consider when the PLC first powers up, and both outputs will be off. We can add the not GreenLED to when we turn on the RedLED.
Online Editing and Testing the ST Program
Online editing can be used to modify and test our ST program. Three icons are used for online editing: Start/Stop, Write, and End.
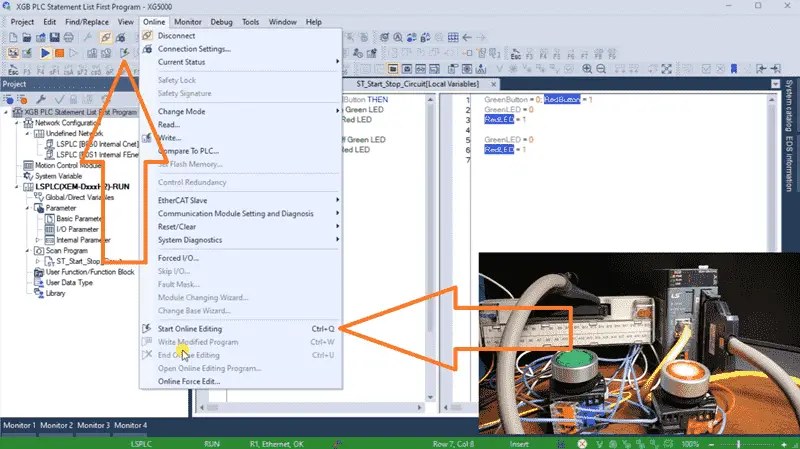
They are located under the main menu | Online or icons on the main menu.
Select the Start/Stop online editor or select Ctrl + Q.
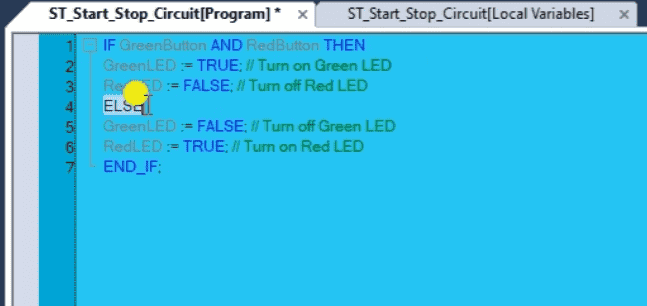
Remove the NOT condition from the first line of the RedButton.
Change the ELSE line to ELSIF NOT RedButton OR NOT GreenLED THEN. This will ensure that the GreenLED will be kept on until the RedButton or GreenLED is not on.

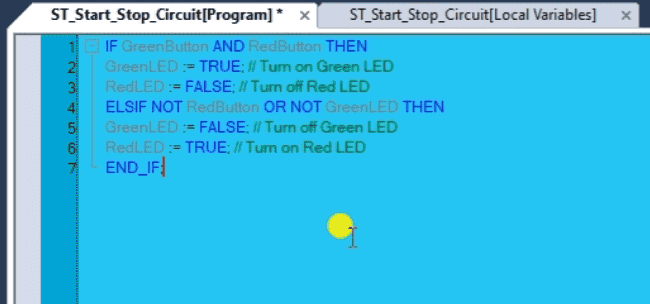
Here is our program.
IF GreenButton AND RedButton THEN
GreenLED := TRUE; // Turn on Green LED
RedLED := FALSE; // Turn off Red LED
ELSIF NOT RedButton OR NOT GreenLED THEN
GreenLED := FALSE; // Turn off Green LED
RedLED := TRUE; // Turn on Red LED
END_IF;
Select the Write Modified Program (Ctrl + W) icon to transfer our program into the XGB PLC.

Select the End Online Editing (Ctrl + U) icon to stop editing our structured text code.
Note: The blue vertical indication on the structured text code represents that we are online editing. The code in blue means this is different from the code in the controller. Watch the video below to learn how to use online editing in the XGB PLC.
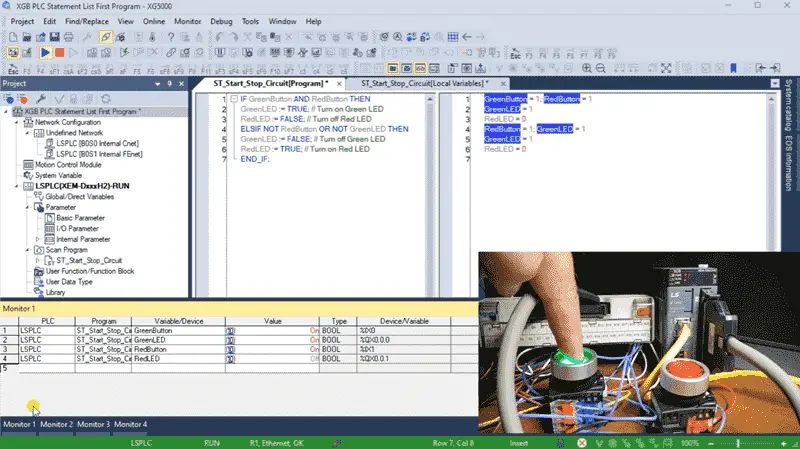
Operate the pushbuttons to ensure that our start-stop circuit is working as expected. Monitor the conditions on the structured text and the “Monitor 1” display.
Programming an XGB PLC using structured text (ST) offers a powerful and flexible approach to designing control logic for industrial automation applications. By mastering the syntax and structure of Structured Text, understanding the control requirements, optimizing code efficiency, and implementing error-handling mechanisms, you can develop robust and reliable control programs for XGB PLCs. With continuous learning and adaptation to new technologies, you can leverage structured text programming to create innovative industrial automation and control systems solutions. The XG5000 programming software allows you to troubleshoot with visual queues and aids quickly. This is unique to structured text programming in the XGB PLC.
Now that you know how to program the XGB PLC using Structured Text Click here to practice your knowledge using the free PLC simulator in the XG5000 programming software.
Click here for the entire XGB PLC series on our ACC Automation website.
Download the Start Stop Circuit Sample Program and try it yourself. Let me know how you make out in the comments below.
Watch on YouTube: XGB PLC Structured Text First Program
LS XGB PLC Additional Information:
LS XGB PLC – Series
– FAQ – Frequently Asked Questions
Product Cut Sheet (XEM-DN32H2 Unit Specifications)
LS PLC Technical Specifications
Manuals:
Interactive Guide
LS PLC User Manual
Other Documents:
PLC Installation Guide
Product Brochure
PLC Statement of Direction
Software and Support:
XG5000 / XG-PM PLC Programming Software
XEM PLC Firmware
Quick Start Procedures
XEM Pulse Servo Wiring Diagrams
Example Applications Directory
If you have any questions or need further information, please contact me.
Thank you,
Garry
If you’re like most of my readers, you’re committed to learning about technology. Numbering systems used in PLCs are not challenging to know and understand. We will walk through the numbering systems used in PLCs. This includes Bits, Decimals, Hexadecimal, ASCII, and Floating Points.
To get this free article, subscribe to my free email newsletter.
Use the information to inform other people how numbering systems work. Sign up now.

The ‘Robust Data Logging for Free’ eBook is also available for free download. The link is included when you subscribe to ACC Automation.