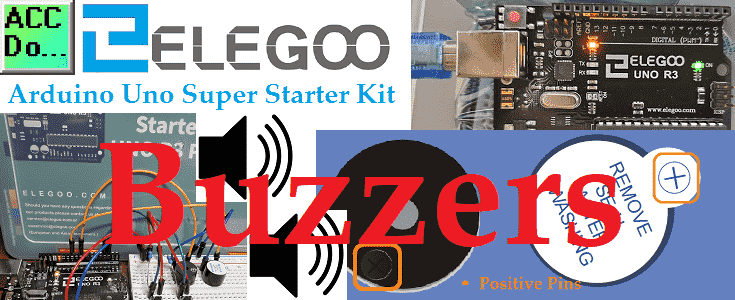
We will now look at active and passive buzzer outputs on our Arduino UNO controller. Electronic buzzers are DC-powered and equipped with an integrated circuit. They are widely used in computers, printers, photocopiers, alarms, electronic toys, automotive electronic devices, telephones, timers, and other electronic products for voice devices. Buzzers can be categorized as active and passive. Turn the pins of two buzzers face up. The one with a green circuit board is a passive buzzer, while the other enclosed with black tape is an active one.
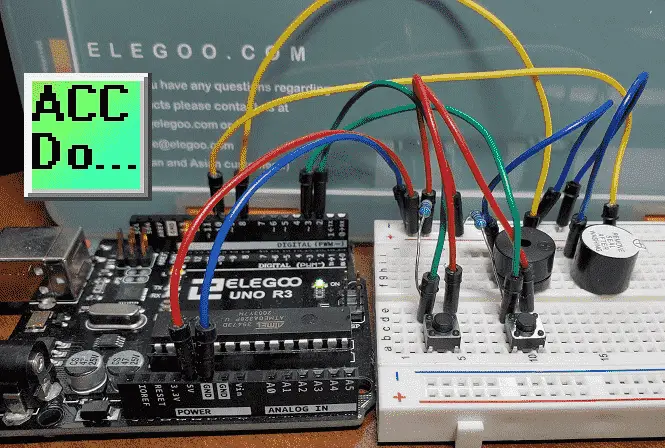
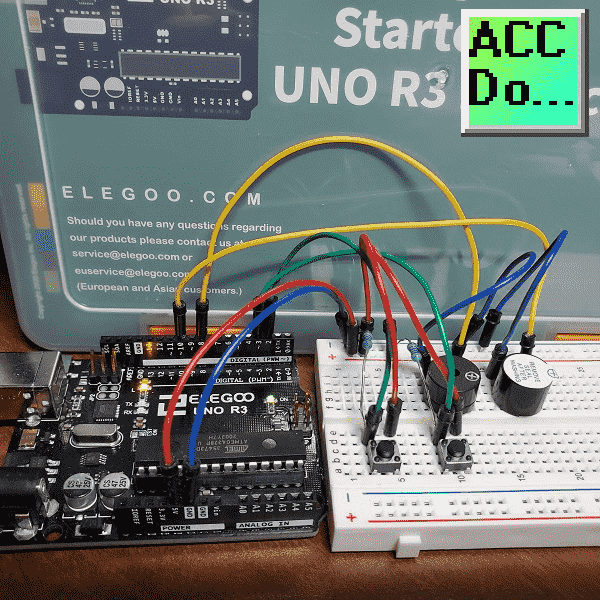
We will be wiring passive and active buzzers to our Arduino UNO R3 controller on our super starter kit. Two pushbuttons with pull-down resistors will control the buzzers. Pressing the first button will play a melody on the passive buzzer. A two-tone alarm will sound using the active buzzer when the other push button is selected. Let’s get started.
A full list of posts in this series can be obtained at the following location:
Arduino Uno Software Super Starter Kit
Previous posts in this Arduino Uno Super Starter Kit Series:
Hardware and Powering – Video
Software – Video
LEDs – Video
Digital Inputs – Video
Analog Inputs – Video
Watch the video below of the operation of active and passive buzzers with our Arduino Uno Kit. Elegoo Super Starter Kit UNO R3.
Active Versus Passive Buzzer
The difference between the two is that an active buzzer has a built-in oscillating source, so it will generate a sound when electrified. A passive buzzer does not have such a source so it will not sound if DC signals are used; instead, you need to use square waves whose frequency is between 2K and 5K to drive it.
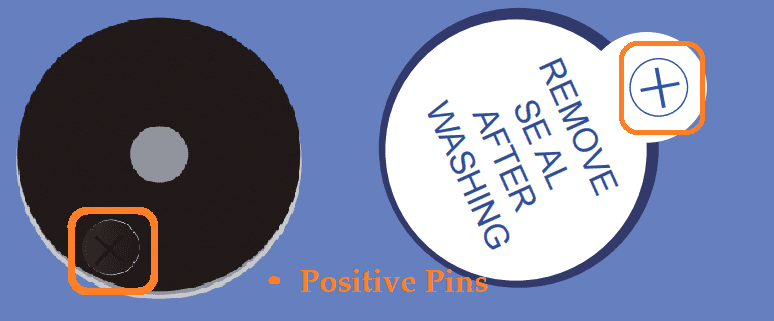
The active buzzer is often more expensive than the passive one because of multiple built-in oscillating circuits. The following posts will explain in more detail.
Active vs. Passive Buzzer: The Differences
Buzzer Basics – Technologies, Tones, and Drive Circuits
Wiring Buzzers to our Arduino UNO
Our passive buzzer will be wired to pin 8 and the active buzzer will be wired to pin 10. The push-button inputs will be wired to pin 2 and 3.
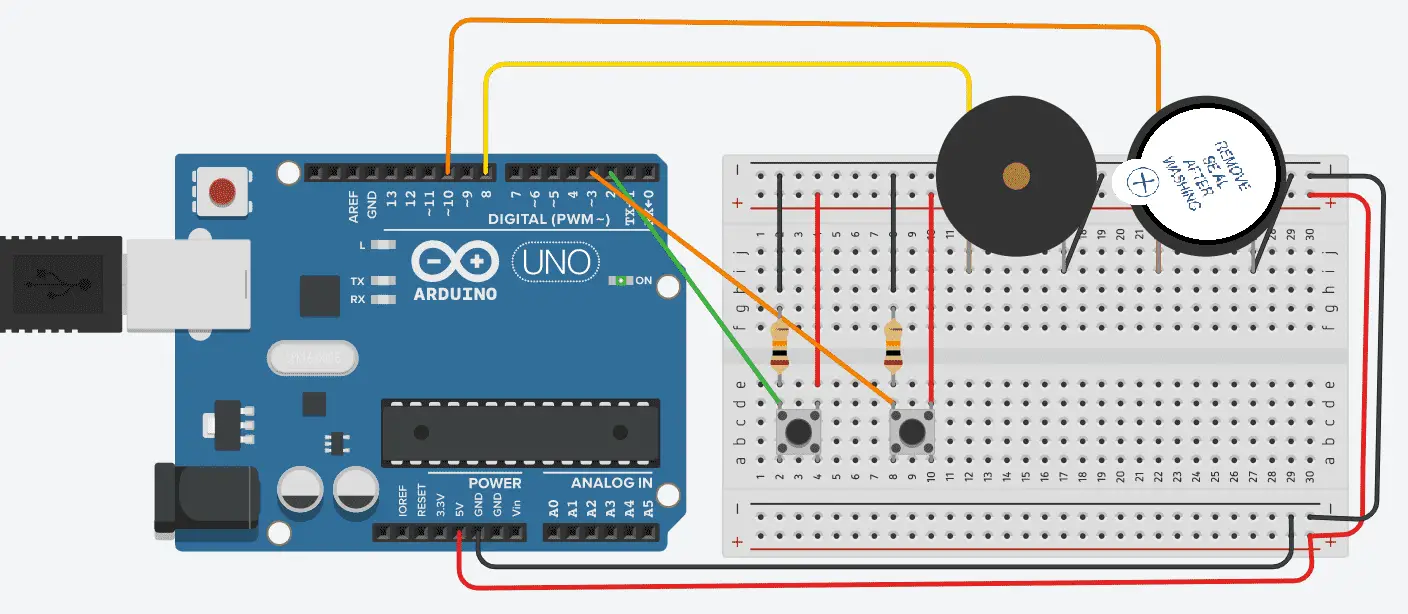
Push buttons will use a pull-down resistor so the push button will be high when pressed. In the normal state, they are low.
Arduino UNO Active and Passive Buzzer Program
This sketch (program) will play a melody when the first push-button is pressed. This will use a passive buzzer. A two-tone alarm will sound when the second button is pressed using an active buzzer.
/*
ACC Automation
https://accautomation.ca/
*/
/*-----( Import needed libraries )-----*/
/*-----( Declare Constants and Pin Numbers )-----*/
#define NOTE_C4 262
#define NOTE_G3 196
#define NOTE_A3 220
#define NOTE_B3 247
#define NOTE_C4 262
// notes in the melody: Pin 8 - Passive Buzzer
int melody[] = {
NOTE_C4, NOTE_G3, NOTE_G3, NOTE_A3, NOTE_G3, 0, NOTE_B3, NOTE_C4
};
// note durations: 4 = quarter note, 8 = eighth note, etc.:
int noteDurations[] = {
4, 8, 8, 4, 4, 4, 4, 4
};
int melodyButton = 2; // Pull down resistor - Press to play melody
int buzzer = 10;//the pin of the Active buzzer
int activeBuzzerButton = 3; // Pull down resistor - Press to signal Active Buzzer
/*-----( Declare objects )-----*/
/*-----( Declare Variables )-----*/
void setup() /****** SETUP: RUNS ONCE ******/
{
pinMode(melodyButton, INPUT);
pinMode(buzzer,OUTPUT);//initialize the buzzer pin as an output
pinMode(activeBuzzerButton, INPUT);
}
void loop() /****** LOOP: RUNS CONSTANTLY ******/
{
if (digitalRead(melodyButton) == HIGH) {
// Play melody
for (int thisNote = 0; thisNote < 8; thisNote++) {
// to calculate the note duration, take one second
// divided by the note type.
//e.g. quarter note = 1000 / 4, eighth note = 1000/8, etc.
int noteDuration = 1000 / noteDurations[thisNote];
tone(8, melody[thisNote], noteDuration);
// to distinguish the notes, set a minimum time between them.
// the note's duration + 30% seems to work well:
int pauseBetweenNotes = noteDuration * 1.30;
delay(pauseBetweenNotes);
// stop the tone playing:
noTone(8);
}
}
unsigned char i; //Frequency buzzer output variable
//Active Buzzer
if (digitalRead(activeBuzzerButton) == HIGH) {
//output frequency
for(i=0;i<80;i++)
{
digitalWrite(buzzer,HIGH);
delay(1);//wait for 1ms
digitalWrite(buzzer,LOW);
delay(1);//wait for 1ms
}
//output another frequency
for(i=0;i<100;i++)
{
digitalWrite(buzzer,HIGH);
delay(2);//wait for 2ms
digitalWrite(buzzer,LOW);
delay(2);//wait for 2ms
}
}
}
The above Arduino program sketches can be downloaded here.
Watch the video below for the operation of the buzzers on our Arduino Uno Super Starter Kit.
Elegoo Links:
Service
service@elegoo.com (USA and Canada)
EUservice@elegoo.com (Europe)
Arduino Compatible Links:
Product Hardware
Elegoo UNO Project Super Starter Kit
Elegoo Download Page
Amazon.com
Amazon.ca
Software
– Arduino IDE (Integrated Development Environment)
– Productivity Blocks (Development Timesaver)
– Productivity Blocks Documentation (Wiki)
Community
– Arduino Blog
– Arduino Forum
– Arduino UNO Facebook
Next time we will look at the tilt ball switch from our Arduino Elegoo super starter kit UNO R3.
Watch on YouTube: Arduino Uno Super Starter Kit Buzzers
If you have any questions or need further information please contact me.
Thank you,
Garry
If you’re like most of my readers, you’re committed to learning about technology. Numbering systems used in PLC’s are not difficult to learn and understand. We will walk through the numbering systems used in PLCs. This includes Bits, Decimal, Hexadecimal, ASCII, and Floating Point. To get this free article, subscribe to my free email newsletter.
Use the information to inform other people how numbering systems work. Sign up now. The ‘Robust Data Logging for Free’ eBook is also available as a free download. The link is included when you subscribe to ACC Automation.