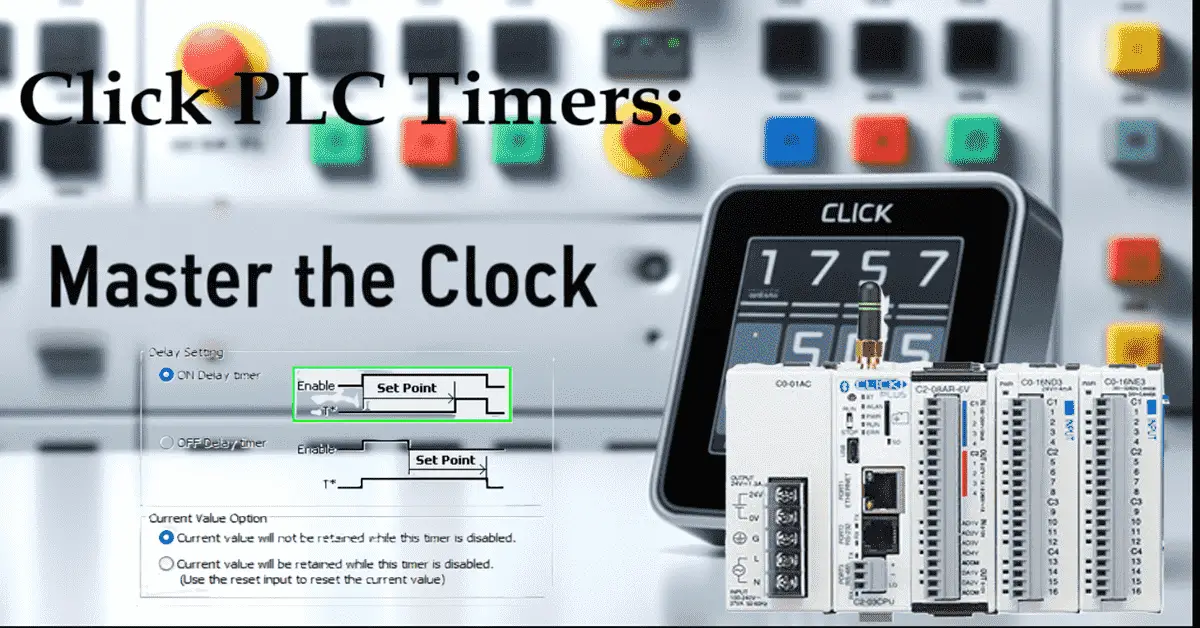
Master the Clock: Orchestrating Automation with Click PLC Timers.
The hum of the conveyor belt was off. Not entirely stopped, but hesitant. Mark, a veteran automation engineer, frowned as his eyes scanned the control panel of the small packaging plant. “Another bottleneck,” he muttered, running a hand through his already disheveled hair. The current system, a patchwork of older relays and basic logic, was notorious for its timing issues. Packages would sometimes pile up, and others would fly off the line too fast. It was chaos.
He’d recently convinced the plant manager to invest in a Click PLC. A compact, powerful little brain for their operation. Now, it was up to Mark to tame the beast of timing. He knew his secret weapon would be the Click PLC’s timers.
Timers are fundamental to automation, allowing you to control sequences, introduce delays, and manage event durations. If you’re working with a Click PLC, understanding how to implement timers effectively will unlock a whole new level of control for your projects.
We’ll delve into the various types of timers available in the Click PLC and walk through practical examples of how to utilize them. Let’s see how Mark does it!
Previously, we installed the Click PLC Programming Software, updated the Firmware on the Click PLUS PLC, and created a sample program to test the inputs and outputs.
Video: FREE CLICK PLC Software: Is It REALLY That Easy?
We then assigned a static IP to CLICK PLUS PLC easily! Video
Our entire Click series can be found here.
All of the previous information for the Click PLC can be applied to the Click PLUS.
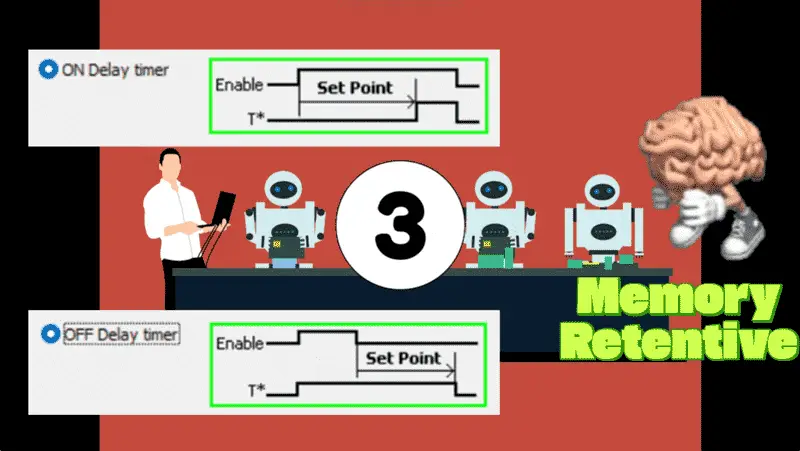
The Three Musketeers of Time
Mark remembered his old instructor’s analogy: “Think of timers as the three musketeers of your PLC: On-Delay, Off-Delay, and Retention.” We can build anything with these three key aspects of a timer.
- On-Delay: “This is our gatekeeper,” he thought. “It waits patiently before opening the gate.” Perfect for when he needed a delay before something happened, like ensuring a box was perfectly centered before the robotic arm descended.
- Off-Delay: “And this one,” he mused, “is like a stubborn guest. It lingers even after you’ve asked it to leave.” Ideal for keeping something running for a short time after the main signal disappears, such as a cooling fan.
- Retentive: “Ah, the persistent one,” he smiled. “It remembers where it left off, even if you interrupt it.” Retention could be used for both the on and off delay timers. This was crucial for their batch processing, where the system might pause but needed to resume counting from exactly where it stopped.
He also knew the critical pieces of information for every timer:
The Input (IN) to start it. This is the condition of the rung to start and stop the timer.
The Set Point (SP) or Preset Time (PT) indicates the duration for which it should count. Base rates can vary from milliseconds to days.
The Current Value (CV) or Accumulated Time (ACC) shows its progress. This shows how much time has expired.
Finally, most importantly, the Timer Bit or Timer Done Bit (TD) – the signal that told the rest of the PLC, “I’m done waiting!” This is just an on or off signal.
Building the Rhythm: Mark’s First Timer Program
Mark fired up the Click PLC programming software, a familiar hum from his workstation. There is only one timer instruction in the Click PLC instruction set; however, it can be configured to run in various ways. He started with the most pressing issue: the conveyor. It needed to pause for exactly 3 seconds to allow a sensor to register a product before the next section started.
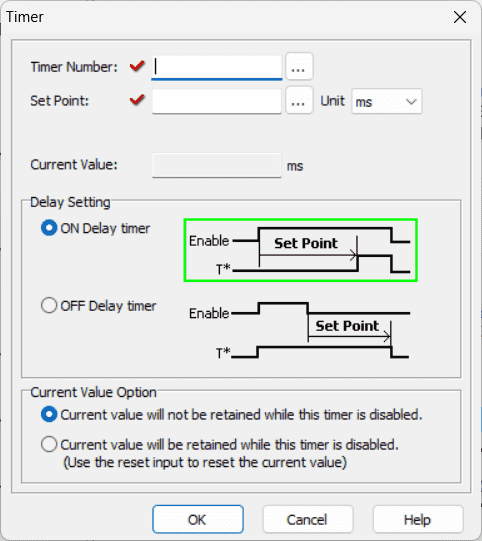
He dragged a Timer instruction onto the ladder logic rung. This will be set for an On-Delay Timer. He labeled it T1 and, remembering the Click’s millisecond default time base, entered 3000 for a 3-second delay. The input would be the sensor detecting a product at the end of the first conveyor section, which we will refer to as X201.

On a new rung, he used T1 (Timer 1 Done) to enable the next section of the conveyor, which outputs Y101.
He uploaded the program. The conveyor ran, X201 detected a product, and for a smooth 3 seconds, the next section held. Then, click ”101 engaged,’‘and the product moves on. No more pile-ups. A small victory, but a significant one.
The Fan That Lingered: An Off-Delay Application
Next, the cooling fan for a heat-sealing machine. It needed to run for 10 seconds after the machine itself turned off to dissipate residual heat. This was a job for an Off-Delay Timer.
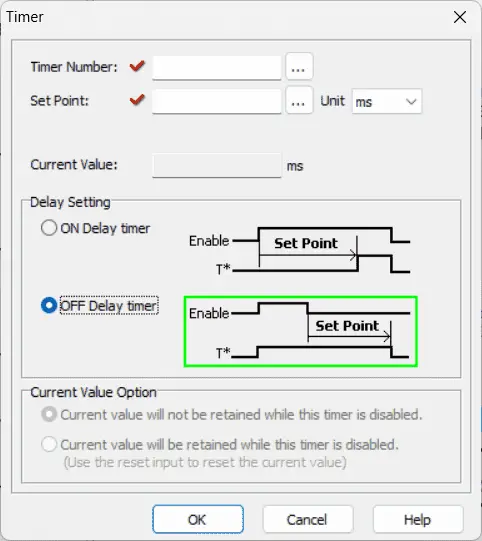
He used the machine’s input signal, X202, as the input to the TOF timer T2. He set the preset to 10000 for 10 seconds. The magic of the TOF was that its output would stay on for the preset time after X2 went off. He connected this directly to the fan, Y102.
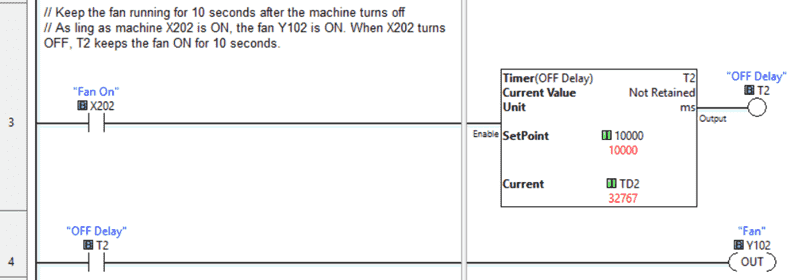
He tested it. Machine on, fan on. The machine shut off, and the fan whirred for precisely 10 more seconds before shutting down gracefully. Perfect.
The Unstoppable Pump: A Retentive Solution
The trickiest part was the batch mixing. They needed to pump a precise amount of liquid, with a total pump run time of 15 seconds. But sometimes, due to other processes, the pump would have to pause mid-cycle. With a regular timer, the count would reset. Not good. This was a job for the Retentive On-Delay Timer.
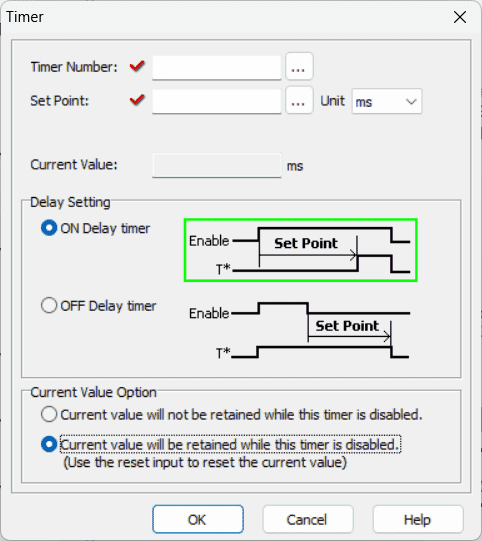
Mark assigned T3 a preset of 15000 (15 seconds) and checked the “Current value will be retained” option. The pump’s start signal, X203, would be the input.
But what if they needed to start a fresh batch? The retentive on-delay timer would remember its old count. He needed a way to reset it. A simple reset button, X204, linked to the reset of the timer instruction, would do the trick. The click PLC programming software is intuitive enough to know that if the timer’s current value is retained, a reset input is required.
Code snippet
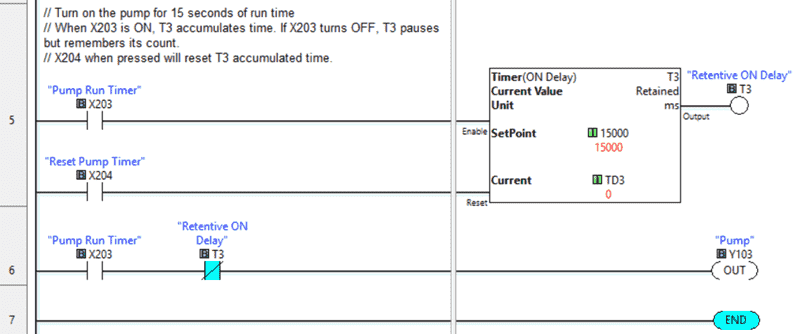
In this case, Mark wanted the pump to be on when X203 is on and accumulate for 15 seconds. On the output rung, he used the X203 input and not the T3. And just like the on-delay timer, the T3 bit would turn on, which would stop the actual pump, Y103. This indicates that the time has elapsed.
Mark leaned back, a satisfied grin spreading across his face. The once-erratic production line now moved with a new rhythm, orchestrated by the precise timing of the Click PLC. The plant manager walked by, noticing the smooth operation. He gave Mark a nod and a thumbs-up.
Mark thought about timers for longer or more complex sequences. We can just cascade timers. The timer done bit can trigger another timer. Cascade timers are something to think about for the future…
“It’s about mastering the clock, ” Mark thought, watching the perfectly spaced packages move down the line. With the Click PLC and its versatile timers, he hadn’t just fixed a problem; he’d brought harmony to the entire process.
Are there any timing challenges in your automation projects that require special attention?
Do you have any specific timer applications you’re working on? Please share them in the comments below!
Learn more about how to design, build, and program your own Click PLC system with confidence by clicking here. Click here to see how you can learn PLC programming using the Machine Simulator by Nirtec. This will provide machine scenes that you can program.
Download the Click PLC Timer Program here.
Watch on YouTube: Master the Clock: Using Timers in the Click PLC
Our entire series on the Click PLC can be found here.
The Click PLC can be programmed using free Click programming software from Automation Direct.
Here is a link to the software. Version 3.70
The entire Click PLC series before the Click PLUS release can be found here.
All previous posts and information are still valid with the Click PLC lineup.
YouTube Click Playlist
YouTube Click PLUS Playlist
Click and Click PLUS PLC Overview
Click and Click PLUS PLC Videos from Automation Direct
If you have any questions or require further information, please don’t hesitate to contact me.
Thank you,
Garry
If you’re like most of my readers, you’re committed to learning about technology. The numbering systems used in PLCs are not difficult to understand. We will walk through them, including Bits, Decimal, Hexadecimal, ASCII, and Floating Point.
To get this free article, subscribe to my free email newsletter.
Use the information to educate others on how numbering systems work.
Sign up now.

The ‘Robust Data Logging for Free’ eBook is also available as a free download. The link is included when you subscribe to ACC Automation.