Arduino programs (sketches) can be written in thousands of different ways. The best Arduino program control will be determined by the purpose of your program and what you are trying to accomplish. To simplify the logic we will be looking at program control that can be achieved using productivity blocks.
Program control will look at subroutines (sometimes referred to as methods or functions), conditional statements, and looping statements. These three items can be combined to reduce your code length, make your program easier to read, and in turn easier to troubleshoot.
We will be looking at each of these instructions that are available using productivity blocks. A sample program will then be discussed that will contain some program control as a demonstration. Let’s get started.
Previous posts in this Productivity Open Arduino Compatible Industrial Controller Series
A full list can be obtained at the following location:
Productivity Open (P1AM-100) Arduino Controller
Productivity Open Arduino Controller Hardware
– Starter Kit Unboxing Video
– Powering Up Video
Installing the Software – Video
First Program – Video
Program Structure – Video
Variables Data Types – Video
Serial Monitor COM – Video
Watch the video below to see the program control work on our productivity open industrial arduino controller.
Program Control
Arduino Subroutines
A subroutine is a list of commands to run in a sequence. Subroutines can be named and reused throughout a program to simplify a repeated task.
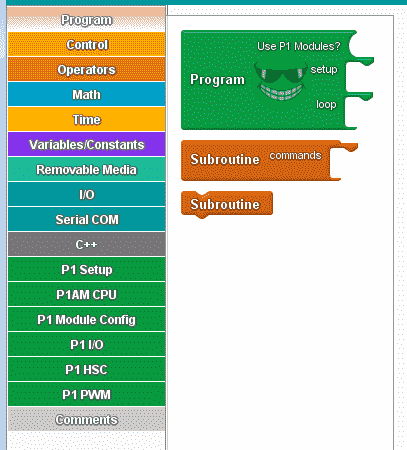
To create a subroutine, drag a ‘Subroutine’ block into the main canvas and connect the desired sequence of blocks under the ‘commands’ hook. To name a subroutine, click the text labeled ‘Subroutine’, then enter the desired name into the box.
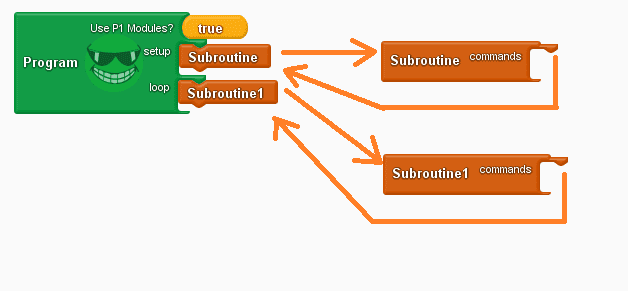
In our example above the program block, has a subroutine call in the setup. This will call the subroutine called “Subroutine” and execute the commands listed. It will then return control to the line under which it was called. Subroutine1 call is in the loop section. It will call ” Subroutine1″ and execute the commands in it and then return the control to the line under which it was called. This subroutine gets called every time through the loop.
Note: Subroutines must have unique names. The program will not verify if you have two subroutines called the same name.
Subroutine calls can be put in your program multiple times to call the same routine. In our example above, a Subroutine can be called in the loop to reinitialize the parameters that we did during the setup loop.
Arduino Conditional Statements
Conditional statements will only run the code when the condition is met.
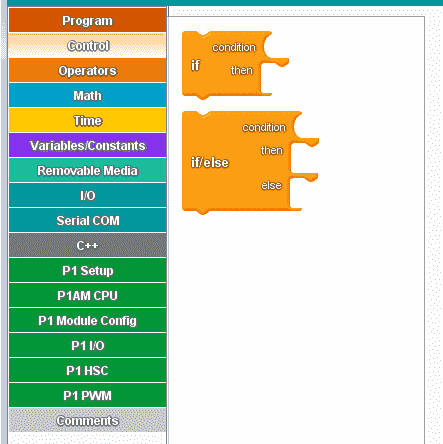
The if and if/else instruction work with a condition. The condition value can only be true/HIGH or false/LOW.
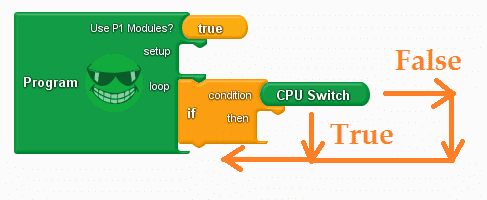
Looking at the if program above, when the CPU switch is on the commands under the then will be executed and then control is passed to the next instruction after the if. When the CPU switch is off, control is passed to the next instruction after the if. The instructions are not executed.
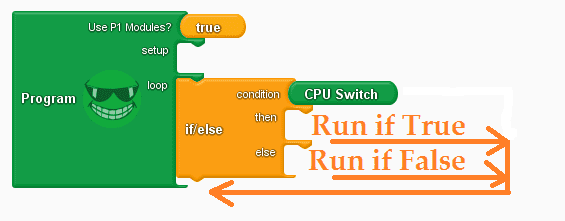
Looking at the if/else program above, when the CPU switch is on the commands under the then will be executed and then control is passed to the next instruction after the if/else. When the CPU switch is off the commands under the else will be executed and then control is passed to the next instruction after the if/else.
Note: The ‘condition’ must have a boolean block connected to it, otherwise the program will not be able to ‘verify’ or ‘upload’.
Arduino Looping Statements
Looping statements are useful for any repetitive operation. A given set of commands are repeated until a condition is false or the number of times through the loop has been achieved. The break block, within the loop, will end the loop cycle immediately.
We will be discussing the while and repeat loops separately, but remember they are part of the looping statements.

Two instructions are available for the while loop. (while / do-while) A condition must become false before the loop will finish. The difference between the while and do while is where the condition is within the instruction.
WHILE
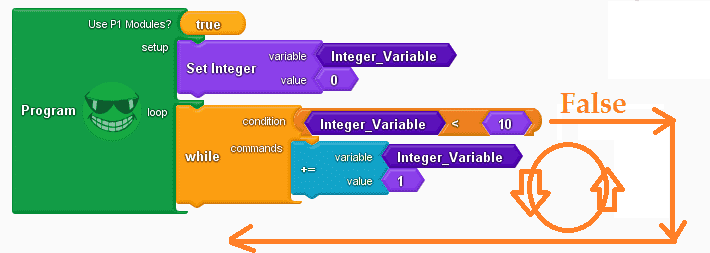
The setup loop will initialize the integer variable to 0. In our loop, the integer variable will be compared to less than 10. If this is true then the commands will be executed. The integer variable will be incremented by 1 and then loop back to check the condition. Once the integer variable has incremented to 10 then the condition is false and the program will then continue after the while instruction. The while loop will check the condition before executing the commands.
DO WHILE
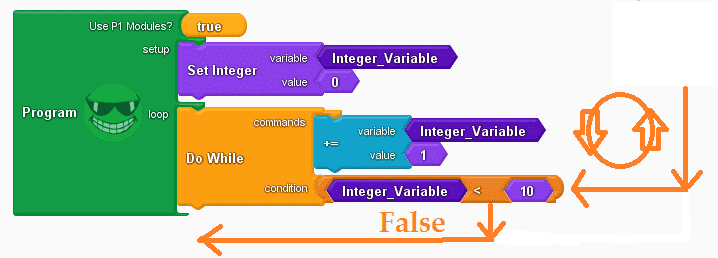
The setup loop will initialize the integer variable to 0. The commands will increment the integer variable by 1. The integer variable will then be compared to less than 10. If this is true then the commands will be executed until the loop condition is false. When the condition is false the program will then continue after the do while instruction. The next time through the loop the commands will be executed once before the condition is checked again. The do-while loop will run the commands at least once before checking the condition of the loop.
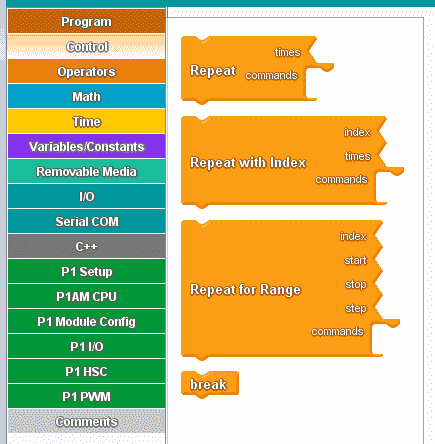
Three instructions are available for the repeat loop. (Repeat, Repeat with Index, Repeat for Range) In all cases, the loop will repeat for the given number of times.
REPEAT

The setup loop will initialize the integer variable to 0. The commands will be executed for the number of times indicated. In our case, the commands will be executed 10 times. After the loop, the control will return to the next instruction after the repeat. The integer variable will be 10 after the first time through the main loop. The next time will be 20, 30, 40, etc.
REPEAT WITH INDEX
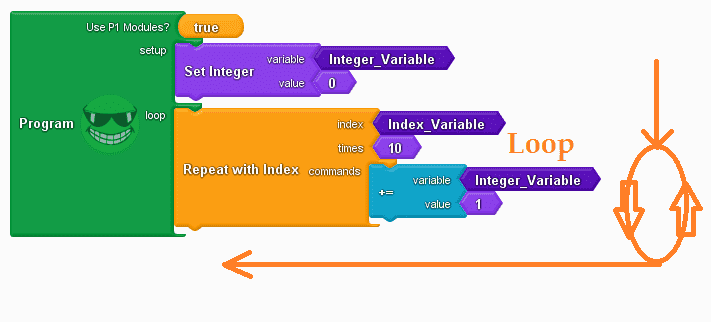
The setup loop will initialize the integer variable to 0. The commands will be executed for the number of times indicated. In our case, the commands will be executed 10 times. The index is a variable that will contain the current number of repeats through the loop. After the loop, the control will return to the next instruction after the repeat. The integer variable will be 10 after the first time through the main loop. The next time will be 20, 30, 40, etc.
REPEAT FOR RANGE
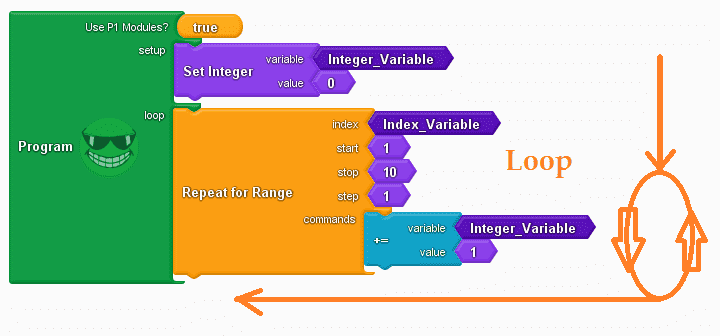
The setup loop will initialize the integer variable to 0. The commands will be executed for the number of times indicated. This instruction will allow us to specify the start, stop, and step for the loop. In our case, our start will be 1 and our stop will be 10. This will increment by 1 (step). The index is a variable that will contain the current number of repeats through the loop. After the loop, the control will return to the next instruction after the repeat. The integer variable will be 10 after the first time through the main loop. The next time will be 20, 30, 40, etc.
Arduino Sample Program Control
Let’s create a program that will use some of the following things that we have discussed above. The program will print to the monitor when the CPU switch is on. Numbers 1 to 10 will be printed once when the switch initially turns on.

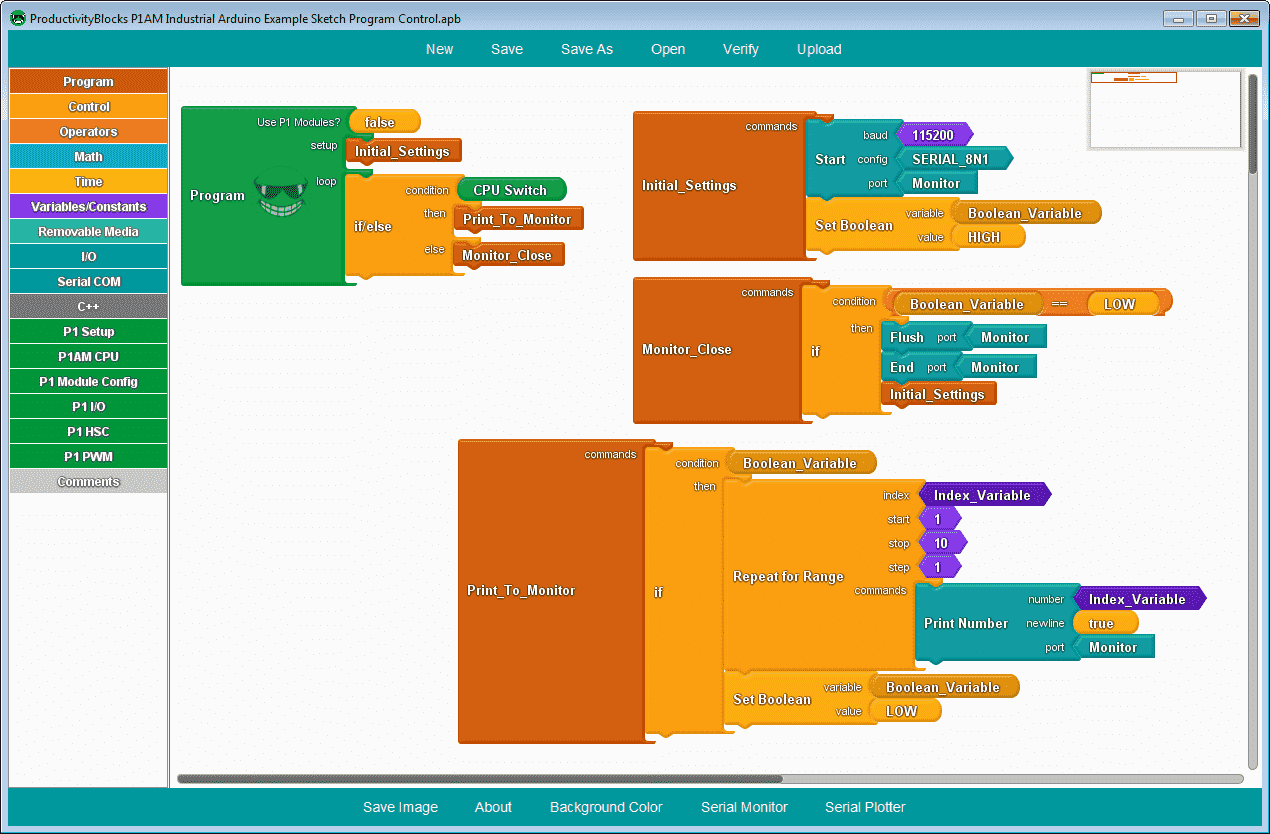
Here is our program structure. We run a subroutine called “Initial_Settings” in the setup part of the program. The loop will check the CPU Switch. If on then a subroutine called “Print_To_Monitor” is executed. When off the “Monitor_Close” subroutine is called. You can see that this program is very easy to understand. Now let’s look at each of the subroutines.
Initial Settings
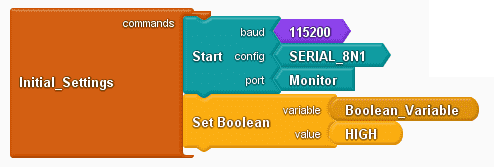
This subroutine will set the monitor serial port with the following configuration. It will then set a Boolean variable to high.
Print To Monitor
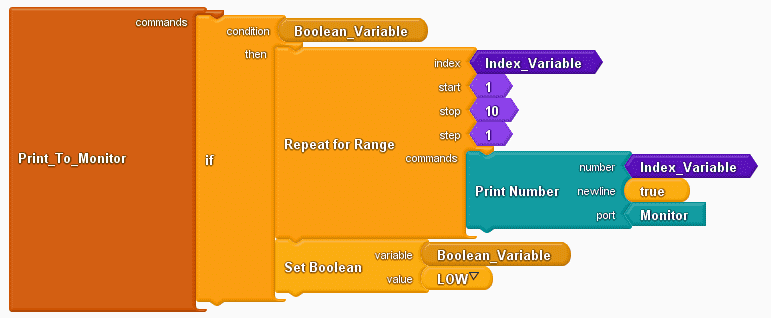
If the Boolean variable is high then the repeat for range instruction is executed. The loop will repeat from 1 to 10 in steps of 1. We then print the number of the index variable. This is the current step sequence of the loop. Once we have gone through the loop 10 times then the Boolean variable is set low. This will ensure that the printing will only happen once on the CPU switch transition.
Monitor Close
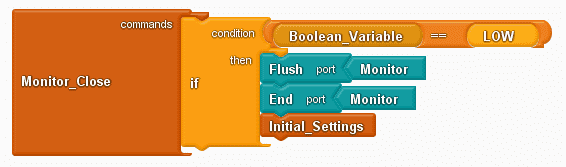
When the CPU switch turns off, this subroutine will execute. If the Boolean variable is low then we flush the serial monitor port. This just means that we wait for all of the communications to end before moving on to the next instruction. The end monitor port will close the serial communications. We then call subroutine initial settings. This will set up our serial monitor port again and turn the Boolean variable to high. This ensures that the “if instruction” will only execute once.
This is the entire program. You can see how easy it is to read how the program is running.
We can now save this productivity blocks program. Select the verify button to transfer the logic to the IDE (integrated development environment) C++ code.
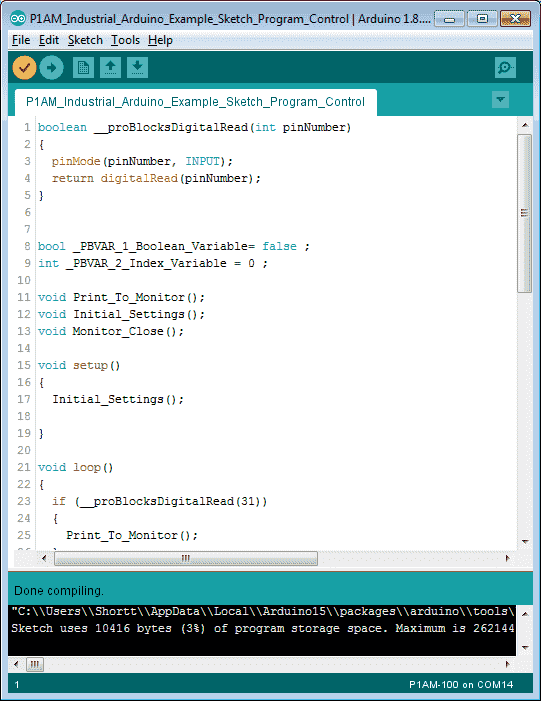
Our program will be converted and the C++ code will be verified. Select the upload button.
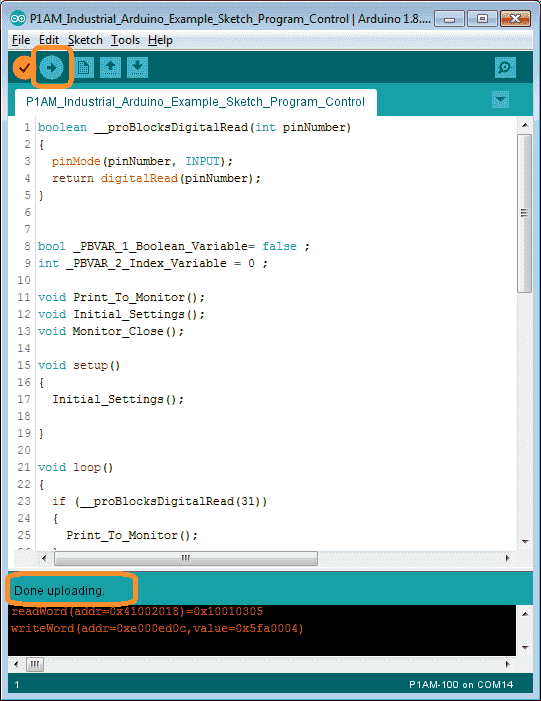
The source code will then be transferred to our P1AM industrial Arduino controller.

Select the serial monitor icon on the IDE.
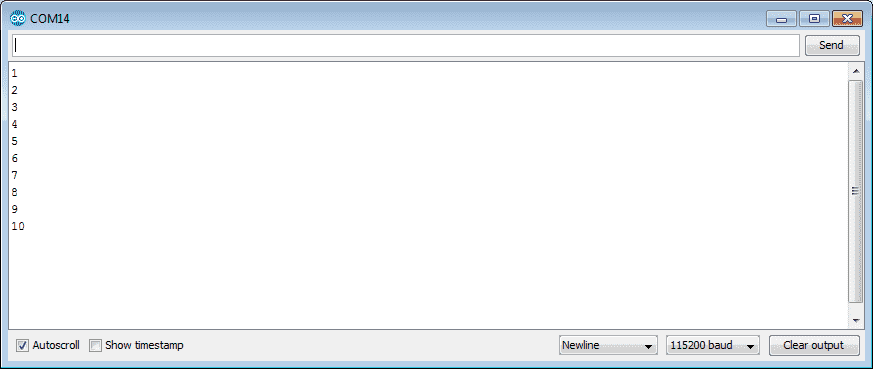
Ensure that the baud rate matches what we specified in our port setup. Run the program and turn on the CPU switch. Our program will function as expected and print the numbers from 1 to 10 on the screen.
Watch the video below to see our program working with our productivity open industrial arduino controller.
Download the P1AM-100 sample sketch and Productivity Block program here.
Productivity Open Arduino Compatible Links:
Product Hardware
– Productivity Open (Automation Direct)
– P1AM-100 Specifications
– Productivity Open User Manual
– Configure a Productivity Open Arduino-based Controller
– Open Source Controllers (Arduino-Compatible)
– Productivity Open Documentation (Facts Engineering)
– P1AM Design Files
Software
– Arduino IDE (Integrated Development Environment)
– P1AM-100 library (Easy Interface for controlling P1000 Modules)
– Productivity Blocks (Development Timesaver)
– Productivity Blocks Documentation (Wiki)
Community
– Automation Direct Forum – Open Source Devices
Next time we will look at operators in the P1AM-100 Arduino Industrial Controller.
Watch on YouTube: Productivity Open P1AM Industrial Arduino Program Control
If you have any questions or need further information please contact me. Thank you, Garry
If you’re like most of my readers, you’re committed to learning about technology. Numbering systems used in PLC’s are not difficult to learn and understand. We will walk through the numbering systems used in PLCs. This includes Bits, Decimal, Hexadecimal, ASCII and Floating Point. To get this free article, subscribe to my free email newsletter.
Use the information to inform other people how numbering systems work. Sign up now. The ‘Robust Data Logging for Free’ eBook is also available as a free download. The link is included when you subscribe to ACC Automation.