
The Horner APG XL4 all in one controller through the Ethernet port can set up a HTTP server. This HTTP (Hypertext Transfer Protocol) server can be used for distributed and controlled information presented to and from the controller to the network. The server can have security for the information presented. We use HTML (Hypertext Mark-up Language) on the server to create this Client / Server communication. Using the program on the process tank application we created previously, we will be controlling and displaying information to the network. A web browser on a computer, tablet, smart tv, or phone can be used to view and control this information in our Horner APG XL4 controller.
Previously we discussed the following in our Horner APG XL4 Series:
System Hardware
Installing the Software Cscape
Cscape Software Setup
Establishing Communication
Numbering System and Addressing
User Interface
Timers and Counters
Compare and Move Instructions
Math Instructions
Program Control Instructions
Rotate and Shift Register
Recipe Instruction
Report Generator
Modbus RTU Instructions
FTP File Transfer Protocol Server
What is HTTP? – Horner XL4 Web Server
HTTP (Hypertext Transfer Protocol) is a standard network protocol used for request-response in a client/server computer network. You have already seen this in your web browser address bar. (https://accautomation.ca/) It is the standard for the World Wide Web. When we specify a website, we are requesting information. The requested information and response all conform to the HTTP protocol.
What is HTML? – Horner XL4 Web Server
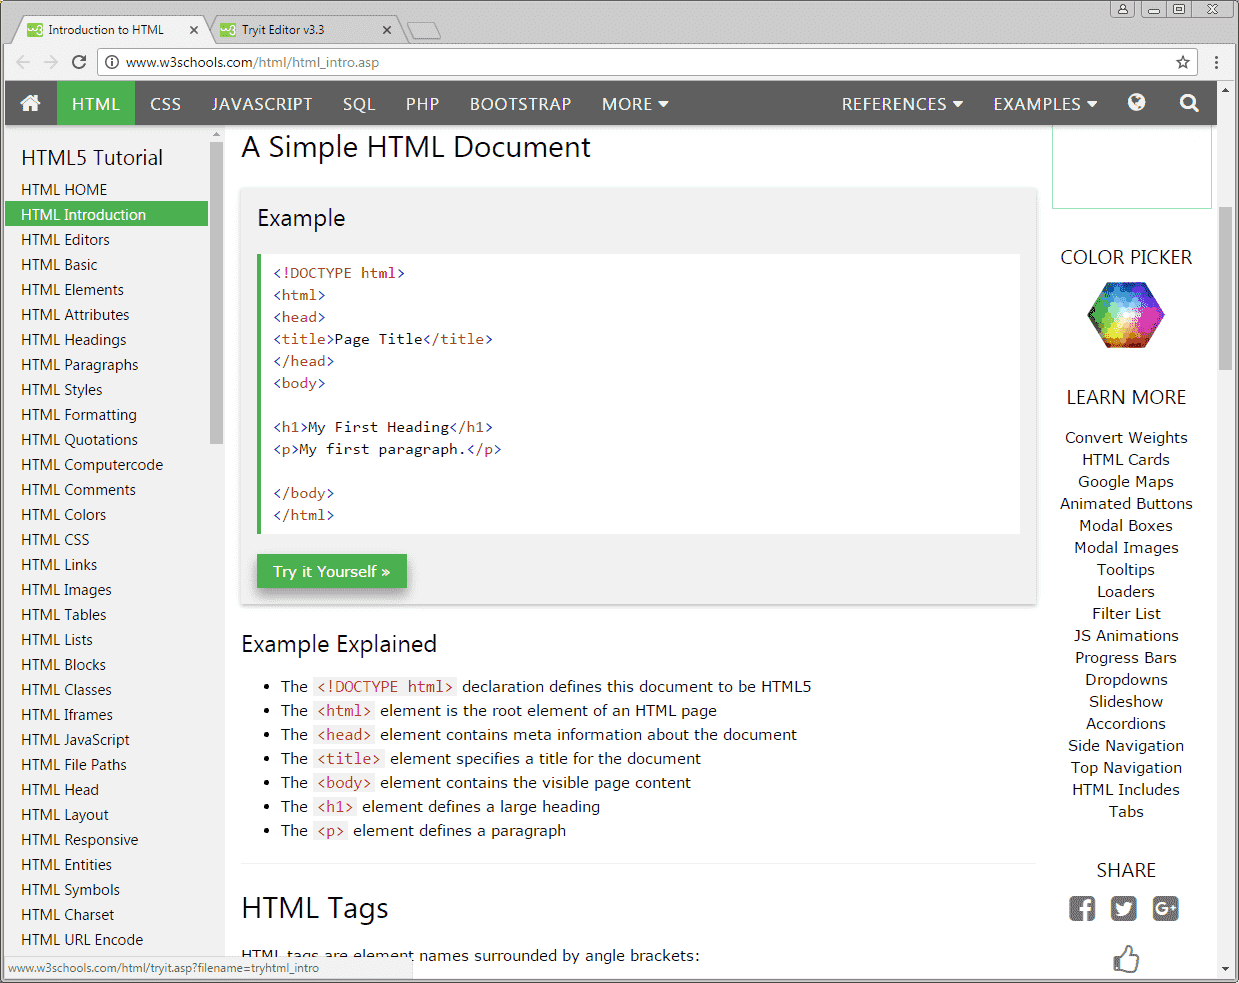
HTML (Hypertext Mark-up Language) is the programming language used to create the information that we would like to display. These files will usually contain an extension such as “.htm” or “.html”. Websites usually utilize a special file called an index.htm which is the default (home page) that is called up automatically. HTML programming is a very complex subject that we cannot possibly cover quickly. The following is the best website to visit to learn and play with the HTML language.
http://www.w3schools.com/html/html_intro.asp
The previous examples of our process mixer with different recipes and reports stored the information on a micro SD card. (See Recipe Instruction and Report Generator from the list above.) Using the HTTP server in the Horner APG XL4 we can now show and control this program using our web browser.
Setting up the HTTP Web Server on the Horner APG XL4
Select Controller | Hardware Configuration… from the main menu. You can also select Hardware Configuration under the Project Navigator Tab.
This will call up our hardware configuration window for the controller.
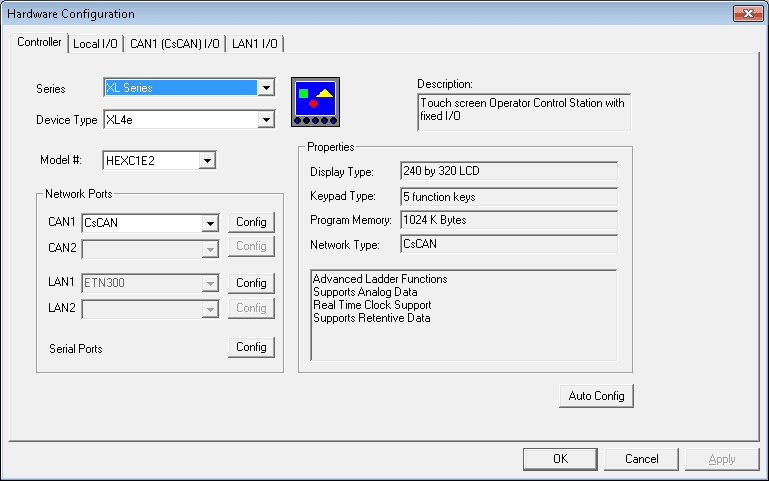
Select Config next to LAN1 (ETN300)
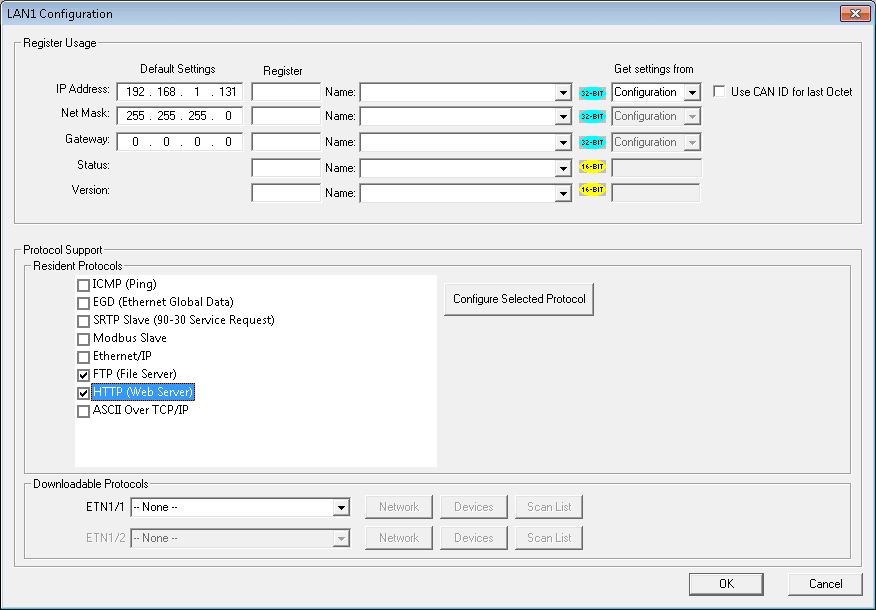
Under this configuration window, we will now select the HTTP (Web Server) under resident protocols.
Hitting the button Configure Selected Protocols will allow us to configure the HTTP Server.
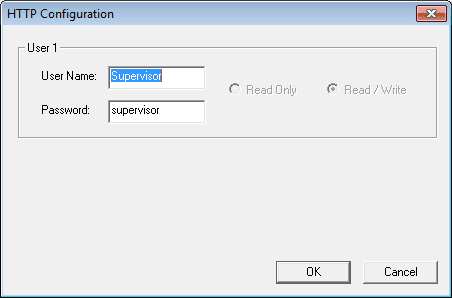
The HTTP Configuration window now appears. We can set up a user name and password if we want the website to be protected. Our user name will be Supervisor and the password will be ‘supervisor’.
We have now set up the controller for an HTTP server.
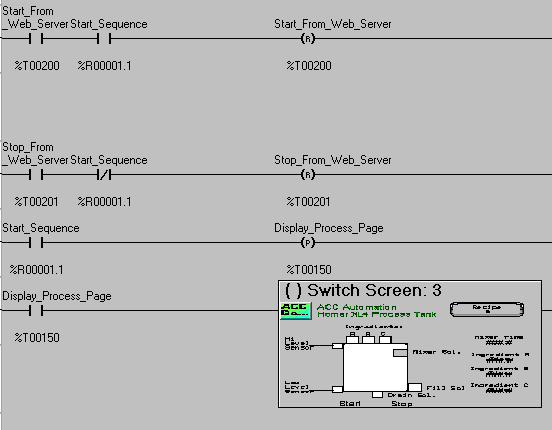
Modify existing logic to start and stop the process – Horner XL4 Web Server
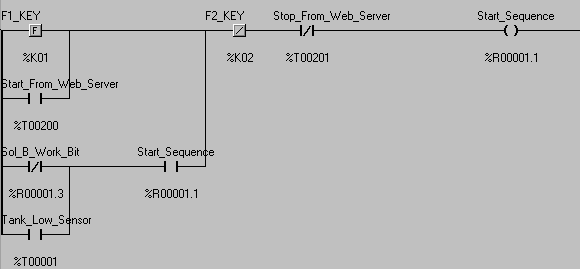
Our existing logic will be modified to incorporate a start and stop bit that will be controlled from the web server.
%T200 – Start from the Web Server
%T201 – Stop from the Web Server
Here is what our start/stop sequence rung looks like:
The bits will turn on, so we will add some code to automatically turn them back off again.
The additional logic is complete. We will now write the web server files.
Write the HTML code to show process.
We can write the HTML code with several different programming software packages. I will use notepad.exe and w3schools online package to create our code.
Reading information from the PLC memory is done by using an iframe tag.
Example: iframe src=”readreg.htm;reg–R33;fmt–UINT;rfs–2″
This tag has the following components:
iframe /iframe – These tags will mark the beginning and end of the tag for reading.
src – This is the quoted string containing our information to read
readreg.htm – This is the reference to our reading of memory
reg – This represents the register that we would like to read. In our example above – %R33
fmt – This is the format of the register that we are reading. The required fmt parameter is followed by a dash and a display format type. Valid format types are
BOOL, BIN, HEX, INT, UINT, DINT, UDINT, REAL and ASCII.
rfs – This is how often the iframe tag information should refresh in seconds. You can select 0 seconds but this will refresh at such a high rate of speed that the traffic on the network would be too great. Leave this at 1 second or more.
The rest of the iframe parameters can be seen by visiting w3school mentioned above.
Writing information to the PLC memory is done by using a form tag.
Example:
form action=”writereg.htm;reg–R33;fmt–UINT” method=”post”
input type=”text” name=”reg” value=”0″ /
input type=”submit” value=”Send” /
/form>
This tag has the following components:
form /form – These tags will mark the beginning and end of the tag for writing.
input / – The first input/tag creates a text input box,
containing a default value of 0, which allows the user to enter a new value for %R33. The second input/tag creates a Send button, which can be clicked to submit the new value. (write it to the register)
action – This is the quoted-string containing our information to write
writereg.htm – This is the reference to our writing of memory
reg – This represents the register that we would like to read. In our example above – %R33
fmt – This is the format of the register that we are reading. The required fmt parameter is followed by a dash and a display format type. Valid format types are BOOL, BIN, HEX, INT, UINT, DINT, UDINT, REAL and ASCII.
Method=”Post” – This is a fixed method that must be present when writing information.
All of the form parameters can be seen by visiting w3school mentioned above.
The form and iframe instructions are the only ones we will need to write and read information to our Horner APG OCS XL4 controller. If we go to the w3school site, scroll down and select ‘Try it Yourself’, you will now see the online editor.
As you change the coded information (HTML) and hit ‘Run’, the display on the right will change accordingly. This way you can get a good idea of what your site will look like in a web browser.
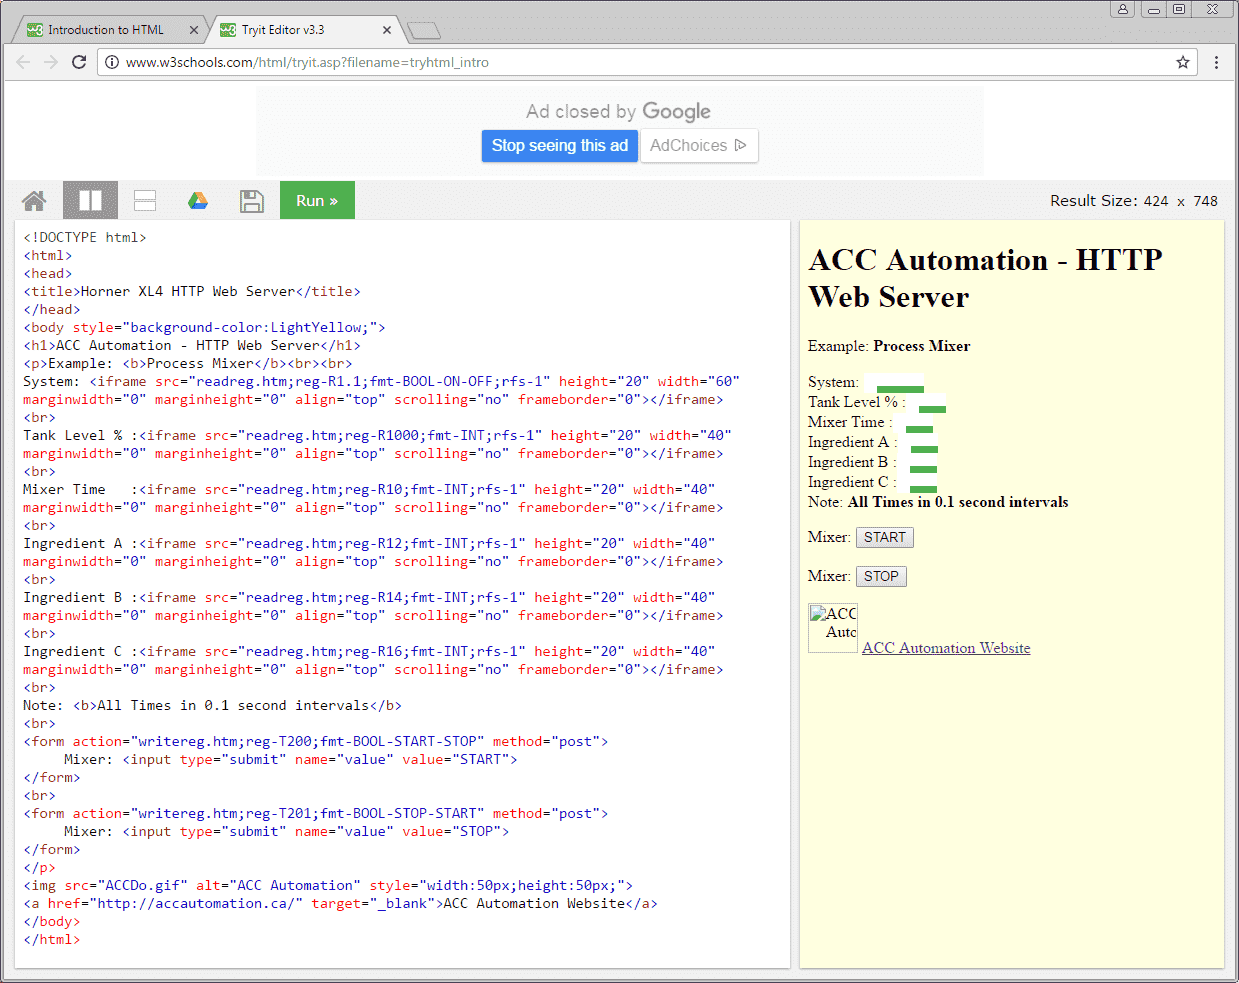
We can select the HTML code on the left side of the page and copy this into windows notepad.
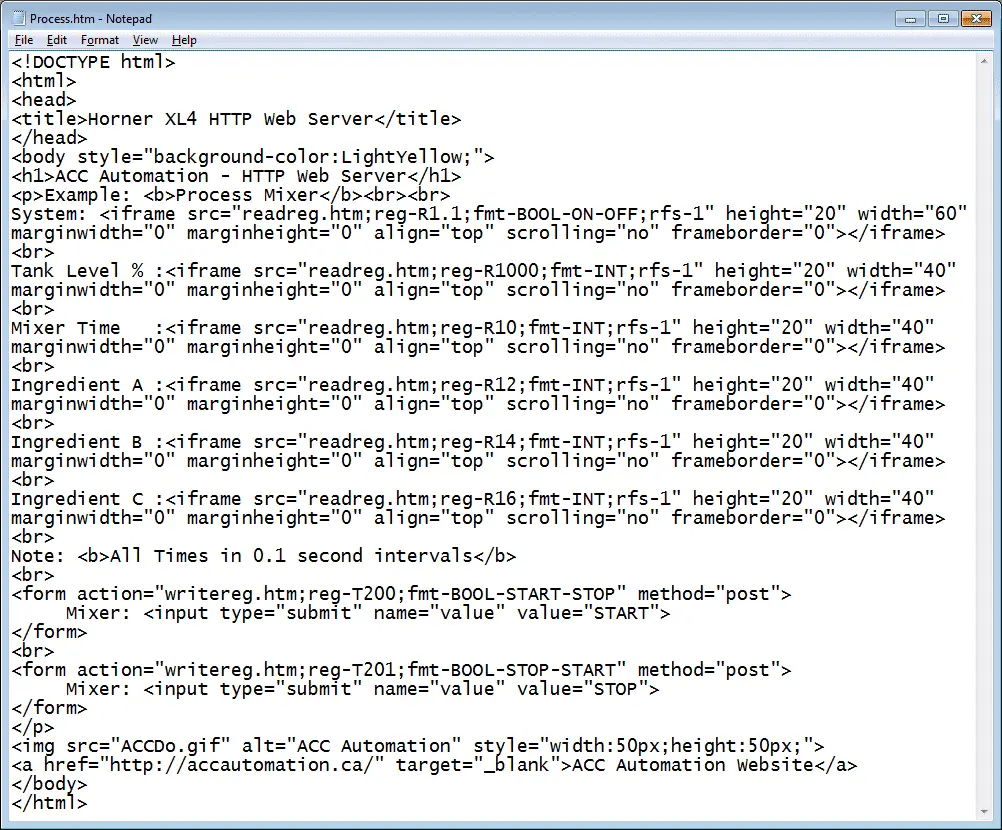
We will save this as Process.htm.
Note: All names in our controller must follow the 8.3 short filename.
Using windows explorer, we can now establish an FTP connection to the controller.
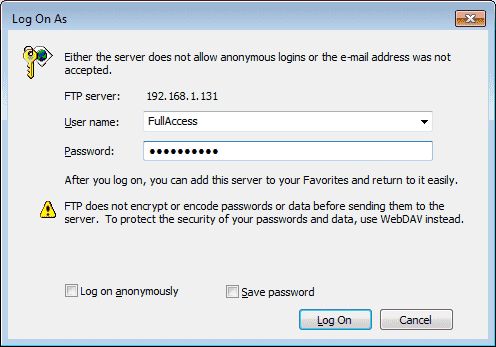
Using windows we will copy and paste our process.htm file onto the memory card in our controller.

You will also see a picture file. This file will show the ACC Automation logo on our webpage.
Using your web browser call up the following address:
http://192.168.1.131/process.htm
You have to be specific on the actual address. The controller will not automatically call up any default address.
You will be then presented with a security message. Enter the user name and password that we specified earlier.
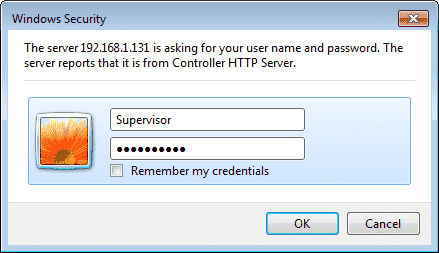
Hit OK
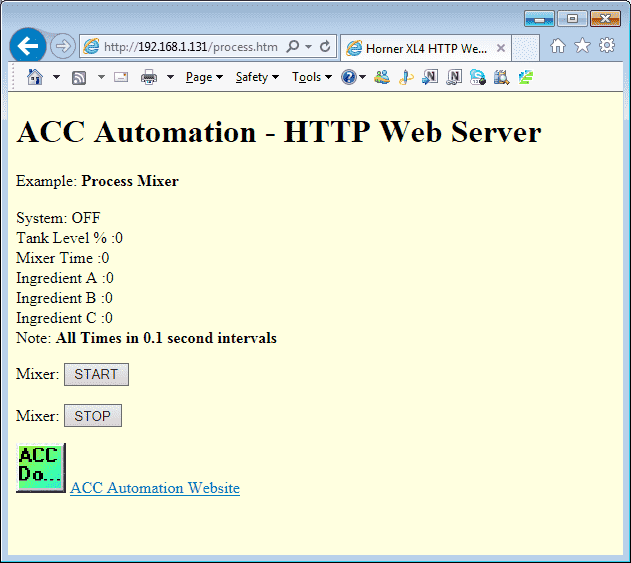
Our web browser now displays the information we programmed using HTML code.
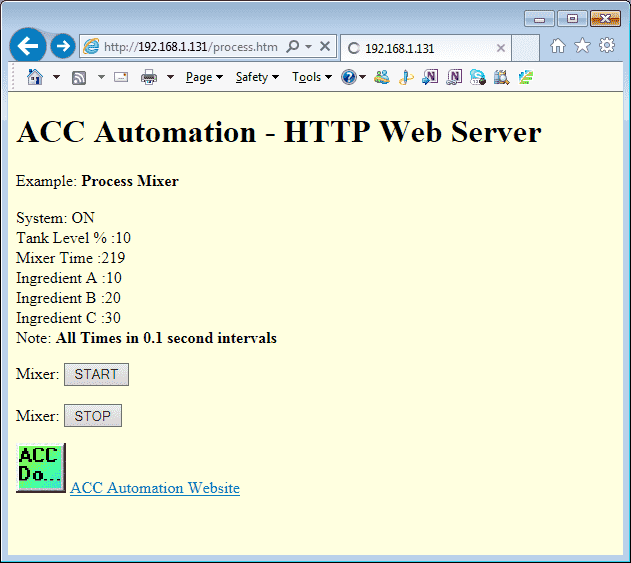
As the information changes, so does the values on the screen.
See this logic in action by watching the YouTube video below.
You can download this application here. It will contain all of the screens and logic programming.
All of the documentation for the XL4 can be downloaded at the following URL:
http://www.horner-apg.com/xl4
Here is some additional information on the HTTP and FTP server applications.
https://hornerautomation.eu/applications/
Next time we will look at AdvancedHMI Modbus TCP Communication.
Watch on YouTube : Horner XL4 HTTP Web Server
If you have any questions or need further information please contact me.
Thank you,
Garry
If you’re like most of my readers, you’re committed to learning about technology. Numbering systems used in PLC’s are not difficult to learn and understand. We will walk through the numbering systems used in PLCs. This includes Bits, Decimal, Hexadecimal, ASCII and Floating Point.
To get this free article, subscribe to my free email newsletter.
Use the information to inform other people how numbering systems work. Sign up now.

The ‘Robust Data Logging for Free’ eBook is also available as a free download. The link is included when you subscribe to ACC Automation.