The ultrasonic sensor (HC-SR04) is great for all kinds of projects that need distance measurements. The HC-SR04 is inexpensive and easy to use. We will be sending signals directly to the sensor and interpreting the results without the need for a library.
Ultrasonic sensor module HC-SR04 provides a 2cm-400cm non-contact measurement function, the accuracy can reach 3mm. The modules include ultrasonic transmitters, receivers, and control circuits. We will be wiring the ultrasonic sensor to our Arduino UNO R3 controller on our super starter kit. Let’s get started.
A full list of posts in this series can be obtained at the following location:
Arduino Uno Software Super Starter Kit
Previous posts in this Arduino Uno Super Starter Kit Series:
Hardware and Powering – Video
Software – Video
LEDs – Video
Digital Inputs – Video
Analog Inputs – Video
Buzzers – Video
Tilt Ball Switch – Video
Servo – Video
Watch the video below of the operation of the ultrasonic sensor with our Arduino Uno Kit. Elegoo Super Starter Kit UNO R3.
Ultrasonic Sensor HC-SR04 – How they work
The ultrasonic sensor HC-SR04 contains transmitters, receivers, and control circuits all in one unit.
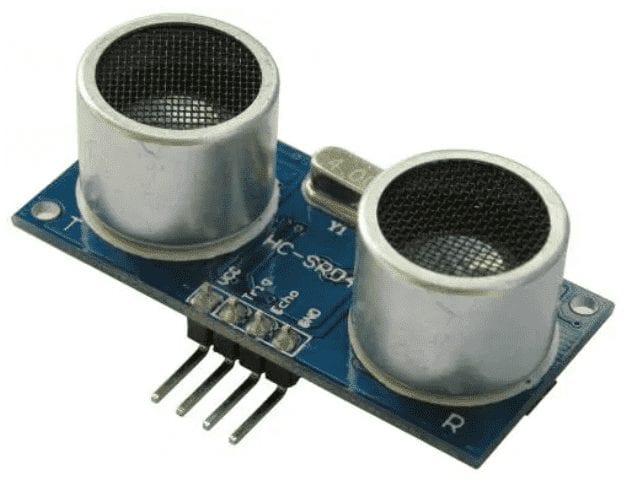
An ultrasonic sensor will send out a sound and wait for the return of this sound. If an object is in the way, the sound will bounce off of it and back to the sensor. The time of the return sound will determine the distance.
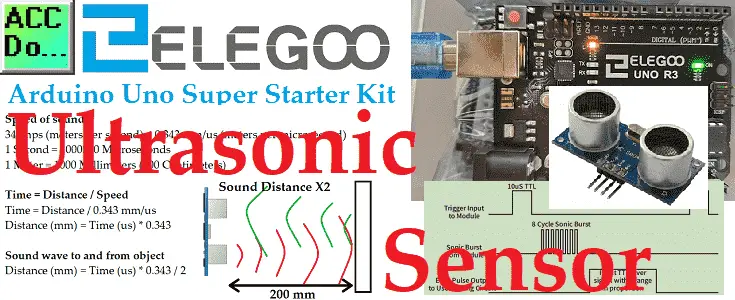
Speed of sound
343mps (meters per second) = 0.343 mm/us (meters per micro second)
1 Second = 1000000 Microseconds
1 Meter = 1000 Millimetres (100 Centimetres)
Time = Distance / Speed
Time = Distance / 0.343 mm/us
Distance (mm) = Time (us) * 0.343
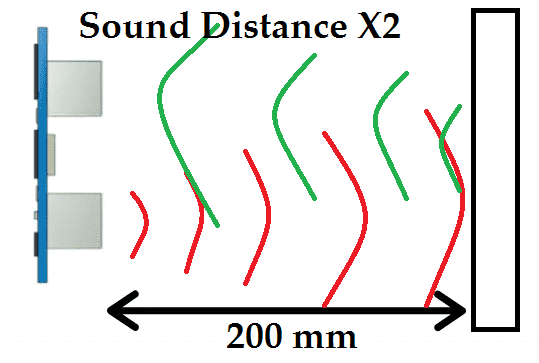
Since the sound waves are traveling to the object, bouncing off of it, and traveling back to the sensor the distance covered is twice that of the actual object. So we will divide by two for the actual distance.
Distance (mm) = Time (us) * 0.343 / 2

The timing chart will show us the general method that the HC-SR04 module will work. When the trigger pin is set high for 10 us this will send out 8 sonic sound bursts. This sound will travel at the speed of sound to the object and back again. The echo pin will output time in us (microseconds) that the sound wave traveled.
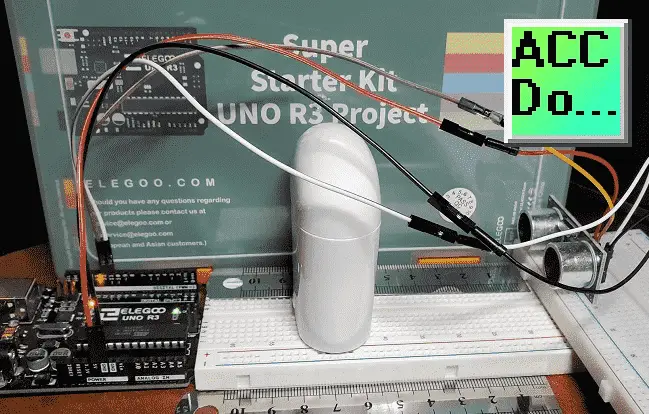
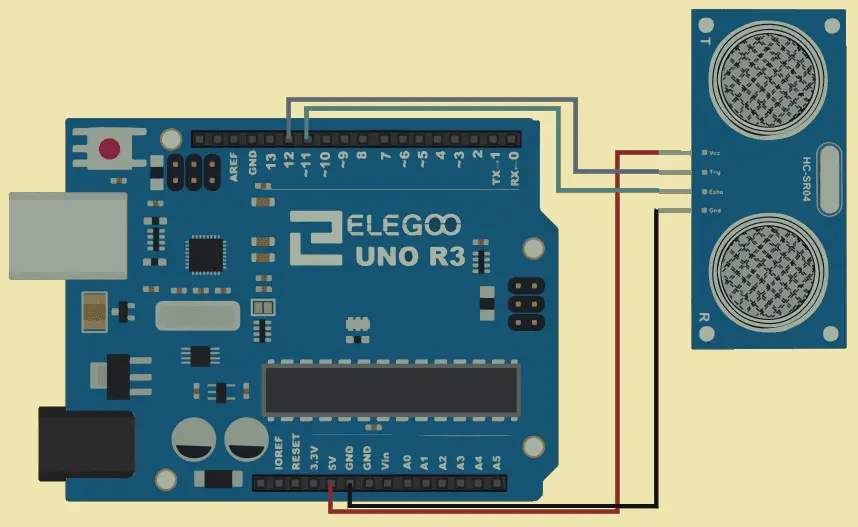
Wiring the Ultrasonic Senor to our Arduino UNO
The ultrasonic sensor has four wires. The Vcc connection will be red and connected to our 5VDC supply. ‘Gnd’ will be black and connected to the GND connection on our Arduino UNO R3. The Trig (trigger) will be connected to D12 (Output) and the Echo will be connected to D11 (Input).
Arduino UNO Ultrasonic Sensor Program
This sketch (program) will define the Echo and Trig pins of our ultrasonic sensor. We will also set up variables for the duration time (us) of the return from the Echo and the distance measured in millimeters (m). The serial port will be used to display the measurement taken.
The program will do the following in a continuous loop.
1 – Set the Trig output high for 10 us. (microseconds)
2 – Read the duration of the Echo input in microseconds. (us)
3 – Calculate the distanced based on the formula; distance = duration * 0.343 / 2
4 – Write the distance to the serial monitor.
/*
ACC Automation
https://accautomation.ca/
Sample Program based on the following information
https://create.arduino.cc/projecthub/abdularbi17/ultrasonic-sensor-hc-sr04-with-arduino-tutorial-327ff6
*/
/*-----( Import needed libraries )-----*/
/*-----( Declare Constants and Pin Numbers )-----*/
#define echoPin 11 // attach pin D11 Arduino to pin Echo of HC-SR04
#define trigPin 12 //attach pin D12 Arduino to pin Trig of HC-SR04
/*-----( Declare objects )-----*/
/*-----( Declare Variables )-----*/
long duration; // variable for the duration of sound wave travel
int distance; // variable for the distance measurement
void setup() /****** SETUP: RUNS ONCE ******/
{
pinMode(trigPin, OUTPUT); // Sets the trigPin as an OUTPUT
pinMode(echoPin, INPUT); // Sets the echoPin as an INPUT
Serial.begin(9600); // // Serial Communication is starting with 9600 of baudrate speed
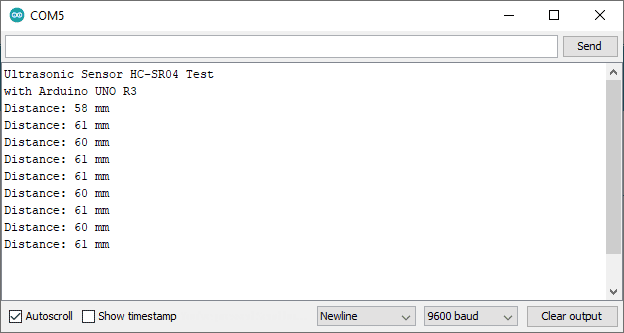
Serial.println("Ultrasonic Sensor HC-SR04 Test"); // print some text in Serial Monitor
Serial.println("with Arduino UNO R3");
}
void loop() /****** LOOP: RUNS CONSTANTLY ******/
{
// Clears the trigPin condition
digitalWrite(trigPin, LOW);
delayMicroseconds(2);
// Sets the trigPin HIGH (ACTIVE) for 10 microseconds
digitalWrite(trigPin, HIGH);
delayMicroseconds(10);
digitalWrite(trigPin, LOW);
// Reads the echoPin, returns the sound wave travel time in microseconds
duration = pulseIn(echoPin, HIGH);
// Calculating the distance
distance = duration * 0.343 / 2; // Speed of sound wave divided by 2 (go and back)
// Displays the distance on the Serial Monitor
Serial.print("Distance: ");
Serial.print(distance);
Serial.println(" mm");
delay(1000);
}
Upload the program to the Arduino UNO R3. Call up the serial monitor and watch the distance measured in mm displayed.
The above Arduino program sketches can be downloaded here.
Watch the video below for the operation of the ultrasonic sensor on our Arduino Uno Super Starter Kit.
Elegoo Links:
Service
service@elegoo.com (USA and Canada)
EUservice@elegoo.com (Europe)
Arduino Compatible Links:
Product Hardware
Elegoo UNO Project Super Starter Kit
Elegoo Download Page
Amazon.com
Amazon.ca
Software
– Arduino IDE (Integrated Development Environment)
– Productivity Blocks (Development Timesaver)
– Productivity Blocks Documentation (Wiki)
Community
– Arduino Blog
– Arduino Forum
– Arduino UNO Facebook
Next time we will look at reading temperature and humidity from our Arduino Elegoo super starter kit UNO R3.
Watch on YouTube: Arduino Uno Super Starter Kit Ultrasonic Sensor
If you have any questions or need further information please contact me.
Thank you,
Garry
If you’re like most of my readers, you’re committed to learning about technology. Numbering systems used in PLCs are not difficult to learn and understand. We will walk through the numbering systems used in PLCs. This includes Bits, Decimal, Hexadecimal, ASCII, and Floating Point. To get this free article, subscribe to my free email newsletter.
Use the information to inform other people how numbering systems work. Sign up now. The ‘Robust Data Logging for Free’ eBook is also available as a free download. The link is included when you subscribe to ACC Automation.