We will now send email and text messages using our BRX Do-More controller. Sending email messages from the PLC sounds like an easy task. However, very few applications do this on the production floor. This is probably due to the networks involved, and user authentication can be complicated. In our example, we will use a restricted Gmail SMTP server so no authentication will be required. We will walk through sending email and text messages from the PLC to Google Gmail. Once in your Gmail account, the message can be automatically forwarded to another verified email or SMS text message address.
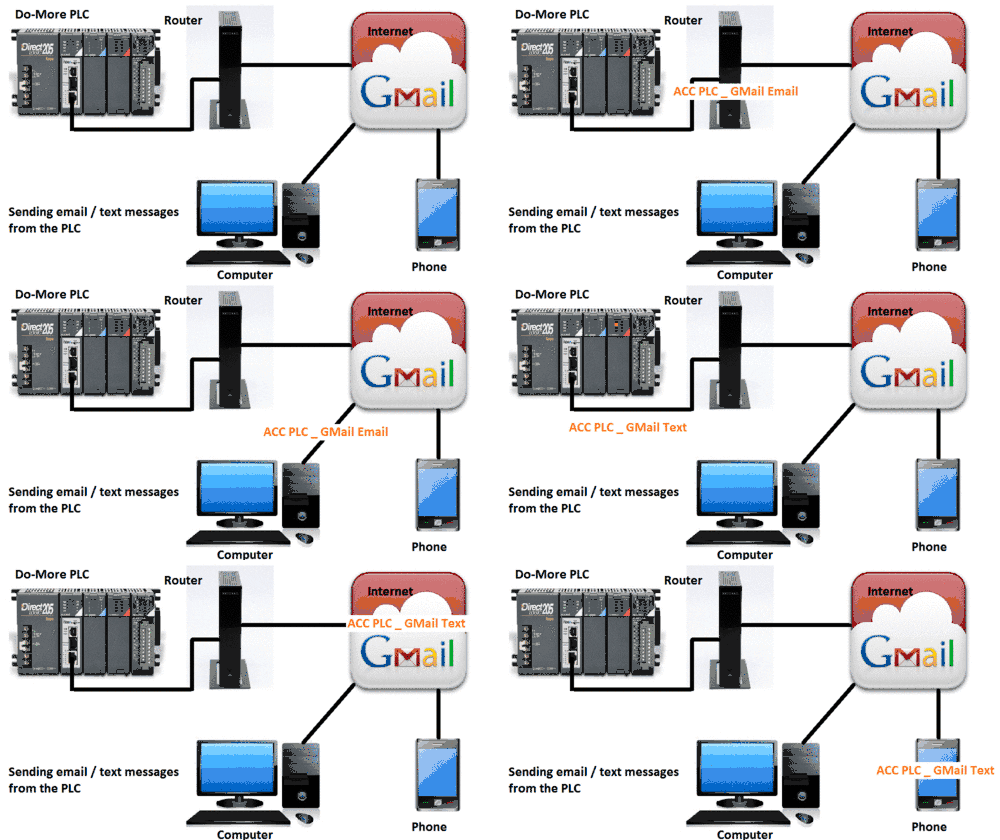
The BRX Series PLC also has this Email capability along with attaching files. We will also be looking at secure email services with the BRX Series PLC. Let’s get started.
Previously in this BRX series PLC, we have discussed:
System Hardware – Video
Unboxing – Video
Installing the Software – Video
Establishing Communication – Video
Firmware Update – Video
Numbering Systems and Addressing – Video
First Program – Video
Monitoring and Testing the Program – Video
Online Editing and Debug Mode – Video
Timers – Video
Counters – Video
High-Speed IO – Video
Compare Instructions – Video
Math Instructions – Video
Program Control – Video
Shifting Instructions – Video
Drum Instruction – Video
Serial Communication – Modbus RTU to Solo Process Temperature Controller – Video
Data Logging – Video
Watch below for the following videos:
BRX PLC Email – Text SMS Messaging Gmail
BRX PLC Secure Email Communication
Note:
Google is removing “Less Secured Apps” in the mail app. (Gmail) If you are using this to send email from your controller, you must enable 2-step verification. This will then give you the option to generate an “App Password” for your controller or program.
Gmail Less Secure App Access – App Passwords
Google Gmail – BRX Do-More
Simple Mail Transfer Protocol (SMTP) is an internet standard for email transmissions.
Google provides three different SMTP settings in which you can send email messages from a printer, scanner or application (PLC).
1. SMTP relay service – used to send mail from your organization by authenticating with the IP address(s). You can send messages to anyone inside or outside of your domain.
2. Gmail SMTP server – requires authentication with your Gmail/Google Apps account and password. Messages can be sent to anyone inside or outside of your domain.
3. Restricted Gmail SMTP server – does not require authentication, and you will be restricted to send messages to Gmail or Google Apps users only.
We will use a restricted Gmail SMTP server to send emails and text messages. This is located at aspmx.l.google.com. This does not require authentication so a greater number of PLCs will be able to communicate to the server.
If you do not have a Google Gmail Account then you will need to set up this free service. Google Email Account
BRX Do-More Series PLC Setup
Now start the Do-more Designer software. This is available free of charge and is a fully functional package complete with a simulator. The BRX Series PLC has an Ethernet connection on board We will ensure this is connected to the internet.
Start a new project or an existing project that has a connection to the internet.
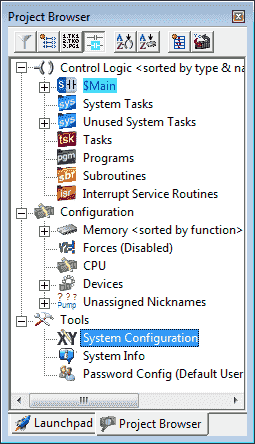
Under ‘Project Browser’: ‘Tools’ select ‘System Configuration’
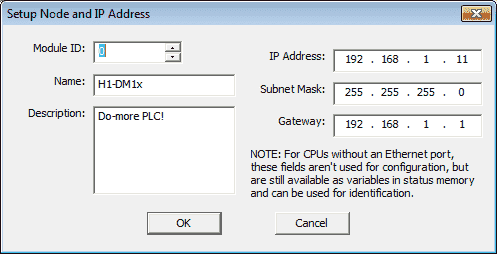
In ‘CPU Configuration’ verify the IP address and Net Mask.
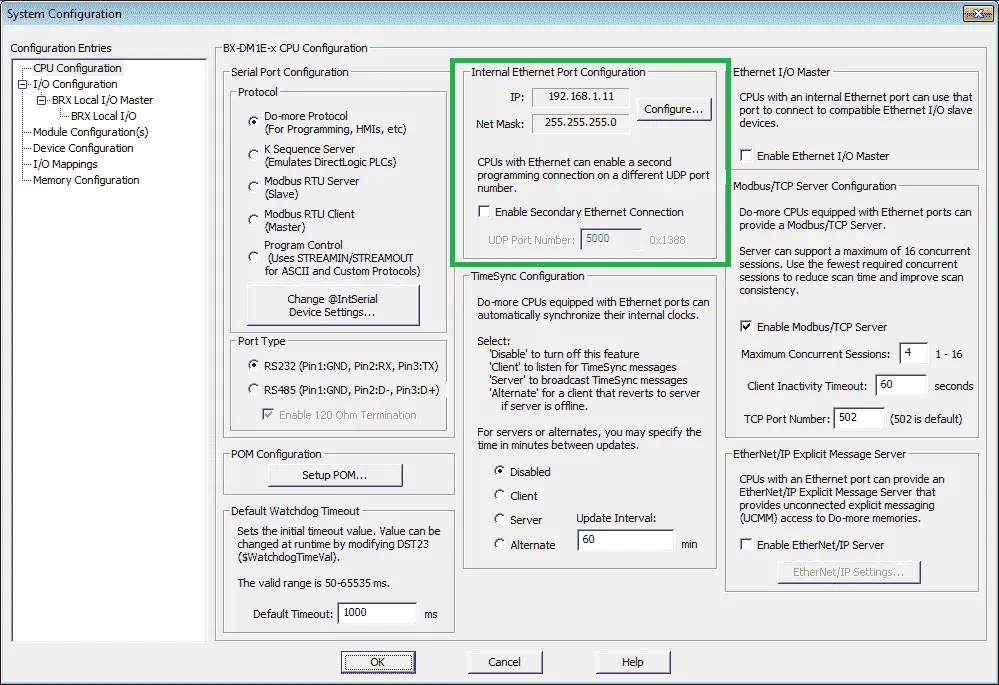
Hit the “Configure…” button. The gateway address is now shown. This is the address to the intranet that needs to be set.
We will now set up our email device that will be used in our PLC instructions. In ‘System Configuration’ select ‘Device Configuration’
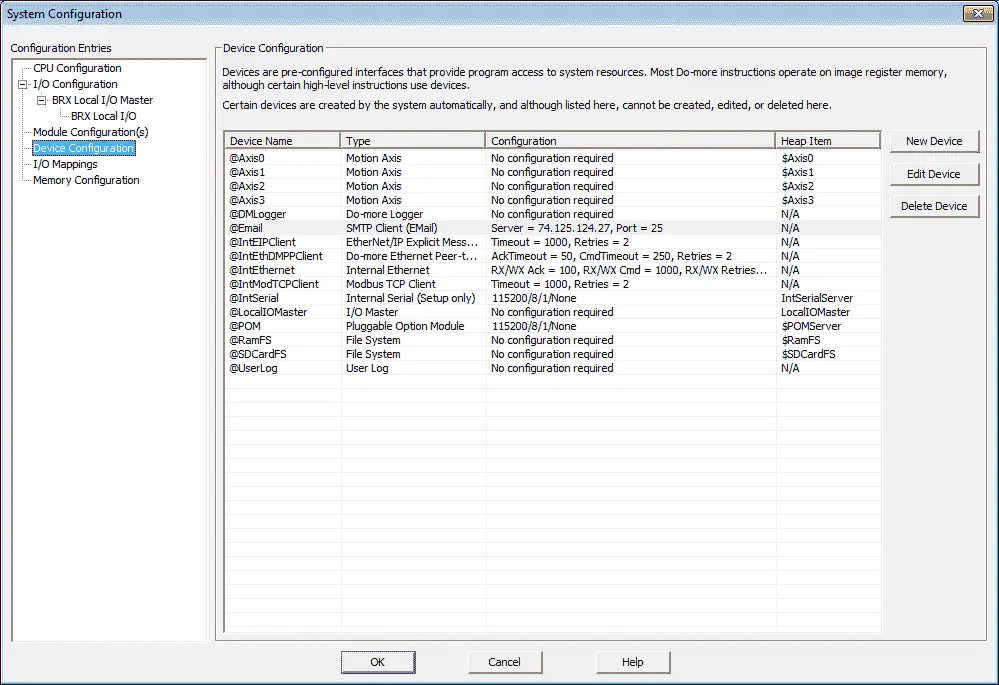
Select “New Device” (If you do not already have an SMTP Client (Email) configured. If you do then select it and hit “Edit Device”)
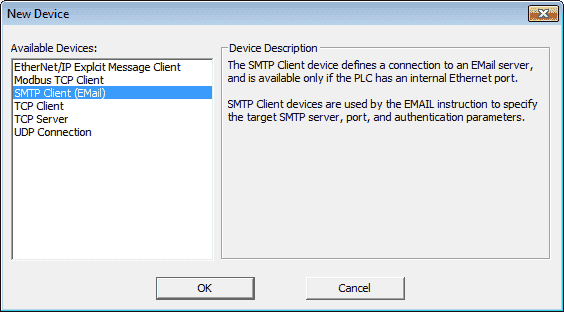
Select ‘SMTP Client (Email)’ and hit ‘OK’
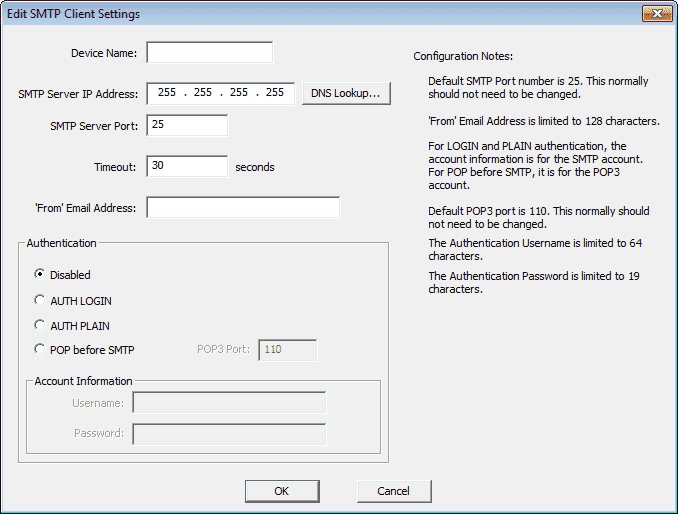
Beside the ‘Device Name’ enter a name for the Email Client. Ex: @Email Beside the ‘SMTP Server IP Address’ hit the ‘DNS Lookup…’
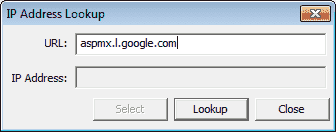
Besides the URL: enter the server address aspmx.l.google.com and then hit ‘Lookup’. This will retrieve one of the IP addresses of the server. Then press ‘Select’ to return this address to the configuration page.
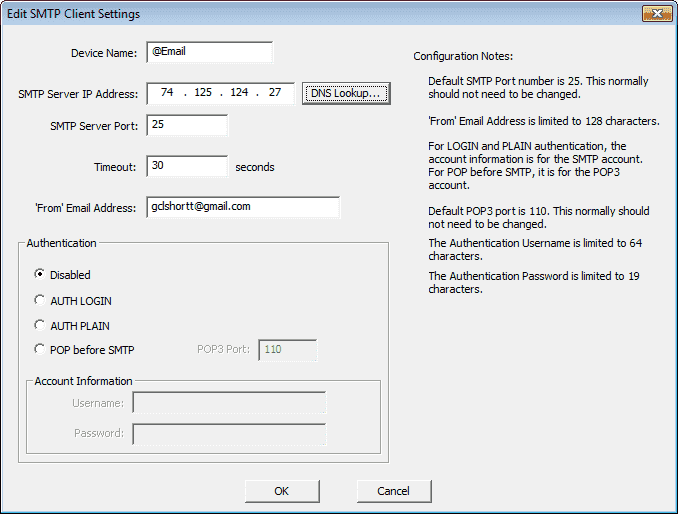
Ensure that the SMTP Server Port is set for 25. This is the default port setting. The Timeout setting can be left at 30 seconds. This is the amount of time for the PLC to wait before setting any error message. Enter your ”‘From’ Email Address” – Enter your Google Gmail account address. Select ‘OK’ to end the configuration. Ensure that authentication is disabled.
Now that we have our email client device ‘@Email’ set up we can move onto programming the Email messages.
EMAIL Instruction – BRX Do-More
We use the EMAIL instruction in the PLC to send the messages. We will send our message with a file attachment. Here is the instruction.
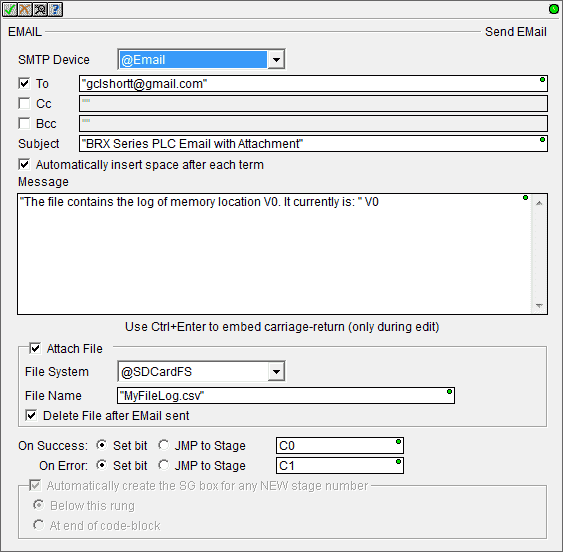
SMTP Device: This is set for the device that we just set up. (@Email)
To: We must select this and enter a valid gmail email address. Notice that this is in quotation marks. Optional items are for Cc (Carbon Copy) and Bcc (Blind Carbon Copy)
Select “Automatically insert space after each term”. This will insert a space after each variable in the message.
Message: This message can be a maximum of 1023 characters. All text strings will be in double quotes. All variables will be written without quotes. In our example we have the following:
“The file contains the log of memory location V0. It currently is: “V0
Notice in the message we combine text with actual word and bit addresses that we want to send. The help function in the Do-more Designer software can provide further information.
Attach File:
This is where we can attach a file to send with the email. We have discussed this previously in the following post:
BRX Series PLC Data Logging – Video
You must be specific on the location of the file and the name of the file to be sent. If the location or file name is incorrect, then a file with “Error Opening Attachment” will be sent.
We will select “Delete File after EMail Sent”. This will erase the file every time the email is sent.
On Success – This will set a bit if the email message is sent. (C0)
On Error – This will set a bit if the email message was not sent. (C1)
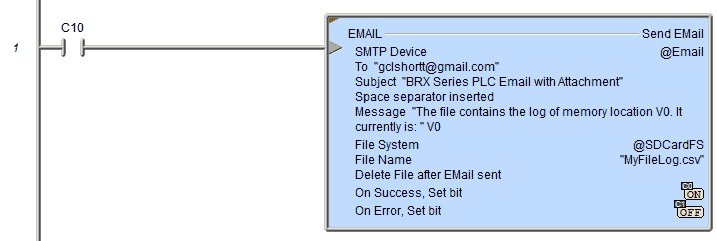
Here is the instruction in our ladder logic. You will notice that the instruction itself has a built in one shot. This is the triangle indication of the instruction.
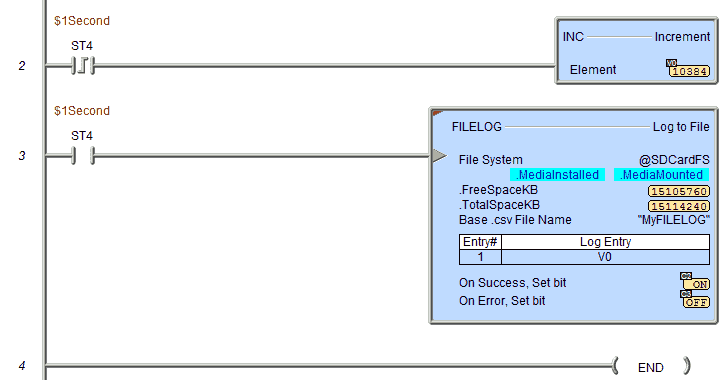
Here is the rest of our ladder logic. This will increment V0 every second. It will also use FILELOG instruction to log V0 every second.
Running the program and triggering the messages will send the Email to your google account. The email will automatically go to your spam folder. This is because authentication is turned off. In order for the email to go to your inbox and forward the message as a text (SMS) message, we need to set up a filter.
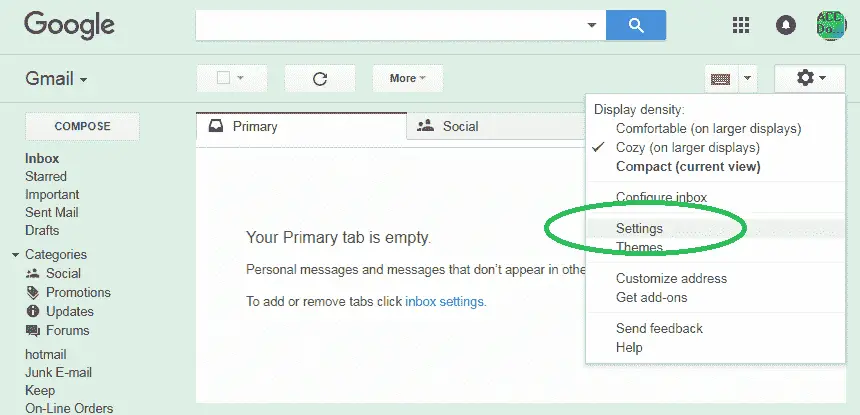
Under the gear sign in Google Gmail select the ‘Settings’.
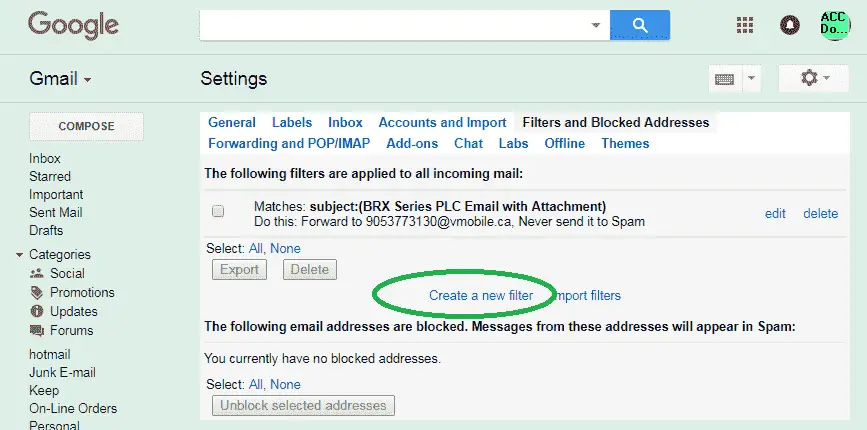
Select ‘Create a new filter’ or if you already have one select the edit button beside the filter.
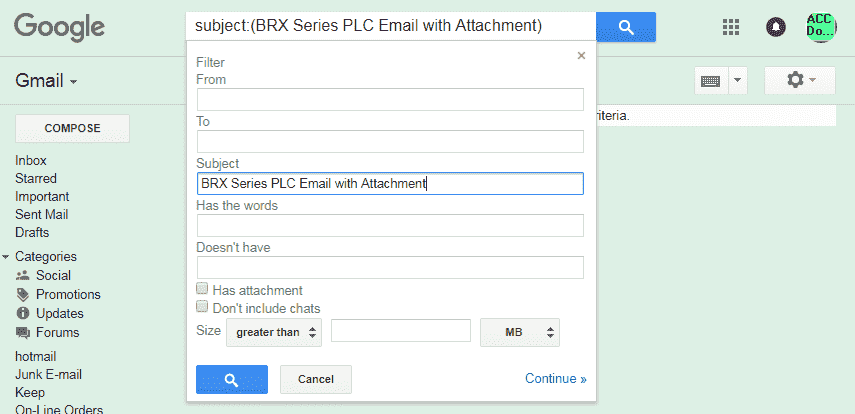
Under the subject, we will add the title “BRX Series PLC Email with Attachment”. The filter will see this email subject and trigger the actions to follow.
Select Continue
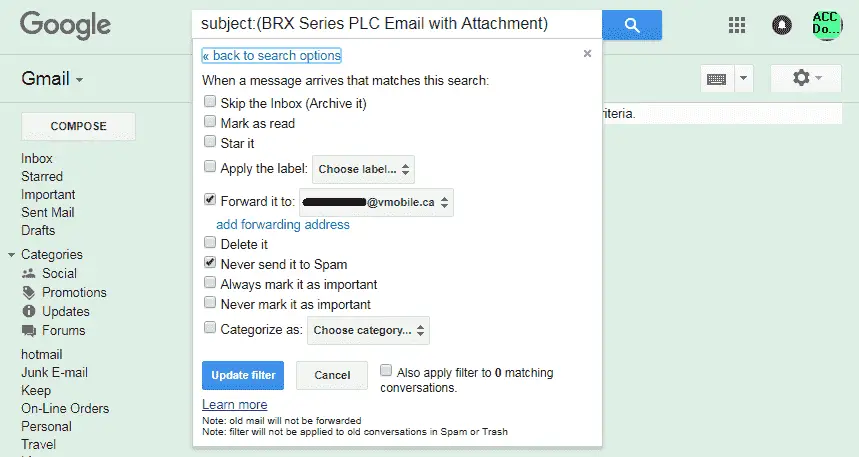
“Never send it to Spam” selection will ensure that the email will go to your inbox.
A dialogue to select forward Email to a specific account. During this process, a verification code will be sent to this address. You must enter this code for validation or respond to the Email in order for the forwarding address to work.
Email to SMS Gateways can be used to forward your message in a text format. Here is a website that will show a List of Email to SMS Gateways.
Here are some that we use in Canada: Example: 613-451-0104 on Rogers network = 6134510104@sms.rogers.com
number@txt.bellmobility.ca
number@sms.wirefree.informe.ca
number@sms.fido.ca
number@msg.telus.com
number@sms.lynxmobility.com
number@text.mtsmobility.com
number@mobiletxt.ca
number@sms.rogers.com
number@sms.sasktel.com
number@vmobile.ca
number@txt.windmobile.ca
number@sms.wirefree.informe.ca
Once we have the forwarding address in and verified, we can select Update or Save Filter.
Running the program and triggering the Email instruction will be sent the email to our Gmail inbox.

Opening the message we can see the attachment.
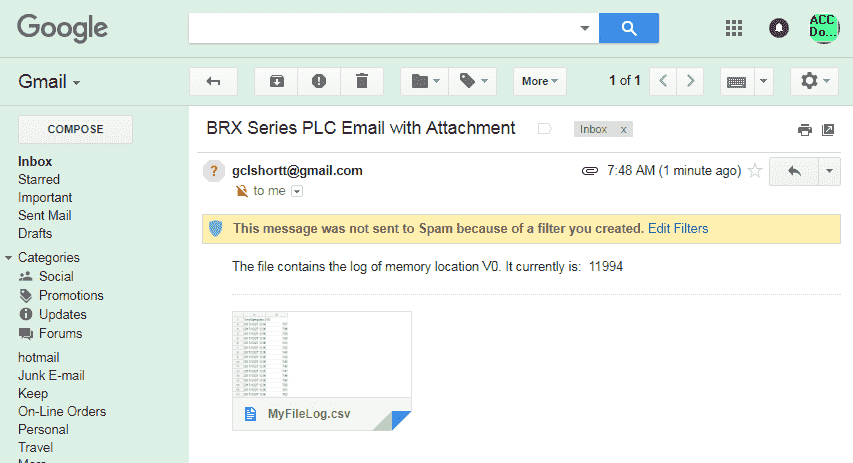
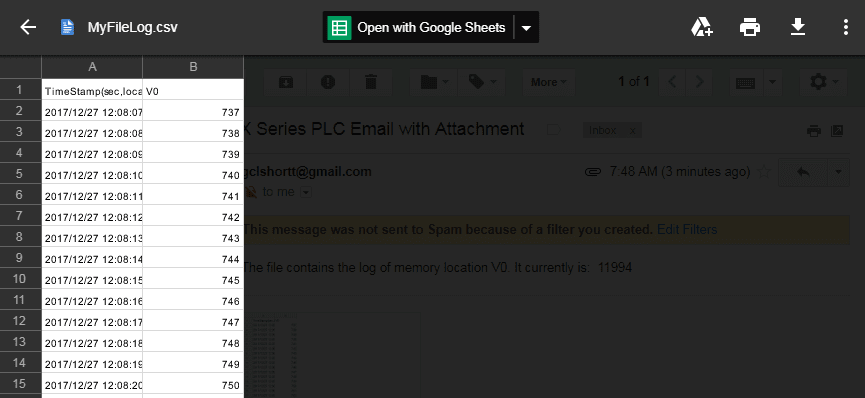
Clicking on the MyFileLog.CSV file will show you the contents of the file. You will see the date and time along with the value of register V0.
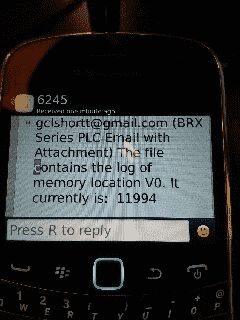
Our filter also forwarded this to our cell phone using SMS. Here is the same message:
In the above example, we used a restricted Gmail SMTP server. No authentication was required so we can send an email with only an internet connection to the PLC. See the video below to see the BRX Series PLC Send Email and Text (SMS) Messages.
You can download the program here.
BRX Series PLC from Automation Direct – Power to deliver
Overview Link (Configure and purchase a system)
Manuals and Product Inserts (Installation and Setup Instruction)
Do-more Designer Software v2.0.3 (Free Download Link) – The software will contain all of the instruction sets and help files for the BRX Series PLC.
Next time we will look at communication to the BRX PLC using AdvancedHMI. (Modbus TCP Protocol)
Watch on YouTube: BRX PLC Email – Text SMS Messaging Gmail
BRX PLC Secure Email Communication
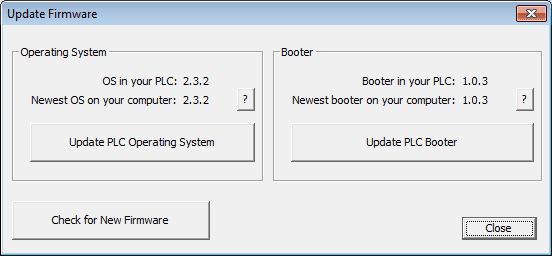
Do-more Designer has added a secure email with SSL and TLS encryption. This feature is only supported on BRX CPUs with an onboard Ethernet port and the Do-more Simulator. The firmware must be at version 2.2 or higher on the BRX CPU. You can check your current version by using the main menu | PLC | Update Firmware…
Note: This must be done when you are online with the PLC.
We will use our program from above and add authentication to our email instructions. Call up the System Configuration window. Main menu | PLC | System Configuration… or select System Configuration under the Tools heading in the Project Browser.
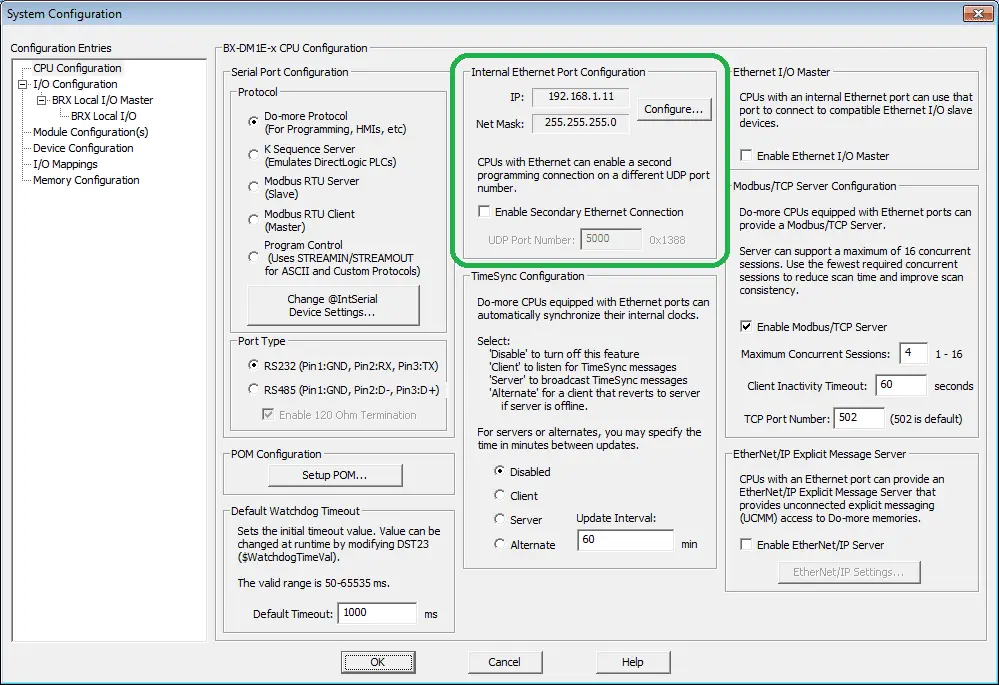
Select Configure… under the Internal Ethernet Port Configuration. This is located on the left side under CPU Configuration.
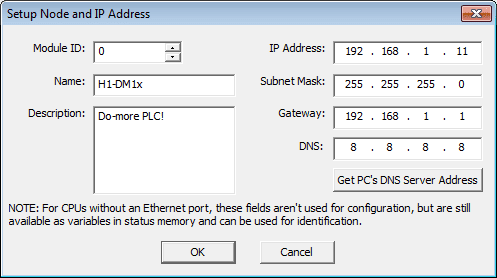
DNS (Domain Name Server)
If we specify a specific IP address such as 74.125.124.27 we do not need a DNS. However, if we specify aspmx.l.google.com then we need a DNS to look up the specific IP address.
In our example, we will be using the google DNS server address. (8.8.8.8)
We will leave all other values the same as our example above.
Our Ethernet port is now set for our email communication.
Device Configuration – BRX Do-More
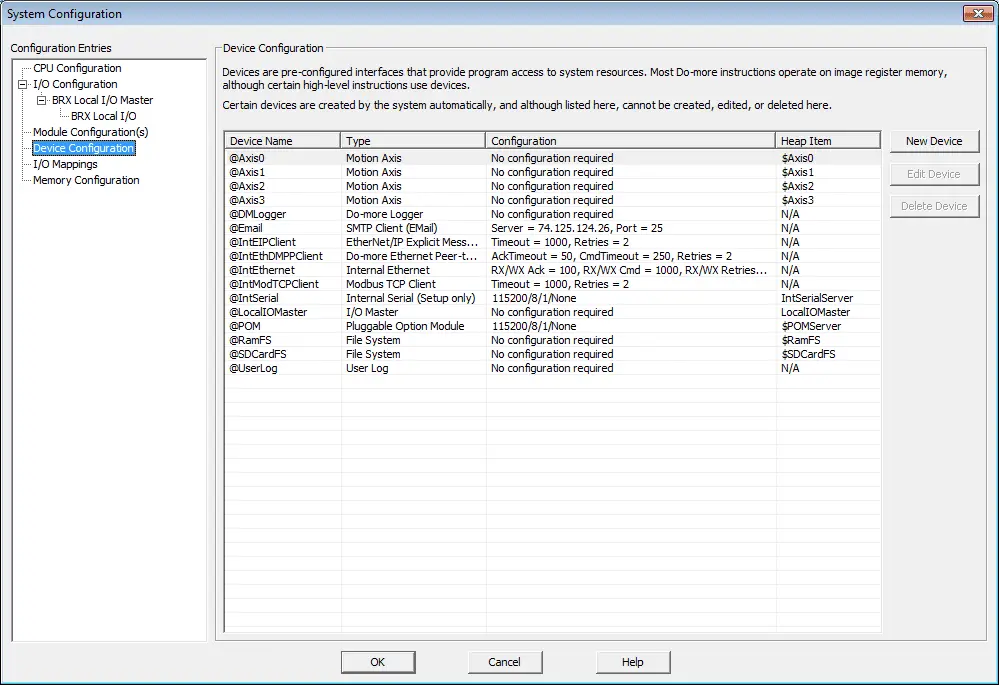
Under the Device Configuration menu in the System Configuration menu, we will create a new email (SMTP Client) device. Select New Device.
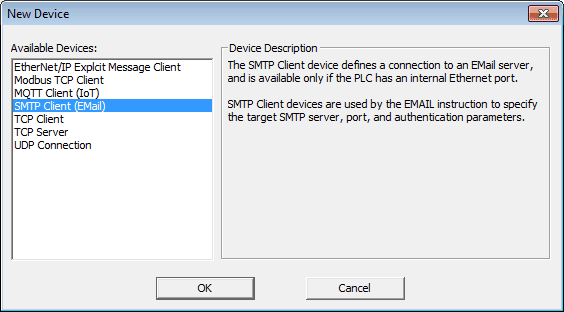
Select SMTP Client (Email) and hit OK.
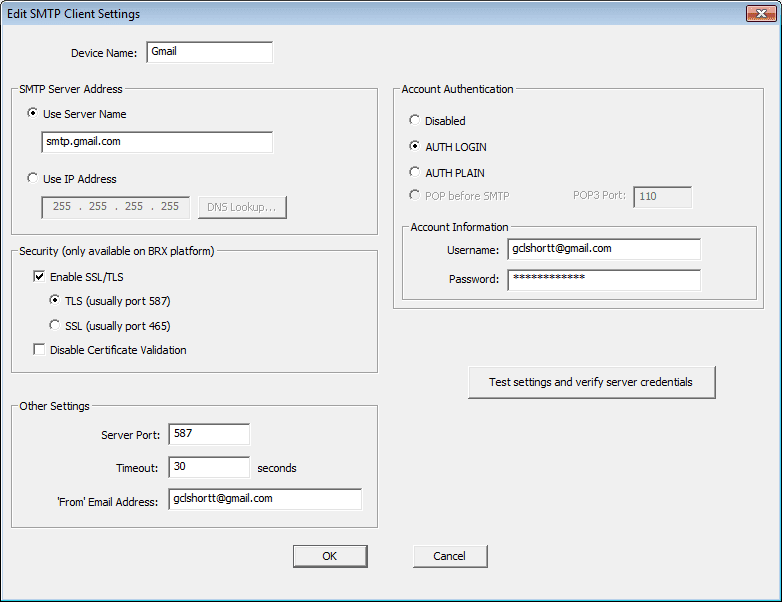
Device Name – Gmail
SMTP Server Address – Use Server Name (DNS Required) – smtp.gmail.com
Security – Enable SSL/TSL – TLS (usually port 587)
Other Settings – Server Port – 587, Timeout – 30 seconds, ‘From’ Email Address – gclshortt@gmail.com
Account Authentication – AUTH LOGIN
Account Information – Username – gclshortt@gmail.com, Password – *******
Once we have specified all of the information required to communicate to the gmail server we can now test the settings. Select ‘Test settings and verify server credentials’.
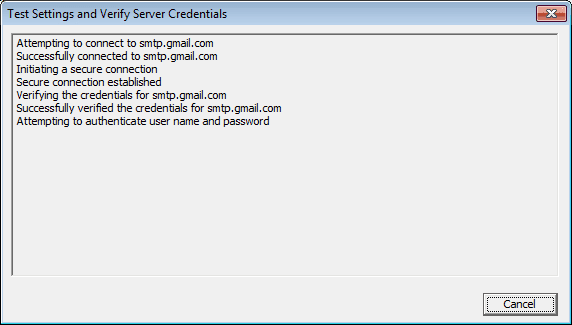
Our testing will now take place.
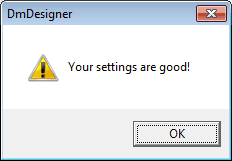
If everything has been set and working we will get this confirmation. We now have our gmail device set to use in our program.
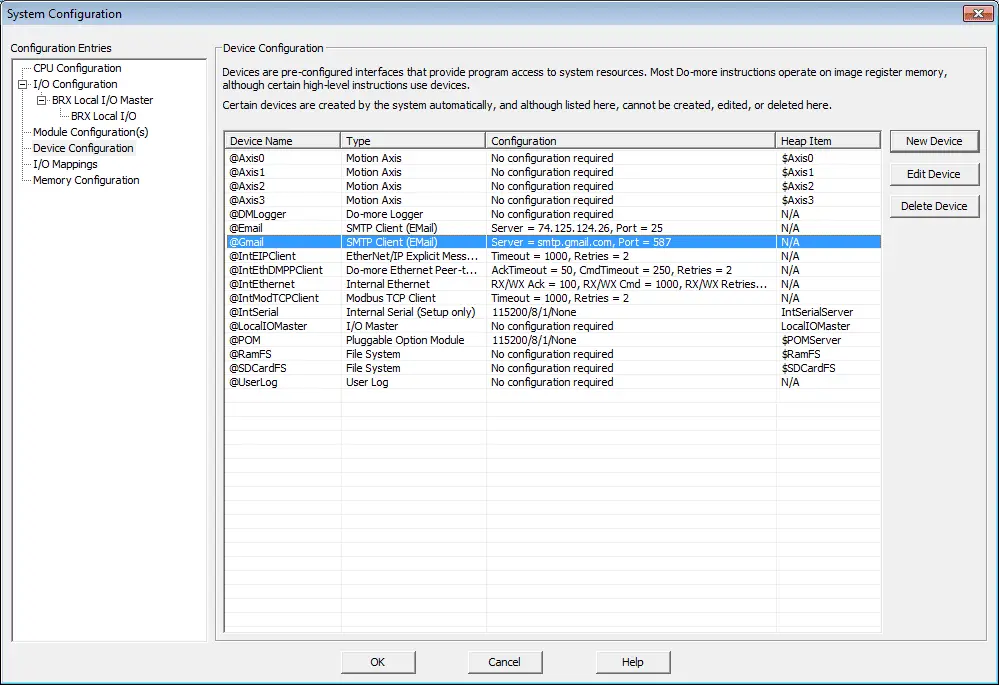
PLC Ladder Modification – BRX Do-More
We will now modify our existing EMAIL instruction.
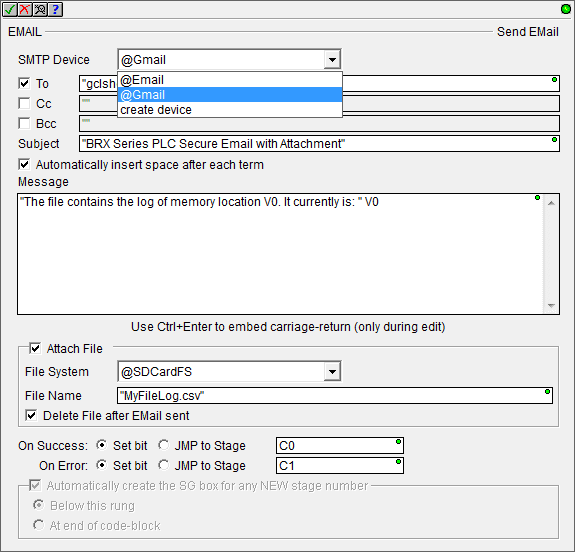
Choose the SMTP Device as @Gmail. This is the device that we have just set up.
We have also changed the subject of the email to ‘BRX Series PLC Secure Email with Attachment’.
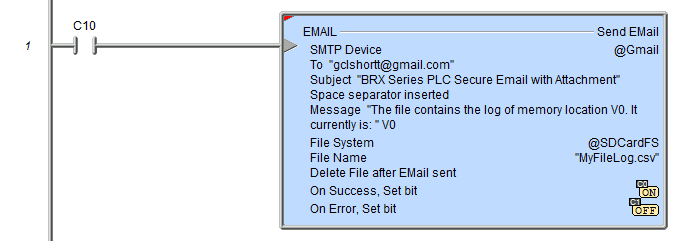
Here is our completed instruction.
Running the program and energizing the rung will send a secure email.
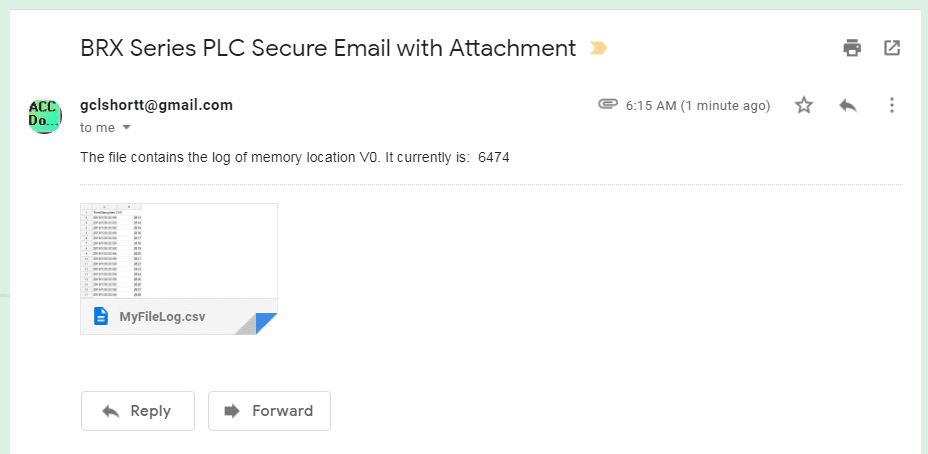
Here is what the email will look like.
Here are some other popular accounts that can be used:
Outlook Settings:
SMTP Server Address – smtp-mail.outlook.com
Security – Enable SSL/TSL – TLS (usually port 587)
AOL Settings:
SMTP Server Address – smtp.aol.com
Security – Enable SSL/TSL – TLS (usually port 587)
Yahoo Settings:
SMTP Server Address – smtp-mail.yahoo.com
Security – Enable SSL/TSL – TLS (usually port 587)
Watch on YouTube: BRX PLC Secure Email Communication
If you have any questions or need further information please contact me.
Thank you,
Garry
If you’re like most of my readers, you’re committed to learning about technology. Numbering systems used in PLC’s are not difficult to learn and understand. We will walk through the numbering systems used in PLCs. This includes Bits, Decimal, Hexadecimal, ASCII and Floating Point.
To get this free article, subscribe to my free email newsletter.
Use the information to inform other people how numbering systems work. Sign up now.
The ‘Robust Data Logging for Free’ eBook is also available as a free download. The link is included when you subscribe to ACC Automation.

