Here’s something that still catches people off guard: the Productivity Suite programming software is completely free. No demo limitations, no 30-day trials, no annual subscriptions eating into your budget year after year. AutomationDirect gives you the full package—every feature, every instruction, every tool—at zero cost. In an industry where software licensing fees can rival hardware costs, that’s not just generous; it’s revolutionary.
Whether you’re programming a compact Productivity1000 on a packaging line, a Productivity2000 in a water treatment facility, or a full-blown Productivity3000 system spanning an entire plant, you’ll use this same software. One download, one installation, and you’re ready to tackle any Productivity Software PLC project that comes your way.
Let’s walk through getting this powerful programming environment installed on your computer.
Before You Download: Productivity Software System Requirements
Before grabbing the installer, make sure your computer meets these minimum specifications. The good news is that Productivity Software Suite isn’t particularly demanding—most computers will handle it just fine.
Supported Operating Systems:
- Windows 11
- Windows 10
Hardware Requirements:
- Processor: Multi-core Recommended
- RAM: 8 GB recommended
- Storage: 2 GB storage space
- Display: 1024 x 768 resolution or higher
- Connectivity: USB port or Ethernet port for PLC communication
If you’re running Windows 11, the software generally works without issues.
Step 1: Download the Installer
Head over to the AutomationDirect support page for software downloads. You can find the Productivity Suite installer at:
https://www.automationdirect.com/support/software-downloads
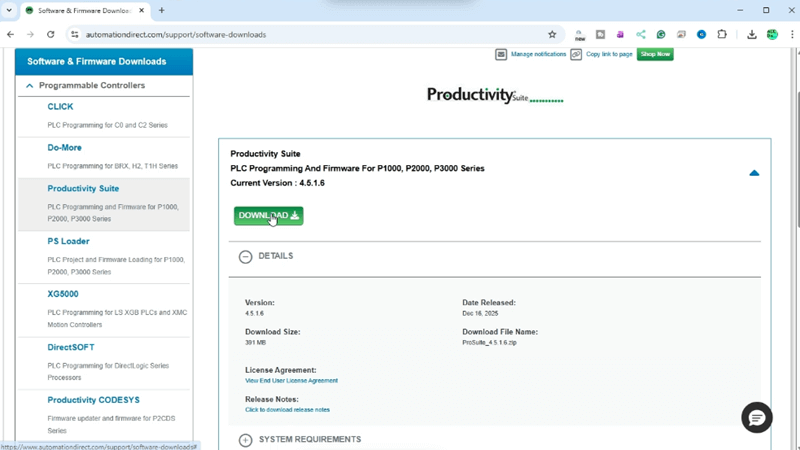
Under Programmable Controllers, Software and Firmware Downloads, select “Productivity Suite” to find the download link. The file comes as a compressed ZIP archive—typically around 400-450 MB depending on the version. Clicking the download button opens the license agreement pop-up window. Select the “I have read and acknowledged…” and select the close button. We can now log into our Automation Direct Account or just enter your email address. Select the download button to start the download.
Save the ZIP file in a location easy to find. I usually create a folder called “Productivity Suite Software” on my downloads to keep things organized. You never know when you’ll need to reinstall on a different machine or help a colleague get set up.
Step 2: Extract the ZIP File
Once the download completes, navigate to where you saved the file. Right-click on the ZIP archive and select “Extract All” from the context menu. Windows will ask where you want to extract the files—the default location works fine, or you can choose a specific folder.

Wait for the extraction to complete. Depending on your computer’s speed, this might take a minute or two. When it finishes, you’ll have a folder containing the setup files.
Step 3: Run the Setup File – Productivity Suite Software
Open the extracted folder and locate the setup executable file. It’s usually named ProSuite with a version number. In this case, it is “ProSuite-4.5.1.6.exe”.
Right-Click on the setup file and select “Run as administrator” to launch the installer. When Windows displays a User Account Control prompt asking if you want to allow the program to make changes to your computer, click “Yes” to proceed.
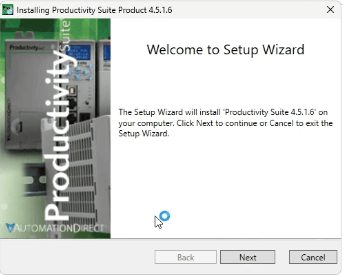
The installation wizard will launch, displaying the welcome screen. Take a moment to close any other applications—especially any previous versions of Productivity Software Suite if you’re upgrading—before continuing.
Step 4: Accept the License Agreement
Click “Next” on the welcome screen to proceed to the license agreement. Read through the End User License Agreement (EULA). This is standard software licensing language covering your rights to use the software and AutomationDirect’s terms.
Once you’ve reviewed the agreement, select “I accept the terms of the license agreement” and click “Next” to continue. You cannot proceed without accepting these terms.
Step 5: Choose Installation Location and Features
Since we had a previous version on this computer, select “Replace Existing Instance.”
The installer will ask where you want to install the software. The default location is typically:
C:\Program Files (x86)\AutomationDirect\Productivity Suite
In our case, we will change the drive to D, which has more space. The default location works perfectly well most of the time.
Click “Next” to continue. A summary of what and where the software will do will be provided.
Step 6: Complete the Productivity Software Installation
Click “Install” to begin copying files to your computer. The progress bar shows how the installation is progressing. This typically takes 5-10 minutes, depending on your system’s speed.
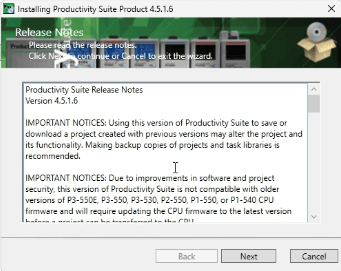
After the files are copied, you will see the latest version release notes. Select Next.
When the installation completes, you’ll see a confirmation screen. The installer will ask you to select Done. This will install the driver and close the installation wizard.
Step 7: First Launch and Verification
Start the productivity suite software via the desktop icon or the Start menu in Windows.
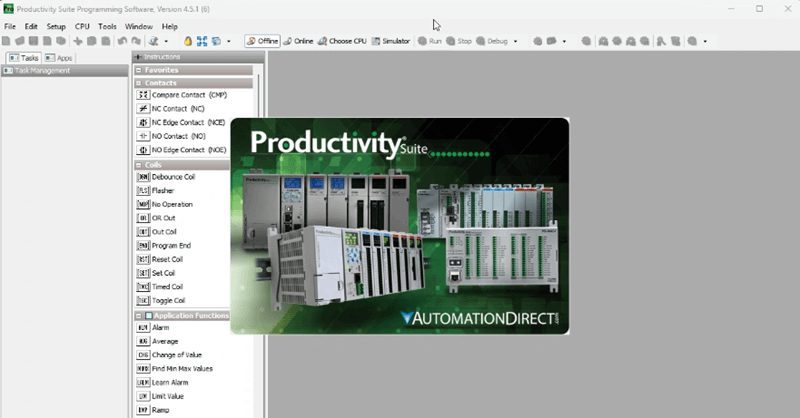
When Productivity Software Suite opens for the first time, you’ll see a splash screen followed by a What’s New page and the main programming environment. On the What’s New page, you will see the latest features of the software. The bottom-left corner of the screen lets you prevent the dialog from appearing again on startup. This can always be accessed in the help menu.
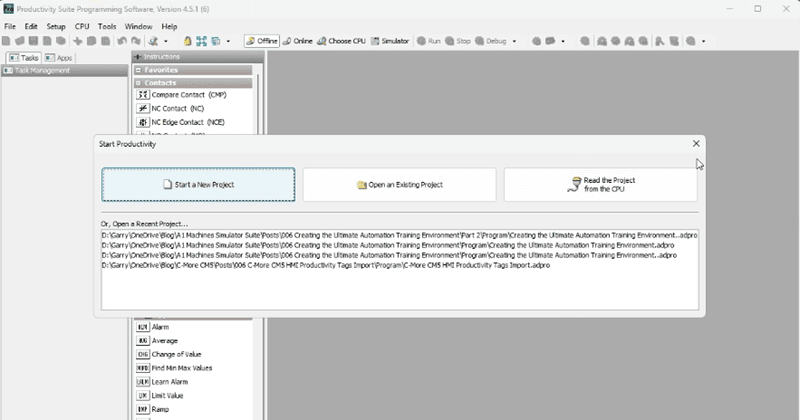
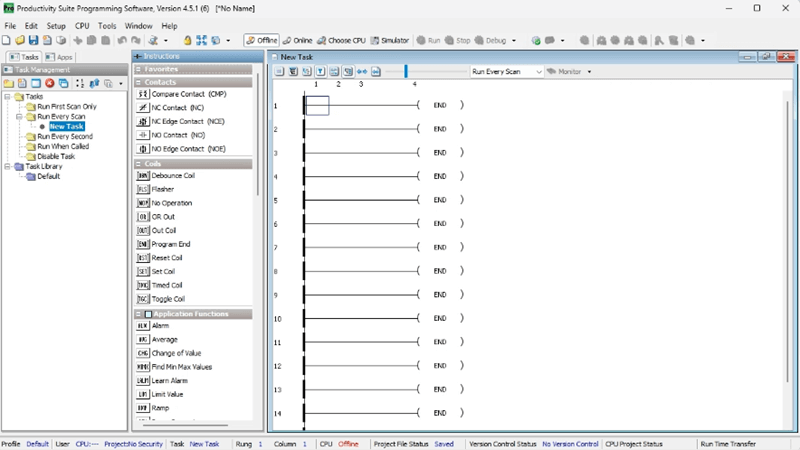
A startup dialog will appear offering options to create a new project, open an existing project, or read a project from a connected CPU.
Take a moment to explore the interface. The workspace is organized into dockable panes that you can arrange to suit your programming style. Key areas include:
- Project Explorer: Navigate your project structure
- Hardware Configuration: Define your PLC and I/O modules
- Ladder Editor: Write and edit your control logic
- Tag Database: Manage all your program variables
- Instructions Pane: Access the full instruction set
The Built-In Simulator: Your Secret Weapon
Here’s where things get exciting for learners and experienced programmers alike. Starting with version 3.8, Productivity Software Suite includes a full PLC simulator. No hardware required.
The simulator emulates:
- Productivity1000, Productivity2000, and Productivity3000 CPUs
- All basic I/O modules (both analog and digital)
- Modbus TCP server/client connections
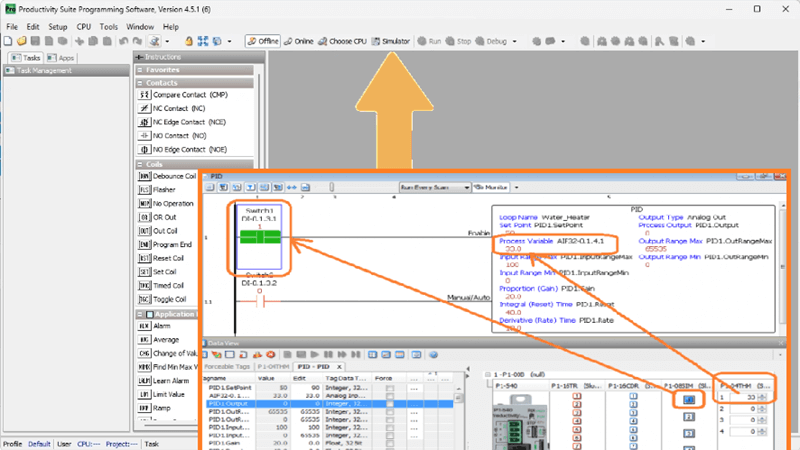
This means you can write, test, and debug your programs before you ever connect to physical hardware. For those learning PLC programming, this removes the barrier of needing expensive equipment just to practice. For professionals, it means you can develop and verify the logic before the commissioning day.
To access the simulator, look for the simulator button near the CPU selection options in the toolbar. Select your target CPU type, configure your virtual I/O, download your program, and run it—all without a physical PLC in sight.
Connecting to Physical Hardware
When you’re ready to work with actual PLCs, Productivity Software Suite makes the connection process straightforward. The PLC Connections dialog displays all available controllers on your network.
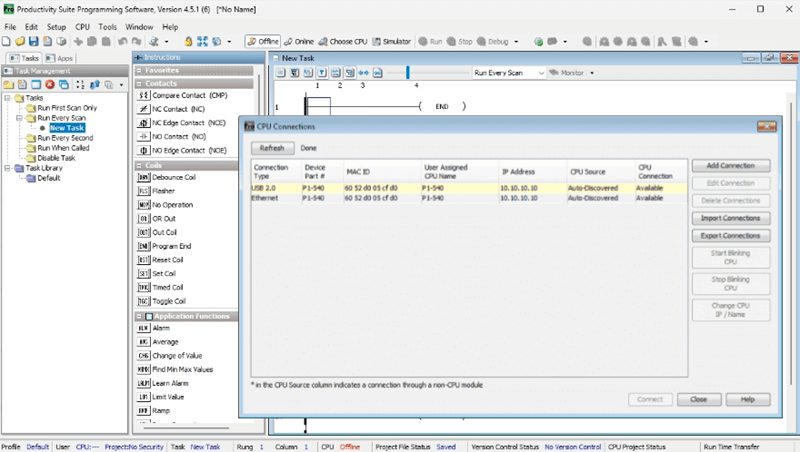
The software even shows PLCs on different subnets and lets you change their IP addresses directly from within the programming environment.
You’re Ready to Program
With Productivity Software Suite installed, you have access to one of the most capable PLC programming environments available—and it didn’t cost you a dime. The tag-based architecture means you’re not fighting with fixed memory addresses. The auto-discovery features save configuration time. And that integrated simulator lets you practice and verify without risk.
Next, we’ll look at establishing communication with your Productivity PLC and creating your first program.
The Productivity Mini PLC series from AutomationDirect, and specifically, the P1-M622-16DR, is a compact powerhouse that packs serious capability into a surprisingly small footprint. To learn more, click here. Click here to build digital twins of 3D virtual machinery, test control logic, and learn automation without expensive hardware, using Machine Simulator.
Watch on YouTube: Unlock FREE PLC Productivity Programming Software with Ease Now!
If you have any questions or need further information, please contact me. Garry
Related Posts:
- Productivity 1000 Series PLC System Hardware
- Productivity Suite PLC Simulator Software Free Download
- Productivity PLC Series
There are many different PLC manufacturers with other hardware and software. All of the programmable logic controllers have similar basic features. Here is how I would approach learning about basic PLCs.
Once you are familiar with the basics of the PLC, you will then learn specifics for the controller you will be programming.
This is the easiest way to learn about PLC programming.
Here are the controllers that we have covered or are covering at ACC Automation:
LS Electric XGB PLC Series
BRX Do-More Series (Do-More Designer Software + Simulator)
Productivity Series P1000 / P2000
Click PLC Series
Omron CP1H Series
Horner XL4 PLC Series
Arduino Opta PLC
The EasyPLC Software Suite is a comprehensive package that includes PLC, HMI, and machine simulator software. This allows you to make a digital twin. See below to receive 10% off this software. This PLC learning package contains the following:
Easy PLC – PLC Simulation will allow programming in Ladder, Grafcet, Logic Blocks, or Script.
HMI System – Easily create a visual human-machine interface (HMI)
Machine Simulator – A virtual 3D world with real-time graphics and physical properties. PLC programs can be tested using the EasyPLC or through other interfaces. (Modbus RTU, TCP, etc.)
Machine Simulator Lite – Designed to run on Android Devices.
Machine Simulator VR – Virtual Reality comes to life so you can test, train, or practice your PLC programming.
Purchase your copy of this learning digital twin package for less than $95 USD for a single computer installation or less than $110 USD to allow access on multiple computers.
Receive 10% off the investment by typing in ACC in the comment section when you order.
Learn PLC programming the easy way. Invest in yourself today.
Examples of PLC program development using the five steps.
Click PLC – Easy Transfer Line Programming – Video
Productivity PLC Simulator – Chain Conveyor MS – Video
Five Steps to PLC Program Development – Die Stamping
PLC Programming Example – Process Mixer
PLC Programming Example – Shift Register (Conveyor Reject)
PLC Programming Example – Paint Spraying
PLC Programming Example – Delay Starting of 7 Motors
PLC Programming Example – Pick and Place
PLC Programming Example – Sorting Station (Shift Register)
PLC Programming Example – Palletizer
If you’re like most of my readers, you’re committed to learning about technology. The numbering systems used in PLCs are not difficult to understand. We will walk through the numbering systems used in PLCs. This includes Bits, Decimals, Hexadecimal, ASCII, and Floating Points.
To get this free article, subscribe to my free email newsletter.
Use the information to educate others on how numbering systems work. Sign up now.

The ‘Robust Data Logging for Free’ eBook is also available as a free download. The link is included when you subscribe to ACC Automation.