We will now look at the BRX Do-More HTTP JSON instructions in the PLC. One of the features of the BRX Do-More Series PLC is the ability to expand its capability to fit your application. Software and hardware changes are ongoing so the PLC can grow with your needs. Communication is something that the BRX Do-More PLC can do very well. As part of the internet of things (IoT), the BRX Do-More will share and exchange data. You can also refer to this as the industrial internet of things. This will suit several industrial applications.

The Do-more Updates Release 2.5.2 on April 22, 2019, has introduced new instructions. Here are the instructions that we will be using:
HTTPCMD – HTTP Request / Response with Server (BRX only) Do-More
JSONPARSE – Parse JSON Text (BRX only) Do-More
We will be using these instructions to read the weather conditions from a website. Let’s get started.
Previously in this BRX series PLC, we have discussed:
System Hardware – Video
Unboxing – Video
Installing the Software – Video
Establishing Communication – Video
Firmware Update – Video
Numbering Systems and Addressing – Video
First Program – Video
Monitoring and Testing the Program – Video
Online Editing and Debug Mode – Video
Timers – Video
Counters – Video
High-Speed IO – Video
Compare Instructions – Video
Math Instructions – Video
Program Control – Video
Shifting Instructions – Video
Drum Instruction – Video
Serial Communication – Modbus RTU to Solo Process Temperature Controller – Video
Data Logging – Video
Email – Text SMS Messaging Gmail – Video
Secure Email Communication Video
AdvancedHMI Communication – Modbus TCP – Video
Analog IO – System Configuration – Video
See the video below to watch how easy it is to retrieve JSON information from a website using the HTTPCMD and JSONPARSE instructions in our BRX Series PLC. (Do-More Designer Simulator)
Weather Data – BRX Do-More JSON Instructions
We will be using the Open Weather Map website to get the current weather information in Atlanta, USA.
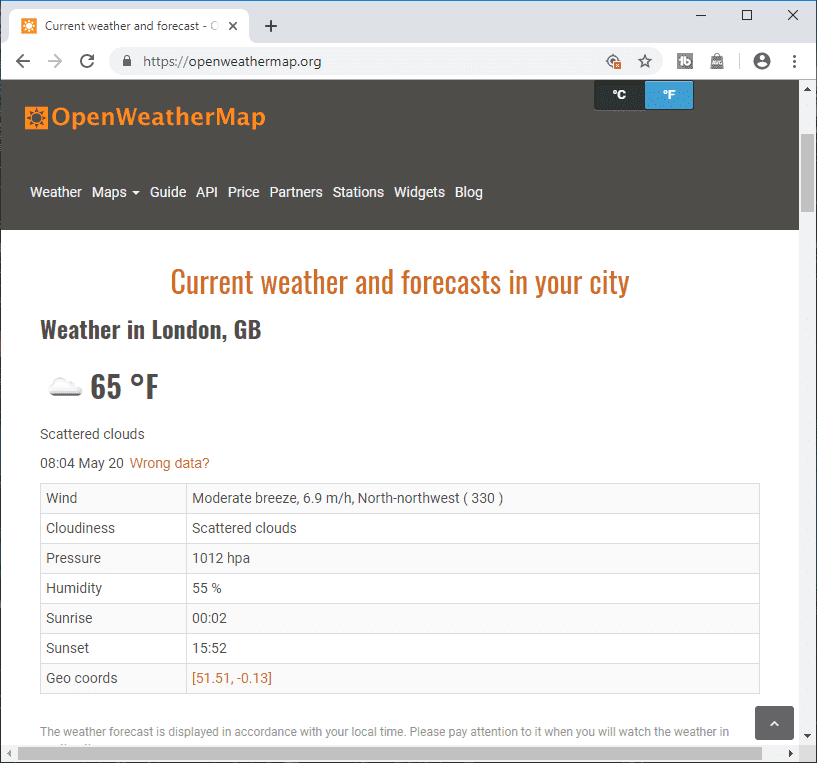
The Open Weather Map Documentation will be shown on the website for the JSON format that we will be using.
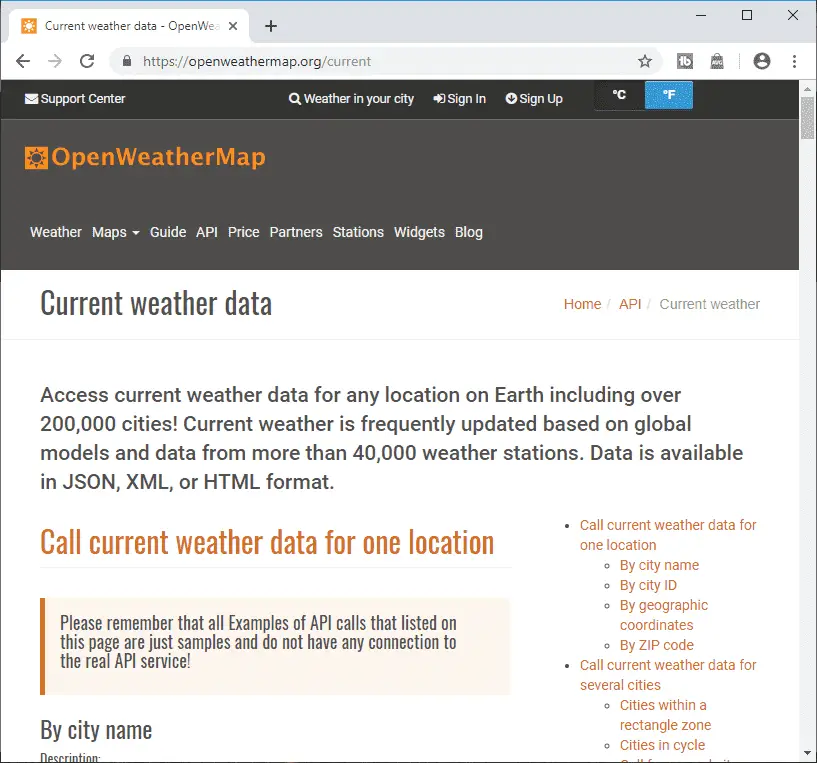
We are currently using a sample from the website but you can sign up to use this information free of charge for a certain number of calls.
Here is the URL we will be using to get our current weather in Atlanta in imperial units.

TCP Connection – openweathermap.org
HTTP Request – /data/2.5/weather?q=Atlanta,us&units=imperial&appid=b6907d289e10d714a6e88b30761fae22
Note: The application identification (appid) will be assigned to you when you register on the website.
Weather Format – JSON
Our URL above responded with the following JSON formatted data.{“coord”:{“lon”:-84.39,”lat”:33.75},”weather”:[{“id”:701,”main”:”Mist”,”description”:”mist”,”icon”:”50d”}],”base”:”stations”,”main”:{“temp”:68.16,”pressure”:1018,”humidity”:73,”temp_min”:64.4,”temp_max”:72},”visibility”:16093,”wind”:{“speed”:4.7,”deg”:260},”clouds”:{“all”:40},”dt”:1558353930,”sys”:{“type”:1,”id”:3335,”message”:0.0097,”country”:”US”,”sunrise”:1558348417,”sunset”:1558398889},”id”:4180439,”name”:”Atlanta”,”cod”:200}
JSON stands for JavaScript Object Notation. It is a method of storing and exchanging data. You can see that this text based data usually generated by JavaScript is easily understood. Example: Our humidity is 73%.
More information on JSON can be found at w3schools.
To make the JSON data even easier to read, an online parser can be used. Copy our data into the INPUT and we can see the OUTPUT.
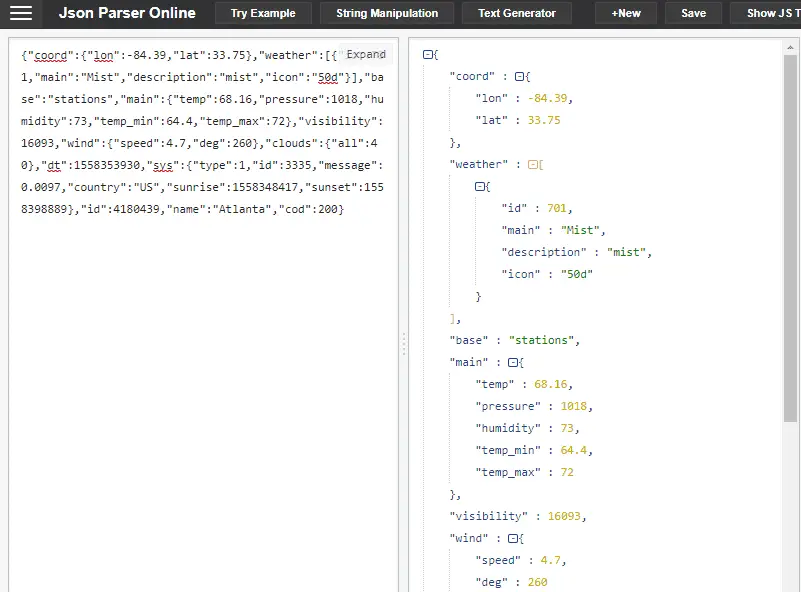
Here is the resulting output from the parser.
{
• “coord” : -{ 0
o “lon” : -84.39,
o “lat” : 33.75
},
• “weather” : -[ 1
o -{
“id” : 701,
“main” : Mist,
“description” : mist,
“icon” : 50d
}
• ],
• “base” : stations, 2
• “main” : -{ 3
o “temp” : 68.16,
o “pressure” : 1018,
o “humidity” : 73,
o “temp_min” : 64.4,
o “temp_max” : 72
},
• “visibility” : 16093, 4
• “wind” : -{ 5
o “speed” : 4.7,
o “deg” : 260
},
• “clouds” : -{ 6
o “all” : 40
},
• “dt” : 1558353930, 7
• “sys” : -{ 8
o “type” : 1,
o “id” : 3335,
o “message” : 0.0097,
o “country” : US,
o “sunrise” : 1558348417,
o “sunset” : 1558398889
},
• “id” : 4180439, 9
• “name” : Atlanta, 10
• “cod” : 200 11
}
Note: I have added the Field Index Number to the JSON for reference. This will assist us in our PLC program.
Size of the Returned Data – JSON
Our returned size of the data is good to know when we start our PLC program. We can copy our result from the URL to bytesizematters. This will display the number of bytes that we will be using.
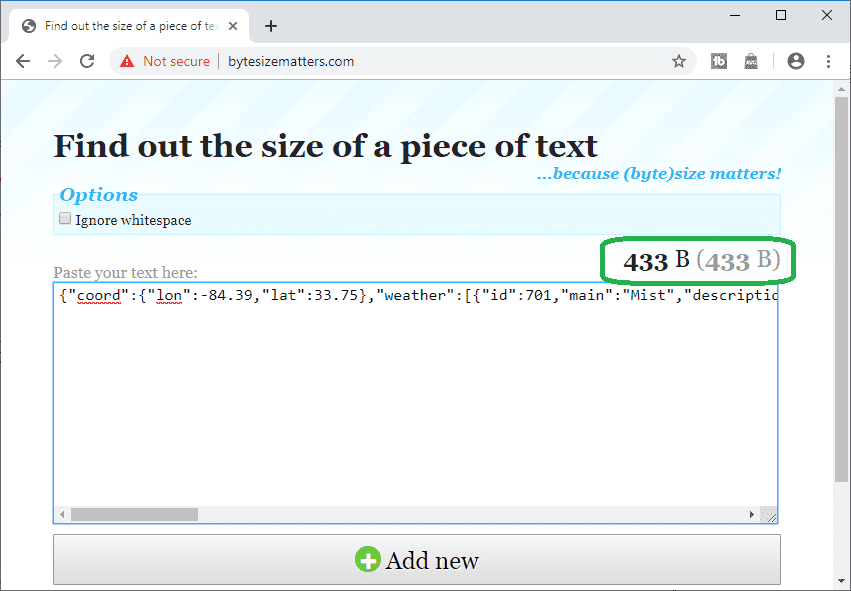
In our case, we are using 433 bytes of data.
Retrieved Information Format – JSON
The data parameters that we will be retrieving with the PLC are main (Index 3) and wind (Index 5). This will give us temperature, pressure, humidity, wind speed and direction.
main
– main.temp – Temperature. Unit Default: Kelvin, Metric: Celsius, Imperial: Fahrenheit.
– main.pressure – Atmospheric pressure (on the sea level, if there is no sea_level or grnd_level data), hPa
– main.humidity – Humidity, %
– main.temp_min – Minimum temperature at the moment. This is deviation from current temp that is possible for large cities and megalopolises geographically expanded (use these parameter optionally). Unit Default: Kelvin, Metric: Celsius, Imperial: Fahrenheit.
– main.temp_max – Maximum temperature at the moment. This is deviation from current temp that is possible for large cities and megalopolises geographically expanded (use these parameter optionally). Unit Default: Kelvin, Metric: Celsius, Imperial: Fahrenheit
wind
– wind.speed – Wind speed. Unit Default: meter/sec, Metric: meter/sec, Imperial: miles/hour.
– wind.deg – Wind direction, degrees (meteorological)
PLC Program – BRX Do-More JSON Instructions
We will be using the Do-More Designer Simulator for our program. The instructions that we are using are only included in version 2.5.2 and higher in our Do-More Designer Software. The Simulator and the BRX PLC can only be used for these instructions.
HTTPCMD – HTTP Request / Response with Server (BRX only) Do-More
The BRX Do-More PLC as an http/https client, send a GET, POST, PUT, HEAD, or DELETE request to a server, and receive the response. Along with the new JSONPARSE and JSONBUILD instructions (see below), HTTPCMD can provide a useful interface between your PLC and data-rich services utilizing REST APIs.
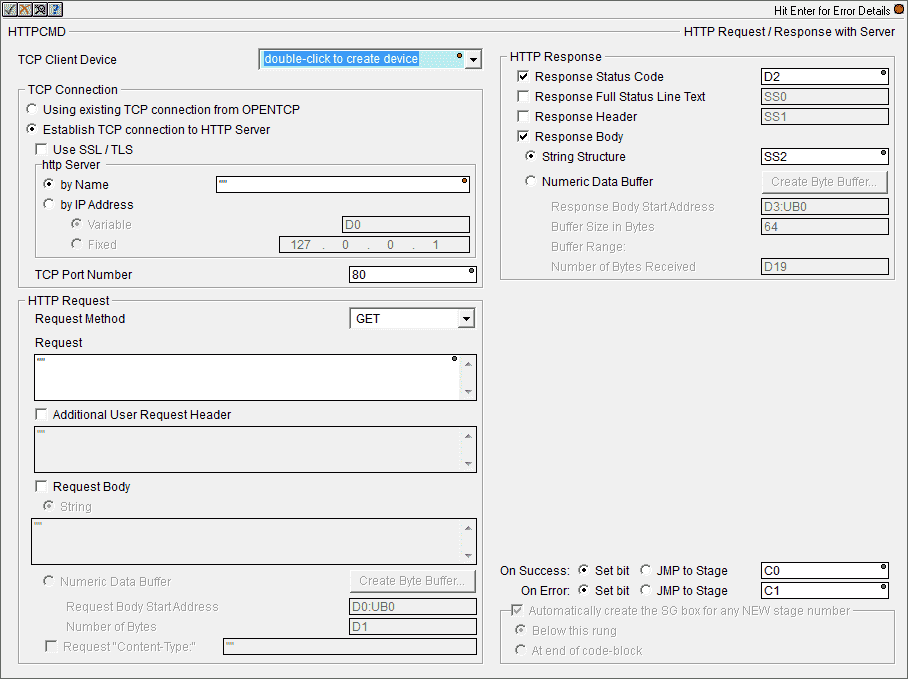
The HTTPCMD will be the first instruction that we will be using. TCP Client Device will need to be set. Double click on the device. This is part of the TCP Connection group of this instruction.
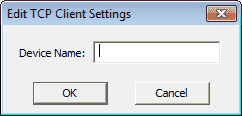
Our device configuration dialog will now appear. This is part of the system configuration of the PLC in which we will create our new TCP Client Device.
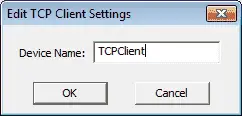
We will name this TCPClient. Select OK.
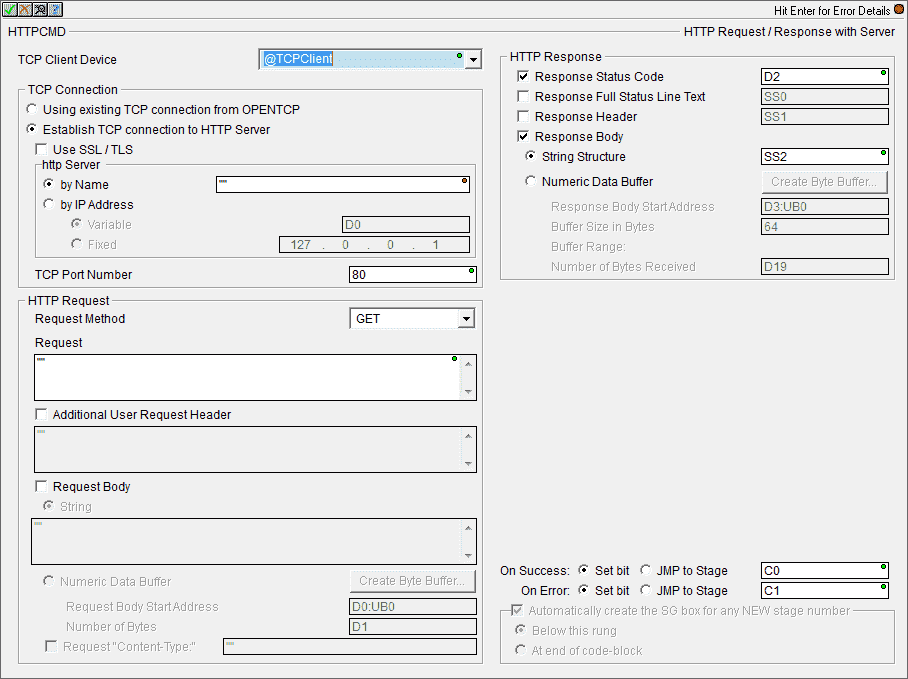
We will now fill in our TCP Connection information.
Ensure that the radio button Establish TCP Connection to HTTP Server is on. The Open Weather Map website uses a secure connection so check the ‘Use SSL/TLS’ selection. This will automatically select TCP Port Number 443. Under the https by name enter “openweathermap.org”.
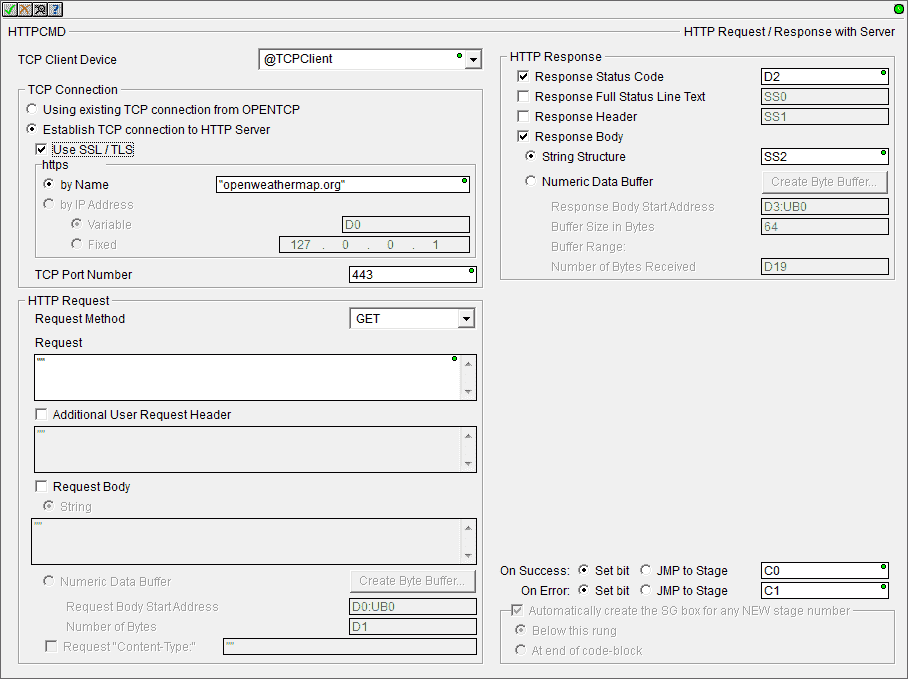
Here is the completed TCP Connection.
We will now fill out the HTTP Request information.
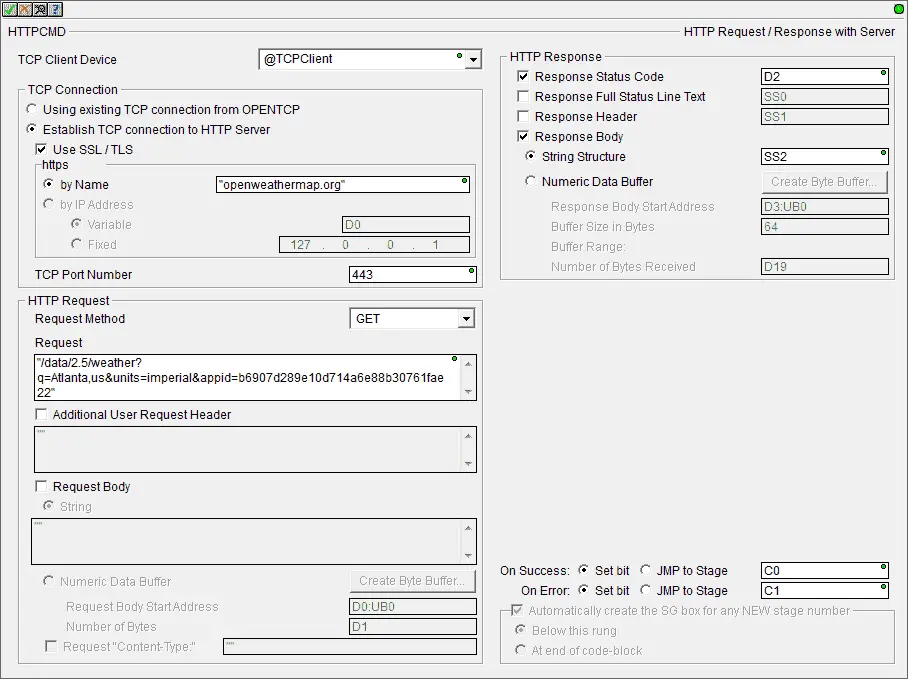
Our request method will be GET. The Request information will be “/data/2.5/weather?q=Atlanta,us&units=imperial&appid=b6907d289e10d714a6e88b30761fae22″. This represents the weather in Atlanta USA in Fahrenheit.
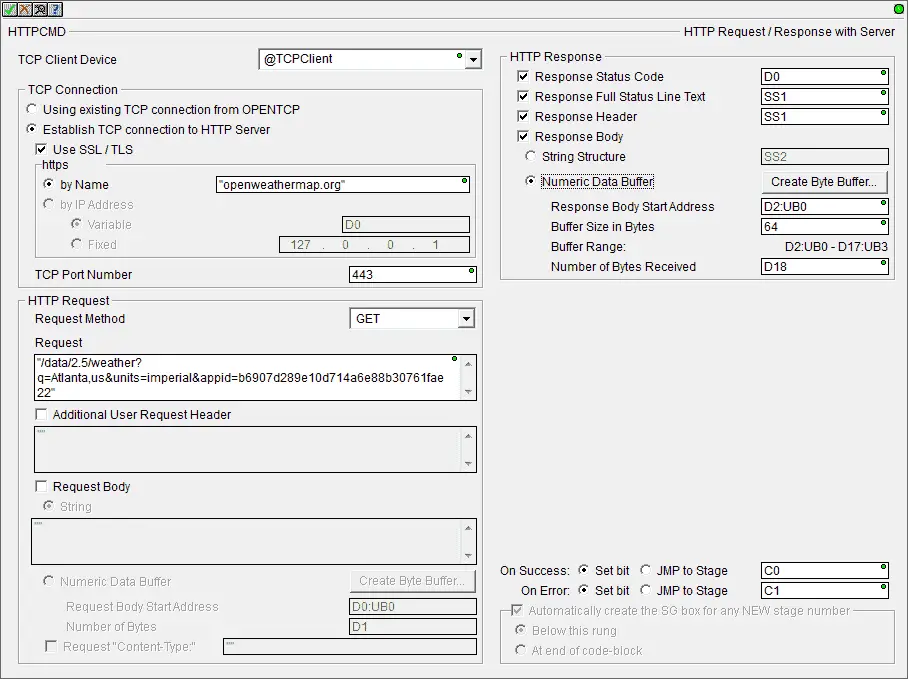
Under the HTTP Response, we will use D0 as our response status code. SS1 will be used as our response full status line text and response header.
Check the response body and select the numeric data buffer. Click the Create Byte Buffer.
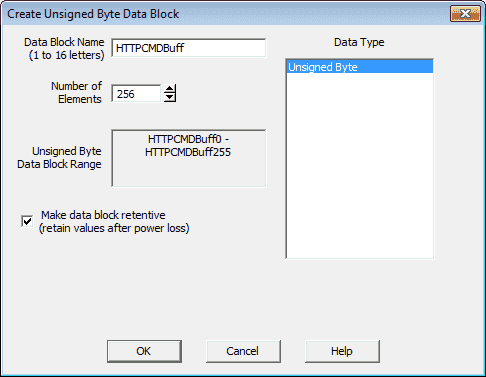
We will create an unsigned byte data block called HTTPCMDBuff. The number of elements will be set for 1000. This will give users additional room in the block if information changes.
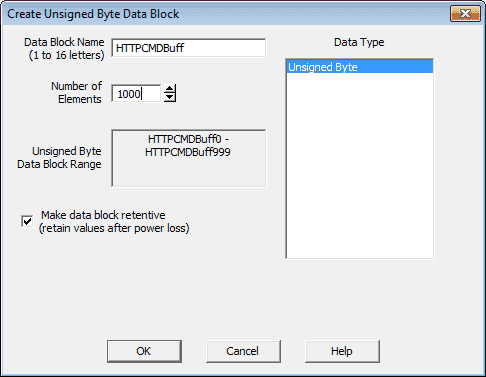
Our data block will be memory retentive. (Retains values after a power loss.)
Select OK.
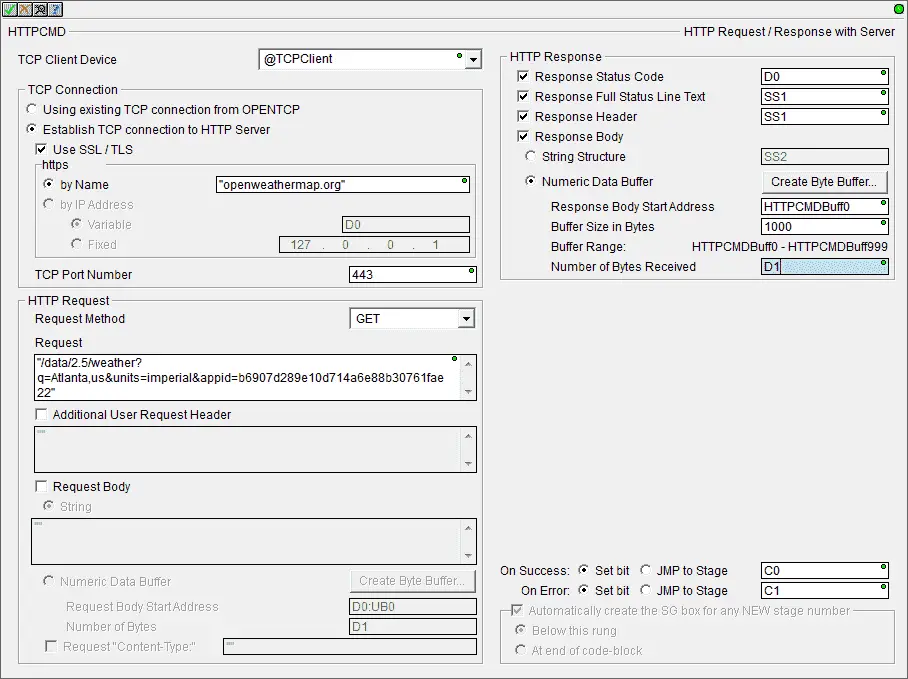
Our HTTPCMD instruction is now complete. Click the check mark in the upper left corner.
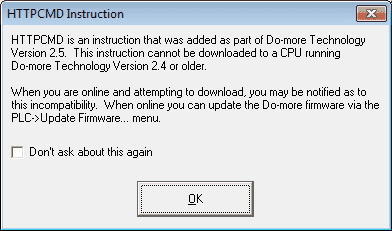
An information message will be displayed indicating the version of the software and firmware required for this instruction. Click OK.
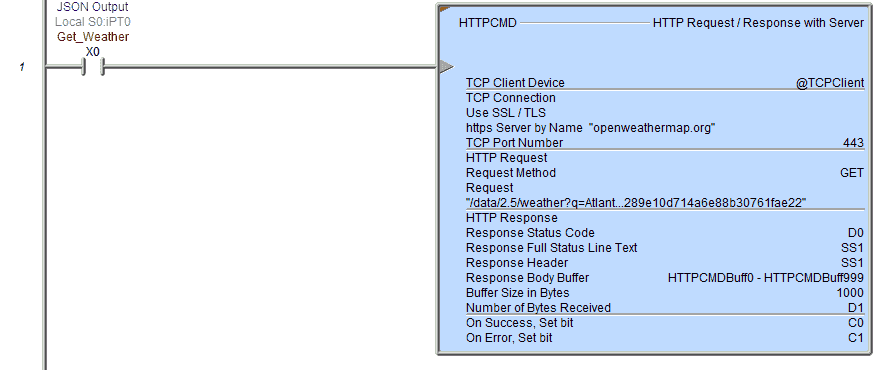
We will use input X0 to trigger this instruction. The instruction is already edge triggered so it will only execute once during a transition of off to on with the input.
If we download and execute this one line of ladder code we can then monitor the result.
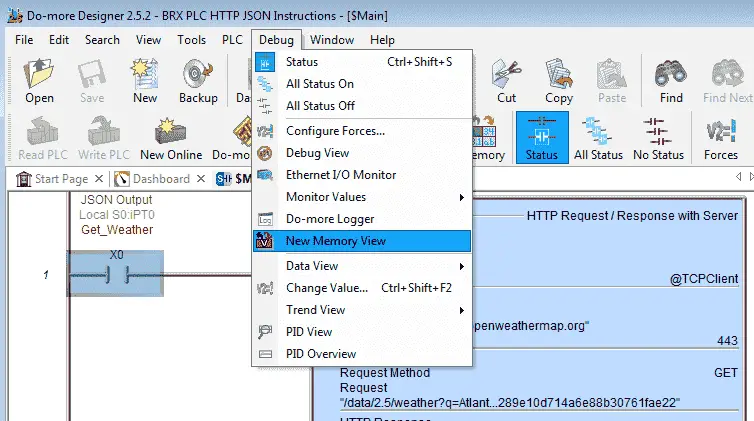
Select New Memory View from the main menu | Debug.
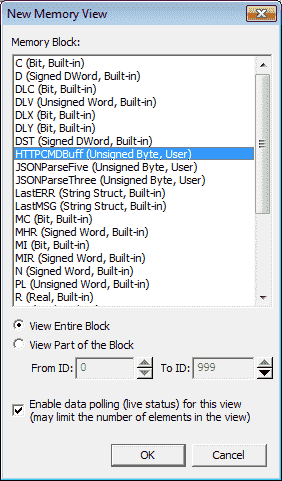
Select the HTTPCMDBuffer that we just created. View Entire Block and select OK.
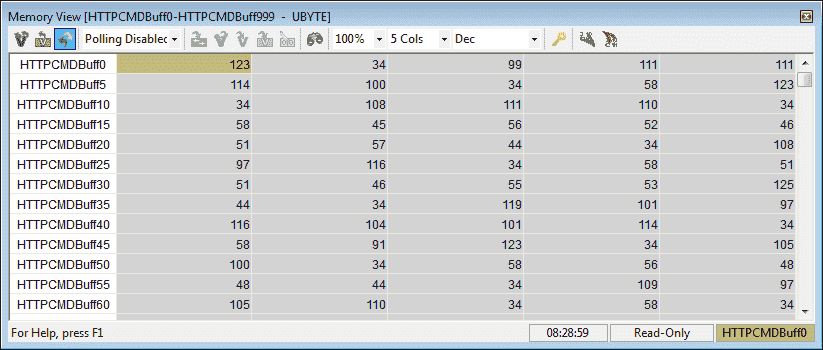
Select 30 cols and ASCII.
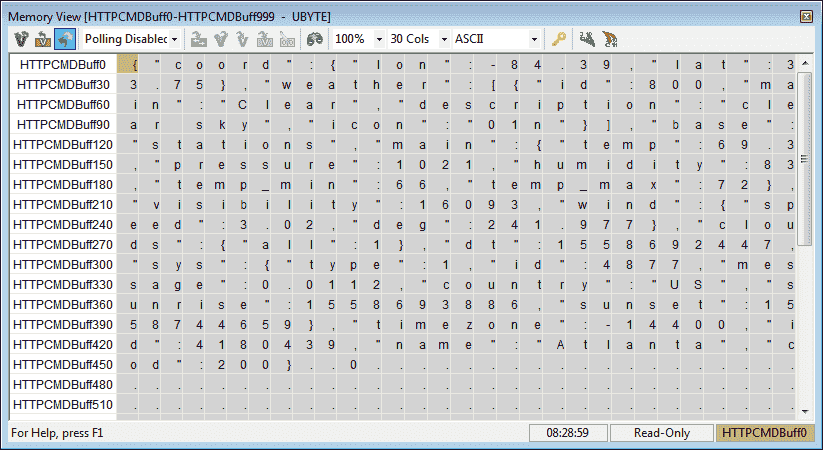
We can see how the information from the website is now in our PLC memory block.
We will now use JSONPARSE to extract the information from this JSON memory block.
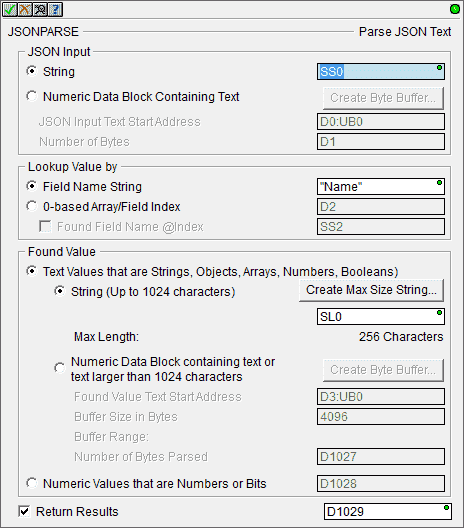
JSONPARSE – Parse JSON Text (BRX only) Do-More
Sometimes data received via MQTT or HTTP REST APIs can come in JSON format. The Parse JSON Text instruction looks up a value based on a Field Name or a 0-based array index within a JSON Input record. The Found Value can be returned as text or as Numeric or Bit values, depending upon the JSON record format. The Return Results DWORD contains details about the result of the parse: any JSON parsing errors• if no parsing error, information on the• JSON Input, whether it was an object, array, or value if no parsing error, information on the• Found Value type, whether it was a nested object, an array, a number, a quoted string, or one of the predefined null, false, true values
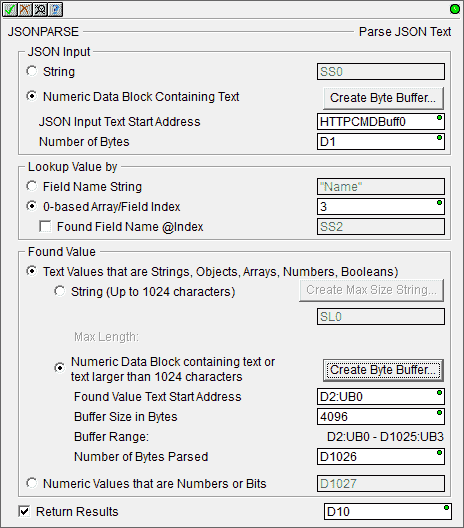
Under the JSON input, we will select the HTTPCMDBuff(0) that we created in the HTTPCMD instruction above. The number of bytes will be set for D1 from the same instruction above.
Select the 0-based Array/Field Index under the ‘Lookup Value by’ section and enter the value 3.
Under the found value select (Text Values that are Stings, Objects, Arrays, Numbers, Booleans) Select the Create Byte Buffer.
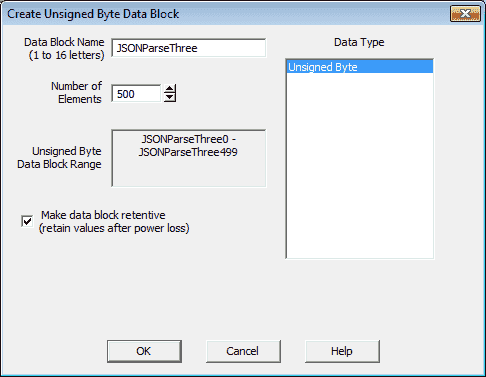
Create a byte data block called JSONParseThree. It will contain 500 elements and be memory retentive. Select OK.
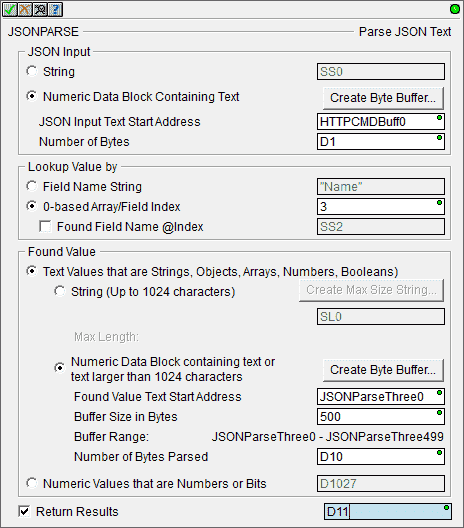
The number of bytes parsed will be put in D10 and the return results will be put in D11. Select the check mark at the top left of the instruction.

We will use the leading edge of the HTTPCMD success bit (C0) to trigger our JSONPARSE instruction.
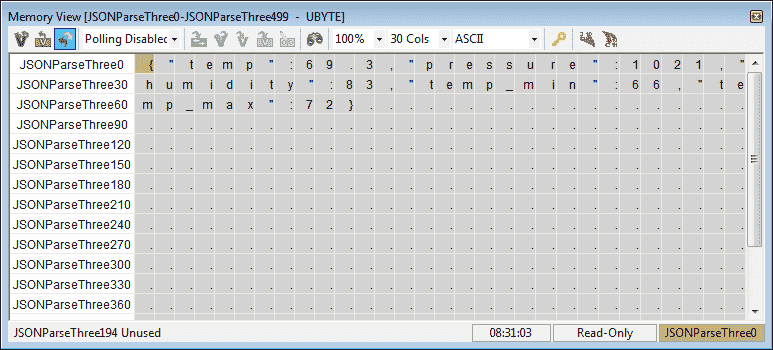
If we were to run our program now, the result that we will see is the field level 3 information from our original data retrieved.
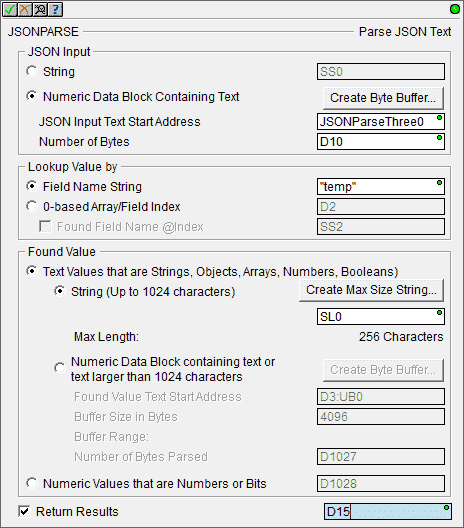
We will now use the JSONPARSE instruction again to look for a specific field string name that we returned previously.
The JSON input will be JSONParseThree(0) and the number of bytes will be D10 from our previous instruction.
Our lookup value by field name string will be set for “temp”. This will return our current temperature.
Under the found value select string and store this information in SL0. Our return results will be set for D15. Select the check mark in the upper left corner.

If the result word from our previous JSONPARSE instruction is successful, (D11:W1 = 1) then execute the find temp value.
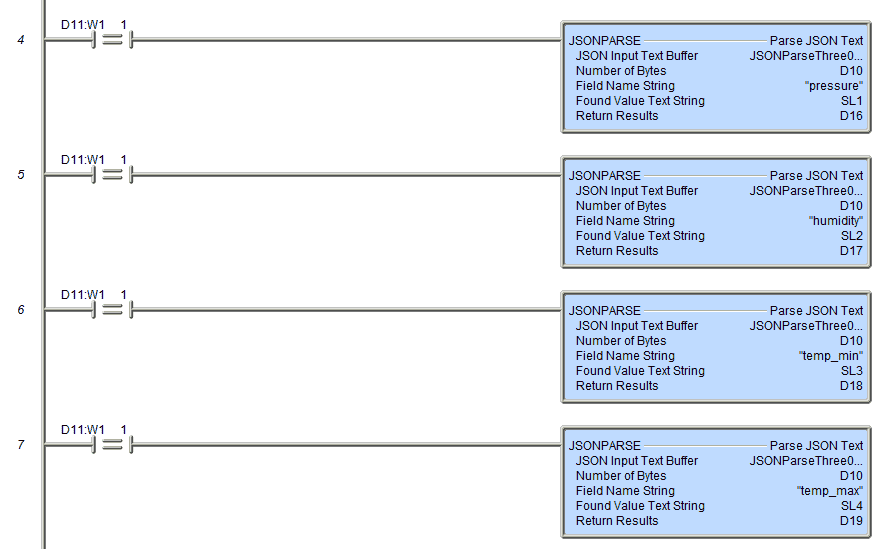
We will also find the other information in field index 3 of our JSON data.
We will now find the values under the field index 5 of our JSON data. (wind)
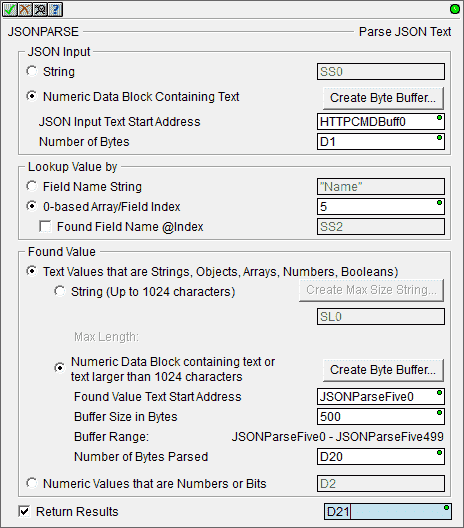
Select the 0-based Array/Field Index under the ‘Lookup Value by’ section and enter the value 5.
Under the found value select (Text Values that are Stings, Objects, Arrays, Numbers, Booleans) Select the Create Byte Buffer. Create a byte data block called JSONParseFive. It will contain 500 elements and be memory retentive. Select OK.

We will use the leading edge of the HTTPCMD success bit (C0) to trigger our JSONPARSE instruction.

If we were to run our program now, the result that we will see is the field level 5 information from our original data retrieved.
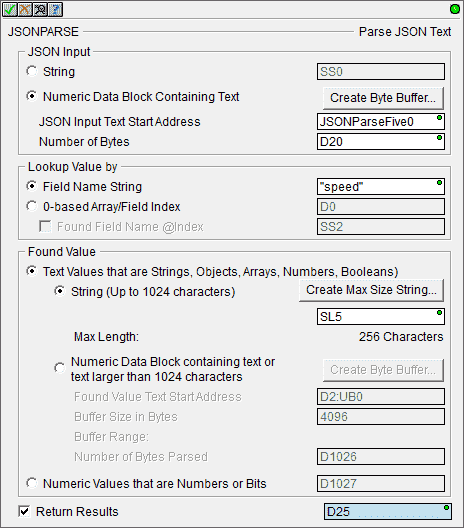
We will now use the JSONPARSE instruction again to look for a specific field string name that we returned previously.
The JSON input will be JSONParseFive(0) and the number of bytes will be D20 from our previous instruction.
Our lookup value by field name string will be set for “speed”. This will return our current wind speed.
Under the found value select string and store this information in SL5. Our return results will be set for D25. Select the check mark in the upper left corner.

If the result word from our previous JSONPARSE instruction is successful, (D11:W1 = 1) then execute the find temp value.

We will also find the other information in field index 5 of our JSON data. (wind direction)
Our final rung of the ladder logic will reset our Data Byte Blocks and the HTTPCMD success and error bits.
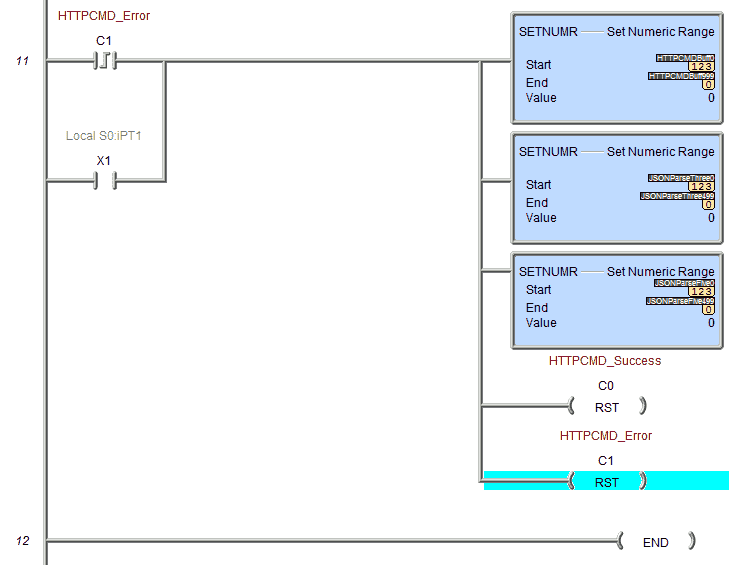
This will be triggered on X1 or the leading edge of the HTTPCMD error condition.
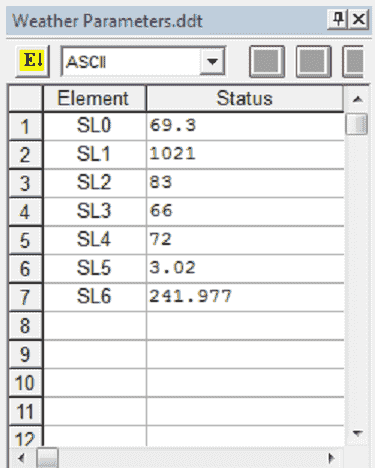
Using Data Monitor we can see all of the values that we have returned from the website.
See the video below to watch the retrieval of the JSON information from a website using the HTTPCMD and JSONPARSE instructions in our BRX Do-More Series PLC. (Do-More Designer Simulator)
You can download the program here.
BRX Do-More Series PLC from Automation Direct – Power to deliver
Overview Link (Configure and purchase a system)
Manuals and Product Inserts (Installation and Setup Instruction)
Do-More Designer Software v2.0.3 (Free Download Link) – The software will contain all of the instruction sets and help files for the BRX Do-More Series PLC.
Watch on YouTube: BRX PLC HTTP JSON Instructions
If you have any questions or need further information please contact me.
Thank you,
Garry
If you’re like most of my readers, you’re committed to learning about technology. Numbering systems used in PLC’s are not difficult to learn and understand. We will walk through the numbering systems used in PLCs. This includes Bits, Decimal, Hexadecimal, ASCII and Floating Point.
To get this free article, subscribe to my free email newsletter.
Use the information to inform other people how numbering systems work. Sign up now.
The ‘Robust Data Logging for Free’ eBook is also available as a free download. The link is included when you subscribe to ACC Automation.

