A proximity sensor (switch) is able to detect object presence without physical contact like a limit switch. No physical contact means that the switch has no parts that will wear out. The life span of the sensor is increased with less maintenance.
A capacitive proximity sensor will detect ferrous and non-ferrous objects. The sensor works by oscillating the charge on the plates in the sensor. When an object is placed in front of the surface, the amount of current flow is detected. (Capacitance) The dielectric of objects will determine the distance that the object can be detected.
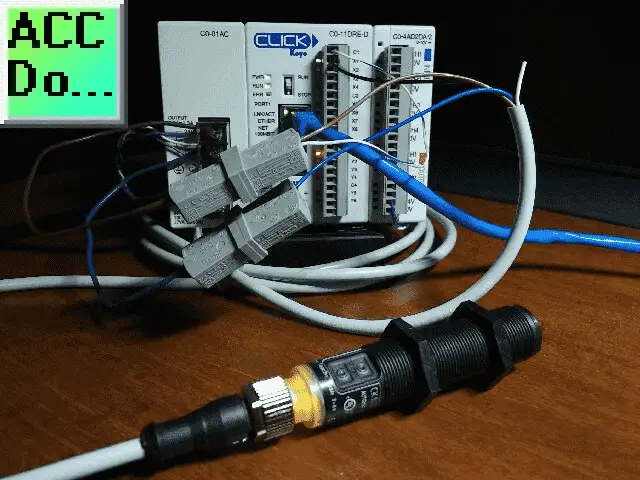
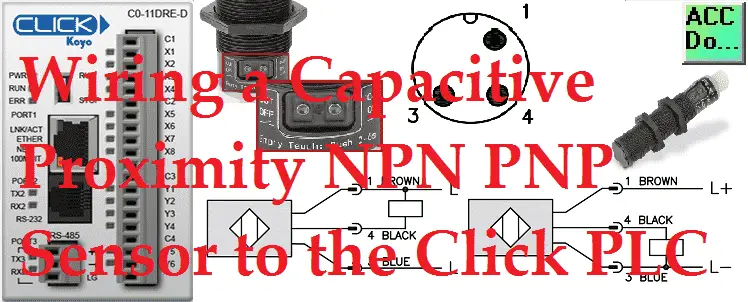
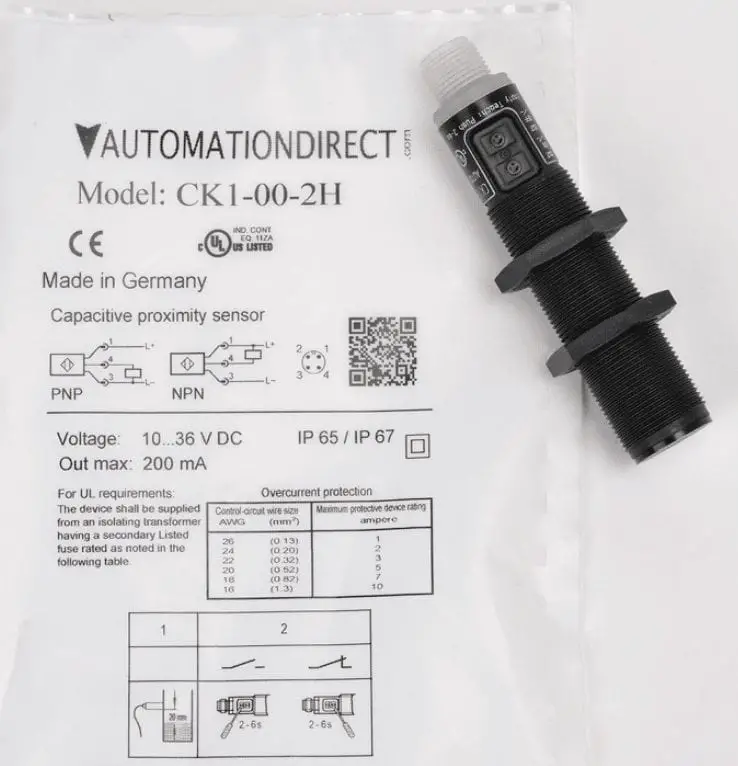
We will be wiring a capacitive proximity switch into the input of our Click PLC. The CK1-00-2H is an 18mm diameter, NPN/PNP N.O./N.C. selectable output with a 12mm sensing distance. That means that the sensor can be wired as positive (Sourcing) or negative (Sinking) switch. This unshielded 10 Hz switching frequency sensor also has a 4-pin M12 quick disconnect. Let’s get started.
Additional discrete component connections to PLC include the following:
Here’s a Quick Way to Wire NPN and PNP Devices
– Wiring NPN Sensor to PLC Video
– Wiring PNP Sensor to PLC Video
– Wiring Contact Discrete PLC Inputs Video
Wiring Interposing Relays
– Wiring NPN and PNP Sensors into the PLC with an Interposing Relay Video
Click PLC HMI Rotary Encoder Dial Input – Video
Wiring Stack Light to Click PLC – Video
Wiring Push Buttons and Selector Switch to Click PLC – Video
– Test and Assembly of Push Buttons and a Selector Switch – Video
Wiring an Inductive Proximity NPN PNP Sensor to the Click PLC – Video
Watch the video below to see the wiring of sinking and sourcing to the Click PLC with the capacitive proximity switch.
CK Series Capacitive Proximity Sensors
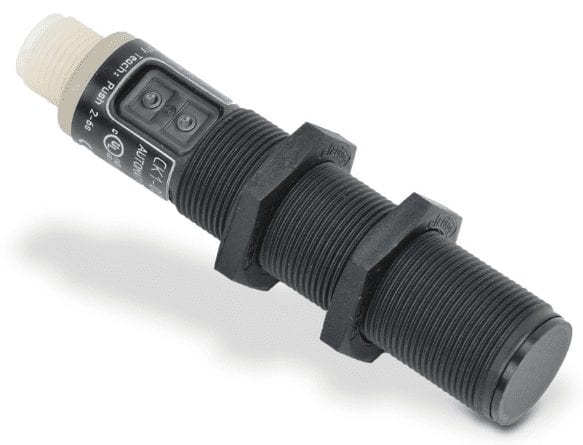
M18 (18 mm) plastic – DC
• NO/NC selectable
• Sensing distance: 12mm
• Supply voltage: 10-36 VDC
• Switching frequency: 10Hz
• IP65/IP67 rated
• LED status indicators
• M12 quick-disconnect; purchase cable separately
• Lifetime warranty
• Auto-detect circuit
• Push button teach
• Mounting accessories available
• Agency approvals: cULus file E328811, CE, RoHS
CK1-00-2H Specifications
Capacitive Proximity Sensors
When looking at proximity sensors here are some terms that you need to understand.
Shielded and Unshielded types affect the mounting and distance that the sensor can detect.
Our sensor is an unshielded sensor. You will notice that the threads stop before the end of the sensor. This will allow a larger surface area for the sensor to detect the object, therefore, the range is greater. In our case our CK1-00-2H sensing range is 12mm. Switching Frequency
This is indicated in the specifications above and is expressed in Hertz. Hertz is a measurement of pulses per second. In our case, our sensor switching frequency is 10Hz. (10 times a second). In general, the larger the proximity sensor the slower the response.
Short Circuit and Reverse Polarity Protection
This will protect the sensor from incorrect wiring. It is a great feature of this capacitive proximity sensor.
Wiring our Sink/Source Input to Click PLC
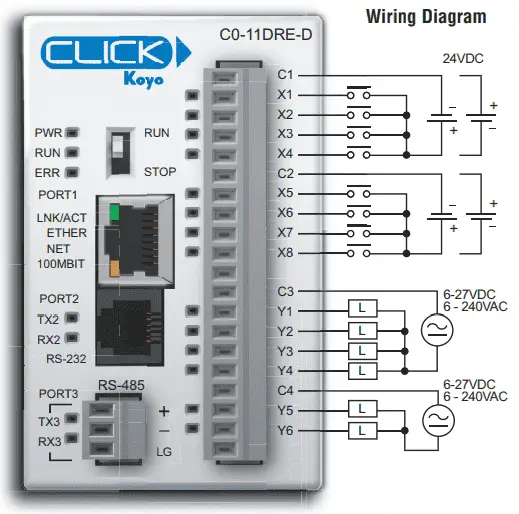
You can see that the inputs of the click can be wired with the common at +24VDC or 0VDC. The input of the PLC will act as the load for our proximity sensor.
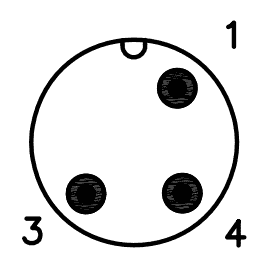
Our capacitive proximity sensor uses a 4-pin M12 quick-disconnect. The specifications for our M12 cable can be found here. (CD12L-0B-020-A0)

NPN Wiring
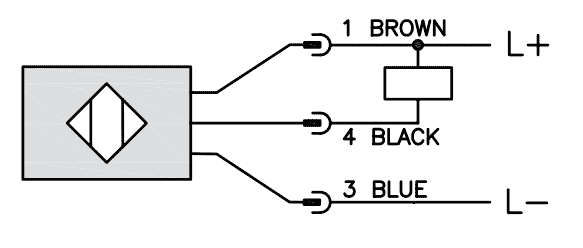
This is sometimes referred to as sinking the load or negative switching. The black wire of our sensor is connected to the PLC input. The common point of the PLC input and the brown wire is connected to the 24VDC supply. The blue wire of our sensor is connected to the 0VDC supply. You can see that when the proximity switches, the sensor then connects the load to 0VDC.
PNP Wiring
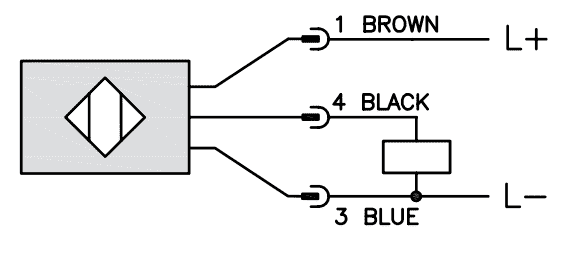
This is sometimes referred to as sourcing the load or positive switching. The black wire of our sensor is connected to the PLC input. The common point of the PLC input and the blue wire is connected to the 0VDC supply. The brown wire of our sensor is connected to the 24VDC supply. You can see that when the proximity switches, the sensor then connects the load to 24VDC.
Watch the video below to see the wiring of our 3-wire sensor each way into our Click PLC.
Teach Functions of Sensor
The teaching function will allow the capacitive proximity sensor to learn the surroundings. It can be used to select the output mode like normally open (N.O.) or normally closed (N.C.). Teach is also used to tell what items not to detect.
Basic Teach Function
The Basic Teach function is conducted while the product is absent and is used to tell the sensor which objects in its environment to suppress in order to detect accurately.
Normally Open Operation (output closes when the tank is full or product is present):
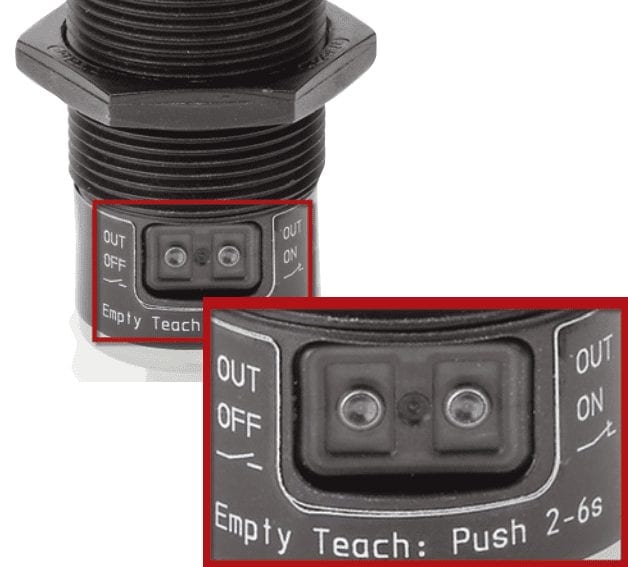
• Press [Out off] for 2s (max 6s) – While pressing the pushbutton the LED flashes slowly. After releasing the pushbutton, the LED extinguishes.
Normally Closed Operation (output opens when the tank is full or product is present):
• Press [Out on] for 2s (max 6s) – While pressing the pushbutton the LED flashes slowly. After releasing the pushbutton, the LED lights continuously.
The proximity sensor is now ready for operation. Objects with low dielectric constants, no further settings are required.
Adjustment Teach Full State
This function is usually performed for liquid material. To perform an Adjustment Teach Full State, first, introduce the product to be detected. For example, if detecting the tank level, fill the tank until the sensing face of the sensor is covered. With the face covered, the LED should light if using the normally open configuration or extinguish if using the normally closed configuration.
Now use the following button sequence to perform the Adjustment Teach Full State: Normally Open Operation (output closes when the tank is full or product is present):
• Press [Out on] for 6s – While pressing the pushbutton the LED first flashes slowly. After six seconds, the LED flashes more rapidly and after releasing the pushbutton, the LED lights continuously.
Normally Closed Operation (output opens when the tank is full or product is present):
• Press [Out off] for 6s – While pressing the pushbutton the LED first flashes slowly. After six seconds, the LED flashes more rapidly and after releasing the pushbutton, the LED extinguishes
Adjustment Teach Empty State
The Adjustment Teach Empty State is recommended to compensate for unwanted material that may have built-up on the sensing face over time. This function can be repeated at any time and it will not affect any Adjustment Teach Full State functions that were performed previously.
To perform an Adjustment Teach Empty State, first, remove the product being detected. For example, if detecting tank level, empty the tank until the level is below the sensing face of the sensor. With the face clear, the LED should extinguish if using the normally
open configuration or light if using the normally closed configuration. Now use the following button sequence to perform the Adjustment Teach Empty State:
Normally Open Operation (output closes when the tank is full or product is present):
• Press [Out off] for 6s – While pressing the pushbutton the LED first flashes slowly. After six seconds, the LED flashes more rapidly and after releasing the pushbutton, the LED extinguishes.
Normally Closed Operation (output opens when the tank is full or product is present):
• Press [Out on] for 6s – While pressing the pushbutton the LED first flashes slowly. After six seconds, the LED flashes more rapidly and after releasing the pushbutton, the LED lights continuously.
Locking/Unlocking
The unit can be electronically locked to protect it against unintentional configurations:
To lock or unlock the unit press [Out on] and [Out off] at the same time for 10s – The LED state (yellow) changes for a short time (i.e., the lit LED goes out briefly or the LED which is not lit lights briefly).
If attempting to perform a teach on the unit and it does not react, it may be locked. Try the above steps to unlock the unit before performing the teach.
Click PLC Program

We will use a simple program in our Click PLC. When the normally open input (X1) proximity sensor is made, the output Y1 turns on.
Monitoring the Click PLC Inputs and Outputs
If the PLC is in a panel and you cannot see the actual inputs and outputs (IO) there is a way to see the status lights. System Monitor is used to doing just that through the Click PLC software.
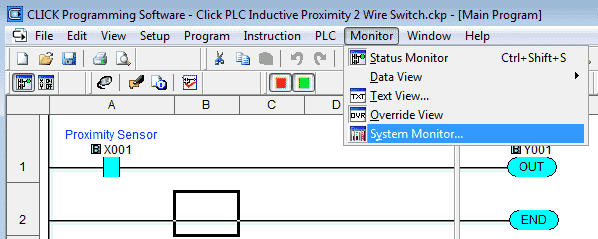
System Monitor can be accessed through the main menu | Monitor | System Monitor…
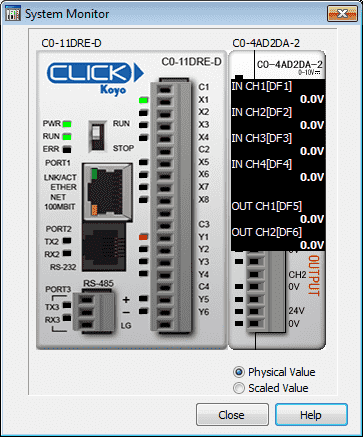
As we run our program the status of the PLC can be monitored.
Please watch the video below to see the wiring and operation of the capacitive proximity switch with the Click PLC.
Download the Click PLC program here.
M18 (18 mm) plastic – DC
CK1-00-2H Specifications
M12 quick-disconnect
CD12L-0B-020-A0
Using the Teach Functions
Proximity Sensor Terminology
Sensors Frequently Asked Questions (FAQ)
Watch on YouTube: Wiring a Capacitive Proximity NPN PNP Sensor to the Click PLC
Here is some additional information on wiring PLC inputs.
Wiring NPN Sensor to PLC
https://youtu.be/Z09l3HKMpqs
https://accautomation.ca/heres-a-quick-way-to-wire-npn-and-pnp-devices/
Wiring PNP Sensor to PLC
https://youtu.be/nP33k5e_Y-k
https://accautomation.ca/heres-a-quick-way-to-wire-npn-and-pnp-devices/
Wiring Contact Discrete PLC Inputs
https://www.youtube.com/watch?v=xh5dE2Z09d0
https://accautomation.ca/how-plc-inputs-work/
Wiring Stack Light to Click PLC
https://accautomation.ca/wiring-stack-light-to-click-plc/
https://youtu.be/gwDIVtNSXfs
If you have any questions or need further information please contact me.
Thank you,
Garry
If you’re like most of my readers, you’re committed to learning about technology. Numbering systems used in PLC’s are not difficult to learn and understand. We will walk through the numbering systems used in PLCs. This includes Bits, Decimal, Hexadecimal, ASCII and Floating Point.
To get this free article, subscribe to my free email newsletter.
Use the information to inform other people how numbering systems work. Sign up now.

The ‘Robust Data Logging for Free’ eBook is also available as a free download. The link is included when you subscribe to ACC Automation.