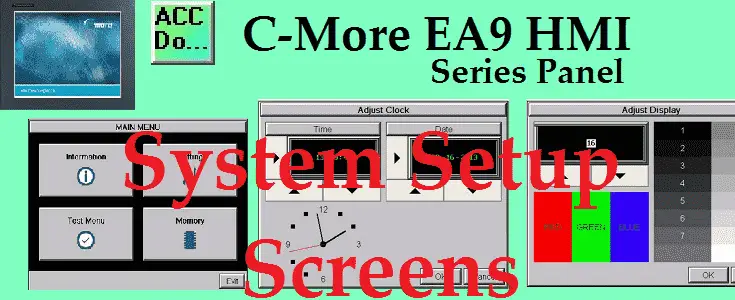
The C-more touch panels include a series of built-in System Setup Screens that allow you to view detailed information about the panel; adjust certain features; configure communications; test various functions of the touch panel; backup & restore firmware, a recipe, log, and project memory; clear memory and reset all values and conditions back to the original factory defaults.
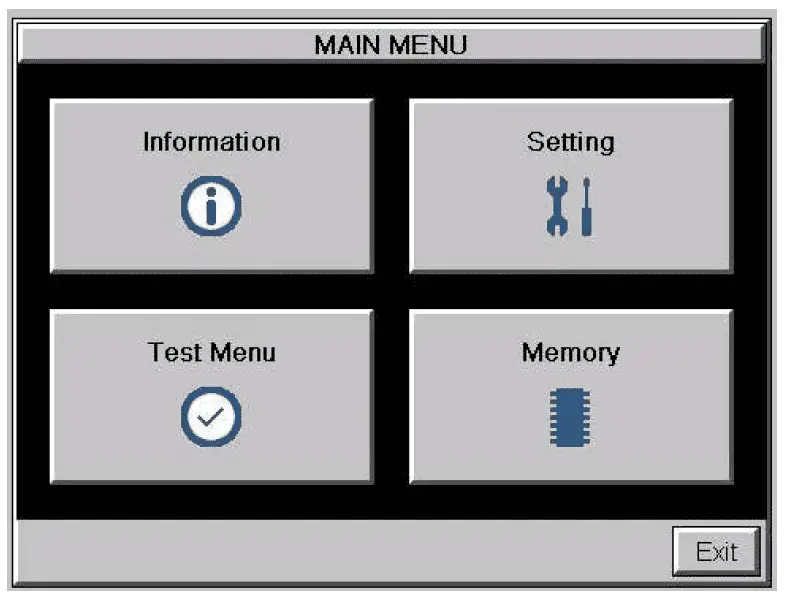
Information, Setting, Test Menu and Memory make up the four Main Menu setup screens.
Information – The information tabs display details about the touch panel model; the panel’s name; version information for the hardware, boot loader, and firmware; clock source, and beeper status. Other tabs display details on the panel’s internal memory and the status of any external memory devices. Communication port details are available in this area, as well as an error log to help in troubleshooting the system.
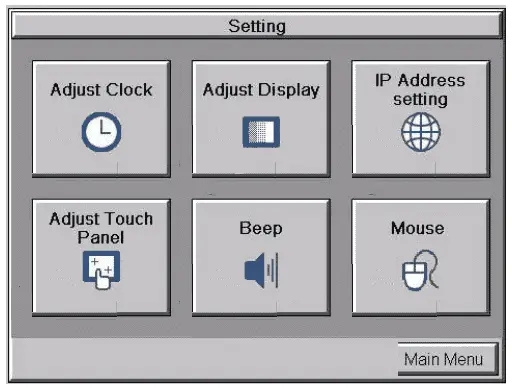
Setting – This is the area for making adjustments to the internal clock, adjusting the brightness of the display, setting the IP address adjusting (calibrating) the touch panel, enabling or disabling the internal beep, and enabling or disabling a mouse pointer.
Test Menu – This menu will allow you to test the touch panel, test the display, test the user LED, test the communication ports, and test both the internal beeper or the audio line output. If a speaker with an amplifier is connected, a WAV sound file is a system provided for the audio line output test.
Memory – The Memory menu allows you to either backup or restores your project, log data, recipe data and/or system memory. Selections can be made to backup to optional SD card memory or USB pen drive memory. The menu selections also give you the ability to clear the memory, and there is also a selection to reset all of the touch panel settings back to the original factory defaults.
We will be reviewing these system screens of the C-More HMI Panel. Let’s get started.
Previously in this C-More EA9 HMI Panel series we have done the following:
System Hardware
– Unboxing and Review Video
– Powering the Unit Video
Installing the Software – Video
Accessing the C-More System Setup Screens
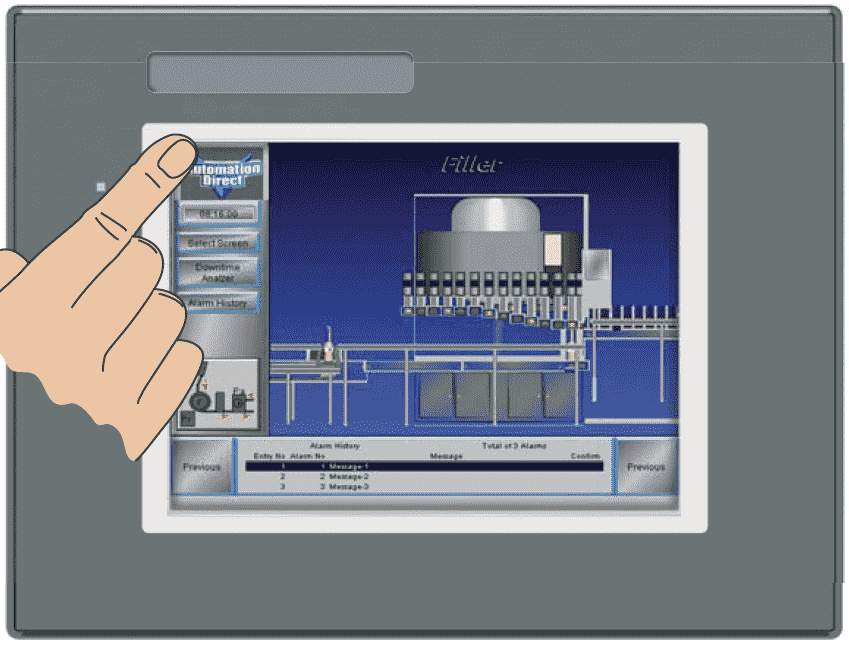
Press the upper left corner of the panel display area for 3 seconds. The Main Menu will be displayed.
If a program is already loaded in the C-More HMI, a warning message will appear. It will tell you that activating system screens will stop the panel mode running. You have a choice to continue.
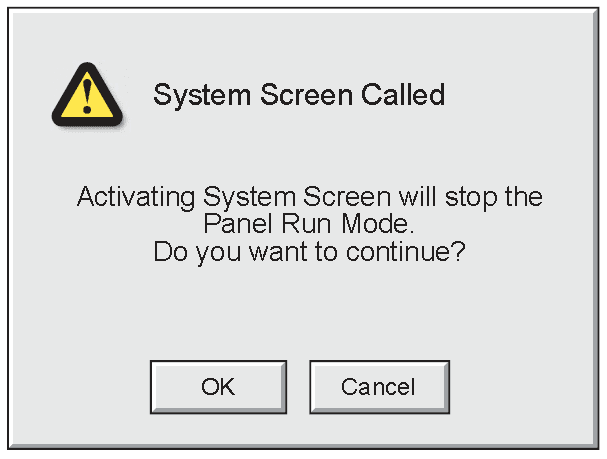
Select OK to continue.
The system setup screen Main Menu will now appear.
Watch the video below to see the review of the system setup screens of the C-More EA9 HMI panel.
C-More System Setup Screens Flowchart
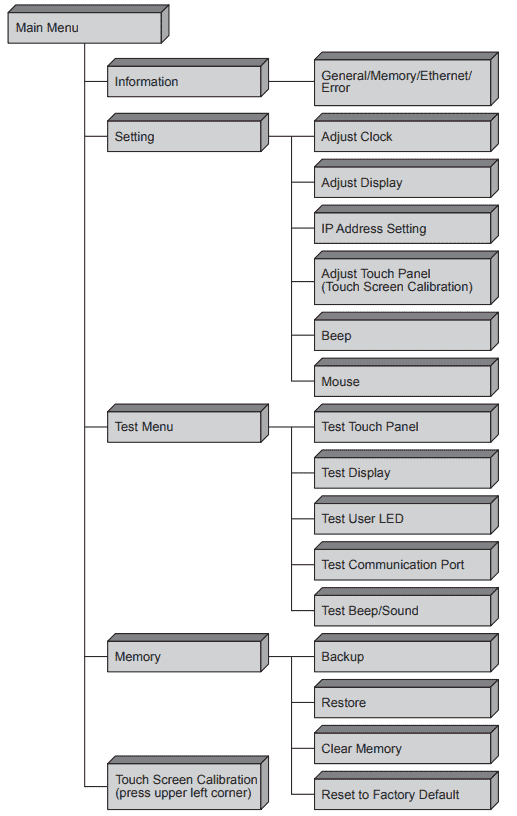
This is a great overview of the setup screen menu and where everything is located.
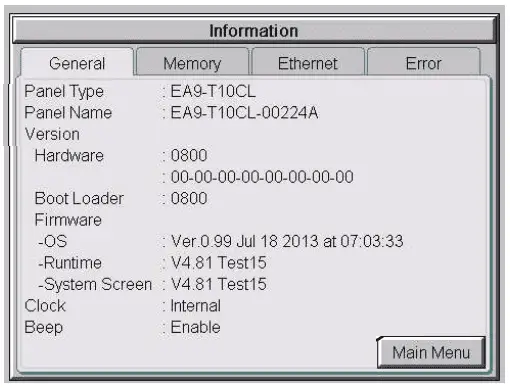
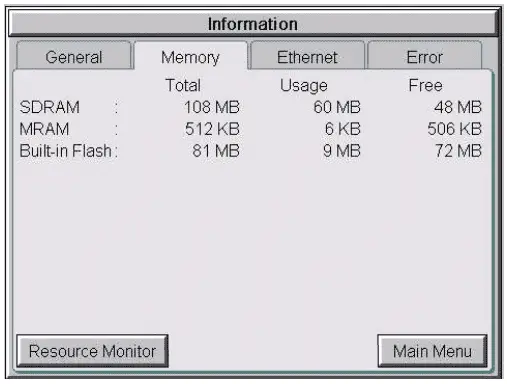
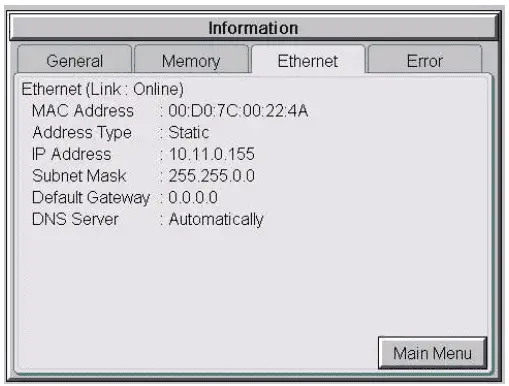
Information – C-More System Setup Screens
General Tab – This tab will show you the Panel Type, Name, Version of the Hardware and Firmware, Clock selection, and if the Beep is enabled or not.
Memory Tab – This will show you the status of each memory. SDRAM, MRAM, and Built-in Flash. The resource monitor will help troubleshoot showing CPU and panel internal memory usage.
Ethernet Tab – This will show you the Ethernet settings. It includes the MAC address, IP address, Type, Subnet Mask, Default Gateway, and DNS Server.
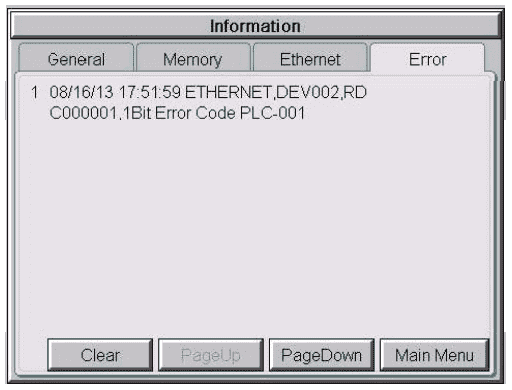
Error Tab – Error messages will be indicated on this screen complete with date and time stamp.
Main Menu – This option on each tab will take you back to the Main Menu.
Setting Menu – C-More System Setup Screens
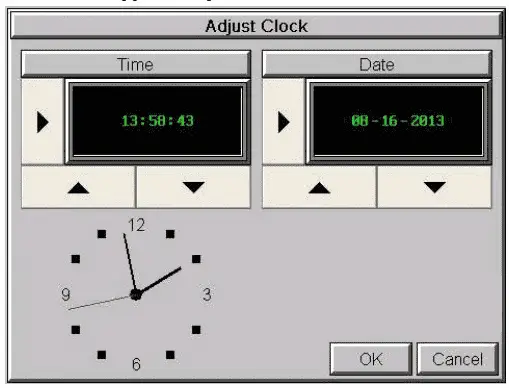
Adjust Clock – This setting will allow you to adjust the real-time clock on our EA9 HMI screen.
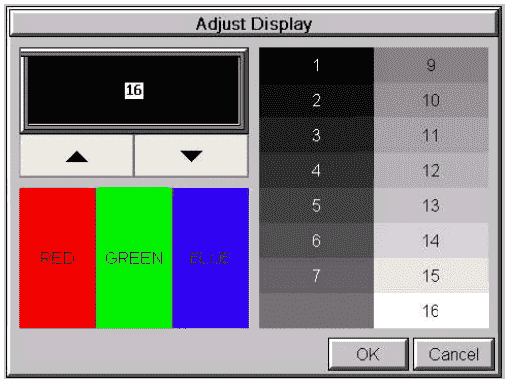
Adjust Display – We can adjust the brightness of the C-More EA9 display. Colour examples are shown to indicate how bright or dim your display will be.
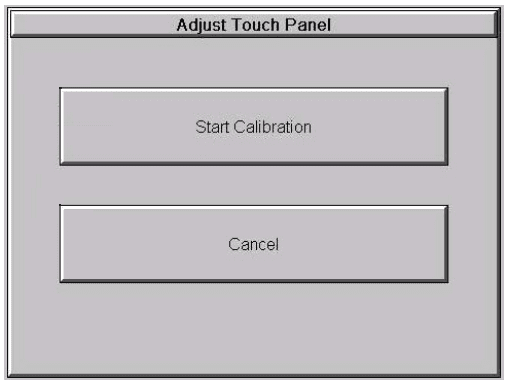
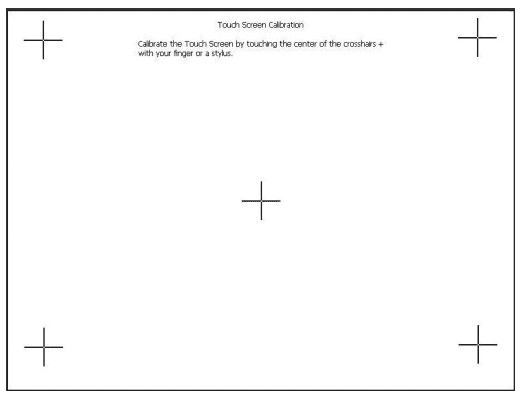
Adjust Touch Panel – We can start the calibration procedure of the HMI panel. This will automatically start when we have a new panel or if we restore the panel to factory default.
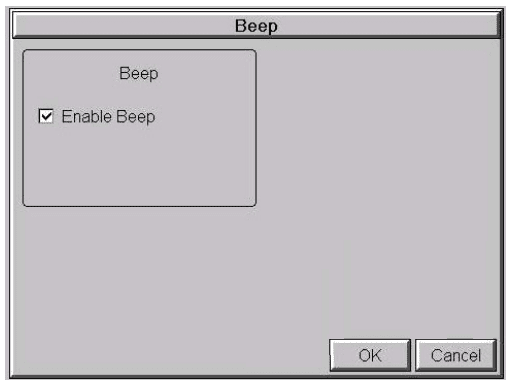
Beep – This will enable or disable the beep as we touch the EA9 C-More screen.
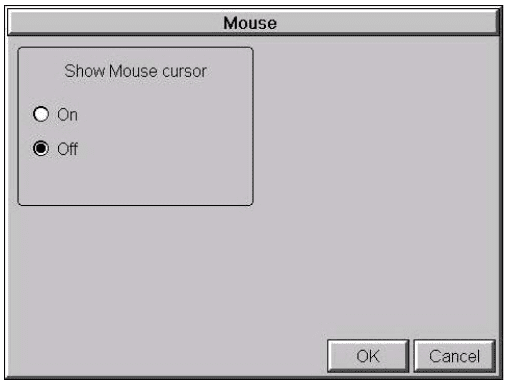
Mouse – This system setup screen function is used to enable/ disable the arrow mouse cursor on the panel screen. It may be valuable to display the mouse cursor, for example, when an external USB keyboard is connected to the panel.
IP Address Setting – This will allow us to set up the Ethernet IP settings. “DHCP” is enabled as the default when this system setup screen is first selected. All of the other selections on this screen are dimmed when the Dynamic Host Configuration Protocol (DHCP) is selected and are not available.
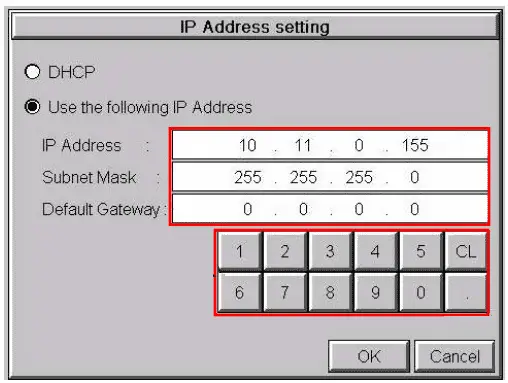
The “Use the following IP Address” setting is selected when its radio button is pressed. Use the numerical keypad to assign the IP address.
Test Menu – C-More System Setup Screens
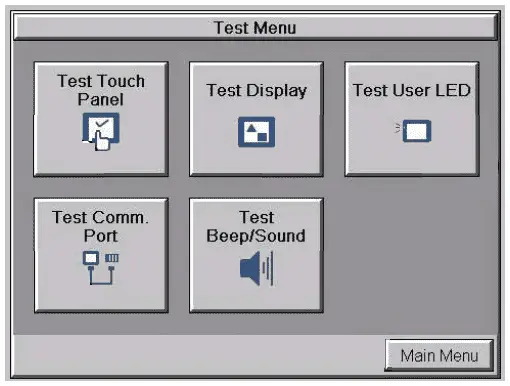
The Test Menu gives you the ability to test the operation of the touch screen, test the LCD display, test the various communication ports, and also test the internal beeper and the audio line out through a user-supplied amplified (stereo) speaker(s).
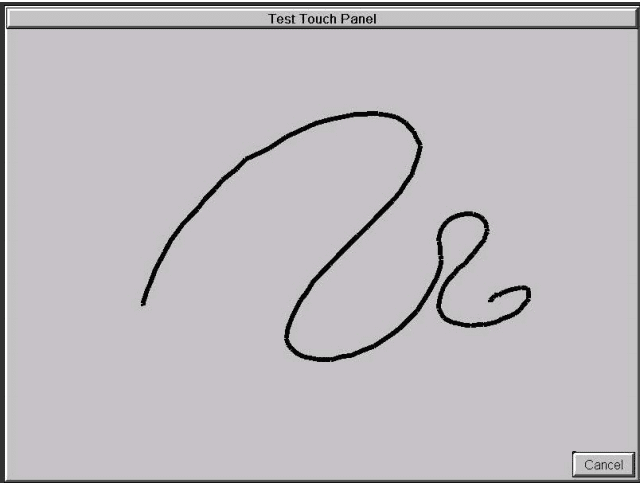
Test Touch Panel – If an area of the touch screen is suspected to be inoperable, touch that area of the screen while in the Test Touch Panel screen mode. The screen pixels should turn black in that area. If the screen pixels do not turn black when touched, then the touch screen is defective or needs to be calibrated.
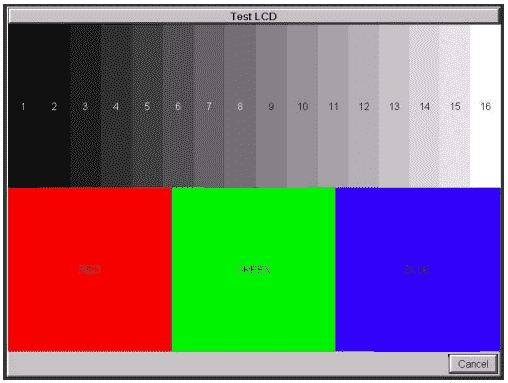
Test Display – There are two different test patterns that may be run on the display to allow the user to check for display screen defects.
Test User LED – The user LED under the green power light can be tested for operation.
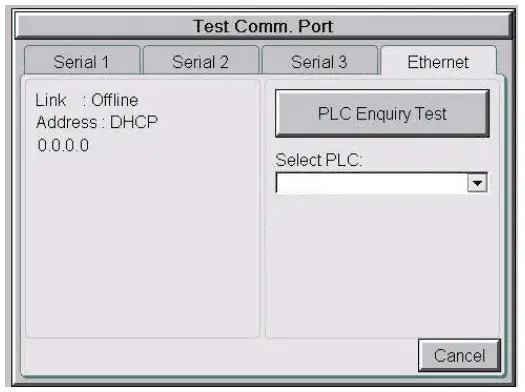
Test Comm. Port – You can test the serial ports and Ethernet port for communications. Some of these options require wiring to perform the loopback tests.
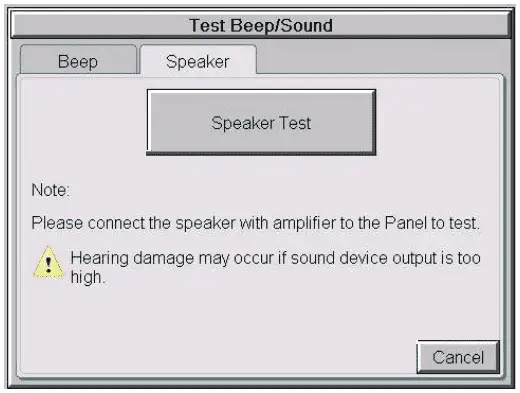
Test Beep/Sound – The internal Beeper can be tested from this system setup screen whether the Beeper is enabled or disabled. The Speaker Test function requires that a speaker(s) with an amplifier (can be stereo) be connected to the Audio Line Out stereo jack on the rear of the touch panel.
Memory Menu – C-More System Setup Screens
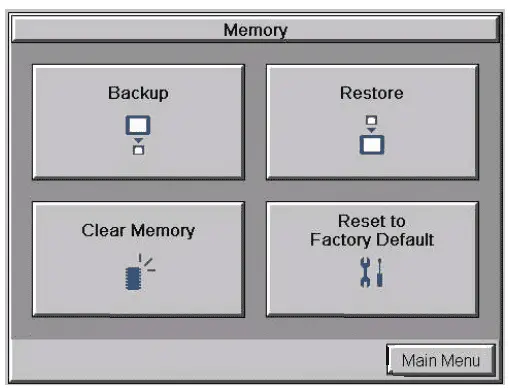
Backup – Your project, Firmware, and OS, log and recipes files can be backed up to or restored from an SD memory card (SD Card Slot 1 or SD Card Slot 2), or a USB memory device.

Restore – Restore a project previously backed up on an SD card or USB pen drive memory device to the same panel. You can copy a project from one panel to another panel using a memory device to physically transport the data files.

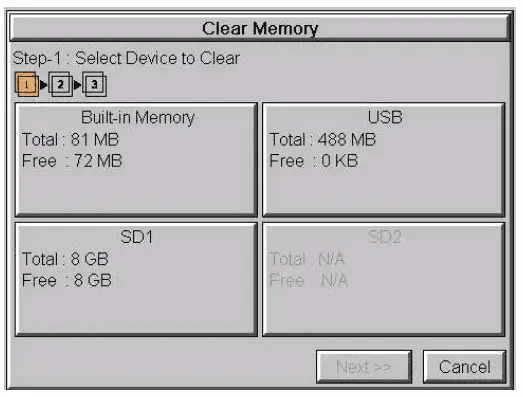
Clear Memory – This function is used to clear individually selected data files, or all data files, within the panel’s Built-in Memory, or any installed memory device such as a USB pen drive or an SD card.
Reset to Factory Default – After pressing the Reset to Factory Default button from the Memory Menu, the message box shown will be displayed.
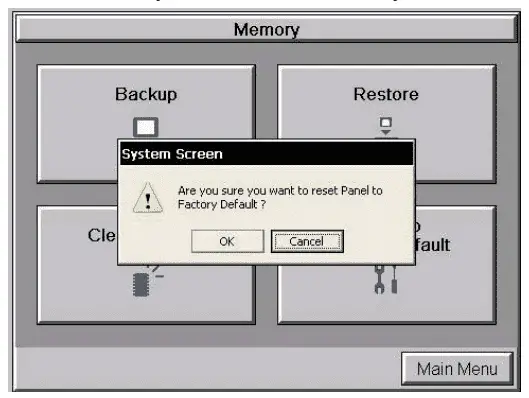
Resetting to the Factory Defaults produces the following actions:
1.) The touch screen calibration is reset to the Factory Defaults.
2.) The project file is cleared.
3.) The log, recipe & WAV files are cleared.
4.) The IP address is set to DHCP.
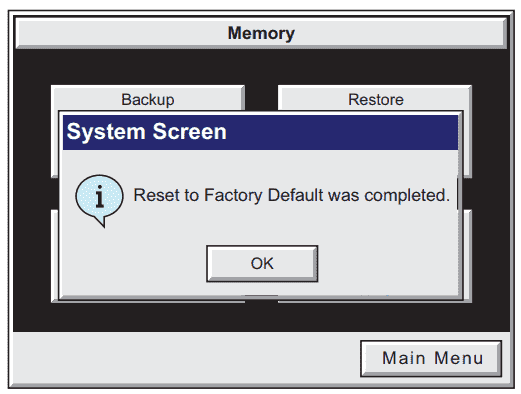
After pressing OK, the touch panel will reboot and start-up on the Touch Screen Calibration procedure.
Watch the video below to see the review of the system setup screens of the C-More EA9 HMI panel.
C-More EA9 Panels from Automation Direct
https://www.automationdirect.com/c-more/home
C-More – Graphic Panel (EA9 Series) User Manual and Quick Start Guides
https://cdn.automationdirect.com/static/manuals/ea9userm/ea9userm.html
EA9-T10CL C-More Specifications
https://cdn.automationdirect.com/static/specs/ea9t10cl.pdf
C-More EA9 Programming Software (Current Version V6.42)
https://support.automationdirect.com/products/cmore.html
This software will enable you to program all of the C-More EA9 HMI units. It includes a simulator for your application.
Next time we will program our first screen of the C-More.
Watch on YouTube: C-More EA9 HMI Series Panel System Setup Screens
If you have any questions or need further information please contact me.
Thank you,
Garry
If you’re like most of my readers, you’re committed to learning about technology. Numbering systems used in PLC’s are not difficult to learn and understand. We will walk through the numbering systems used in PLCs. This includes Bits, Decimal, Hexadecimal, ASCII and Floating Point.
To get this free article, subscribe to my free email newsletter.
Use the information to inform other people how numbering systems work. Sign up now.

The ‘Robust Data Logging for Free’ eBook is also available as a free download. The link is included when you subscribe to ACC Automation.