We will apply the five steps to PLC program development to a palletizer example. Our example will allow you to determine how many layers of boxes you want on each skid.

Developing the PLC program is a process that can be clearly defined. In our series on the five steps to PLC program development, we have done some similar practical examples.
PLC Programming Examples – Five Steps to PLC Program Development
– Press
– Process Mixer
– Shift Register (Conveyor Reject)
– Paint Spraying
– Delay Starting of 7 Motors
– Pick and Place
– Sorting Station (Shift Register)
Define the task: (1) – Palletizer PLC Programming Example
Watch the sequence of operation video below. This will demonstrate the pallet layer selection, running, and resetting of the machine. (Palletizer)
Watch on YouTube: PLC Programming Example – Palletizer Testing
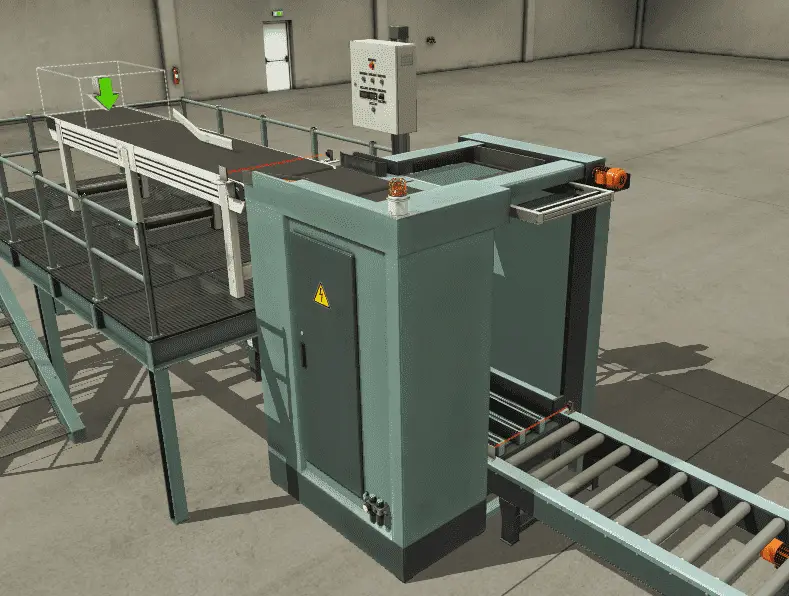
A normally open start and normally closed stop pushbuttons are used to start and stop the process in automatic mode. Upon starting the pallet conveyors will load a pallet onto the elevator.
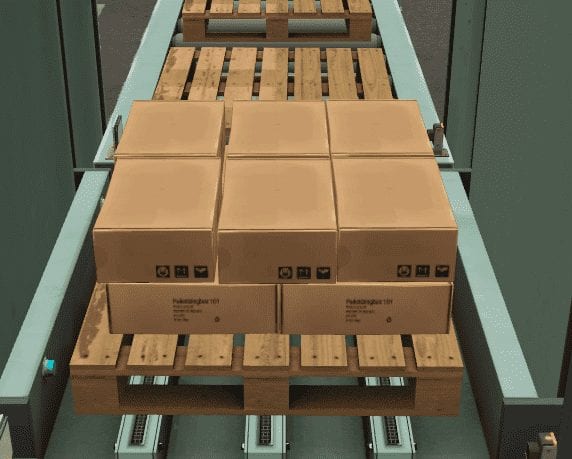
The elevator will move the pallet to the top of the elevator where it will be loaded with layers of boxes. Boxes are staggered on each layer so that they will interlock with themselves. This will provide a more stable skid.
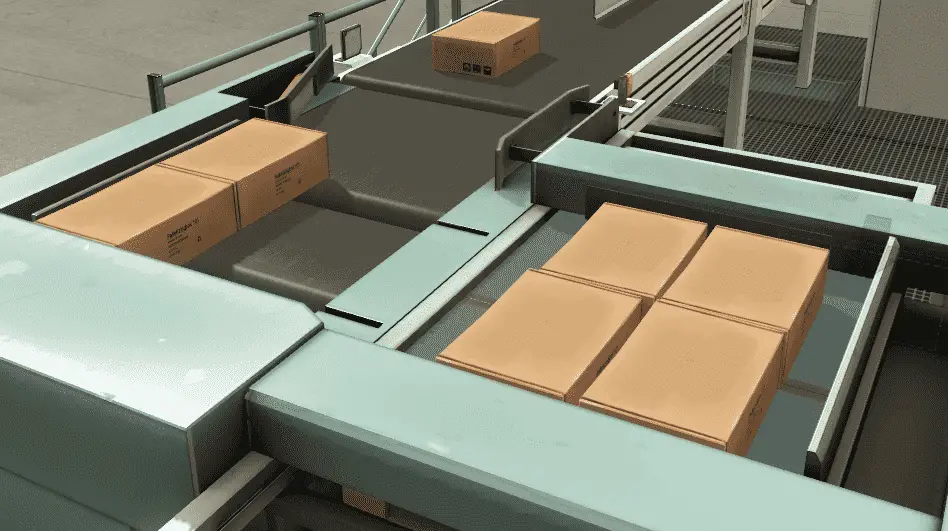

A turning device is utilized to orientate the boxes on every other layer. A pusher is used to move the rows of boxes to the plate.
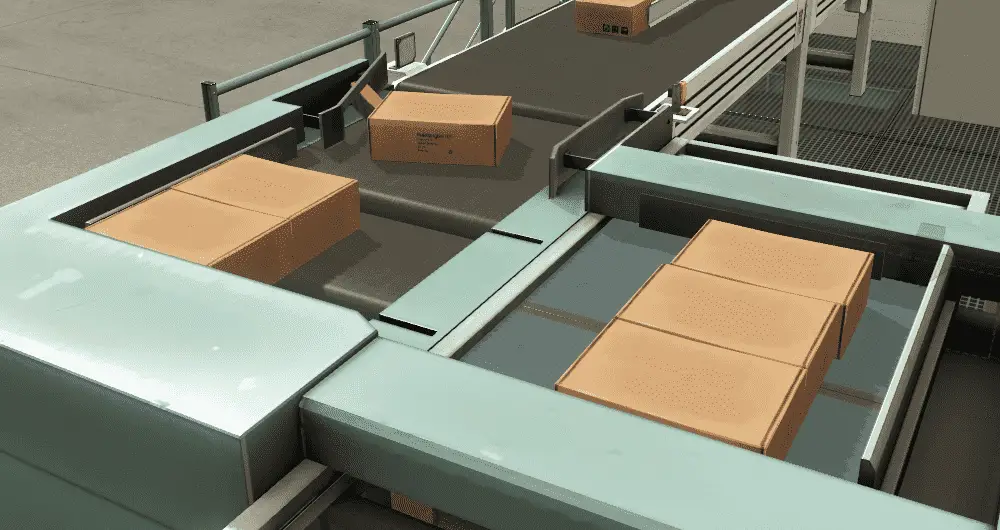
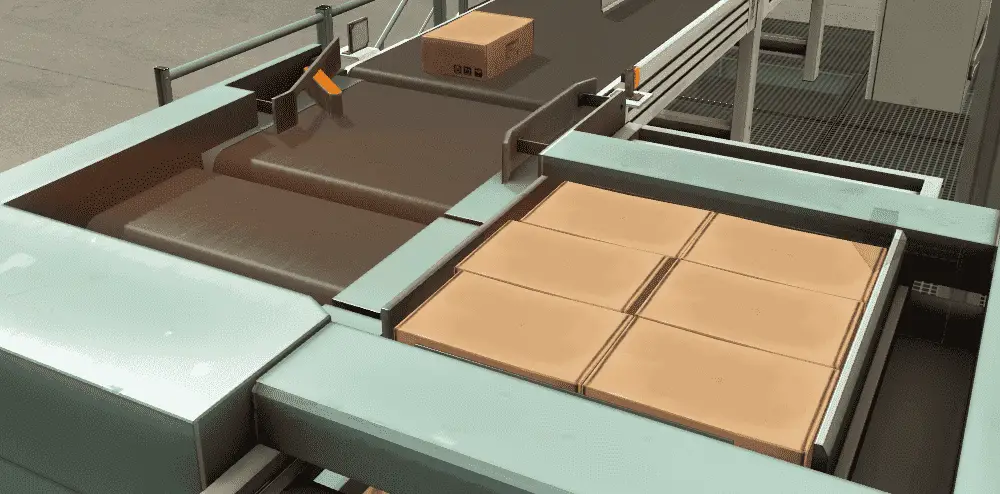
Once the last row is pushed on the plate, a clamp will be used to square up the layer of boxes. The plate will then open putting the layer of boxes onto the pallet. The elevator will then move down to allow the plate to close. The next layer then can be assembled on the plate.
When the layers of boxes have been obtained, the elevator will move all the way to the bottom. This will align with the exit conveyor. The finished pallet will then move onto the exit conveyor. An empty pallet is then moved onto the load conveyor and the process will continue again.
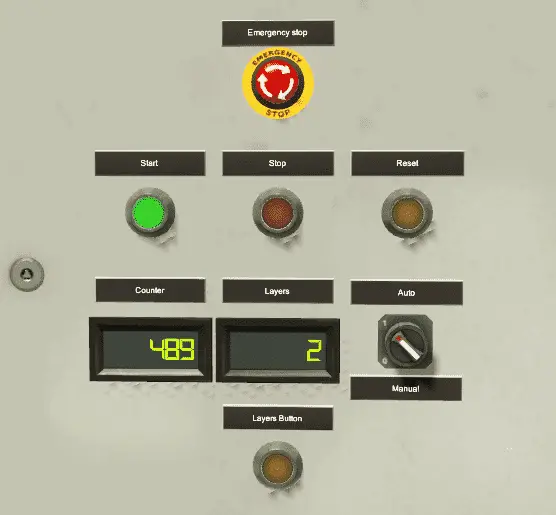
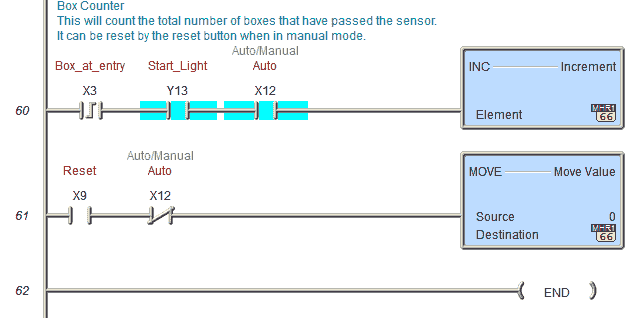
A counter will be used to track the number of boxes that have been processed. This can be reset by hitting the reset in the manual mode.
The reset button in the manual mode will also reset the machine and move the elevator to the bottom.
Define the Inputs and Outputs: (2)– Palletizer PLC Programming Example
Inputs for Palletizer:
Pallet at Entry – Sensor – On/Off
Pallet at Exit – Sensor – On/Off
Pallet loaded – Sensor – On/Off
Box at Entry – Sensor – On/Off
Pusher Limit – Sensor – On/Off
Plate Limit – Sensor – On/Off
Clamped – Sensor – On/Off
Elevator Moving – Sensor – On/Off
Start Pushbutton – Normally Open – On/Off
Reset Pushbutton – Normally Open – On/Off
Stop Pushbutton – Normally Closed – On/Off
Emergency Stop – Normally Closed – On/Off
Auto / Manual – Switch – On/Off
Layers Button Pushbutton – Normally Open – On/Off
Outputs for Palletizer:
Pallet Feeder – Contactor – On/Off
Load Pallet – Contactor – On/Off
Exit Conveyor – Contactor – On/Off
Move to Limit – Contactor – On/Off
Elevator Up – Contactor – On/Off
Elevator Down – Contactor – On/Off
Box Feeder – Contactor – On/Off
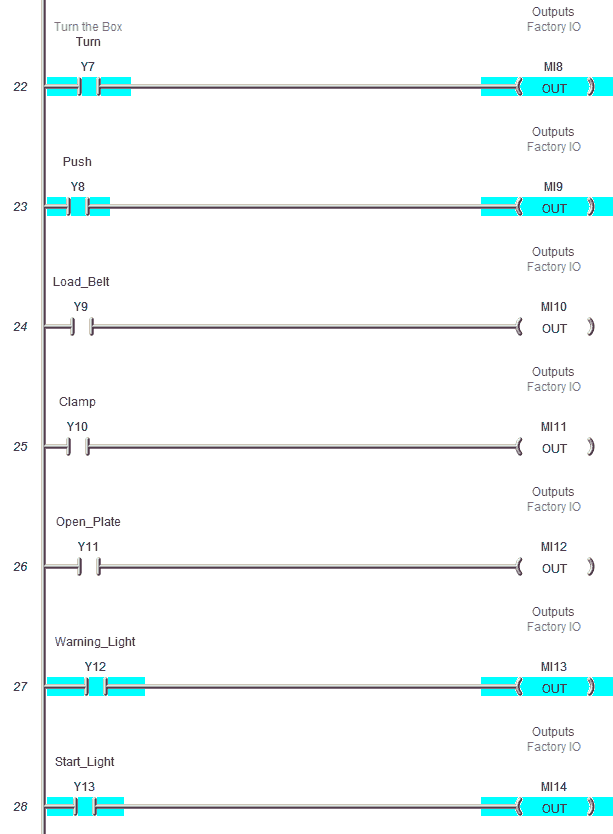
Turn – Contactor – On/Off
Push – Contactor – On/Off
Load Belt – Contactor – On/Off
Clamp – Contactor – On/Off
Open Plate – Contactor – On/Off
Warning Light – Contactor – On/Off
Start Light – Contactor – On/Off
Reset Light – Contactor – On/Off
Stop Light – Contactor – On/Off
Counter – Register – 16 bits
Layers – Register – 16 bits
Develop a logical sequence of operation: (3) – Palletizer PLC Programming Example
A flow chart or sequence table is used to fully understand the process the needs to be controlled. It must also answer questions like the following:
What happens when electrical power and/or pneumatic air is lost? What happens when the input / output devices fail? Do we need redundancy?
This step is where you can save yourself a lot of work by understanding everything about the operation. It will help prevent you from continuously re-writing the PLC logic. Knowing all of these answers upfront is vital in the development of the PLC program.
Here is our sequence of operations for our PLC programming palletizer example application.
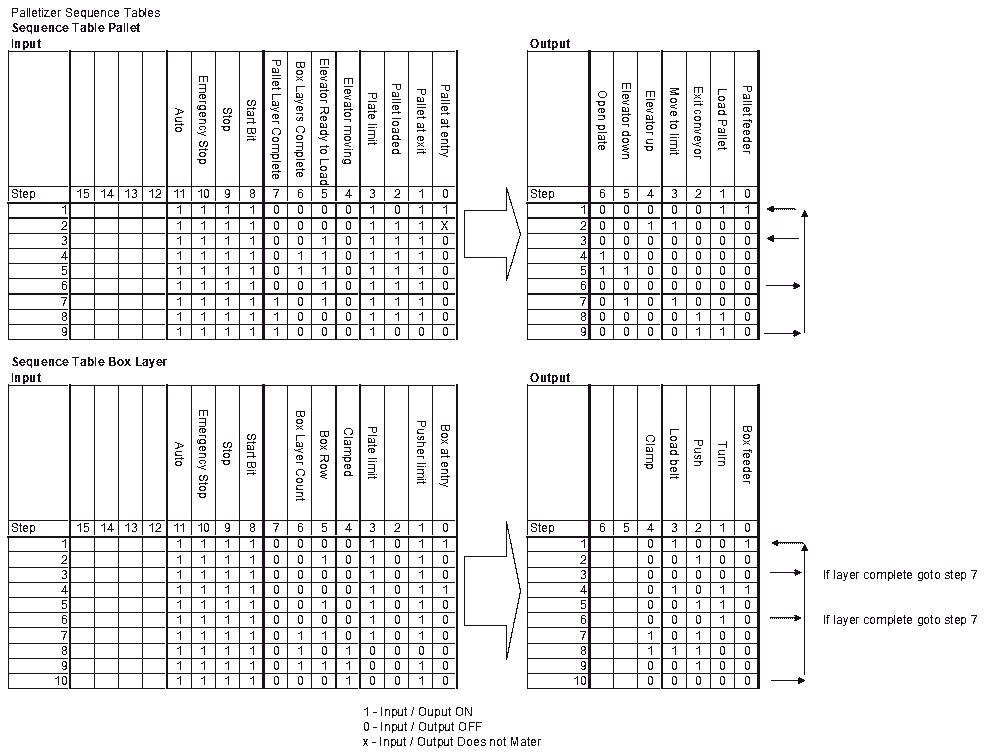
If our input conditions are true then the outputs are set. It will then look at the next step for the input conditions to set the outputs. Etc.
Develop the PLC program: (4) – Palletizer PLC Programming Example
Writing the code for the PLC will be the next step in our program development. A quick review can be seen on our post: Buiding A PLC Program That You Can Be Proud Of
(This series takes you through using discrete inputs and outputs to control traffic lights and cylinders. As we progress we introduce additional methods to solve logic. We look at sequencers in a new way and learn how to write programs to allow users to teach the new sequence.)
The first thing in our program is to control the start and stop functions. This is done through a latching circuit. The start light bit is used as a control relay for the rest of the program.

This is the logic for the loading and unloading of the pallets. You will notice that we have an off delay timer for the exit conveyor.
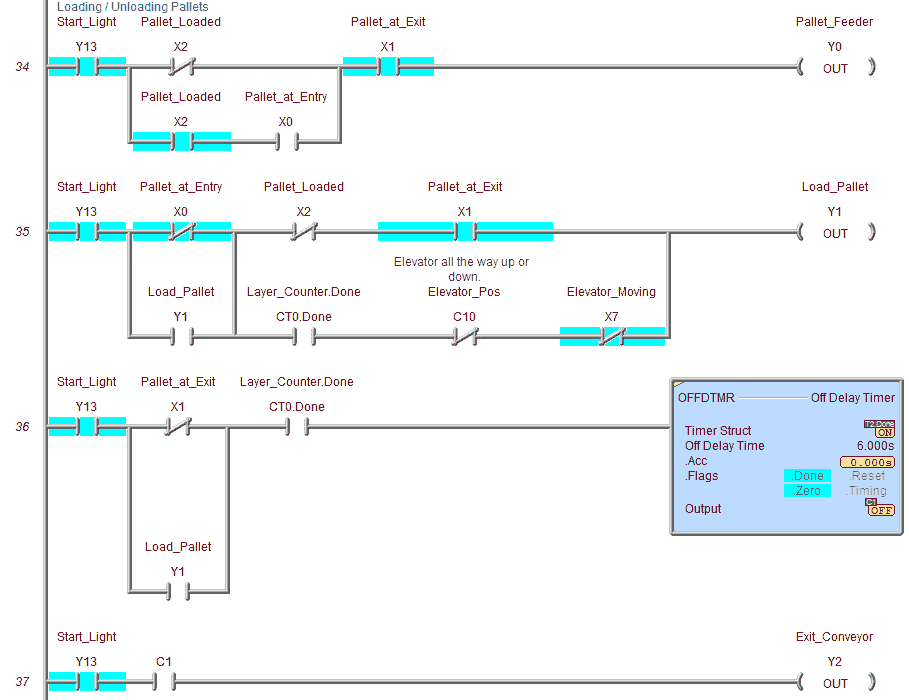
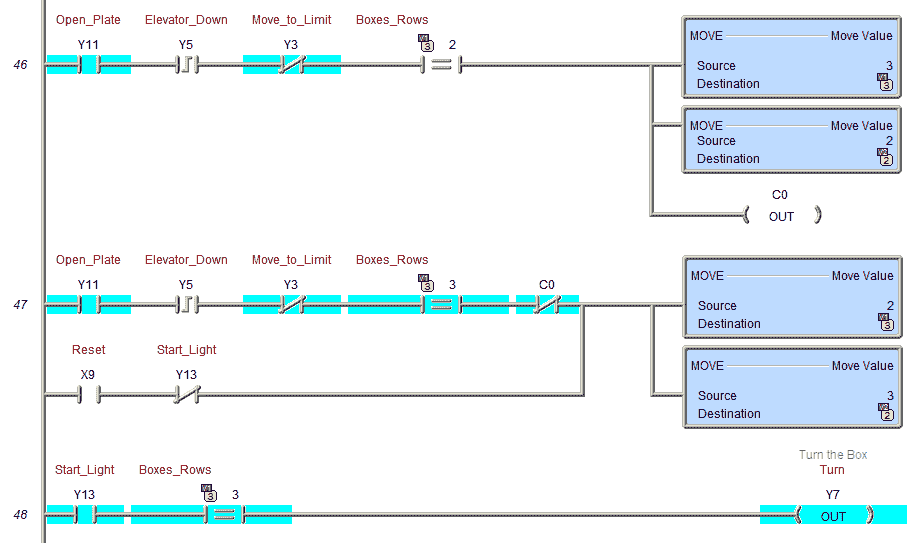
The elevator movement to move the elevator all the way to the top or bottom is to activate the move to limit and the elevator up or down output at the same time.
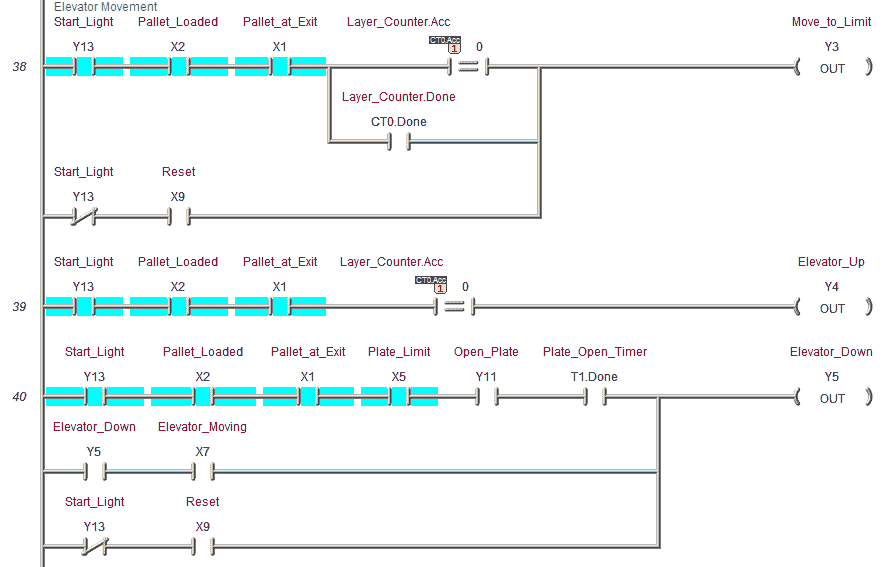
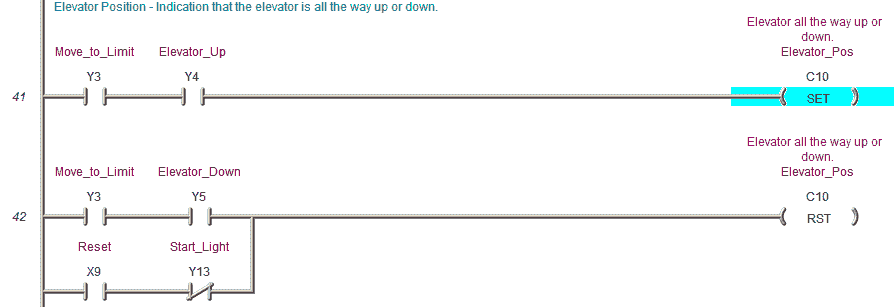
The elevator position is monitored by bit C10. If this is on then the elevator is at the top with a pallet and ready to load boxes.
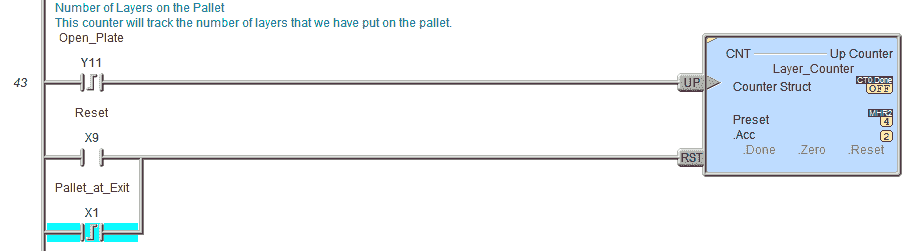
The number of layers on the pallet is done with counter 0.
The boxes are staggered on the layer. A counter is set up for the number of boxes in the row and the number of rows on the layer.
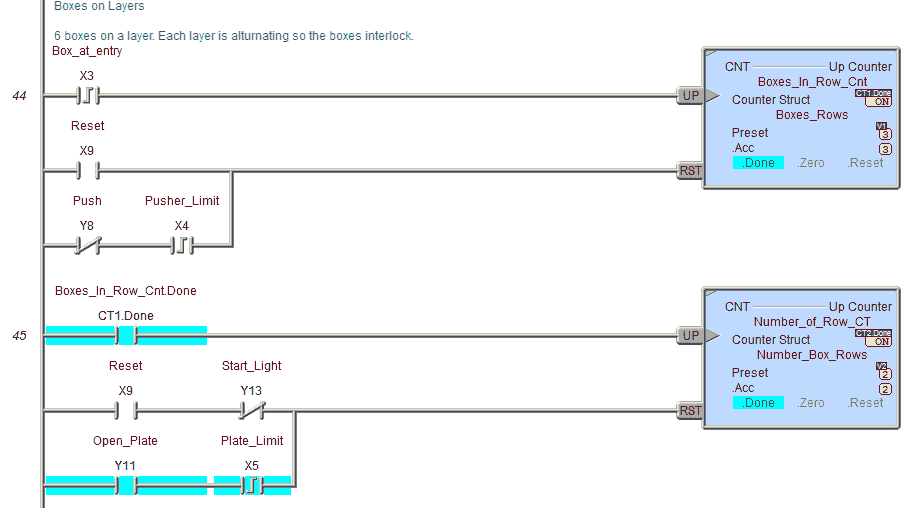
The boxes in the rows and the number of rows are staggered. This code will set up the counters and turn on the turning output.
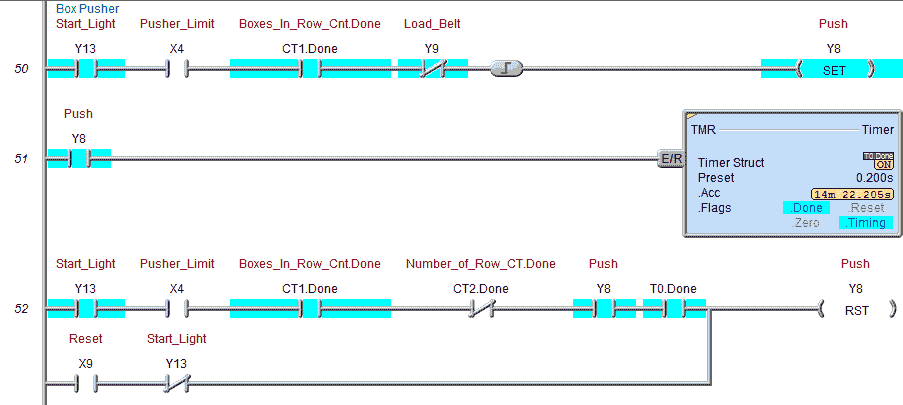
The box feeder and load belt will move the boxes into the pusher area.

The pusher will push the boxes in the row onto the plate.
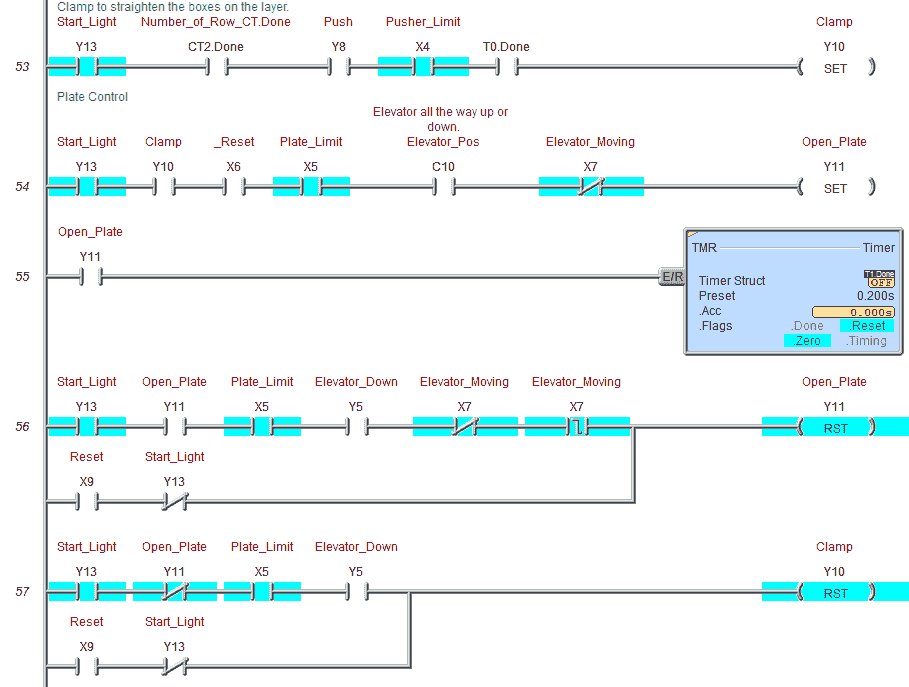
This section of the code will clamp the boxes and open the plate once the layer of boxes has been made.
The number of layers on the pallets can be set between 1 and 4.

The total number of boxes are counted using an INC increment instruction. The reset button when in manual mode will reset the number to 0.
This is the end of our program.
Test the program: (5) – Palletizer PLC Programming Example
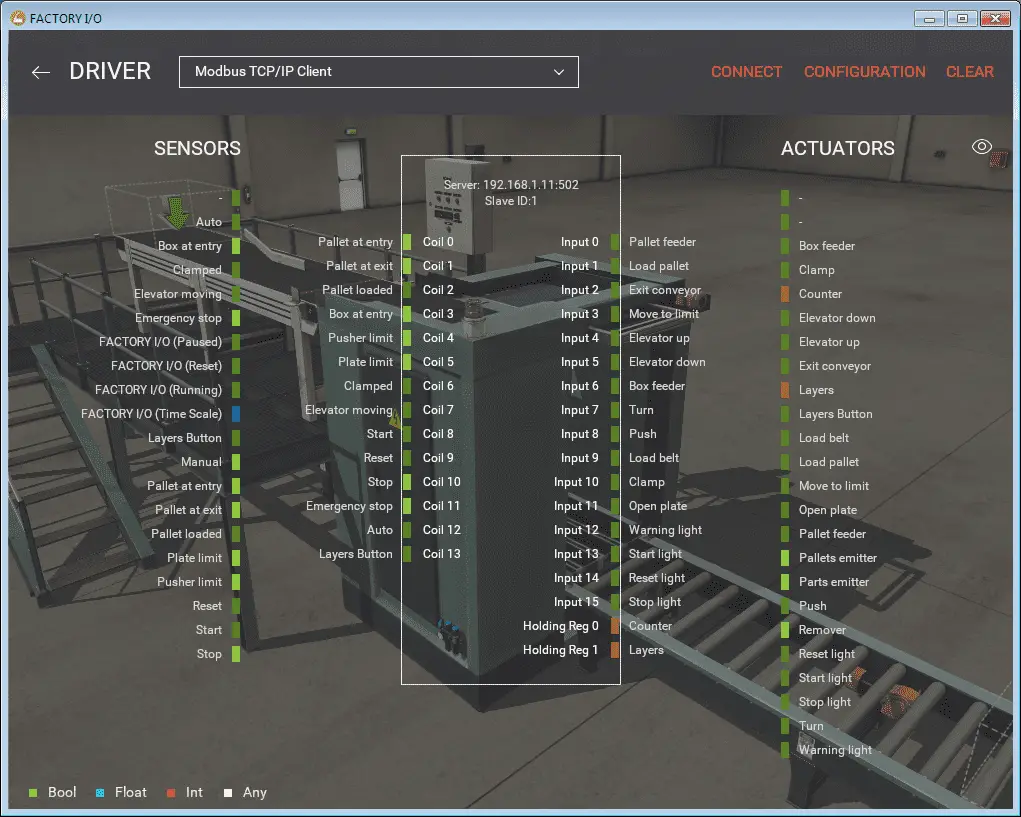
We will be using Factory IO to test the palletizer PLC programming example. This communicates Modbus TCP Client (Master) to our BRX Series PLC (Modbus TCP Server (Slave)).
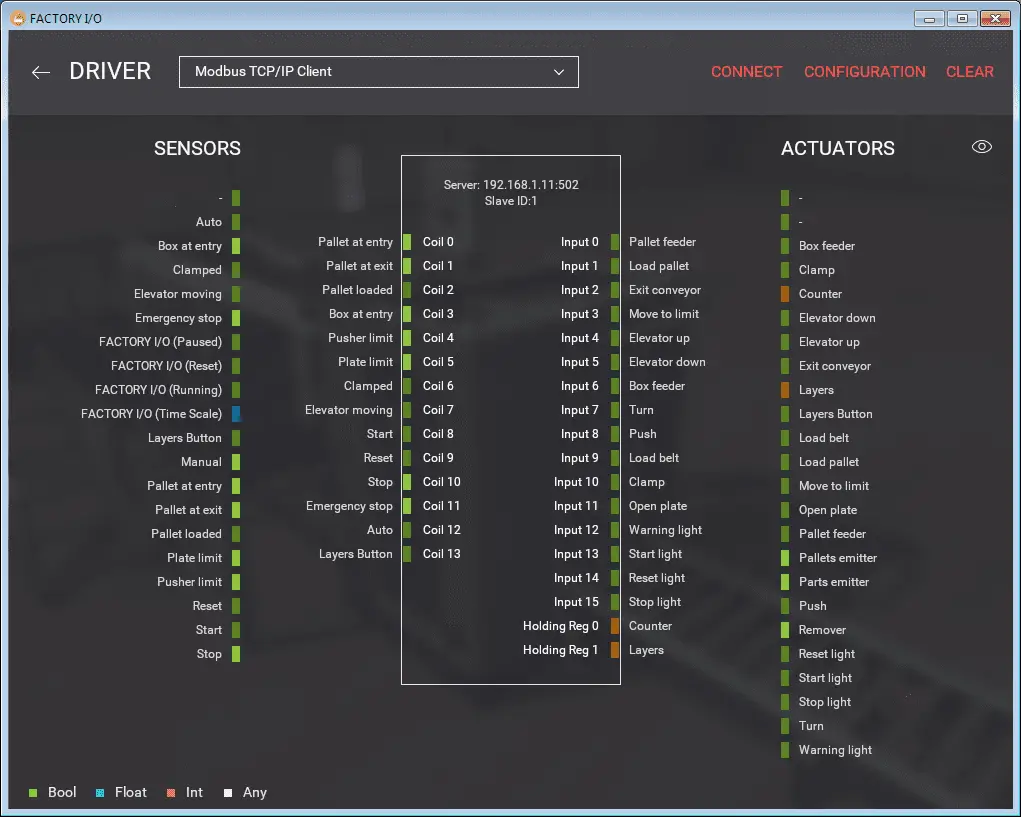
We will now add the inputs and outputs to our program for communication to our scene in Factory IO. The output coils from Factory IO will set the actual input addresses in our PLC. See the following post on Understanding the PLC Program Scan. This will demonstrate how we can set the actual PLC inputs.

The inputs from Factory IO will be set by the actual outputs from our PLC.
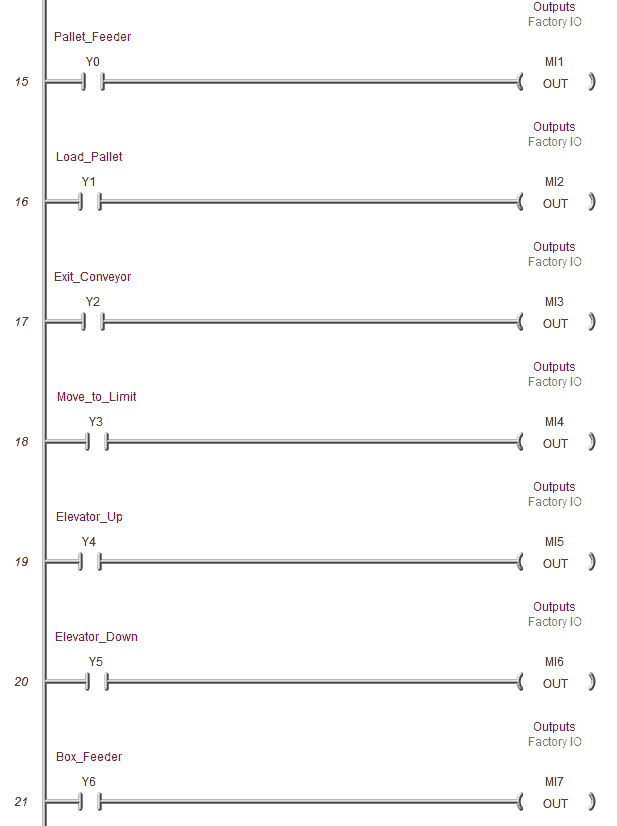

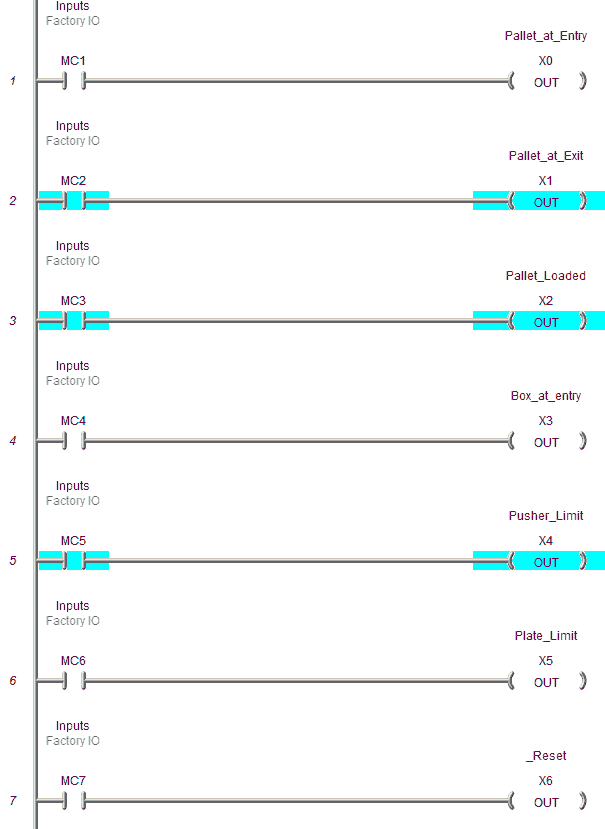
The first step in testing out the program is to ensure that the inputs and outputs of the PLC are wired correctly. We would usually turn each input on manually and see the corresponding input of the PLC turn on. The same applies to the output devices. We would turn on each of the outputs to determine if they have been wired correctly.
Next we will try our manual operations programmed into the process. If everything is working then we will start running our program in automatic mode.
Test the program for things that can go wrong. Unplug a sensor or remove a box after the sensor has seen it. The program should be able to react.
Watch the video below to see an explanation and test of the program using Factory IO.
You can download the program and Factory IO scene here.
Watch on YouTube: PLC Programming Example – Palletizer
If you have any questions or need further information please contact me.
Thank you,
Garry
If you’re like most of my readers, you’re committed to learning about technology. Numbering systems used in PLC’s are not difficult to learn and understand. We will walk through the numbering systems used in PLCs. This includes Bits, Decimal, Hexadecimal, ASCII, and Floating Point.
To get this free article, subscribe to my free email newsletter.
Use the information to inform other people how numbering systems work. Sign up now.

The ‘Robust Data Logging for Free’ eBook is also available as a free download. The link is included when you subscribe to ACC Automation.
Hello
I want to ask you if you have the grafecet for palletizer can you send it to me please
Hi Oussama,
I do not have the grafecet for the program, but I have added the excel file to the download for the program. It can be downloaded at the following location. (Or above in the post.)
https://www.dropbox.com/s/cvjqwefspcmw0g9/PLC%20Programming%20Example%20-%20Palletizer.zip?dl=0
Regards,
Garry
hi
can u explain to me how to display a number on digital displayer in grafcet
Hi Oussama,
What do you mean by a digital displayer? Do you have a model number?
If you are using the Factory IO display, then you would just reference the address for the number. The program that is written in ladder or grafcet would determine how the number is changed.
Regards,
Garry
Hi garrys
thank you for reply
How do I make it so when I press stop it will end the thing its doing and continues after pressing start again?
Hi Bert,
You will notice that in the sequence table we have the start and stop circuit outputs. These are inputs to the sequence table. When you hit the stop button the outputs will remain at their last state. Hitting start again will continue the sequence.
Regards,
Garry
Hey, I thanks for responding so fast. What I actually meant to ask was if there is a way to make it stop right after the action it is currently doing. So it would complete the action even after pressing stop.
Hi Bert,
According to the sequence tables, it should stop the outputs from advancing to the next step. If you need it to advanced to the next step when stopping then place an off delay on the stop signal. I’m not sure I actually follow what you want to do. The output will depend on what is being done. If you are controlling a cylinder and it is moving out when the stop is hit, the cylinder will continue until it is out.
Regards,
Garry
Hola, que programa ocupas para programar el PLc y donde puedo descargarlo?
Hola erik
El programa se llama Do-More Designer. Estamos utilizando el simulador que viene con el software. Este es un programa gratuito que se puede descargar en la siguiente ubicación.
https://support.automationdirect.com/products/domore.html
Aquí hay una descripción general del software:
https://www.automationdirect.com/adc/overview/catalog/software_products/programmable_controller_software/do-more_plc_programming_software
Saludos,
Garry
Hi Erik,
The program is called Do-More Designer. We are using the simulator that comes with the software. This is a free program that can be downloaded at the following location.
https://support.automationdirect.com/products/domore.html
Here is an overview of the software:
https://www.automationdirect.com/adc/overview/catalog/software_products/programmable_controller_software/do-more_plc_programming_software
Regards,
Garry
Hi Garry,
In which position “pusher limit” input is located ?
Hi Mukesh,
The pusher limit is on X4. This is used on rung number 44 as part of the counter.
Regards,
Garry
In the document “pusher limit” is mentioned as sensor. So I want to know Where this sensor is placed in the machine and when it will get high, when it will get low?
Hi Mukesh,
The pusher limit is a sensor that is on the pusher for the boxes. This will help make up the row of boxes.
It will be high when the pusher is extended fully.
Regards,
Garry
Hi Garry,
So happy for your response Thanks. But still I have confusion. As you send if “pusher limit” will get high on full extend of push then in rung 50, before push is extend how we are checking “push limit” signal…
Hi Mukesh,
It has been a while since I looked at the program. Calling up Factory IO and loading the scene, I reviewed the pusher limit signal. The pusher limit will be on when the pusher is at its limits. (Extended and Retracted) When the pusher is all the way retracted then the sensor input will be on. It will also be on when the pusher is extended fully.
Sorry for the confusion.
Regards,
Garry
I am currently programming the same exercise in the Siemens TIA Portal and have seen your YouTube video.
And I have to say that you do a very good job and certainly help many young people to program with it.
So thumb up and please keep it up
greetings
Rene
Thank you for the comment Rene.
Garry
We have an older Currie Palletizer LSP-5
Our PLC System is absolute and looking to replace the complete unit with a “Turn-key”.
Are you able to sell us a Unit pre-programmed with out Patterns?
Regards,
Leo Nadeau
Hi Leo Nadeau,
I am not able to sell a unit pre-programmed.
This website is a learning site only for how to program.
Regards,
Garry