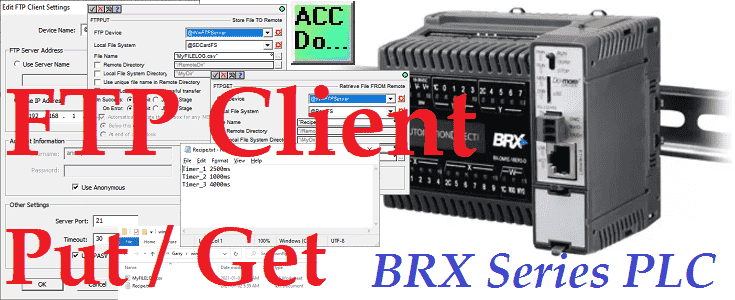
We will look at the BRX Do-More FTP (File Transfer Protocol) on our PLC. Using FTPGET and FTPPUT instructions we can transfer files to an FTP server. Our BRX Do-More PLC now has the ability to be an FTP Client. This will allow us to transfer our logged files to an FTP server that we programmed in the following post.
Data Logging – Video
As an FTP Client, the Do-More PLC now has the ability to transfer and retrieve files from the network at an appropriate time in the PLC logic.
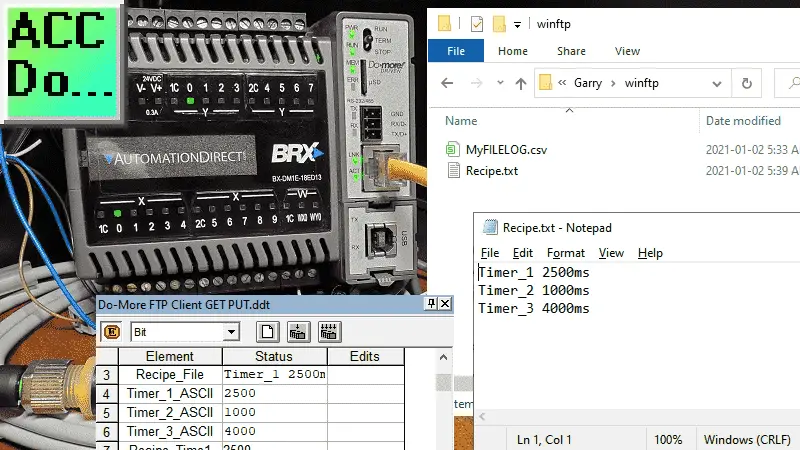
We will be setting up a Windows 10 FTP server on our computer. Using the FTPPUT FTP Client command on our BRX Do-More PLC we will store a file on our FTP server. The FTPGET Client command instruction will be used to retrieve a recipe text file on our server. This recipe file will have three timers that we will be used in a sample program to turn on some outputs. Let’s get started.
Previously in this BRX series PLC, we have discussed:
System Hardware – Video
Unboxing – Video
Installing the Software – Video
Establishing Communication – Video
Firmware Update – Video
Numbering Systems and Addressing – Video
First Program – Video
Monitoring and Testing the Program – Video
Online Editing and Debug Mode – Video
Timers – Video
Counters – Video
High-Speed IO – Video
Compare Instructions – Video
Math Instructions – Video
Program Control – Video
Shifting Instructions – Video
Drum Instruction – Video
Serial Communication – Modbus RTU to Solo Process Temperature Controller – Video
Data Logging – Video
Email – Text SMS Messaging Gmail – Video
Secure Email Communication Video
AdvancedHMI Communication – Modbus TCP – Video
Analog IO – System Configuration – Video
HTTP JSON Instructions – Video
Analog Dusk to Dawn Program – Video
INC DEC 512 Registers for DMX512 – Video
PID with PWM Output – Video
PID Ramp Soak Profile – Video
Do-More Simulator MQTT Publish / Subscribe – Video
BRX Do-More PLC MQTT Communications – Video
Stride Field Remote IO Modules Modbus TCP Ethernet
– Unboxing SIO MB12CDR and SIO MB04ADS Video
– Powering and Configuring Video
BRX Do-More PLC to Stride Field IO Modbus TCP – Video
BRX Do-More PLC Ethernet Remote IO Controller BX-DMIO
– Unboxing BX-DMIO Video
– Configuration and Programming Video
Modbus RTU TCP Remote IO Controller BX-MBIO
– Hardware Video
– Powering and Configuring Video
BRX Do-More PLC to Modbus Remote IO Controller BX-MBIO – Video
Modbus ASCII Protocol – Video
Peerlink Ethernet Communication – Video
HTTP Web Server – Video
Dynamic Web Pages – Video
Our entire BRX D0-More series can be found here.
The programming software and manuals can be downloaded from the Automation Direct website free of charge.
Watch the video below to see the Windows 10 FTP Server installation, and then the FTP Client Get and Put instructions in action on our BRX Do-More PLC.
Do-More Designer Requirement (Software) for FTP Client
In order to use our FTP Client on our BRX Do-More PLC, we will need to download and install version 2.8 or newer of the Do-More Designer Software.
You can download the latest version of Do-More Designer here.
Windows 10 FTP Server Installation
The first thing that we will install the FTP server on our Windows 10 computer. This will create a directory in which files can be saved and retrieved from the PLC.
Press the “Windows Start Key” + X and select settings.
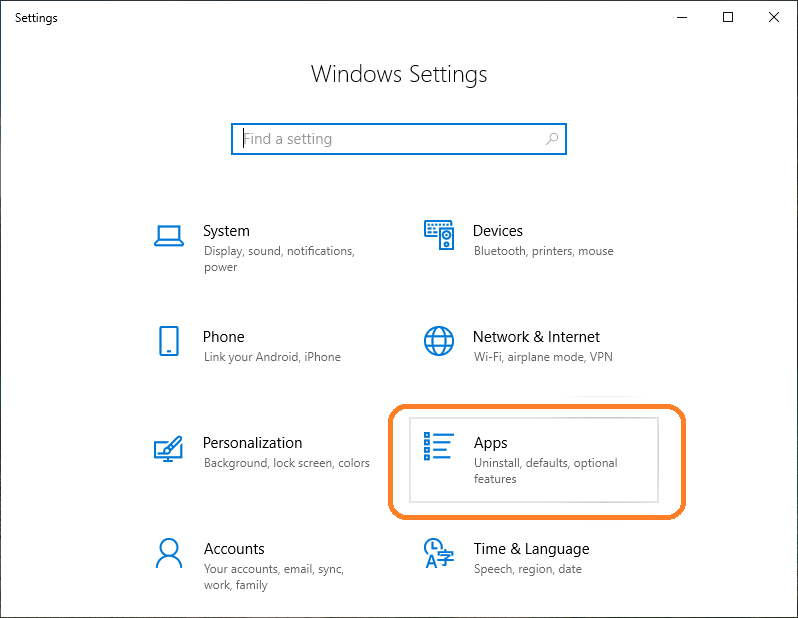
Select Apps to install new software.
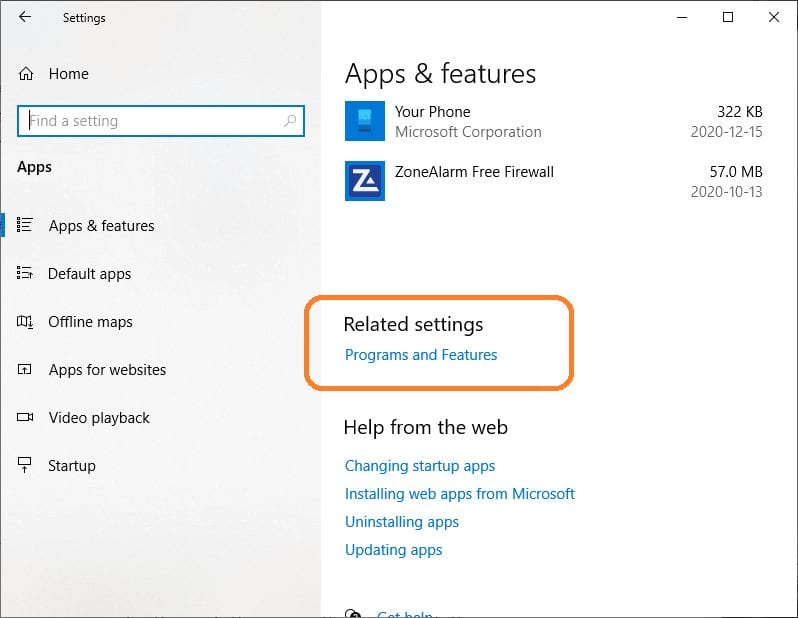
Scroll down until you see the title related settings. Then select Programs and Features. If you have a full screen it will be located in the top right corner.
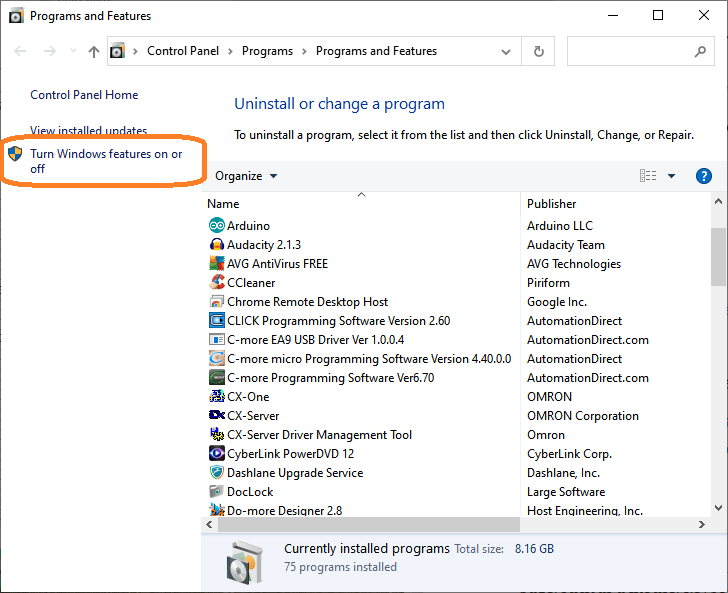
On the program and features window, select turn windows features on or off. The FTP server is part of your windows operating system.
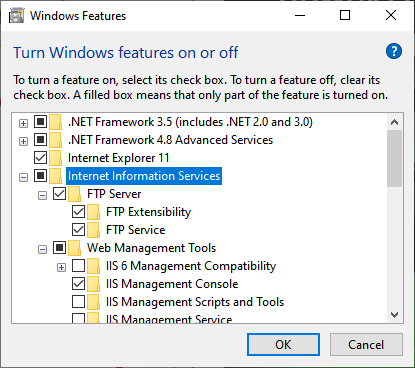
Expand Internet Information Services and check the FTP Server option.
Expand FTP Server and check the FTP Extensibility option.
Check Web Management Tools with the default selections.
Click OK to begin the installation.
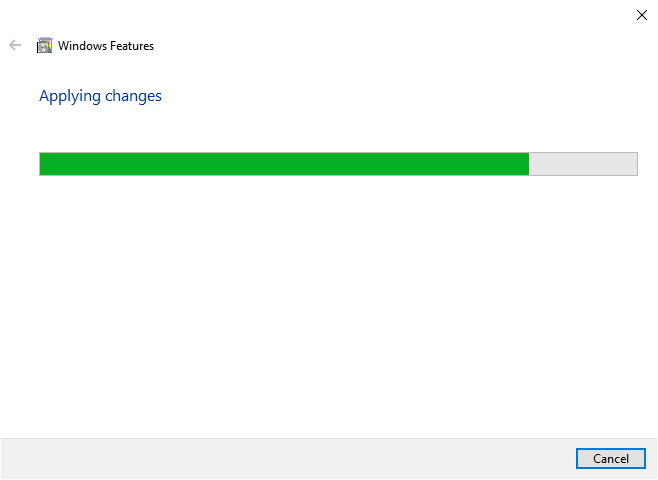
The FTP Server software will now be installed.

Once the FTP has finished installing, you will be notified. Select close.
Windows 10 FTP Server Configuration
FTP server configuration is done through the internet information services (IIS) manager. We will now create the FTP Server Site and determine how other devices can communicate to this server.
Open the control panel on your computer. Click or tap on the search box from your taskbar or press the Windows key on your keyboard. Then type “control” and click or tap the “Control Panel” search result or select it and press Open on the right pane.
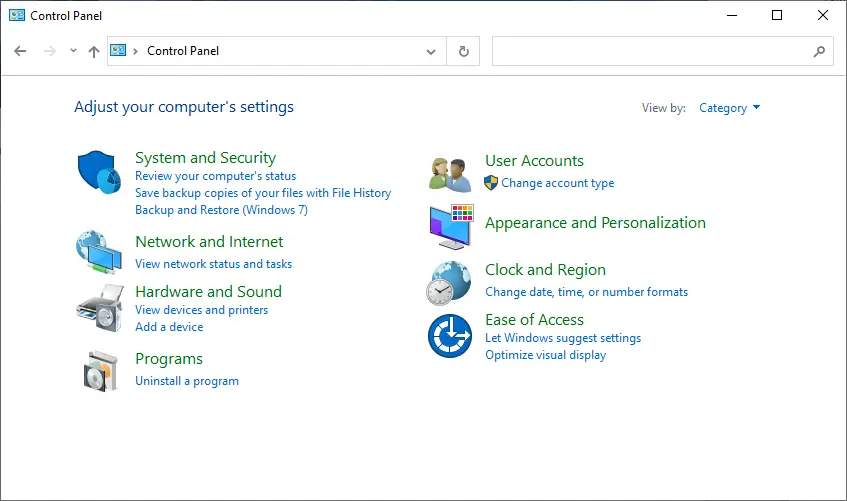
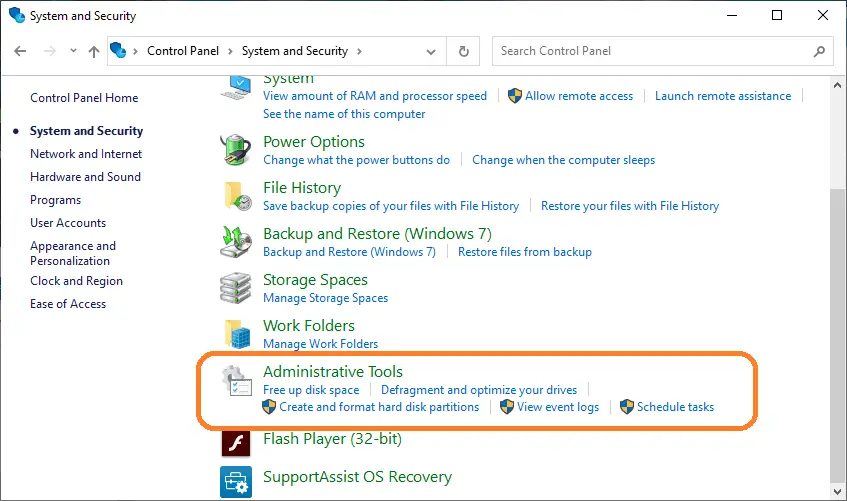
Under system and security select administrative tools.
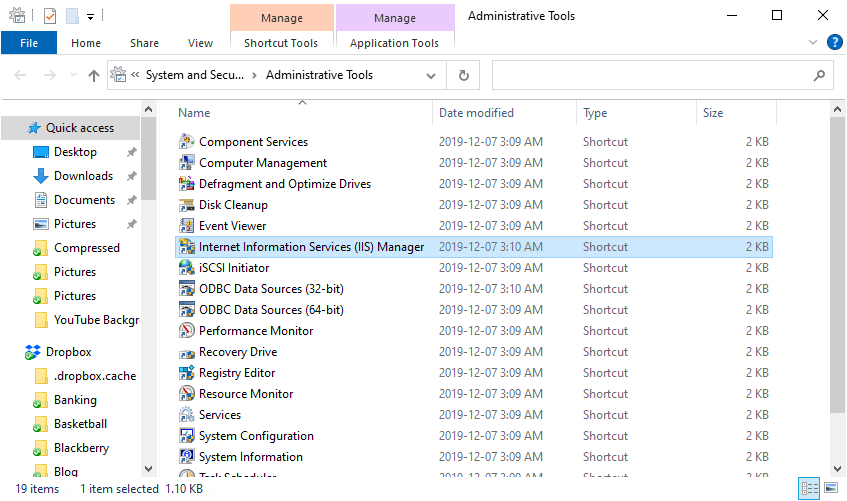
Double click on Internet Information Services (IIS) Manager.
This is the IIS manager window.
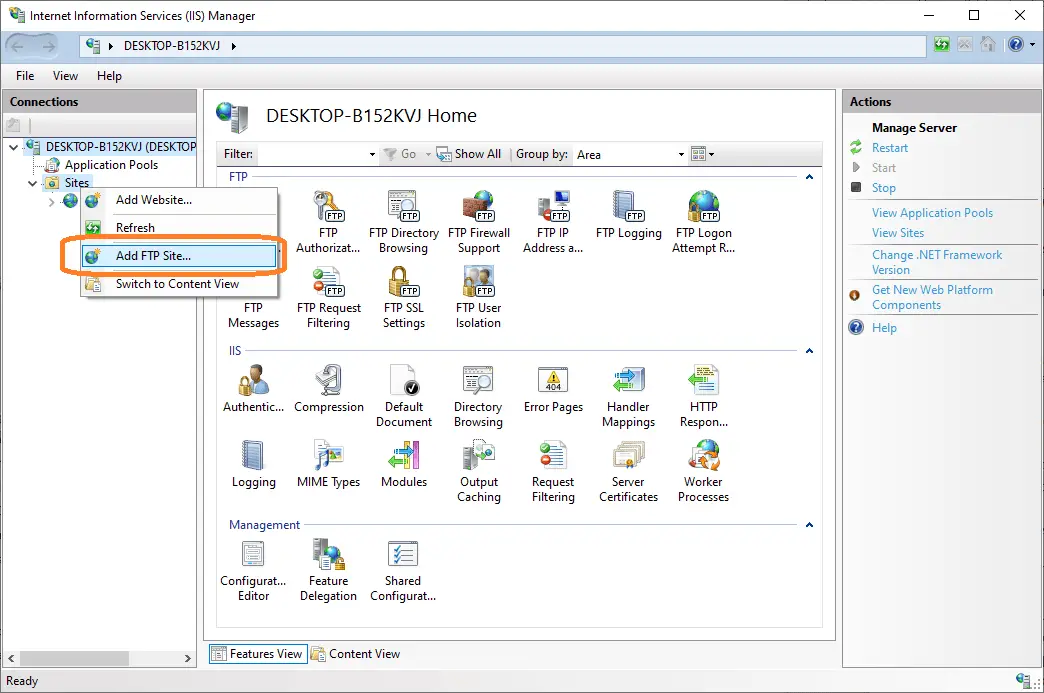
Expand and right-click Sites on the connections pane. Select Add FTP Site.
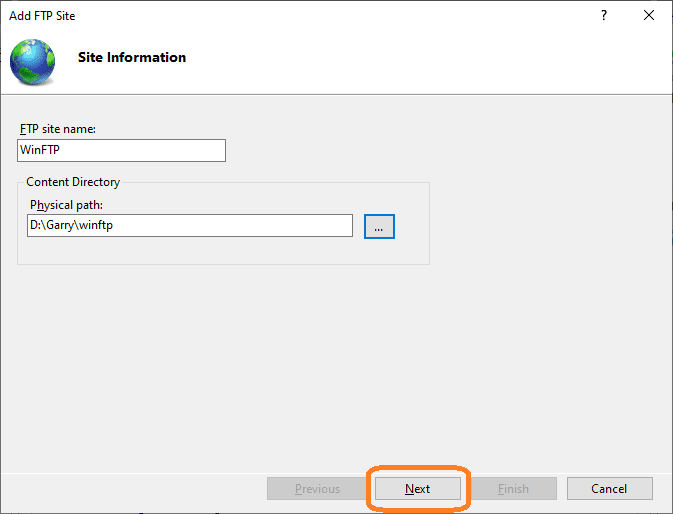
We will name the FTP site WinFTP and specify the physical path to the files on your server. Click next.
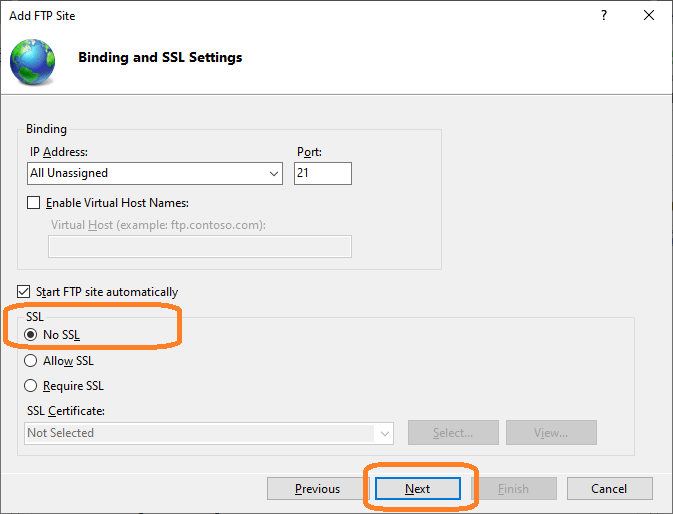
On the binding and SSL settings window change the SSL to No SSL. We will leave the rest as their default values. Click next.
Note: An FTP server that will host sensitive data should be configured to require SSL.
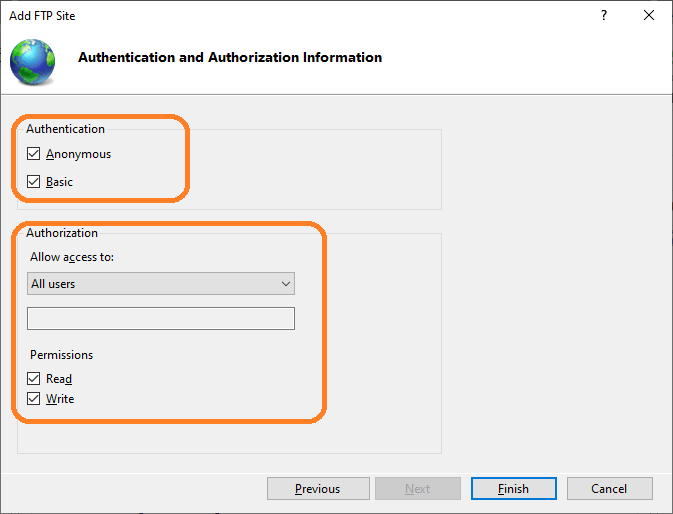
On the authentication and authorization information window, we will select anonymous and basic. Since this is for testing purposes we will allow all users to read and write. Click finish.
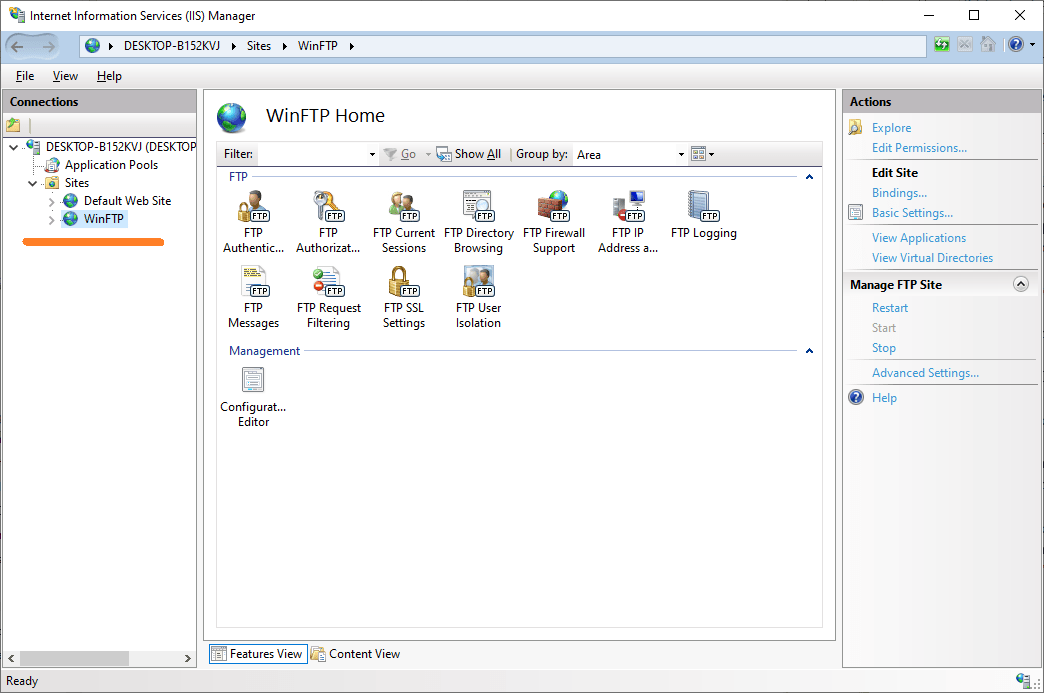
Our FTP server configuration is complete.
Notes:
The firewall on your computer must allow for the FTP Server.
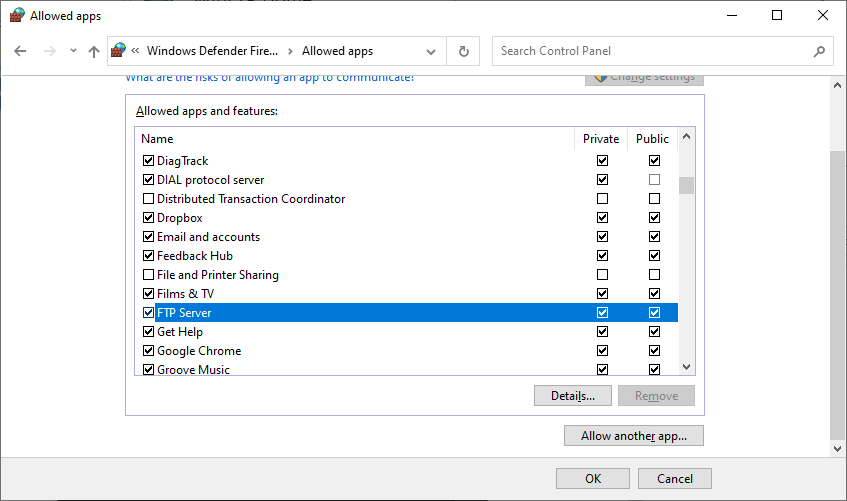
This shows you the setting of the windows defender firewall allowing the FTP server both private and public.
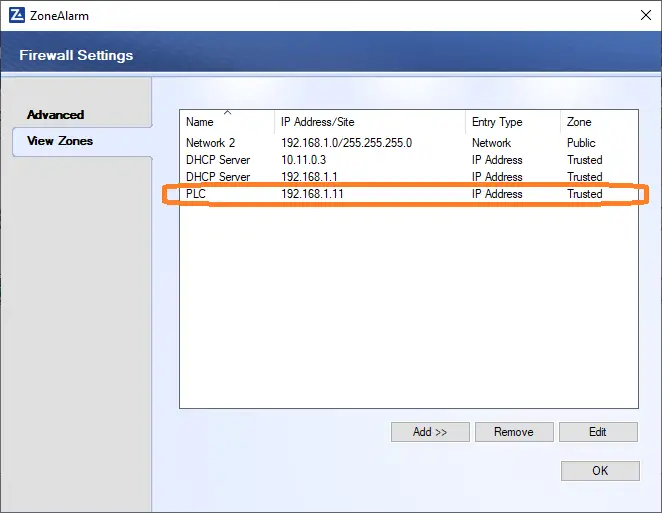
This is the ZoneAlarm firewall settings. A specific PLC address is used to allow the FTP server connection.
If you are going to access this through a router then port forwarding must be used for port 21. This is the port for FTP.
BRX Do-More FTP Client Device
An FTP Client device is created in the BRX Do-More PLC by selecting the new device button in the device configuration menu of the System Configuration window.
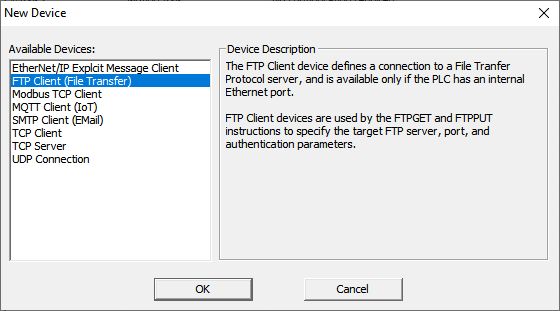
Select FTP Client (File Transfer) to define a connection to the file transfer protocol (FTP) server that we created above. Select OK.
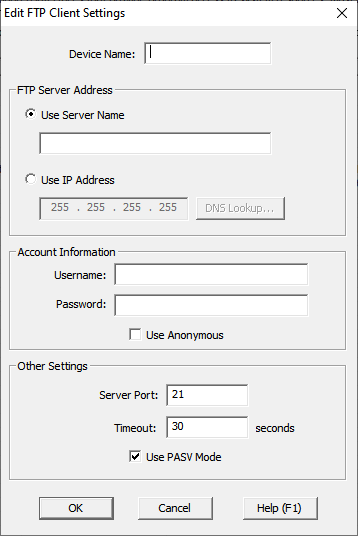
On the Edit FTP Client Settings window, we will fill in the parameters for our FTP client.
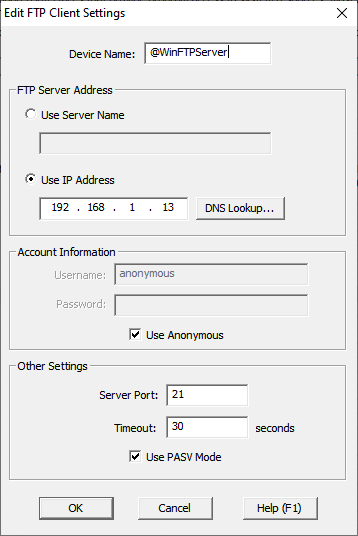
The device name can be what we want to call this device internally in our BRX Do-More PLC. In our case, we have used the name “@WinFTPServer” to indicate that this is a windows FTP server that we are connecting.
The FTP server address will be the IP address of our computer that we set up above. If you are unsure of the address type “ipconfig /all” in a command prompt to view the address. It will be listed under your ethernet adapter IPv4 address.
Under the account information, select use anonymous. We allowed anonymous settings in the setup of our FTP Server.
We will leave the other settings as their default. The server port will be 21 and the timeout is 30 seconds. The use PASV mode is checked. Passive or PASV mode in the client means that the same port number will be used for communication in both directions.
Select OK.
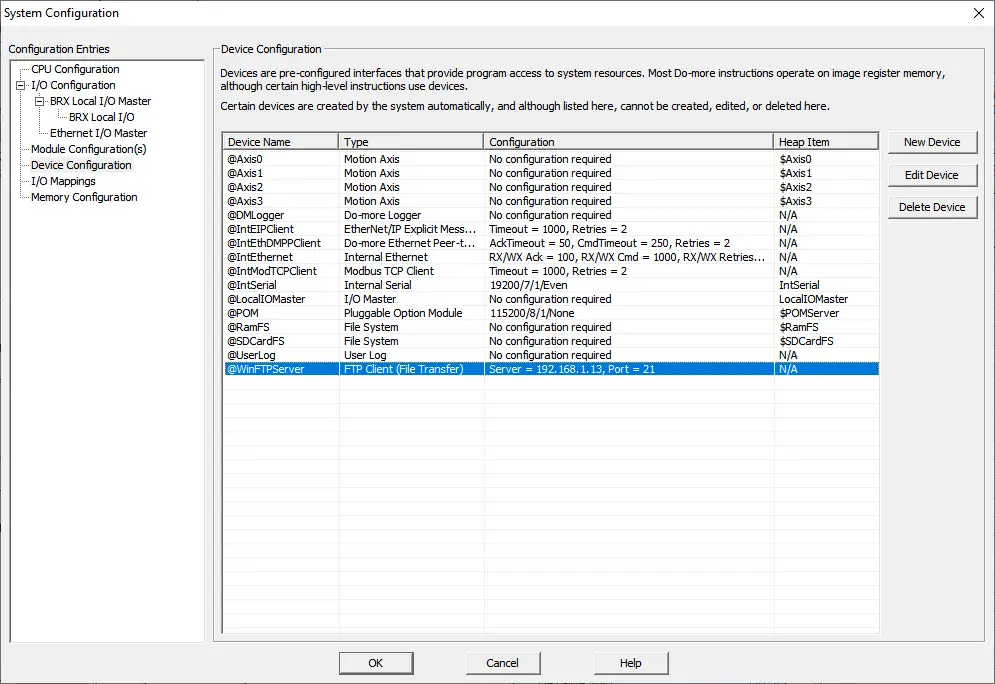
Our FTP Client is now complete on our BRX Do-More PLC.
Select OK to close the system configuration window.
BRX Do-More Program for FTP Client / Server Communication
Do-More FTP Client Put Instruction
The FTPPUT instruction is used to store a file to the remote using FTP.
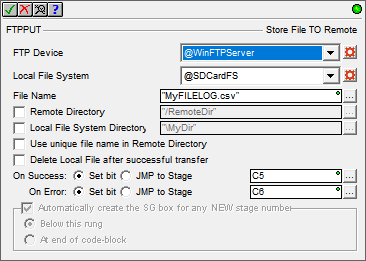
The FTP Device will be the client we have set up above. The local file system will point to the location of the file that we want to transfer. In our case, we are using the Micro SD card on our BRX Do-More PLC. “@SDCardFS”
The file name will be “MyFILELOG.csv”. This file is what we saved during our post on the Data Logging – Video mentioned above. The remote and local file directories may be specified. We will use the root location for our example. There is also an option to delete the local file after it has been successfully transferred. This will keep the amount of information limited to the BRX Do-more System.
Bits can be set upon the file transfer success or error.

Here is our completed FTPPUT instruction. You will see that the instruction is a one-shot (Triangle on the input line) that will only happen during a transition from off to on for the input condition. (C100) The red corner instruction box means that the communication will happen asynchronously. This means that it may take several scans for the file to be transferred.
Watch the video below to see the successful transfer of the file to the FTP Server directory using the FTPPUT BRX Do-More Client Put instruction.
Do-More FTP Client Get Instruction
The FTPGET instruction is used to retrieve a file from the remote using FTP.
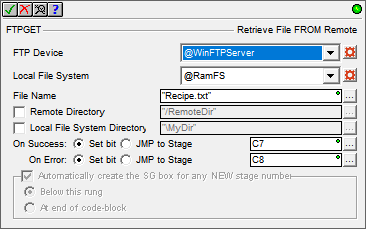
The FTP Device will be the client we have set up above. The local file system will point to the storage location of the file that we want to receive. In our case, we are using the RAM (Random Access Memory) on our BRX Do-More PLC. “@RamFS”
The filename to be retrieved from the FTP server will be “Recipe.txt”.
Remote and local file directories may be specified. We will use the root location for our example. Bits can be set upon the file transfer success or error.

Here is our completed FTPGET instruction. You will see that the instruction is a one-shot (Triangle on the input line) that will only happen during a transition from off to on for the input condition. (C101) The red corner instruction box means that the communication will happen asynchronously. This means that it may take several scans for the file to be retrieved.
Watch the video below to see the successful retrieval of the file from the FTP Server directory using the FTPGET BRX Do-More Client Get instruction.
Do-More FTP Client Get Text File (Recipe)
In our example, we are using a text file called “Recipe.txt”. This file can be created using any text editor like Notepad. Spreadsheet programs like excel could also be used to create the file. The file is placed in the root directory of our windows 10 FTP server.
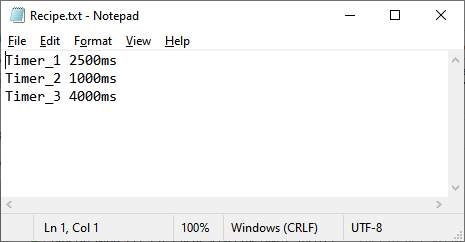
In our recipe, we have set up three timers. These time vales have a unique position within the text file. They are fixed so that the BRX Do-More PLC will be able to get to the correct byte of information and translate the time for the timers.
So keeping this in mind, if we wanted Timer_1 to be 500ms we would use 0500ms in the file. This would keep the time to 4 place holders.
Do-More Text File Read
Once we have the text file retrieved from the FTP server, we can now read the information.
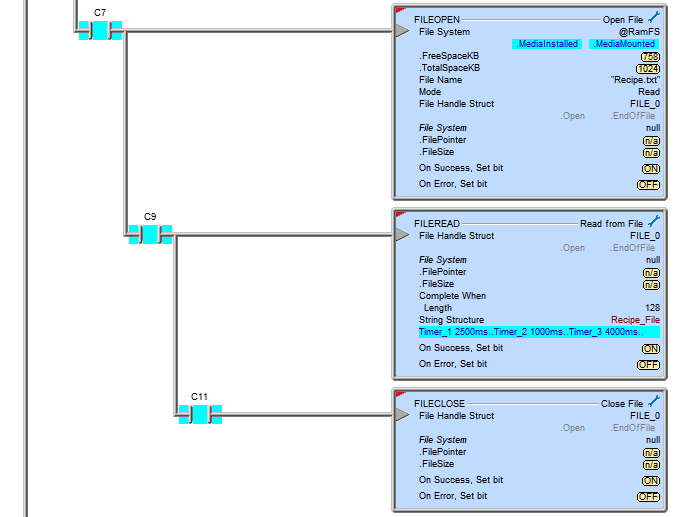
Bit C7 is on when the text file has been successfully received. Using the FILEOPEN instruction we open the file. C9 will be on when the text file has been opened successfully. We use the FILEREAD instruction to read the file into a variable SS0. If this is done successfully then we close the file using the FILECLOSE instruction.
File open, file read and file close is the sequence required to read the recipe file from the FTP server.
Do-More ASCII Text to Integer Value
SS0 will contain our recipe file. We will now convert our information from ASCII to Integers so we can use them in our program.
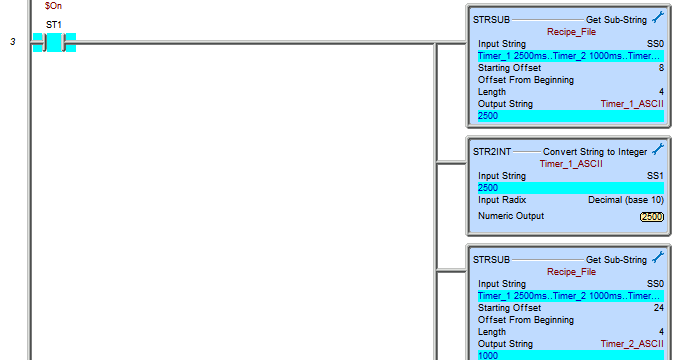
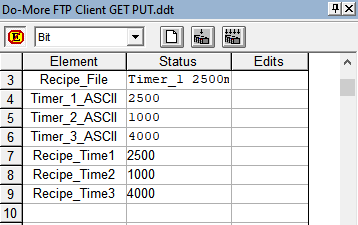
Using the STRSUB get substring instruction we will put the ASCII value of timer 1 and place it into SS1. The starting offset is 8 (bytes) and the length is 4 (bytes). In ASCII a byte is one character.
The STR2INT convert string to integer instruction will then change our SS1 ASCII time value to a decimal value. This is then stored in V1.
Recap:
SS0 – A recipe text file
SS1 – ASCII Timer 1 Value
V1 – Time value integer
We then repeat the two instructions for timer 2 and 3.
The program can be downloaded from the link below.
BRX Do-More PLC Recipe File Sample Program
Using the three-timer values retrieved above we will now use them to cycle some outputs on and off.
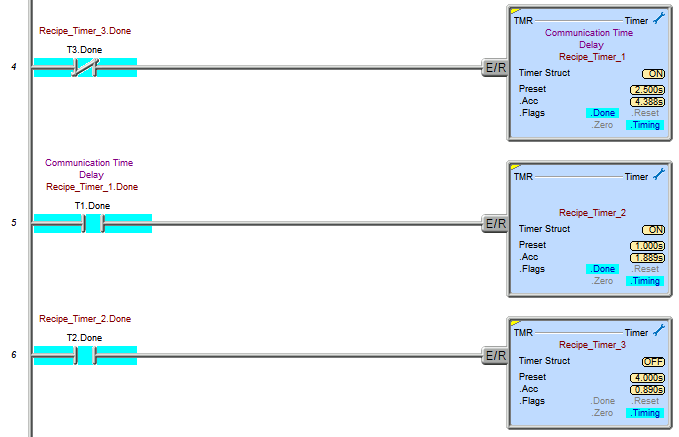
The timers will each cycle the output Y1 to Y3 respectfully.
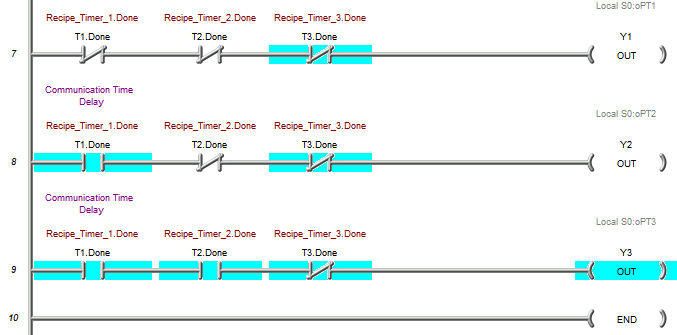
Timer 1,2,3 will keep Y1,2,3 on for the time duration specified in the recipe.
Using the Data View we can monitor the variable.
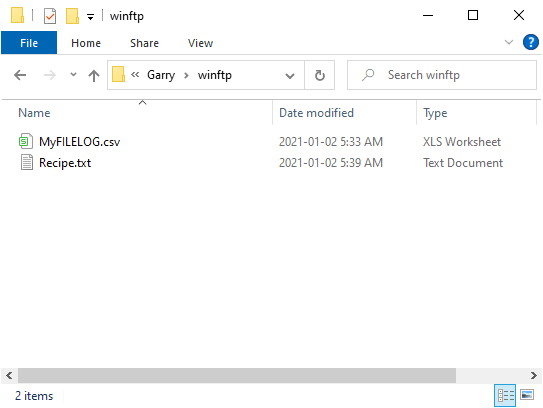
Here is a look at our FTP Server directory.
Watch the video below to see the FTP Client Get and Put in action on our BRX Do-More PLC.
Download the BRX Do-More program and recipe text here.
BRX Series PLC from Automation Direct – Power to deliver
Overview Link (Configure and purchase a system)
Manuals and Product Inserts (Installation and Setup Instruction)
Do-More Designer Software (Free Download Link) – The software will contain all of the instruction sets and help files for the BRX Series PLC.
Watch on YouTube: BRX Do-More PLC FTP Client Get Put
If you have any questions or need further information please contact me.
Thank you,
Garry
If you’re like most of my readers, you’re committed to learning about technology. Numbering systems used in PLC’s are not difficult to learn and understand. We will walk through the numbering systems used in PLCs. This includes Bits, Decimal, Hexadecimal, ASCII, and Floating Point. To get this free article, subscribe to my free email newsletter.
Use the information to inform other people how numbering systems work. Sign up now. The ‘Robust Data Logging for Free’ eBook is also available as a free download. The link is included when you subscribe to ACC Automation.

