Drum instructions are great tools when you have a simple sequence of events that need to occur at a set time interval or as a result of an event. They mimic an electromechanical drum sequencer. The Click PLC has a drum in the instruction set. We will discuss the drum instruction and look at an example of controlling traffic lights.
Previously in this series, we have discussed:
System Hardware – Video
Installing the Software – Video
Establish Communication – Video
Numbering System and Addressing – Video
Timers and Counters
– Counter Video
– Timer Video
Compare and Math Instructions – Video
Program Control Instructions – Video
Shift Register – Video
The programming software and manuals can be downloaded from the Automation Direct website free of charge.
What is a Drum Instruction? (Sequencer)
Have you ever seen the mechanisms of a music box? Ok, so it’s a little drum with pegs that catch and flick the chimes in a particular sequence to play whatever tune is on the drum. So in the PLC, you can have a drum driven by an event, (input from a limit switch or button), or by time.
Click PLC Drum Instruction Traffic Light Example
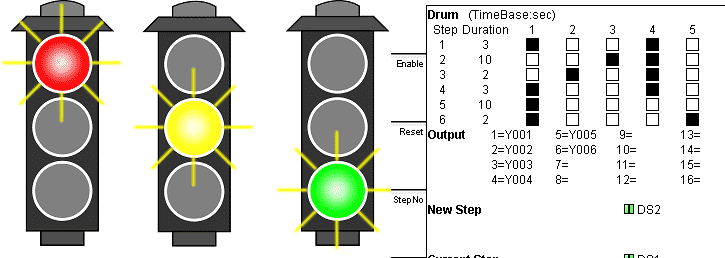
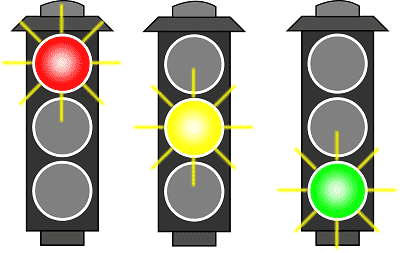
Let’s look at an example. We will control a set of traffic lights, Red, Yellow, and Green for an intersection.
In a previous post, we have discussed the sequencing of traffic lights using discrete outputs and timers. We also used indirect addressing to control the lights.
Building a PLC Program that you can be proud of – Part 1
Now we will use drum instruction to control the lights.
North / South
Red (Y1), Yellow (Y2) Green (Y3)
West / East
Red(Y4), Yellow (Y5), and Green (Y6)
The sequence of operations will be as follows. We will have a Red / Red overlap of 3 seconds then the North / South will go Green for 10 seconds. The North / South will then go Yellow for 2 seconds before the Red / Red overlap of 3 seconds again. The West / East will then go Green for 10 seconds, then Yellow for 2 seconds. The sequence will then start again with the Red / Red overlap.
We will use input X2 to jog the sequence so we will not have to wait for the time to expire in each step.
Input X1 will be used for troubleshooting. When on it will go to the step specified in memory location DS2.
Parts of the Click Drum Instruction
These are the parts of the drum instruction:
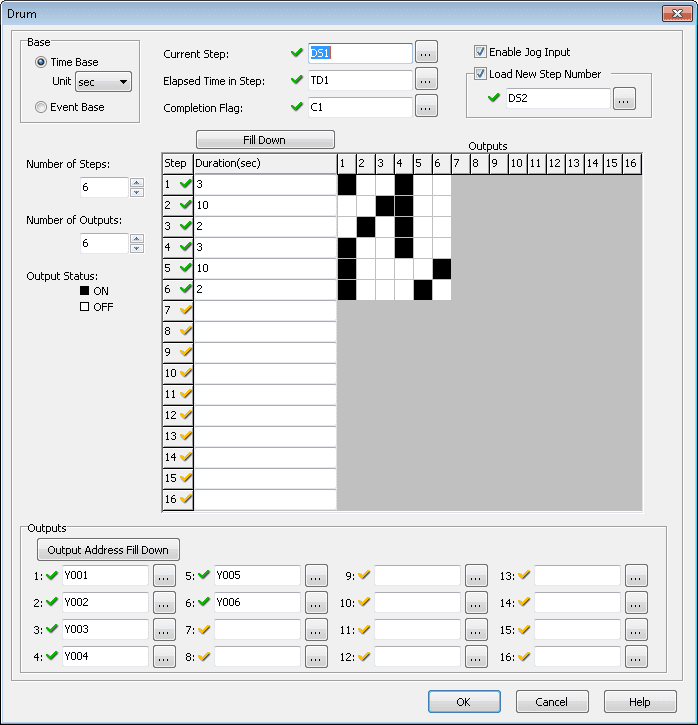
Base – This section will give us the opportunity to select an event-based or time-based drum instruction. The time base instruction further defines the units that we can select from the timing. (ms, sec, min, hour, day) We will set this for Time Base (seconds).
Current Step – This is a memory location that will show the current step number of the drum instruction. We will set this for memory location DS1.
Elapsed Time in Step – This is the memory location that will show a current time in the step. In our case, we will use TD1.
Completion Flag – This is the output bit that will turn on when the drum instruction is complete. (C1)
Enable Jog Input – This will allow us to specify an input to the instruction to jog through the drum sequence.
Load New Step Number – When this is selected input to the drum instruction is added so that when true it will go to the step specified in the memory location. In our case, this will be set for memory location DS2.
Number of Steps – This is the number of steps in our drum instruction. The maximum number is 16. In our example, we have 6 steps before returning to the beginning.
Number of Outputs – We can have a maximum of 16 outputs being controlled with the drum instruction. We have 6 outputs in our example for the traffic light.
Outputs – Here is where we specify the memory location for our outputs. In our case, we have Y1 to Y6 for the traffic lights. You can use the ‘Output Address Fill Down’ button to automatically increment to the next address output value.
Click Drum Output for Light Sequence
We now have a grid that we can determine the status of each step of the drum.
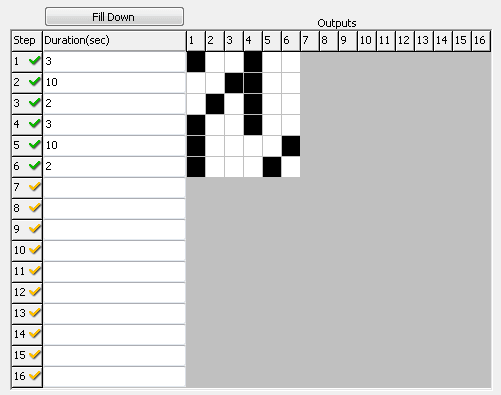
Each of the steps will have a duration. The time base was previously set to seconds. We can now fill in the time we require for each step. If the time is the same on the next step we can just hit the ‘Fill Down’ button.
Clicking each of the squares in the grid will turn them on or off. The black squares represent the status for the step and the corresponding output.
We will not put this instruction into the ladder logic.

Our enable is an unconditional rung. This means that the instruction will always be enabled. We will use the complete bit (C1) as our input condition to reset our drum instruction back to the beginning.
Note: We can also use in parallel the first scan bit (SC2). If the power is removed from the PLC or it switches from program to run, the outputs start from a known state (RED/RED)
X1 input will be used to jump to a step in the drum specified by memory location DS2.
X2 input is our jog input. This will move to the next step without waiting for the time to expire.
What we see in our ladder is a detailed display. We can see the normal display by right-clicking the instruction on the ladder and selecting ‘Normal Display’. Here is what it will look like.
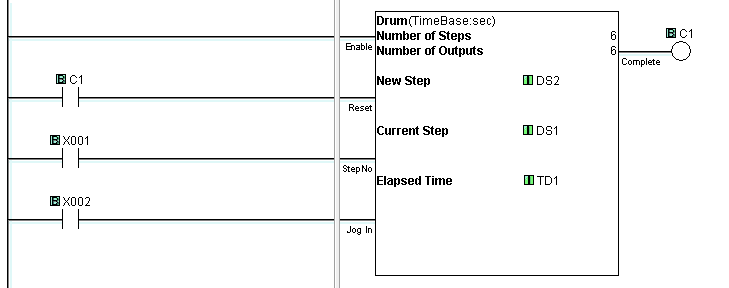
As you can see we can accomplish our sequencing of the traffic lights using drum instruction. This is just one line of ladder code. Watch the YouTube video below to see this drum instruction in action.
Next time we will look at Send and Receive Instructions.
Watch on YouTube: Click PLC Drum Instruction
If you have any questions or need further information please contact me.
Thank you,
Garry
If you’re like most of my readers, you’re committed to learning about technology. Numbering systems used in PLCs are not difficult to learn and understand. We will walk through the numbering systems used in PLCs. This includes Bits, Decimal, Hexadecimal, ASCII, and Floating Point.
To get this free article, subscribe to my free email newsletter.
Use the information to inform other people how numbering systems work. Sign up now.

The ‘Robust Data Logging for Free’ eBook is also available as a free download. The link is included when you subscribe to ACC Automation.