
We will now look at the productivity Arduino Ethernet web server that we will implement on our Productivity Open P1AM industrial Arduino controller.
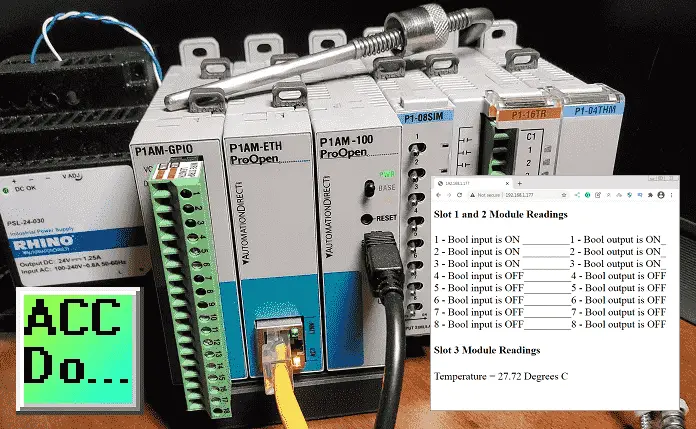
This P1AM Web Server Example is based on an example found here. This example uses the productivity open P1AM-ETH shield to create a web server that displays the input values of a P1-08SIM and P1-04THM to a web page. This page is automatically updated every 3 seconds. The IP address of the webserver is set in the Arduino program (Sketch) Entering this IP address in your browser to view the web page. This will display the information from our Arduino P1AM on our web browser. Let’s get started.
Previous posts in this Productivity Open Arduino Compatible Industrial Controller Series
A full list can be obtained at the following location:
Productivity Open (P1AM-100) Arduino Controller
Productivity Open Arduino Controller Hardware
– Starter Kit Unboxing Video
– Powering Up Video
Installing the Software – Video
First Program – Video
Program Structure – Video
Variables Data Types – Video
Serial Monitor COM – Video
Program Control – Video
Operators – Video
GPIO Inputs and Outputs – Video
Math Instructions – Video
Time Instructions – Video
P1000 Expansion Analog Combination Module – Video
P1000 Expansion Digital Inputs and Outputs Part 1 – Video
P1000 Expansion Digital Inputs and Outputs Part 2 – Video
Watchdog Timer – Video
P1000 Expansion Thermocouple Module – Video
PID Control – Video
P1AM Arduino Modbus TCP to C-More Micro EA3 – Video
P1AM Arduino Modbus TCP to C-More EA9 – Video
Watch the video below to see a sample program (sketch) of the P1AM-ETH Modbus Web Server. Google Chrome will be displaying our web page.
P1AM-ETH -Ethernet Shield – Productivity Open
Specifications
The P1AM-ETH is an industrially rated MKR format shield based on the WIZnet W5500 chip that adds ethernet connectivity to the P1AM-100. The P1AM-ETH uses SPI to communicate with the P1AM-100 or other MKR format CPU. The P1AM-ETH uses the Arduino Ethernet library which comes standard with the Arduino IDE.
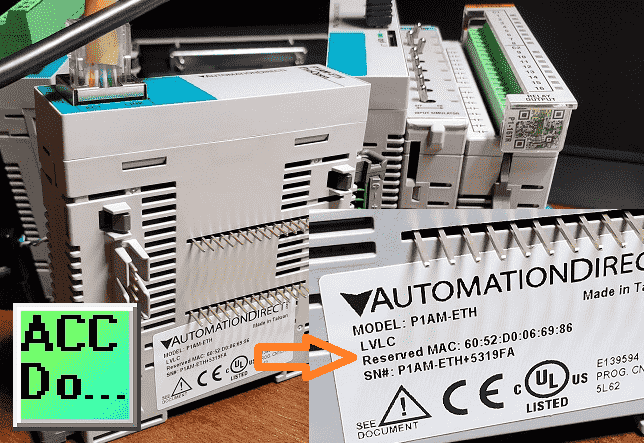
The MAC (Media Access Control) address is the physical hardware identification number. This is printed on the right-hand side label of our P1AM-ETH unit.
We will need this number for our program.
Productivity Open Web Server Program Sketch
Setup Libraries
We specify the Ethernet and P1AM libraries for the webserver program sketch.
#include <Ethernet.h>
#include <P1AM.h>
The MAC address for the Ethernet shield is then specified along with the IP address and Ethernet server port. The default port is 80.
byte mac[] = {0x60, 0x52, 0xD0, 0x06, 0x69, 0x86}; // P1AM-ETH have unique MAC IDs on their product label
IPAddress ip(192, 168, 1, 177); //IP Address our webpage will be at
EthernetServer server(80); //initilizes ethernet using port 80
The setup of the P1-04THM is configured here. We have done a previous post here on the setup and operation of this productivity 1000 card here using productivity blocks.
// configure the P1-04THM here: https://facts-engineering.github.io/modules/P1-04THM/P1-04THM.html
// Post of Thermocouple card here: https://accautomation.ca/productivity-open-p1am-industrial-arduino-p1000-expansion-thermocouple-module/
const char P1_04THM_CONFIG[] = { 0x40, 0x00, 0x60, 0x01, 0x21, 0x00, 0x22, 0x00, 0x23, 0x00, 0x24, 0x00, 0x00, 0x00, 0x00, 0x00, 0x00, 0x00, 0x00, 0x00 };
double P1_04THM_1 = 0.0;
Setup of our Arduino Web Server Program
This section of the program will start the serial monitor and initialize the Ethernet shield. The program will not run without the Ethernet shield. Once this is done the IP address for the Ethernet shield is printed on the serial monitor. The thermocouple card is then initialized.
void setup() {
Serial.begin(115200);
while(!Serial); //Wait for Serial port to open. Remove this line if you want it to start automatically
while(!P1.init()); //Wait for module sign-on
Ethernet.init(5); //CS pin for P1AM-ETH
Ethernet.begin(mac, ip); // start the Ethernet connection
if (Ethernet.hardwareStatus() == EthernetNoHardware) { // Check for Ethernet hardware present
Serial.println("Ethernet shield is missing. Please try again");
while (true) {
delay(1); // do nothing, no point running without Ethernet hardware
}
}
if (Ethernet.linkStatus() == LinkOFF) {
Serial.println("Ethernet cable is not connected.");
}
// start the server
server.begin();
Serial.print("server is at ");
Serial.println(Ethernet.localIP());
//Configure Thermocouple Module
P1.configureModule(P1_04THM_CONFIG,3);
}
Program Sketch Main Section (Loop)
The Ethernet Shield will listen for a client. If nothing is there the inputs (slot 1) are copied to the outputs (slot 2).
If a client connects then we indicate on the serial monitor. The standard HTTP response header is sent along with the refresh rate of 3 seconds. We then send the client the information for the web page.
void loop() {
 // listen for incoming clients
 EthernetClient client = server.available();
if (client) {
    Serial.println("new client");
    // an http request ends with a blank line
    boolean currentLineIsBlank = true;
    while (client.connected()) {
      if (client.available()) {
        char c = client.read();
        Serial.write(c);
        // if you've gotten to the end of the line (received a newline
        // character) and the line is blank, the http request has ended,
        // so you can send a reply
        if (c == '\n' && currentLineIsBlank) {
          // send a standard http response header
          client.println("HTTP/1.1 200 OK");
          client.println("Content-Type: text/html");
          client.println("Connection: close");  // the connection will be closed after completion of the response
         client.println("Refresh: 3");  // refresh the page automatically every 3 sec
          client.println();
          client.println("<!DOCTYPE HTML>");
          client.println("<html>"); //Start our HTML here
          client.println("<h1>Slot 1 and 2 Module Readings</h1>"); //Print the title
          client.println("<br>");
          client.println("<font size= \" 6 \" >"); //This line makes our text larger. Since we need to send the " character we have to "escape" it using a /"
          //----------------------This code handles the Slot 1 and 2 boolean values displayed on the webpage----------------------------
          for (int i = 1; i <= 8; i++) { //Run our loop for i = 1 to 8 - Individual input bits
            int boolpoint = P1.readDiscrete(1, i); //reads boolean from slot 1 for the channel indiciated by our loop variable "i"
            String String_Variable = "";
            Serial.println(boolpoint);  //Debug print to serial monitor
            client.print(i);  //Print this text exactly
            client.print(" - Bool input is ");  //Print this text exactly
            if (boolpoint){
              String_Variable = "ON ";
              }
              else {
              String_Variable = "OFF";
              }
            client.print(String_Variable);  //Print our current reading on counts
            client.print("_________");  //Print this text exactly
            client.print(i);  //Print this text exactly
            client.print(" - Bool output is ");  //Print this text exactly
            if (boolpoint){
              String_Variable = "ON_";
              }
              else {
              String_Variable = "OFF";
              }
            client.print(String_Variable);  //Print our current reading on counts
            client.println("<br>");
          }
          //----------------------This code handles the Slot 3 first thermocouple value displayed on the webpage----------------------------
          double thermo1input = P1.readTemperature(3,1);  //reads first analog temperature data from slot 3 for the channel
          Serial.println(thermo1input);  //Debug print to serial monitor
          client.println("<h4>Slot 3 Module Readings</h4>");  //Print the title
          client.print("Temperature = ");  //Print this text exactly
          client.print(thermo1input);  //Print this text exactly
          client.print(" Degrees C ");  //Print this text exactly
          //------------------------------------------------------------------------------------------------------------
          client.println("</font>");
          client.println("</html>");  //Our HTML ends here
          break;
        }
        if (c == '\n') {
          // you're starting a new line
          currentLineIsBlank = true;
        } else if (c != '\r') {
          // you've gotten a character on the current line
          currentLineIsBlank = false;
        }
      }
    }
    // close the connection:
    client.stop();
    Serial.println("client disconnected");
  }
P1.writeDiscrete(P1.readDiscrete(1),2); //Write slot 1 value into slot 2
}
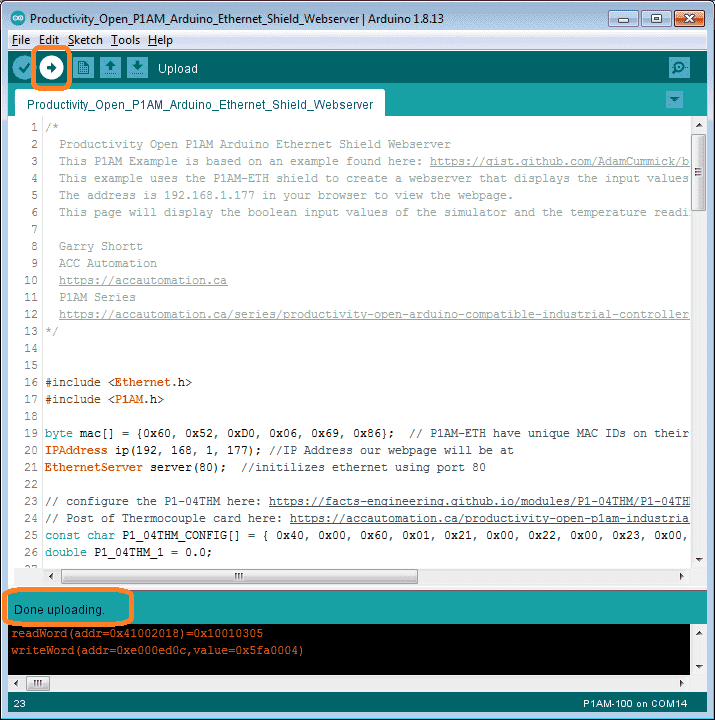
Verify the program.
Upload the program.
Testing the Web Server Program Sketch
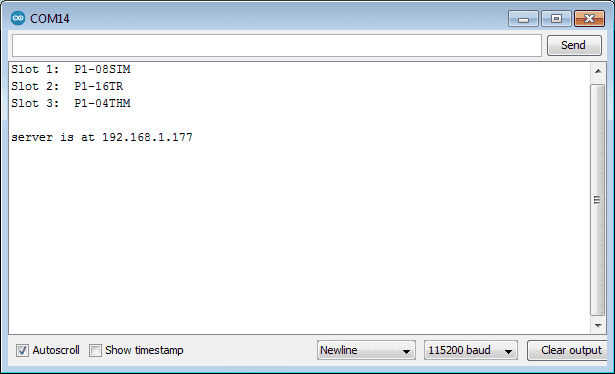
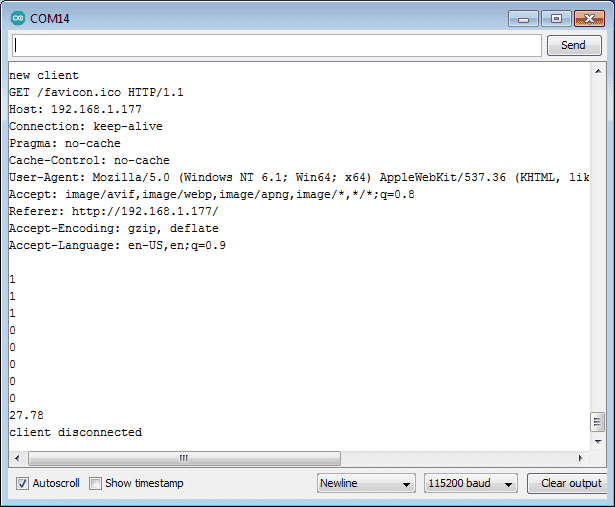
After downloading the sketch to the P1AM, select the serial monitor. The productivity 1000 cards will be displayed that are connected to our Arduino unit. The server IP address will be displayed on the serial monitor.
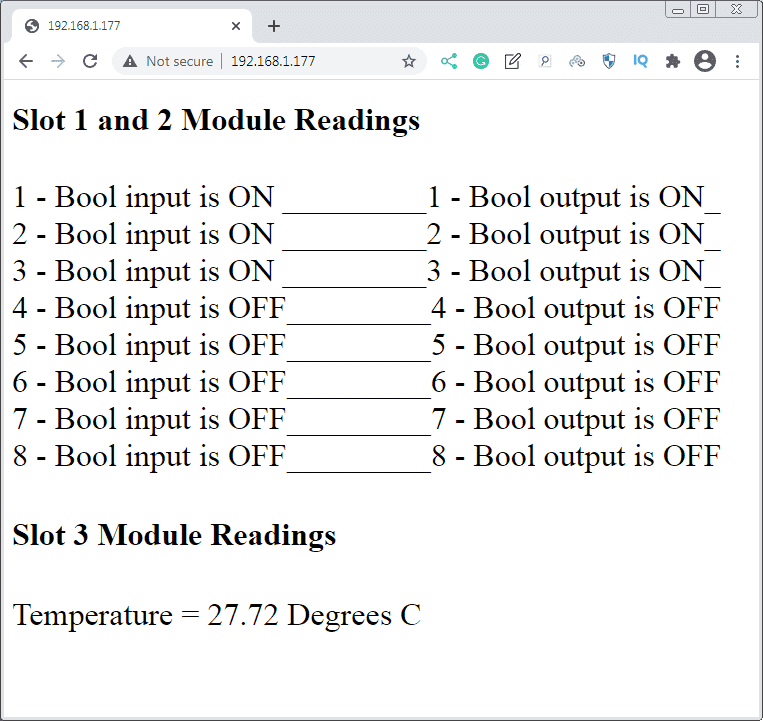
Display of Web Page from the Web Server
Open up your web browser and enter the IP address of the server on the address line. Our information will be displayed and updated every 3 seconds.
If we view the serial monitor, the communication to the connected client can be seen.
Watch the video below to see the operation of our productivity open industrial Arduino controller web server.
Download the P1AM-100 sample sketch (program) here.
Productivity Open Arduino Compatible Links:
Product Hardware
– Productivity Open (Automation Direct)
– P1AM-100 Specifications
– Productivity Open User Manual
– Configure a Productivity Open Arduino-based Controller
– Open Source Controllers (Arduino-Compatible)
– Productivity Open Documentation (Facts Engineering)
– P1AM Design Files
Software
– Arduino IDE (Integrated Development Environment)
– P1AM-100 library (Easy Interface for controlling P1000 Modules)
– Productivity Blocks (Development Timesaver)
– Productivity Blocks Documentation (Wiki)
Community
– Automation Direct Forum – Open Source Devices
Next time we will look at programming the Modbus TCP Client with our Ethernet industrial shield on our P1AM-100 Arduino Industrial Controller. We will be connecting to a Click PLC.
Watch on YouTube: Productivity Open P1AM Arduino Ethernet Shield Web Server
If you have any questions or need further information please contact me.
Thank you, Garry
If you’re like most of my readers, you’re committed to learning about technology. Numbering systems used in PLC’s are not difficult to learn and understand. We will walk through the numbering systems used in PLCs. This includes Bits, Decimal, Hexadecimal, ASCII and Floating Point. To get this free article, subscribe to my free email newsletter.

The ‘Robust Data Logging for Free’ eBook is also available as a free download. The link is included when you subscribe to ACC Automation.