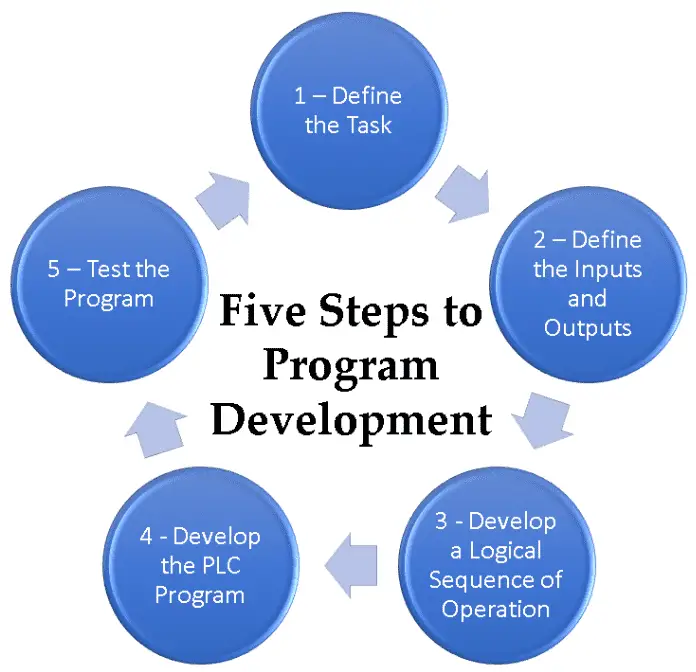
Developing a programmable logic controller (PLC) program can be broken down into five steps. These programming steps are as follows:
Five Steps to PLC Program Development
Step 1 – Define the task
Step 2 – Define the Inputs and Outputs
Step 3 – Develop a logical sequence of operation
Step 4 – Develop the PLC program
Step 5 – Test the program
These five steps to PLC program development will help you understand, program, and troubleshoot your automated machine.
 We will look at each of these steps in more detail as we discuss the PLC programming development. Let’s get started.
Previously in this PLC Learning Series:
PLC Training Series – Tutorial for Everyone – Video
What are PLC Inputs? – Video
What are PLC Outputs? – Video
Memory Backup – Video
Understanding Numbers – Video
Program Cyclic Scan – Video
A PLC programmer must know everything about the machine before they can program it. Five steps will be taken for every PLC program written. Each step must be fully understood before continuing to the next. Sometimes during the next step, the previous one may be revisited. This is due to additional or clarifying information. This process will get you to a PLC program that will function as expected. Watch the video below for an explanation of the five steps to PLC program development.
Some recent posts discuss the five steps to PLC program development using examples.
Click PLC – Easy Transfer Line Programming – Video
Productivity PLC Simulator – Chain Conveyor MS – Video
See the links below for additional program examples.
Step 1 – Define the task.
What has to happen? This step is a collection of information about how the machine is to function. Conversations with owners, engineers, maintenance, operators, etc., are a few people to help you understand how the device will work. I find open-ended questions are best to ask.
How do you picture this operating?
What happens when…?
Do your similar existing machines have some current problems?
How is the machine maintained? (Mechanical Cycles, Oil Changes, etc.)
 Write this information down and summarize your findings. The next step will sometimes force you to go back to individuals and ask further questions. This is one of the most critical steps for your program development. Good note-taking is essential.

Step 2 – Define the Inputs and Outputs
Review the requirements and ensure that everything is included. The information in step 1 will help you to determine the inputs and outputs required to perform the operations. This input and output list may also be provided to you.
The inputs and outputs refer to both discrete (on/off) and analog. Any special communications can also be included in this step. An example would be a temperature controller that will communicate Modbus RTU.
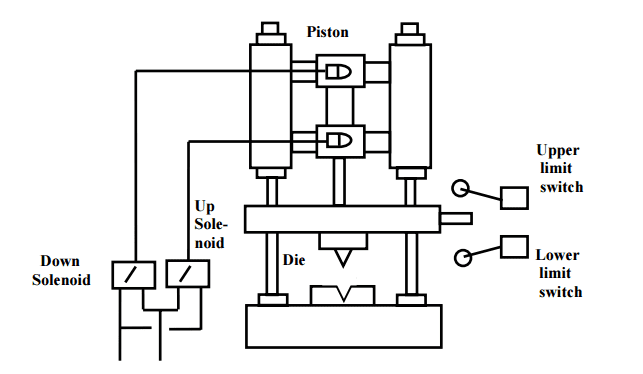
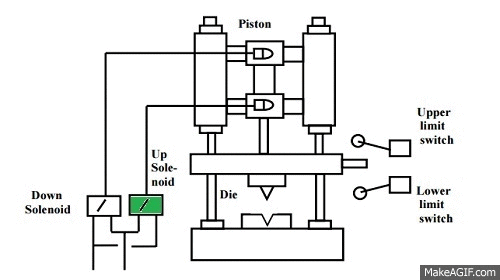
Inputs:
Master Switch – On/Off
Upper Limit Switch – On/Off
Lower Limit Switch – On/Off

Outputs:
Down Solenoid – On/Off
Up Solenoid – On/Off
If a control panel is required, ensure the inputs, like start, stop, reset, emergency stop, etc., are included. Outputs like lights, counters, etc., are sometimes forgotten on the panel.
Step 3 – Develop a logical sequence of operations.
This is where the majority of time is spent in PLC program development. Steps 1 and 2 allow you to express what has to happen in the PLC program systematically. Based on the logic, you may have to modify the program’s inputs/outputs or sequence. This is the most accessible place to make changes.
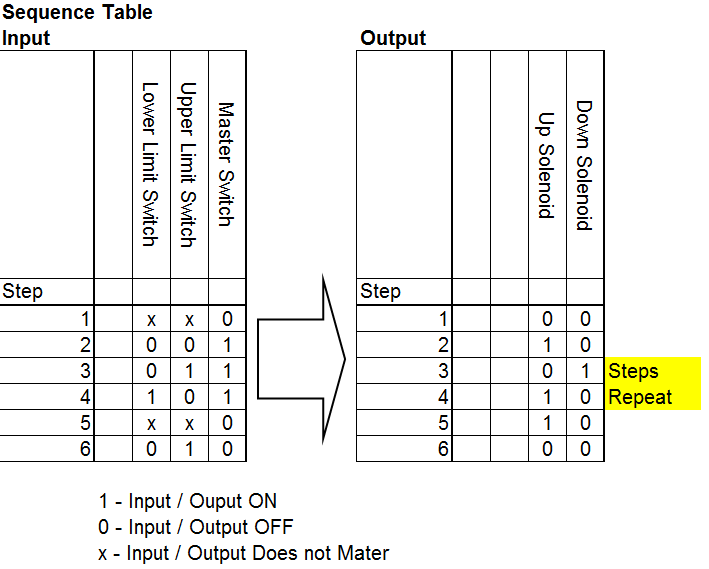
You can use anything to understand the logic of the operation before programming fully. This can be done using a flow chart or sequence table. Many people do not use this step and jump straight to programming.
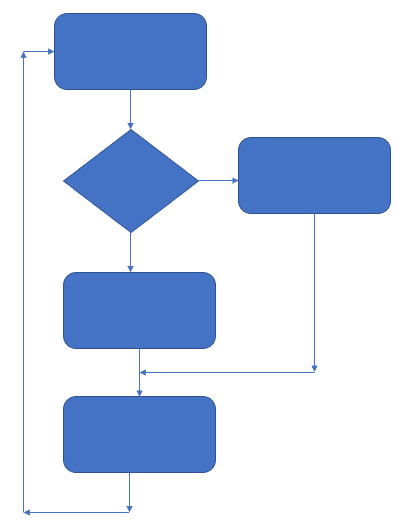 Fully understanding the logic before starting to program can save you time and frustration.
Step 4 – Develop the PLC program.
Utilizing the above steps, we will now actually write the plc program. This can be in several different languages. In the majority of cases, ladder logic is used.
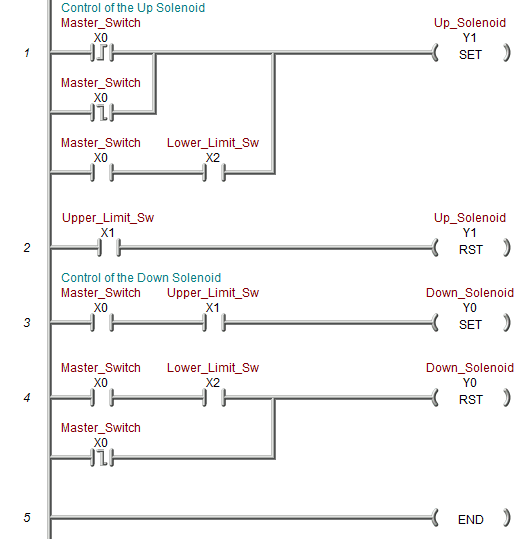
Look at the sequence table concerning the following logic. I have used Set and Reset conditions, which are quickly followed by the sequence table. When the master switch turns on, the up solenoid is activated. Notice the first rung is a direct correlation. Follow the rest of the sequence table with this ladder logic.
Document, Document, Document This is a vital part of every program, saving you time and money when you return to the program years later.
Step 5 – Test the program.
Test the logic that you have developed. Once again, the previous steps are helpful in this process. First, start with what is referred to as ringing out the IO. This is where you would trigger the inputs and set the outputs to verify the wiring and communication. PLC program development testing is an important step to test for all conditions of the logic. (Power Cycle, Sensors Fail, Safety, etc.)
 Test the program with a simulator or actual machine. Make modifications as necessary. Check with the people most knowledgeable about the device to see if it is doing what they expect. Do they need anything else? Follow up after a time frame to see if any problems need to be addressed.
 Watch the video below to review the five steps to PLC program development.
Additional examples of PLC program development using the five steps.
Click PLC – Easy Transfer Line Programming – Video
Productivity PLC Simulator – Chain Conveyor MS – Video
Five Steps to PLC Program Development – Die Stamping
PLC Programming Example – Process Mixer
PLC Programming Example – Shift Register (Conveyor Reject)
PLC Programming Example – Paint Spraying
PLC Programming Example – Delay Starting of 7 Motors
PLC Programming Example – Pick and Place
PLC Programming Example – Sorting Station (Shift Register)
PLC Programming Example – Palletizer
PLC Beginner’s Guide to PLC Programming
There are many different PLC manufacturers with other hardware and software. All of the programmable logic controllers have similar basic features. Here is how I would approach learning about basic PLCs.
Once you are familiar with the basics of the PLC, you will then learn specifics for the controller you will be programming.
This is the easiest way to learn about PLC programming.
Watch on YouTube: PLC Learning Series – Programming Steps
If you have any questions or need further information, please contact me.
Thank you,
Garry
If you’re like most of my readers, you’re committed to learning about technology. Numbering systems used in PLCs are not challenging to learn and understand. We will walk through the numbering systems used in PLCs. This includes Bits, Decimals, Hexadecimal, ASCII, and Floating Points.
To get this free article, subscribe to my free email newsletter.
Use the information to inform other people how numbering systems work. Sign up now.

The ‘Robust Data Logging for Free’ eBook is also available as a free download. The link is included when you subscribe to ACC Automation.