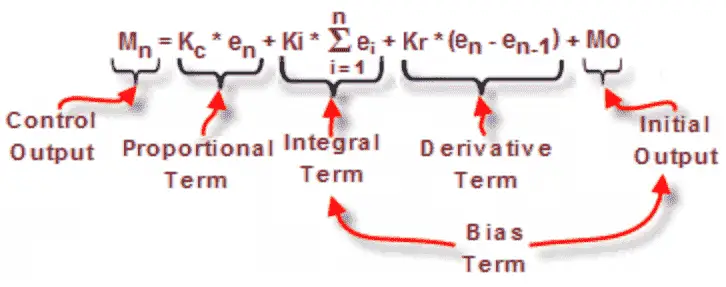
A Proportional-Integral-Derivative algorithm is a generic Control Loop feedback formula widely used in industrial control systems. A PID algorithm attempts to correct the error between a measured process variable and the desired setpoint by calculating and then outputting a corrective action that can adjust the process accordingly and rapidly, to keep the Error to a minimum.
The following links will explain the PID instruction.
PID for Dummies
PID Theory Explained
Wikipedia PID Controller
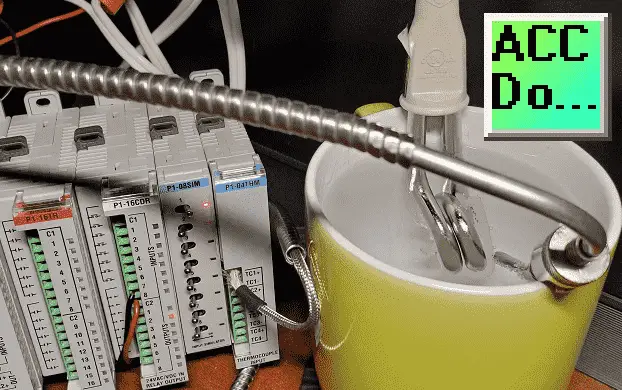
We will be using an immersion heater in a cup of water to keep the temperature at a constant value.
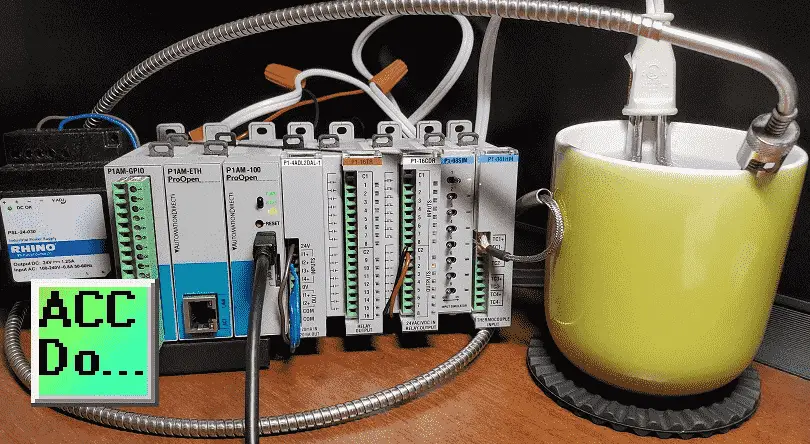
Our immersion heater will be controlled through a relay using time proportional control from our PID output. A J type thermocouple will be used with the P1-04THM thermocouple temperature and voltage input module. The Arduino PID Library by Brett Beauregard will be used with our productivity open P1AM industrial arduino. Our program sketch will use productivity blocks, that will then be verified into the C++ code in the Arduino IDE. Let’s get started.
Previous posts in this Productivity Open Arduino Compatible Industrial Controller Series
A full list can be obtained at the following location:
Productivity Open (P1AM-100) Arduino Controller
Productivity Open Arduino Controller Hardware
– Starter Kit Unboxing Video
– Powering Up Video
Installing the Software – Video
First Program – Video
Program Structure – Video
Variables Data Types – Video
Serial Monitor COM – Video
Program Control – Video
Operators – Video
GPIO Inputs and Outputs – Video
Math Instructions – Video
Time Instructions – Video
P1000 Expansion Analog Combination Module – Video
P1000 Expansion Digital Inputs and Outputs Part 1 – Video
P1000 Expansion Digital Inputs and Outputs Part 2 – Video
Watchdog Timer – Video
P1000 Expansion Thermocouple Module – Video
Watch the video below to see the sample program (sketch) controlling the temperature of our water using the productivity open industrial arduino controller.
PID Control Library
The first thing that we must do is to ensure that the PID library is installed.
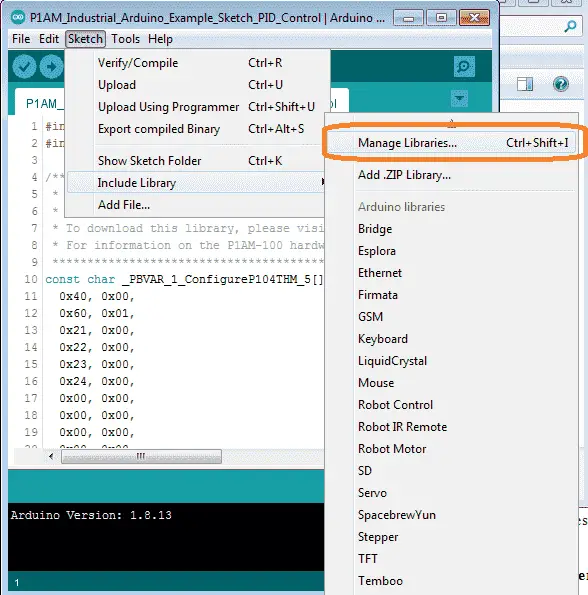
Call up the library by using the main menu | Sketch | Include Library | Manage Libraries… Alternatively, you can use the short cut of Ctrl+Shift+I.

Type in PID on the top line to call up all of the PID functions available in the library. Scroll down until you find the PID by Brett Beauregard. If it is not installed then select the latest version and install.

PID Control Math Simply Explained
The following post will use basic math to develop a PID loop in the Click PLC without using the built-in function. This is based on the PID without a Ph.D. paper by Tim Wescott.
Click PLC PID using Factory IO – Video
Here are some references on PID control:
PID without a Ph.D. By Tim Wescott
Understanding PID in 4 minutes
PID Control – A brief introduction
PID Controllers Explained
Who Else Wants to Learn about On-Off and PID Control?
PID Control Arduino Sample Program (Sketch)
Our sample program (sketch) will use the CPU switch to turn on and off our program. If the program is running then the CPU LED light will be on. If the CPU is not on then all of the digital outputs will be off.
When the CPU switch is on and we turn on the first simulator input this will then control the relay output to heat the water in a cup using an immersion heater. A second output is used to indicate that the loop is running. The relay is controlled by time. If the first simulator input is off then we turn off the outputs.
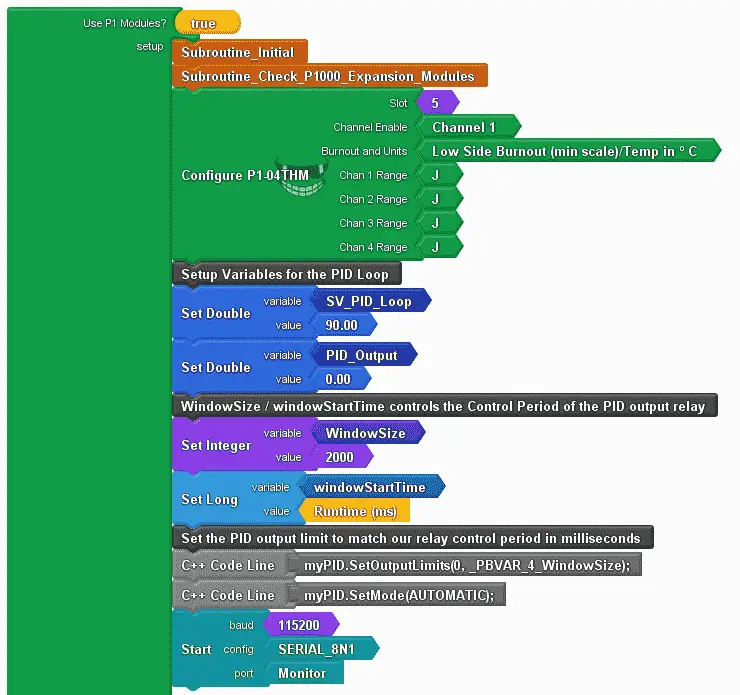
The use of P1 Modules is set to true. This will include the library for the P1AM and P1_HSC. Subroutine_Initial will turn off our outputs. Subroutine_Check_P1000_Expansion_Modules will check to ensure that the digital cards are still attached and functioning correctly.
We use the configure P1-04THM on Slot 5. This will set our first input for a J type thermocouple.
The PID variables are set up for our loop.
The set value is set for 90.00 degrees Celsius. The variable is called SV_PID_Loop.
The PID output is set to double and has an initial value of 0.00.
A variable called WindowSize is used for the control period of the relay output. This is set for 2000 milliseconds. 2 seconds is the control period of the relay.
The window start time variable will be used to tell when to set the next start time of the control relay.
The PID output limit is set the window size of 2000 milliseconds and the PID is set to automatic. C++ code line blocks are used to set these parameters.
The serial monitor is used to display the variables on the screen so we can see the function of our program.

The C++ Declarations block instruction is used to call up the PID library and specify the parameters. In our case the present value (PV) temperature is coming from the thermocouple, The output is called PID output is specified along with the PID set value (SV) for the loop. PID parameters are set for 50, 245, and 40. This can be experimented with depending on your setup. See links above for tuning the PID parameters. Finally, the application calls for direct control. If we were using a cooler instead of a heater this would be set for reverse control.
#include
#include

/******************************************************************************************
* Automationdirect.com
* This version of ProductivityBlocks supports P1AM-100 Library V1.0.0
* To download this library, please visit https://github.com/facts-engineering/P1AM
* For information on the P1AM-100 hardware, please visit https://www.automationdirect.com
******************************************************************************************/
const char _PBVAR_1_ConfigureP104THM_5[] = {
0x40, 0x00,
0x60, 0x01,
0x21, 0x00,
0x22, 0x00,
0x23, 0x00,
0x24, 0x00,
0x00, 0x00,
0x00, 0x00,
0x00, 0x00,
0x00, 0x00
};
const char* _PBVAR_10_RollCall[] = {
"P1-4ADL2DAL-1", "P1-16TR", "P1-16CDR", "P1-08SIM", "P1-04THM", "P1-", "P1-", "P1-", "P1-", "P1-", "P1-", "P1-", "P1-", "P1-", "P1-"};
#define _PBVAR_11_CPU_LED_PIN 32
double _PBVAR_2_SV_PID_Loop = 0.0 ;
double _PBVAR_3_PID_Output = 0.0 ;
int _PBVAR_4_WindowSize = 0 ;
unsigned long _PBVAR_5_windowStartTime = 0UL ;
boolean __proBlocksDigitalRead(int pinNumber)
{
pinMode(pinNumber, INPUT);
return digitalRead(pinNumber);
}
void __proBlocksDigitalWrite(int pinNumber, boolean status)
{
pinMode(pinNumber, OUTPUT);
digitalWrite(pinNumber, status);
}
unsigned long _PBVAR_6_Slot4 = 0UL ;
double _PBVAR_7_PV_Temperature = 0.0 ;
unsigned long _PBVAR_8_now = 0UL ;
int _PBVAR_9_previousMillisecond = 0 ;

#include ;
//Specify the links and initial tuning parameters;
PID myPID(&_PBVAR_7_PV_Temperature, &_PBVAR_3_PID_Output, &_PBVAR_2_SV_PID_Loop, 50, 245, 40, DIRECT);

void Subroutine_Initial();
void Subroutine_Check_P1000_Expansion_Modules();

void setup()
{
while(!P1.init())
{
}
Subroutine_Initial();
Subroutine_Check_P1000_Expansion_Modules();
P1.configureModule(_PBVAR_1_ConfigureP104THM_5, 5);
//Setup Variables for the PID Loop
_PBVAR_2_SV_PID_Loop = 90.00 ;
_PBVAR_3_PID_Output = 0.00 ;
//WindowSize / windowStartTime controls the Control Period of the PID output relay
_PBVAR_4_WindowSize = 2000 ;
_PBVAR_5_windowStartTime = millis() ;

//Set the PID output limit to match our relay control period in milliseconds
myPID.SetOutputLimits(0, _PBVAR_4_WindowSize);
myPID.SetMode(AUTOMATIC);
Serial.begin(115200, SERIAL_8N1);
}
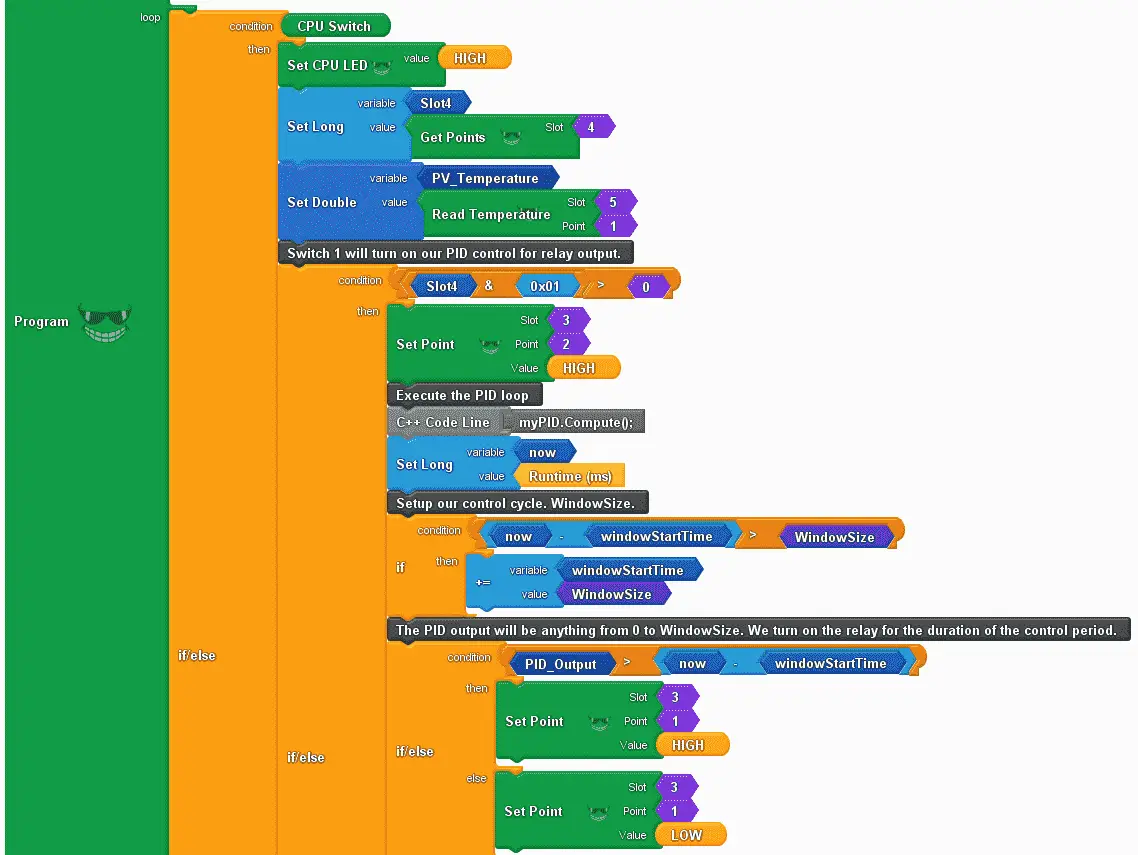
If the CPU switch is on then set the CPU LED on. then get the points in slot 4 which is the input simulator module.
The temperature is then read from slot 5.
If the first input is on then we setpoint 2 of slot 3 on. This will indicate that we are controlling the heater.
Using the C++ code line block we execute the PID loop control.
The current runtime in milliseconds is recorded in a variable called now.
If now minus the window start time is greater than the window size (2000 ms) then we take the window start time and add the window size. This will give us our 2-second control window for the relay output.
The PID output is then compared the time now minus the window start time. If it is greater then the output relay point 1 on slot 3 will be turned on. If it is less than, the relay will be turned off. You can see that this relay will be on for a portion of the 2-second cycle.
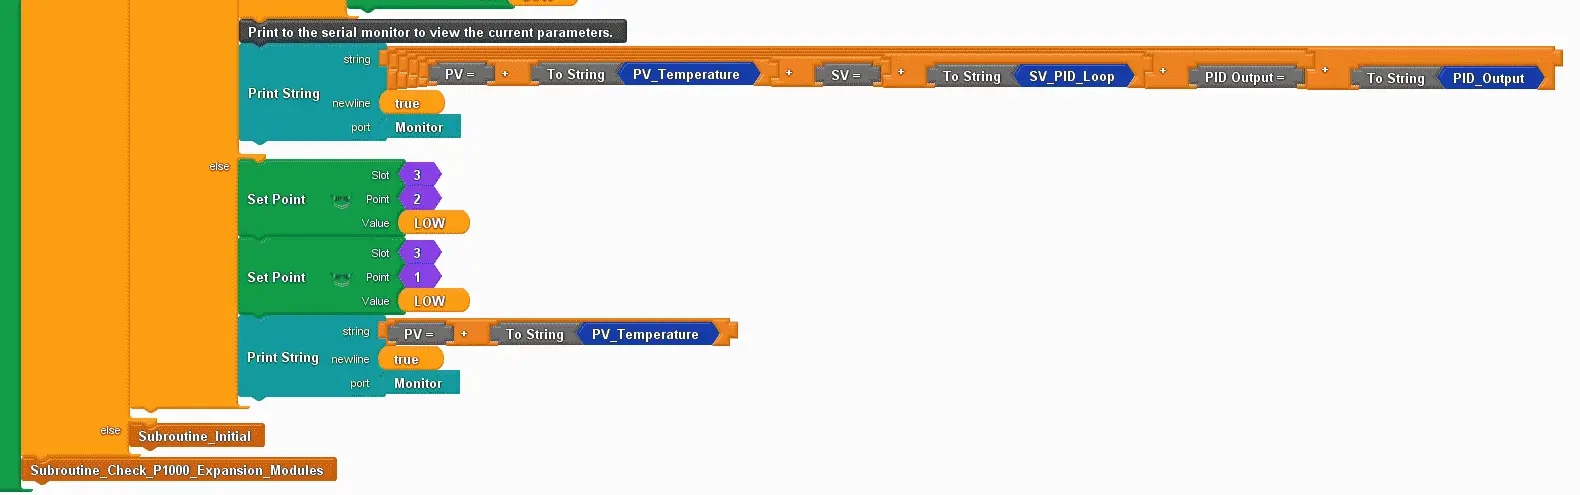
We then print the present and set and PID output values to the serial monitor.
When the simulator input switch is off, we turn off both relays and print the temperature to the serial monitor.
If the CPU switch is off we will call up the initial subroutine to turn off all of the outputs.
At the end of the loop we call up the check P1000 expansion modules.
void loop()
{
if (__proBlocksDigitalRead(31))
{
__proBlocksDigitalWrite(32, HIGH);
_PBVAR_6_Slot4 = P1.readDiscrete(4, 0) ;
_PBVAR_7_PV_Temperature = P1.readTemperature(5, 1) ;

//Switch 1 will turn on our PID control for relay output.
if (( ( (_PBVAR_6_Slot4 & 0x01UL) ) > ( 0 ) ))
{
P1.writeDiscrete( (uint32_t)HIGH, 3, 2);
//Execute the PID loop

myPID.Compute();
_PBVAR_8_now = millis() ;

//Setup our control cycle. WindowSize.
if (( ( ( _PBVAR_8_now - _PBVAR_5_windowStartTime ) ) > ( _PBVAR_4_WindowSize ) ))
{
_PBVAR_5_windowStartTime += _PBVAR_4_WindowSize;
}

//The PID output will be anything from 0 to WindowSize. We turn on the relay for the duration of the control period.
if (( ( _PBVAR_3_PID_Output ) > ( ( _PBVAR_8_now - _PBVAR_5_windowStartTime ) ) ))
{
P1.writeDiscrete( (uint32_t)HIGH, 3, 1);
}
else
{
P1.writeDiscrete( (uint32_t)LOW, 3, 1);
}

//Print to the serial monitor to view the current parameters.
Serial.println("PV =" + String(_PBVAR_7_PV_Temperature) + "SV =" + String(_PBVAR_2_SV_PID_Loop) + "PID Output =" + String(_PBVAR_3_PID_Output));
}
else
{
P1.writeDiscrete( (uint32_t)LOW, 3, 2);
P1.writeDiscrete( (uint32_t)LOW, 3, 1);
Serial.println("PV =" + String(_PBVAR_7_PV_Temperature));
}
}
else
{
Subroutine_Initial();
}
Subroutine_Check_P1000_Expansion_Modules();
}
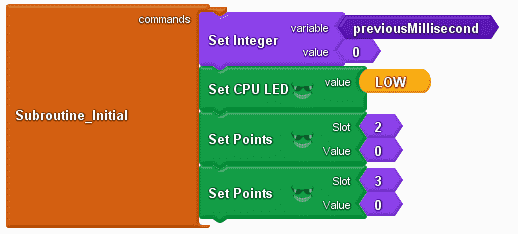
Subroutine initial will set our previous milliseconds to a value of 0, set the CPU LED low (off), and set all of the digital output points off. The shift register variable is also set to 0.
void Subroutine_Initial()
{
_PBVAR_9_previousMillisecond = 0 ;
__proBlocksDigitalWrite(32, LOW);
P1.writeDiscrete(0, 2, 0);
P1.writeDiscrete(0, 3, 0);
}
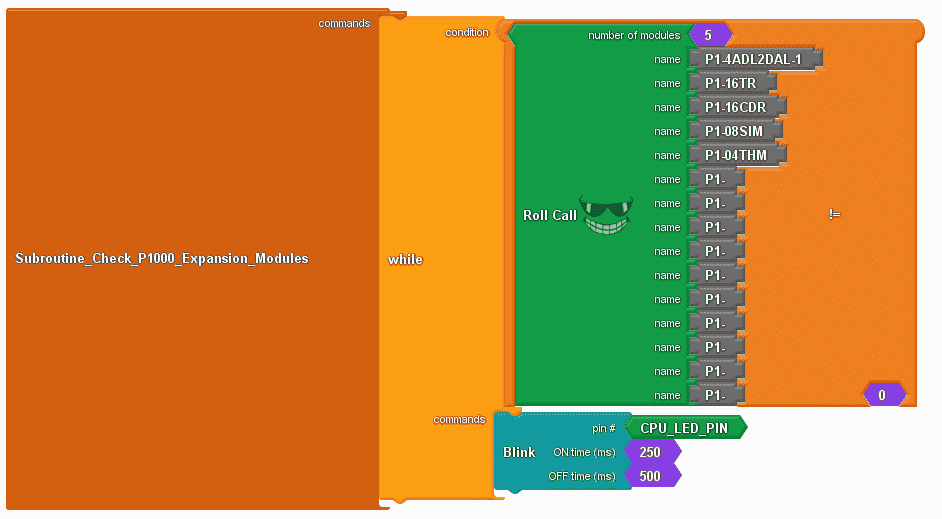
Subroutine check P1000 expansion modules will use the roll call instruction. While the roll call instruction is not equal to 0 (modules do not match) then blink the CPU LED light.
void Subroutine_Check_P1000_Expansion_Modules()
{
while ( ( ( P1.rollCall(_PBVAR_10_RollCall, 5) ) != ( 0 ) ) )
{
__proBlocksDigitalWrite(_PBVAR_11_CPU_LED_PIN,HIGH);
delay(250);
__proBlocksDigitalWrite(32,LOW);
delay(500);
}

}
Once the upload to the P1AM CPU is complete, we can test our program.
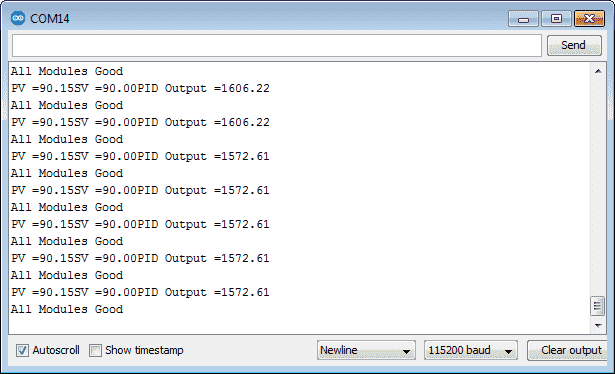
Calling up the serial monitor, we can see our current temperature in degrees Celsius being updated on our monitor every second.
Watch the video below to see the operation of our sample sketch with the PID control in the productivity open industrial arduino controller.
Download the P1AM-100 sample sketch and Productivity Block program here.
Productivity Open Arduino Compatible Links:
Product Hardware
– Productivity Open (Automation Direct)
– P1AM-100 Specifications
– Productivity Open User Manual
– Configure a Productivity Open Arduino-based Controller
– Open Source Controllers (Arduino-Compatible)
– Productivity Open Documentation (Facts Engineering)
– P1AM Design Files
Software
– Arduino IDE (Integrated Development Environment)
– P1AM-100 library (Easy Interface for controlling P1000 Modules)
– Productivity Blocks (Development Timesaver)
– Productivity Blocks Documentation (Wiki)
Community
– Automation Direct Forum – Open Source Devices
Next time we will look at the Ethernet industrial shield on our P1AM-100 Arduino Industrial Controller.
Watch on YouTube: Productivity Open P1AM Industrial Arduino PID Control
If you have any questions or need further information please contact me.
Thank you, Garry
If you’re like most of my readers, you’re committed to learning about technology. Numbering systems used in PLC’s are not difficult to learn and understand. We will walk through the numbering systems used in PLCs. This includes Bits, Decimal, Hexadecimal, ASCII and Floating Point. To get this free article, subscribe to my free email newsletter.

The ‘Robust Data Logging for Free’ eBook is also available as a free download. The link is included when you subscribe to ACC Automation.
Hi Garry, my name is Daniel Asencio, I have a problem with a C20k plc, the problem is that the stack ran out and I lost the program, but I have several plcs with the same program and I would like to copy the program to enter it in which it was removed.
Hi Daniel,
In order to copy the program from one controller to the other, you will need a handheld programmer. The program will be displayed in mnemonics. This is explained in the programming manual for the controller.
https://accautomation.ca/purchase-find-parts/omron-c20k-c28k-c40k-c60k/#Peripheral
The part number for the programming console is 3G2A6-PRO15-E. You will also see links to the manuals at the above link.
I hope this helps you out.
Regards,
Garry