What is a proximity switch?
A proximity switch is a type of sensor that detects the presence or absence of an object without physical contact. It uses electromagnetic fields, light, or sound to sense the proximity of an object. This technology is widely used in various industries for automation and control purposes.
Proximity switches are commonly used in manufacturing processes to detect the position of objects on a conveyor belt, monitor the level of liquid in a tank, or control the movement of robotic arms. They are also used in security systems to detect the presence of intruders or in automotive applications to control the operation of headlights or windshield wipers.
One of the main advantages of proximity switches is their non-contact operation, which eliminates the need for physical contact with the object being sensed. This reduces wear and tear, increases reliability, and minimizes maintenance requirements. Proximity switches are also highly accurate and can detect objects with high precision.
Different types of proximity switches are available, including inductive, capacitive, ultrasonic, and photoelectric. Each type has its advantages and is suitable for specific applications. The choice of proximity switch depends on factors such as the type of object being sensed, the distance at which detection is required, and the environmental conditions.
In the following sections, we will explore the different types of proximity switches and discuss their wiring and installation.
Types of proximity switches
Different types of proximity switches are available, each with advantages and suitable for specific applications. The four main types of proximity switches are inductive, capacitive, ultrasonic, and photoelectric.
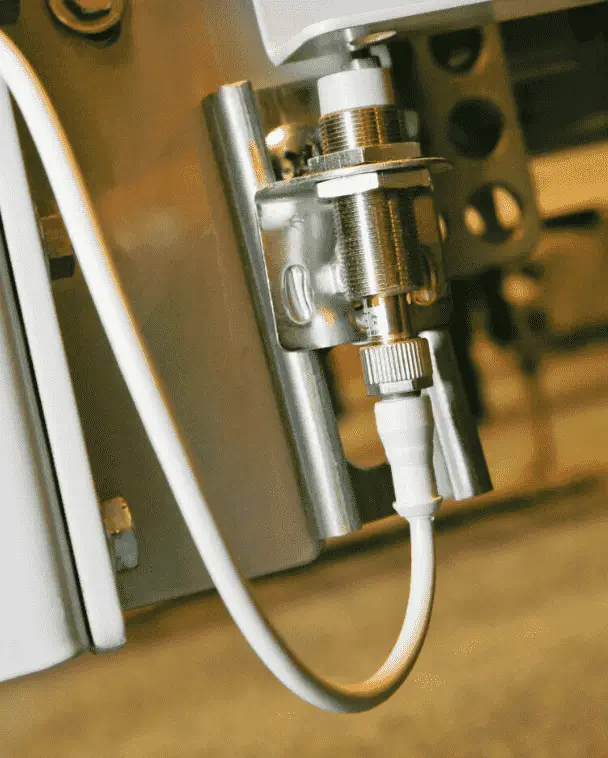
Inductive proximity switches use electromagnetic fields to detect the presence of metal objects. They are commonly used in industrial applications for detecting the position of things on a conveyor belt or seeing the teeth on a gear. Inductive switches are reliable, durable, and can detect objects at a close distance.
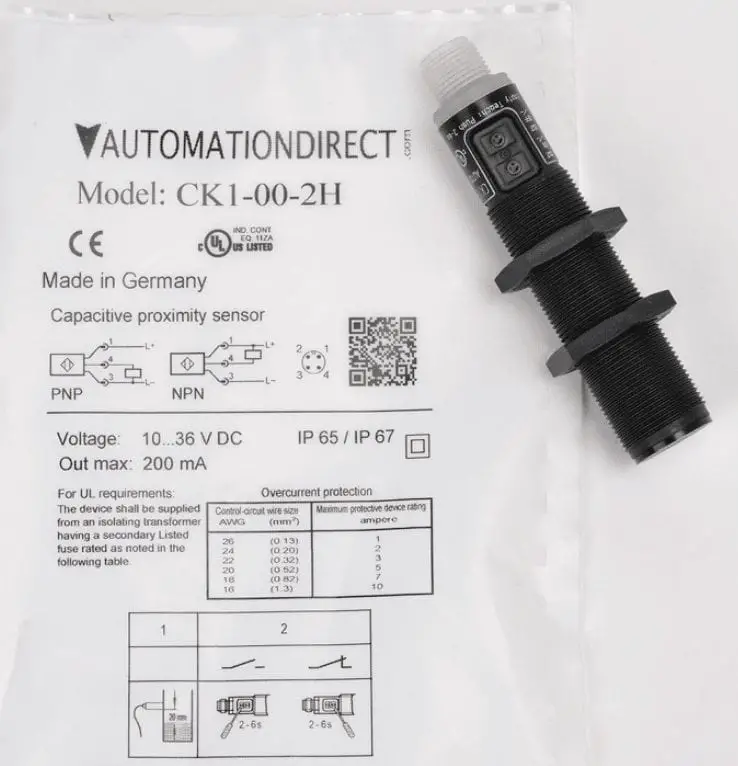
On the other hand, capacitive proximity switches use changes in capacitance to detect the presence of objects. They are suitable for detecting metallic and non-metallic objects, making them versatile in various industries. Capacitive switches are often used in packaging, food processing, and pharmaceutical applications. Things can be sensed at a close distance.
Ultrasonic proximity switches use sound to detect the presence or absence of objects. They are commonly used in distance sensing or when the color of things changes. Seeing the levels of liquids in tanks is a common application for this product.
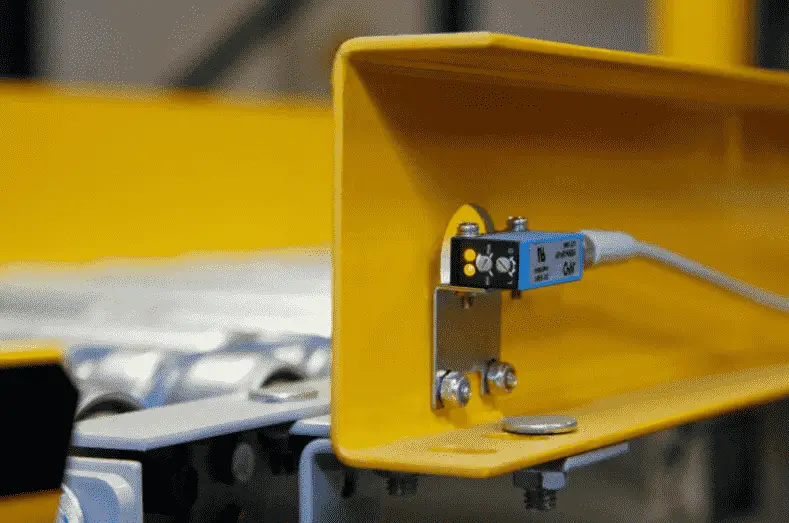
Photoelectric proximity switches use light beams to detect the presence or absence of objects. They are available in different configurations, such as through-beam, retro-reflective, and diffuse reflective. Photoelectric switches are commonly used in automation, robotics, and security systems.
Each type of proximity switch has advantages and limitations, and the choice depends on the specific application requirements. Factors such as the type of object being sensed, the distance at which detection is required, and the environmental conditions play a crucial role in selecting the appropriate proximity switch.
In the next section, we will discuss the wiring and installation of proximity switches, providing practical guidance for their integration into different systems.
Wiring of proximity switches
Once you have selected the appropriate type of proximity switch for your application, the next step is to wire and install it properly. The wiring of proximity switches is crucial to ensure accurate and reliable detection of objects.
Before starting the wiring process, it is essential to familiarize yourself with the specifications and wiring diagram provided by the manufacturer. This will help you understand the necessary connections and ensure correct installation.
The first step is to determine the power supply for the proximity switch. Most proximity switches operate on low-voltage DC power, typically 12-24 volts. Ensure to provide a stable power source that meets the requirements of the switch.
Next, you need to connect the proximity switch to the control circuit. This involves connecting the switch’s output to the input of the control device, such as a PLC or relay. Follow the wiring diagram provided by the manufacturer to make the appropriate connections.
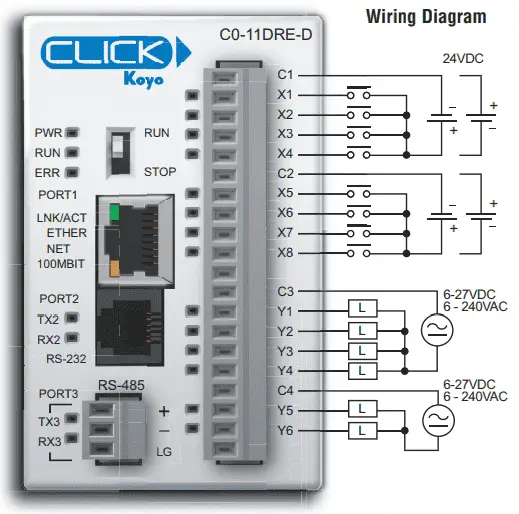
It is also essential to consider the wiring distance between the proximity switch and the control device. Excessive wiring distance can lead to voltage drops and signal interference. If the distance is too long, consider using shielded cables or signal amplifiers to maintain signal integrity.
Lastly, ensure proper grounding of the proximity switch and the control circuit. Grounding helps to prevent electrical noise and interference, ensuring accurate detection.
By following the manufacturer’s instructions and guidelines, you can ensure proper wiring and installation of proximity switches, resulting in reliable and efficient operation.
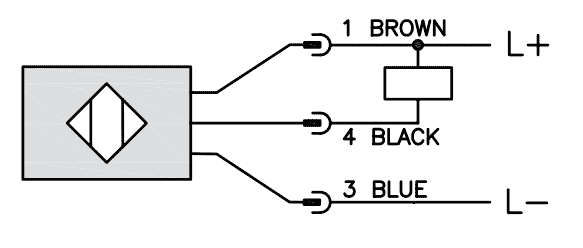
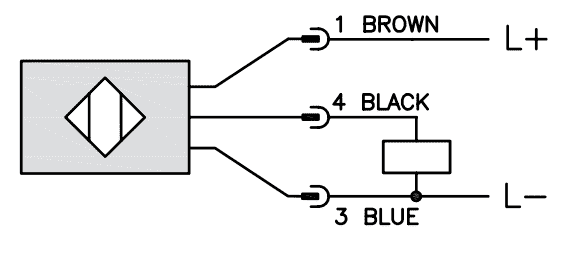
3-wire NPN and PNP wiring
3-wire Proximity switches can be confusing to wire. The choice between NPN and PNP wiring depends on the requirements of your specific application.
In a 3-wire NPN configuration, the proximity switch is connected to a positive power supply, and the output is connected to the control device. When an object is detected, the switch’s output is pulled to the ground, completing the circuit and signaling the control device.
On the other hand, a 3-wire PNP configuration involves connecting the proximity switch to a negative power supply and the output to the control device. When an object is detected, the switch’s output is pulled to the positive supply voltage, completing the circuit and signaling the control device.
When choosing between NPN and PNP wiring, consider the compatibility with your control device and the wiring requirements of your application. Some control devices may only accept one type of wiring, so it is important to check the specifications.
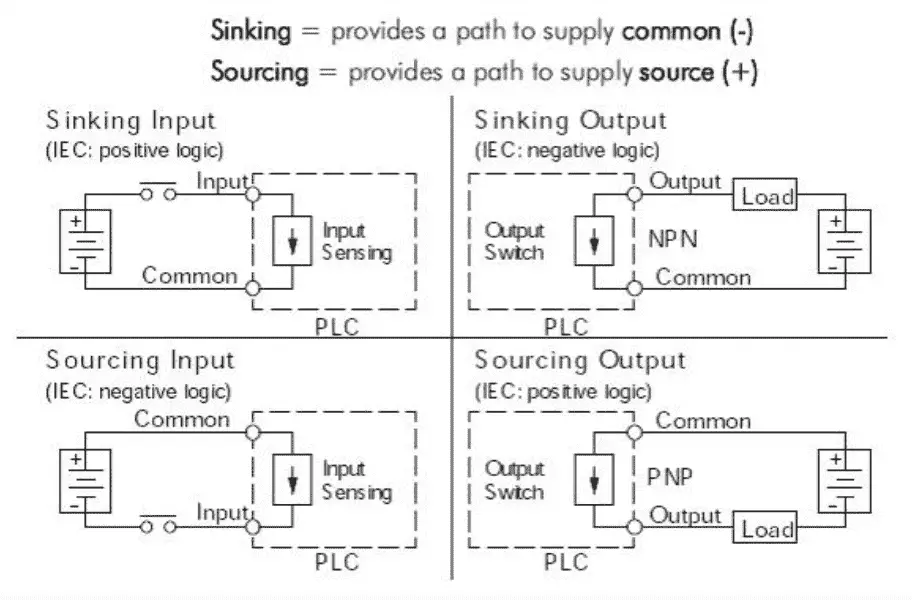
Additionally, it is crucial to ensure proper polarity when wiring proximity switches. Incorrect polarity can lead to malfunctioning or inaccurate detection. Always refer to the manufacturer’s wiring diagram and guidelines to ensure correct wiring.
By understanding the differences between 3-wire NPN and PNP wiring configurations, you can select the appropriate wiring method for your proximity switch and ensure reliable operation in your application.
Factors to consider when selecting a proximity sensor
When choosing a proximity sensor, several factors must be considered to ensure optimal performance and functionality in your application.

1. Sensing Range: The sensing range of a proximity sensor determines the distance at which it can detect objects. Different sensing technologies are suitable for various lengths. Inductive and capacitive sensors are commonly used for smaller distances, such as a few millimeters. For more considerable distances, ultrasonic and photoelectric sensors are more appropriate.
2. Sensing Technology: Proximity sensors utilize various technologies, including inductive, capacitive, ultrasonic, and photoelectric sensing. Each technology has its strengths and limitations. Consider the nature of the objects you need to detect and choose a sensor that is best suited for your specific application.
3. Environmental Conditions: Proximity sensors may be exposed to harsh environments, such as extreme temperatures, moisture, or vibrations. Selecting a sensor designed to withstand these conditions and ensure reliable operation even in challenging environments is crucial.
4. Output Type: Proximity sensors can have different output types, such as NPN, PNP, or analog. It is essential to consider the compatibility of the sensor’s output with your control device. Choose a sensor that can easily integrate into your system and provide the required output for seamless operation.
5. Cost: Cost is always a factor to consider when selecting any component for your application. Compare the prices of different proximity sensors and find the right balance between cost and performance to meet your budget requirements.
Considering these factors, you can confidently select the suitable proximity sensor for your application, ensuring accurate and reliable object detection.
Watch on YouTube: What is a Proximity Switch? (Sensor)
PLC Beginner’s Guide to PLC Programming
There are many different PLC manufacturers with other hardware and software. All of the programmable logic controllers have similar basic features. Here is how I would approach learning about basic PLCs.
Once you are familiar with the basics of the PLC, you will then learn specifics for the controller you will be programming.
This is the easiest way to learn about PLC programming.
Here are the controllers that we have covered or are covering at ACC Automation:
Arduino Opta PLC
BRX Do-More Series (Do-More Designer Software + Simulator)
Productivity Series P1000 / P2000
Click PLC Series
Omron CP1H Series
Horner XL4 PLC Series
EasyPLC Software Suite is a complete PLC, HMI, and Machine Simulator Software package. See below to receive 10% off this software. This PLC learning package includes the following:
Easy PLC – PLC Simulation will allow programming in Ladder, Grafcet, Logic Blocks, or Script.
HMI System – Easily create a visual human-machine interface (HMI)
Machine Simulator – A virtual 3D world with real-time graphics and physical properties. PLC programs can be tested using the EasyPLC or through other interfaces. (Modbus RTU, TCP, etc.)
Machine Simulator Lite – Designed to run on Android Devices.
Machine Simulator VR – Virtual Reality comes to life so you can test, train, or practice your PLC programming.
Purchase your copy of this learning package for less than $95 USD for a single computer install or less than $110 USD to allow different computers.
Receive 10% off the investment by typing in ACC in the comment section when you order.
Learn PLC programming the easy way. Invest in yourself today.
Additional examples of PLC program development using the five steps.
Click PLC – Easy Transfer Line Programming – Video
Productivity PLC Simulator – Chain Conveyor MS – Video
Five Steps to PLC Program Development – Die Stamping
PLC Programming Example – Process Mixer
PLC Programming Example – Shift Register (Conveyor Reject)
PLC Programming Example – Paint Spraying
PLC Programming Example – Delay Starting of 7 Motors
PLC Programming Example – Pick and Place
PLC Programming Example – Sorting Station (Shift Register)
PLC Programming Example – Palletizer
If you have any questions or need further information, please contact me.
Thank you,
Garry
If you’re like most of my readers, you’re committed to learning about technology. Numbering systems used in PLCs are not challenging to learn and understand. We will walk through the numbering systems used in PLCs. This includes Bits, Decimals, Hexadecimal, ASCII, and Floating Points.
To get this free article, subscribe to my free email newsletter.
Use the information to inform other people how numbering systems work. Sign up now.

The ‘Robust Data Logging for Free’ eBook is also available as a free download. The link is included when you subscribe to ACC Automation.