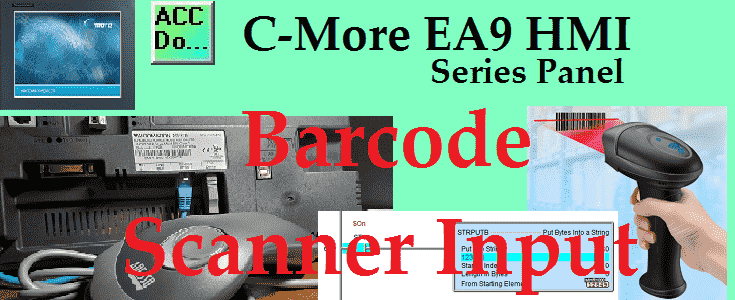
The C-More HMI Panel will support a barcode scanner (barcode reader) input. A scanner uses a light source and a light sensor to translate optical impulses into an electrical signal. The CMore can accept a USB barcode scanner input.
We will now connect and program a barcode scanner into our HMI panel. The PLC ladder logic will then be modified to take action on the barcode input. Let’s get started.
Previously in this C-More EA9 HMI Panel series, we have done the following:
System Hardware
– Unboxing and Review Video
– Powering the Unit Video
Installing the Software – Video
System Setup Screens – Video
First Program
– Establishing Communication and Updating Firmware Video
– First Program Video
Panel to PLC and PLC to Panel Settings – Video
Common Screen Menu – Video
Simulate Project – Video
Object List Shapes – Video
Object List Buttons – Video
Object List Indicators – Video
Object List Entry – Video
Object List Meters and Graphs – Video
Object List Bitmaps – Video
Object List Recipe – Video
Define Custom Keypad – Video
Object List Alarms – Video
Object List Text – Video
Object List Clock – Video
Watch the video below to see the Barcode Scanner Input in action on our C-More EA9 HMI Panel.
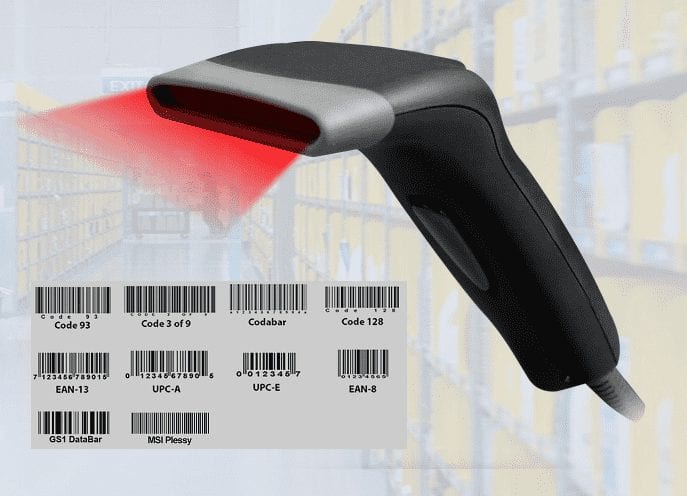
Barcode Symbols
Barcodes use symbols to represent information. The barcode symbol type like QR Code or UPC-A will tell us how to interpret the information. This is just like different languages.

Two dimensional (2D) barcodes generally can represent more information in the same amount of space over one dimensional (1D) barcodes. This is because they use both the vertical and horizontal arrangement of the pattern as opposed to just the horizontal. See the examples above. We will be using a 1D Barcode called 3 of 9. You can download this font below so you can make your own barcode symbols.
The 3 of 9 or Code-39 barcode has a Start and End character (*). This common barcode type is used because the character set includes the numbers 0 to 9, letters A to Z, and several symbols. Download the free 3 of 9 font below to create your own barcodes.
Barcode Scanner Hardware
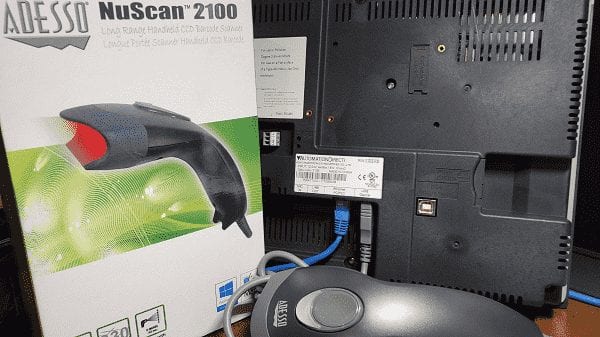
We will be using an Adesso NuScan 2100. This is a USB 1D barcode scanner.

The scanner will be connected to the USB Type-A Port on our C-More HMI.
NuScan 2100 Series User Guide
NuScan 2100 Series Programming Guide
These USB scanners can be purchase on Ebay.ca or Amazon.ca.
NuScan Scanners on Ebay
NuScan Scanners on Amazon
Code Barcode Scanners
A selection of Code brand scanners is available to read barcodes for specific applications.
Code Handheld Barcode Scanner Video
– Scanner Suffix Video
– QR Creation Video
– Factory Reset Video
How to configure a Code Barcode Reader with just a QR Code.
There is a tool called Cortextools2. This software was created by Code. You can Device Configuration Website.
- Open CortexTools and connect the barcode scanner to the computer running the program.
- Go to the Configuration Tab
- Click on “From Reader” in the Get Settings section
- Select the various configurations you want to do. (Note I could not tell from your post what those settings are as each page in the configuration guide has an A4, B4, C4, D4, etc.)
- Click on the “Send Settings to Barcode Generator”
The barcode generated has all of the configurations you selected.
Purchase your Barcode Scanner here.
Setting Our Barcode Scanner Input Screen – C-More
We will be adding to the program we created last time. (C-More EA9 HMI Series Panel Object List Clock).
Select a new screen under the main menu | Screen | New Screen…
Alternatively, we can also use the icons in the Navigation panel.
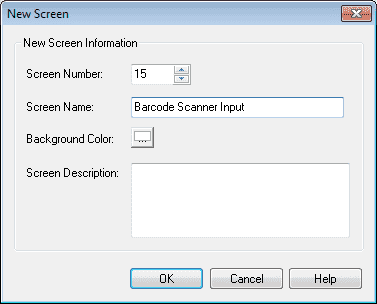
We will name screen 15 Barcode Scanner Input. The screen description can be used to describe the screen. Hit OK.
Our new screen will now be displayed.
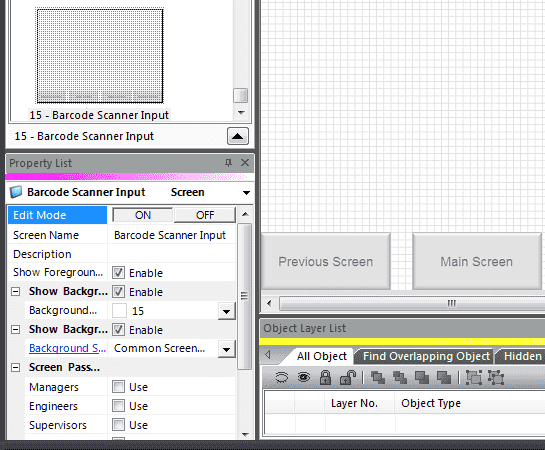
Under the property list window, turn on the editing and enable the show background. Select Common Screen Menu under the background screen. Turn off the edit mode under the property list.

We must now add our new screen so we can select it when using the common screen menu. Select page 100. Select the Screen Selector button. Under the Screen tab, select the 15 – Barcode Scanner Input and hit the Add button so it moves it over to the Current Screen Buttons. Hit OK. We can now go back to our newly created Object Clock screen page 15 from our navigation window.
Our new screen is now ready for us to add our text entry object.
Tag Name Database – C-More
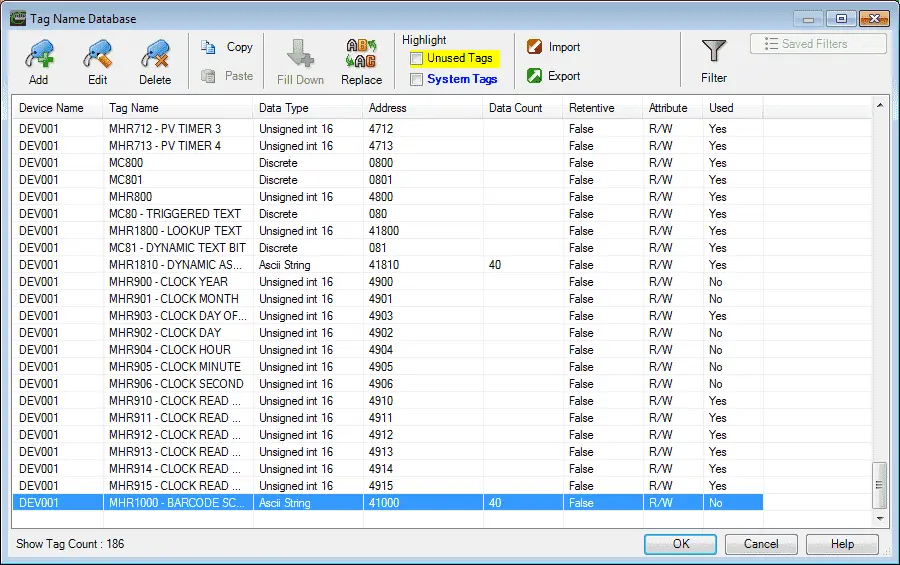
We will use the following address location for the barcode scanner input object on our cmore HMI.
MHR1000 – ASCII String (40 Data Count) – Modbus Address 41000 – Read / Write
Text Entry (Barcode Scanner) Object
We will use the text entry object to get the information from our USB barcode scanner.
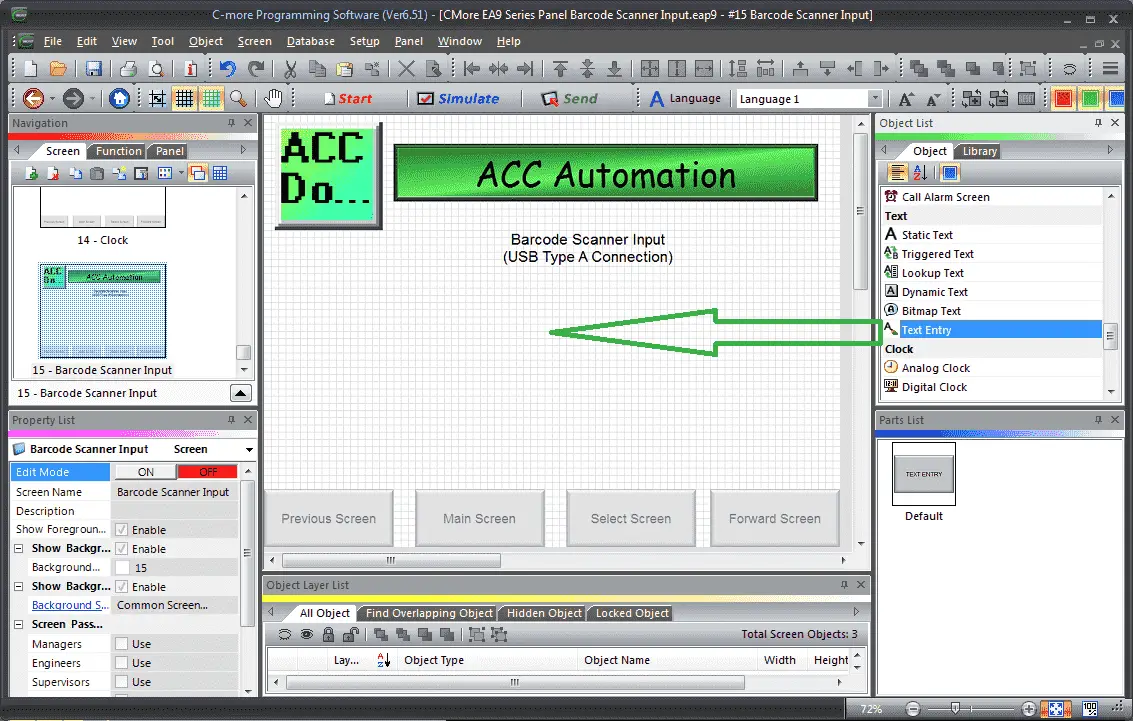
Select Screen 15 from the navigation window. We will now add a Text Entry object under the Text heading in the Object list window. Left-click (hold) and drag the text entry onto the screen.
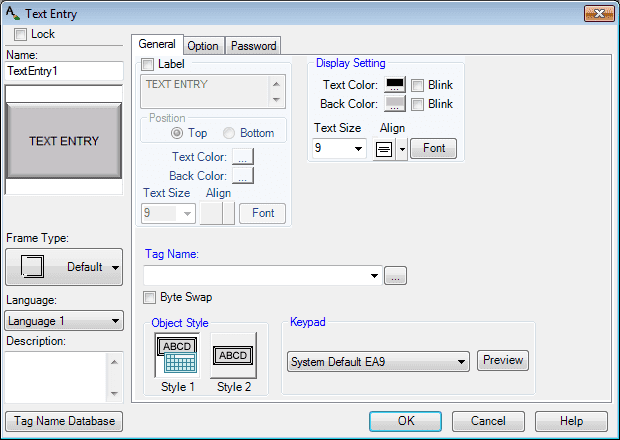
The Text Entry window will display. You can also use the main menu | Object | Text | Text Entry… and click on the work area of the screen. This will give you the default selection.
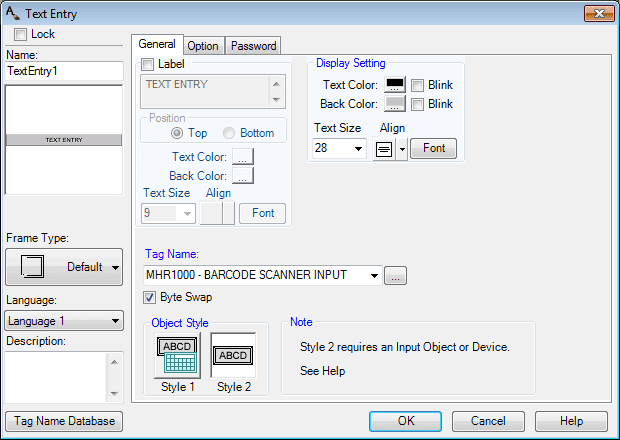
This window will allow you to change the look of the text entry object on the screen. Change the text size to 28. This will ensure that we can see the entry clearly. Our tag name will be set for MHR1000 – Barcode Scanner Input. The Byte Swap setting will be selected. Sometimes the two bytes in a word are reversed. (2-1 instead of 1 -2) This will allow us to switch the bytes to read the information correctly.
Object Style – Style 2 is selected. This is used for input devices to the HMI.
Here is the completed General tab selection of our text entry. Click the Options tab.
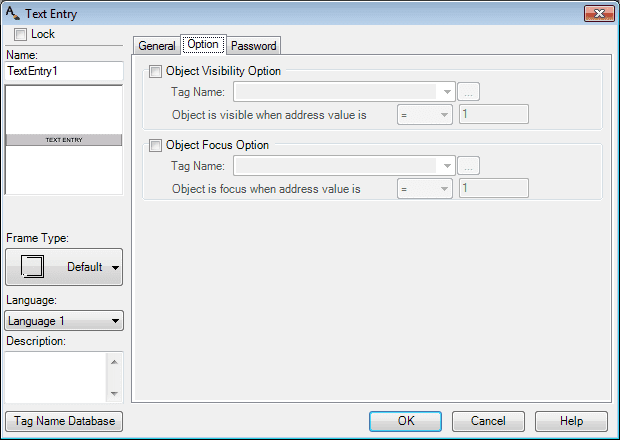
We can set the visibility of the text entry. In our case, we will not set this parameter. The Object Focus Option must be selected. Our tag will be set to an internal System On Bit. The object is in focus when the address value is ON. When the barcode scanner sends the information to the HMI the text entry must have focus in order for the information to be received. Setting this option ensures that when the page is displayed the barcode scanned information will be put into our text entry.
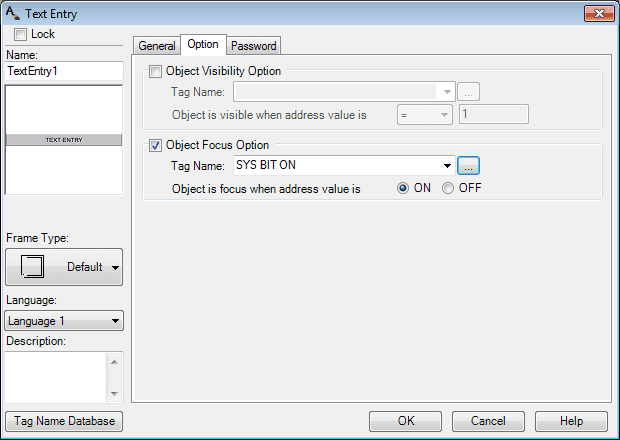
Here is the completed Option tab of our text entry. Select Password.
We will not be using the password option for our sample page. Select OK
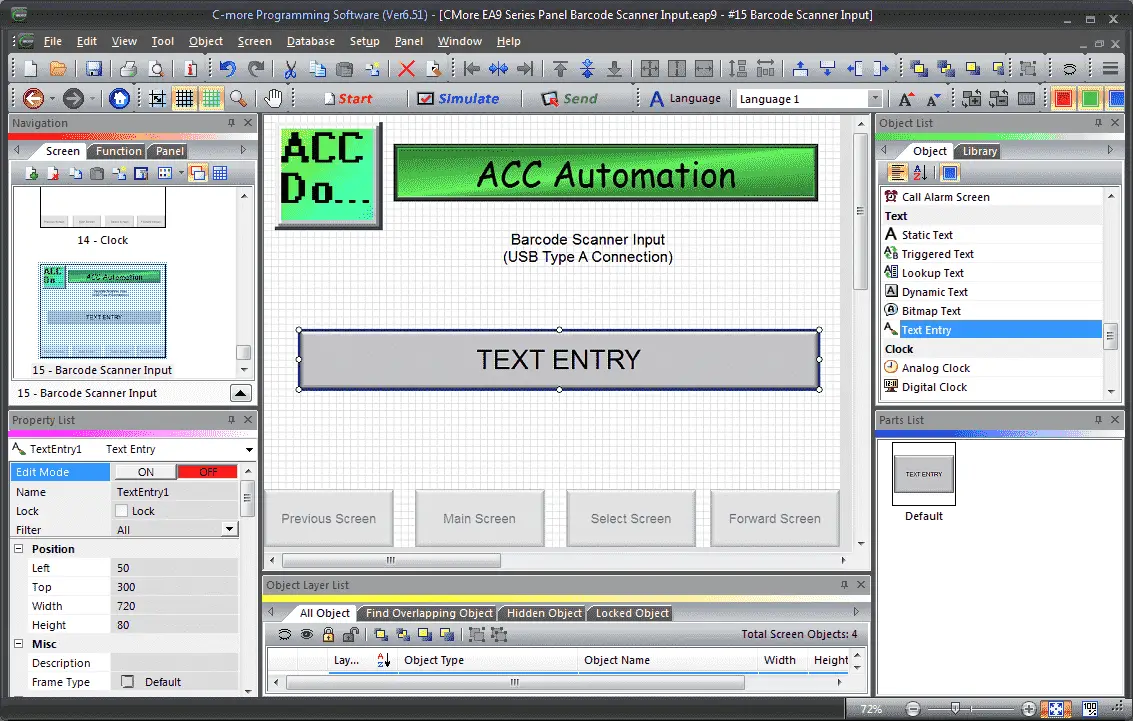
We can now use the mouse to size and position our text entry on the screen.
We can now download our HMI program to our C-More EA9 unit.
Program Additions – PLC Do-More Simulator
We are using our Do-More Designer software for our sample screens. This PLC simulator is used to communicate to our C-More HMI. The C-More is connected via an Ethernet cord communicating Modbus TCP.
Using the program we previously developed, we will add additional rungs to the program for our Barcode Scanner Input.
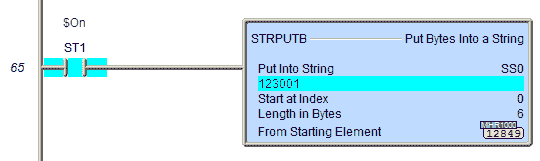
STRPUTB – Put Bytes Into a String
This instruction is used to move the Byte information from the MHR area into the SS area without the instruction checking the type of information in the memory location.
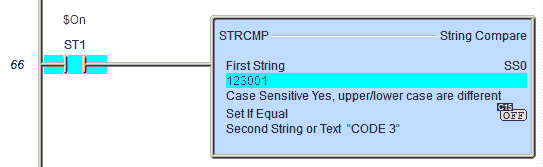
STRCMP – String Compare
The string compare is comparing the barcode string input to the entered text code “CODE 39”. If equal then C15 is set.
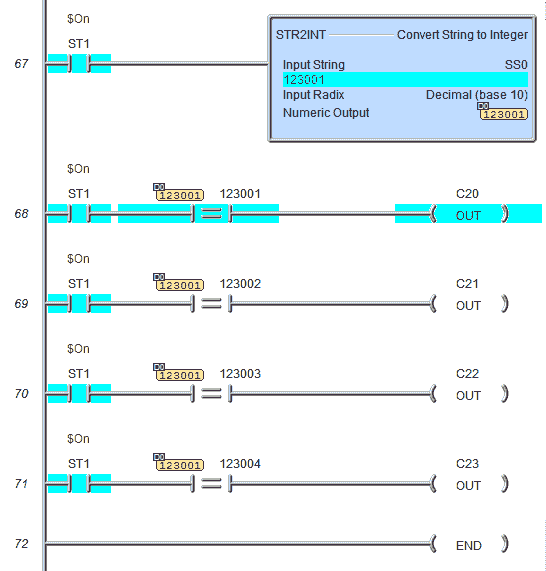
STR2INT – Convert String to Integer
The string is converted to an integer. This integer is then compared to predetermined values and the corresponding outputs are set.
Download the PLC, C-More and 3of9 Font program here.
Watch the video below to see the Barcode Scanner Input in action on our C-More EA9 HMI Panel.
C-More EA9 Panels from Automation Direct
https://www.automationdirect.com/adc/overview/catalog/hmi_(human_machine_interface)/c-more_touch_panels_ea9_series
C-More – Graphic Panel (EA9 Series) User Manual and Quick Start Guides
https://cdn.automationdirect.com/static/manuals/ea9userm/ea9userm.html
EA9-T10CL C-More Specifications
https://cdn.automationdirect.com/static/specs/ea9t10cl.pdf
C-More EA9 Programming Software (Current Version V6.42)
https://support.automationdirect.com/products/cmore.html
This software will enable you to program all of the C-More EA9 HMI units. It includes a simulator for your application.
Next time we will look at the Web Server of our C-More HMI Panel.
Watch on YouTube: C-More EA9 HMI Series Panel Barcode Scanner Input
If you have any questions or need further information please contact me.
Thank you,
Garry
If you’re like most of my readers, you’re committed to learning about technology. Numbering systems used in PLC’s are not difficult to learn and understand. We will walk through the numbering systems used in PLCs. This includes Bits, Decimal, Hexadecimal, ASCII and Floating Point.
To get this free article, subscribe to my free email newsletter.
Use the information to inform other people how numbering systems work. Sign up now.

The ‘Robust Data Logging for Free’ eBook is also available as a free download. The link is included when you subscribe to ACC Automation.