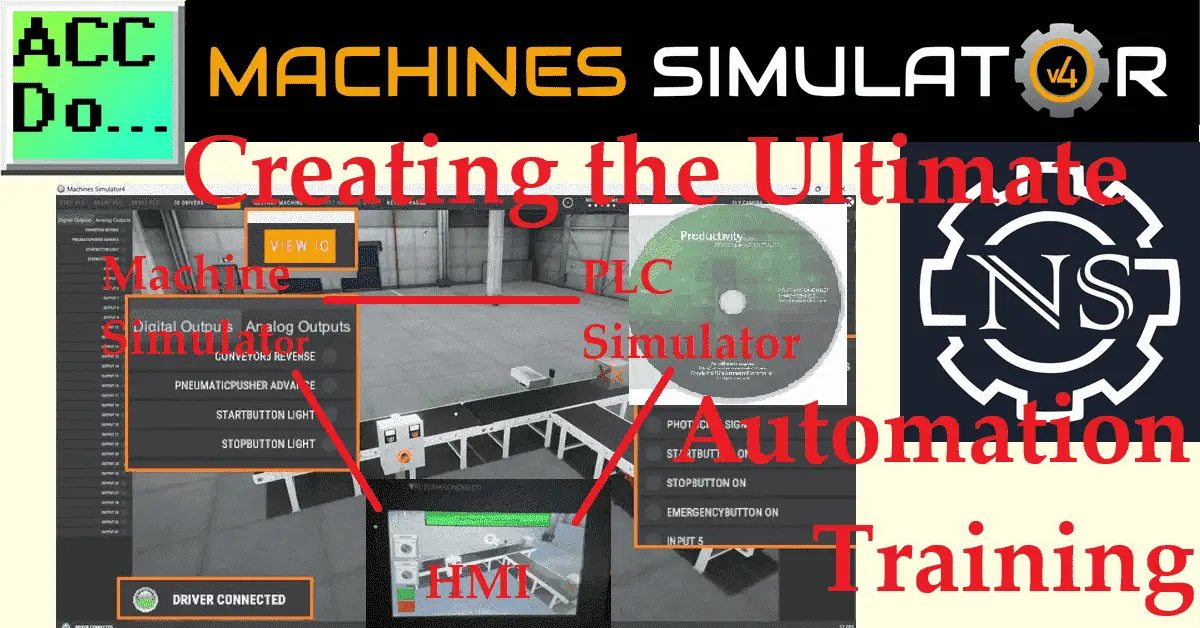
Only 31% of businesses have fully automated at least one function (McKinsey). This means a huge demand for automation and creating a training environment exists. Typically, automation training and hands-on programming take time and a lot of resources, but this is no longer the case. Creating an effective automation training environment tailored to your industry has never been easier.
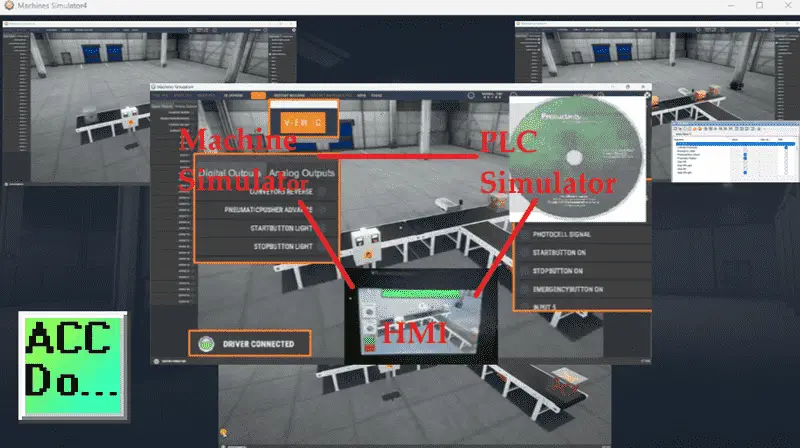
The new Machine Simulator (EasyPLC) software suite now has a Modbus TCP Server driver. This means that we can now connect many automation devices to our automation network. Human Machine Interfaces (HMI) and programmable logic controllers (PLC) are just the start of your automation training setup. The Machine Simulator scenes have many pre-built machines, or you can design your own for your industry. This comprehensive automation training resource ensures you are prepared to expand your professional life in automation.
We will use the Machine Simulator built-in “Easy Transfer Line” with the Modbus TCP Server driver. Control for this machine will come from the Productivity PLC Programming Suite Software. The PLC simulator will communicate Modbus TCP Client to the Server. This will set the stage for adding HMI and SCADA to our ultimate automation training setup later. Let’s get started.
Learn PLC programming the easy way. See below for a 10% discount on this cost-effective learning tool. Invest in yourself today.
Previously, we have done the following:
Easy PLC Installing the Software – Video
EasyPLC Software Suite – Quick Start – Video
Click PLC – Easy Transfer Line Programming – Video
Productivity PLC Simulator – Chain Conveyor MS – Video
Do-More PLC – EasyPLC Box Selection Program – Video
Click PLC EasyPLC Gantry Simulator – Video
Click PLC Simple Conveyor EasyPLC – Video
EasyPLC Paint Line Bit Shift – BRX Do-More PLC – Video
Click PLC – EasyPLC PLC Mixer Programming – Video
Click PLC EasyPLC Warehouse Stacker Example – Video
– Operation Video
EasyPLC Machine Simulator Productivity PLC Robotic Cell – Video
EasyPLC Simulator Robotic Cell Click PLC – Video
Palletizing Conveyor Programming Do-More PLC – Video
Palletizing Conveyor Programming – Click PLC – Video
Product Quality Verification! Do-More PLC Sequencer – Video
Revolutionize Learning PLCs with Pallet 3D Sim! – Video
Robot Packing PLC Program Development – Video
Box Dumper Easily Learn PLC Programming – Video
Innovative Solution for Mixing Ink and Bottling – Video
Benchwork 1 Do-More Practice PLC Programming – Video
LS Electric XGB PLC Easy Transfer Program – Video
Do-More PLC Automatic Robot Packing Machine – Video
Latest Machine Simulator Modbus Server Driver – Video
Machine Simulator Modbus Server to C-More HMI – Video
Machine Simulator Modbus Server (Automation Training Machine)
We will use a prebuilt scene in the machine simulator or MS. Start the Machine simulator and select the “Machines” icon on the top menu.
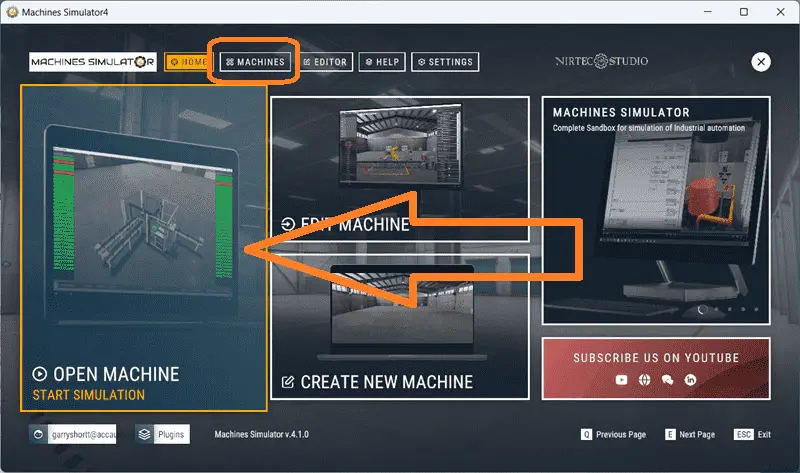
You can also select the “Open Machine – Start Simulation” on the main page.
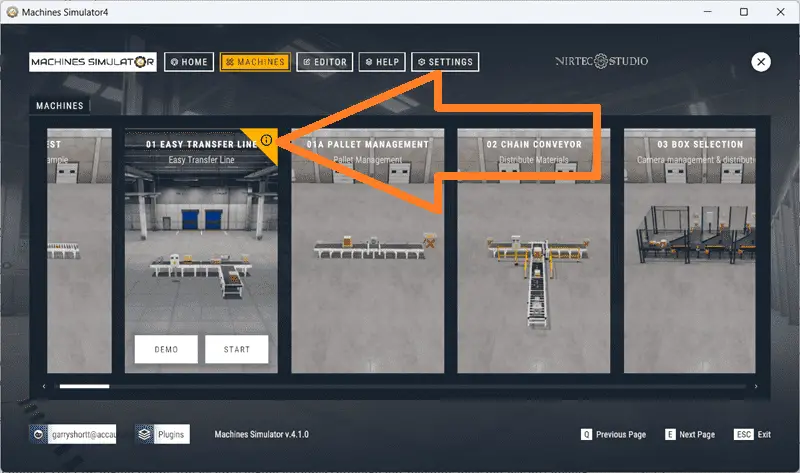
All of the prebuilt machines will now be displayed. These have been programmed, so you can immediately start learning with this package. We will be using the “01 Easy Transfer Line”. Selections will be displayed as you move your mouse over the machine icon. Select the exclamation point in the upper right corner.
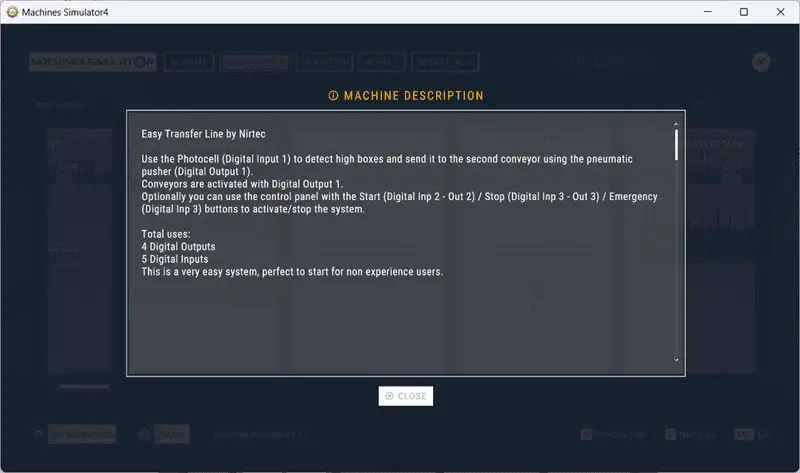
This will display the machine description of what you need to program. Select close. The “Demo” mode will show you the workings of the machine. It will demonstrate how the machine is to function. Select “Start”.
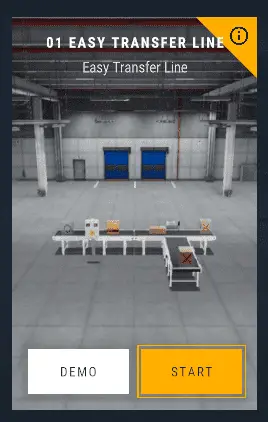
The machine simulator will now load the easy transfer line.
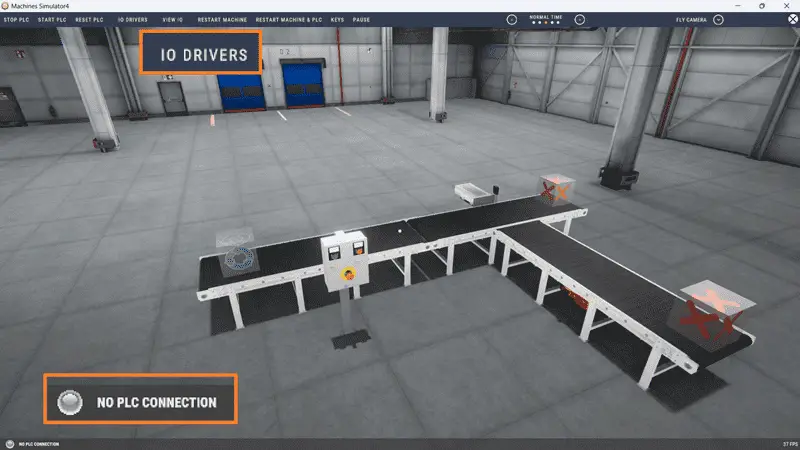
In the bottom left corner, you will see that we have “No PLC Connection”.
Select “I/O Drivers” on the top menu.
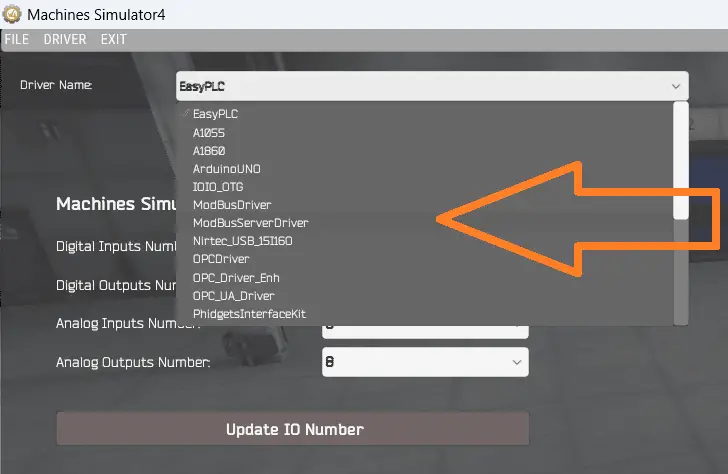
Under the “Driver Name,” you will see that EasyPLC is selected by default. Select “EasyPLC” to call up all of the Machine Simulator drivers. Select “ModbusServerDriver”.
The Modbus server driver uses TCP/IP protocol on Ethernet to communicate with other Modbus devices and software.
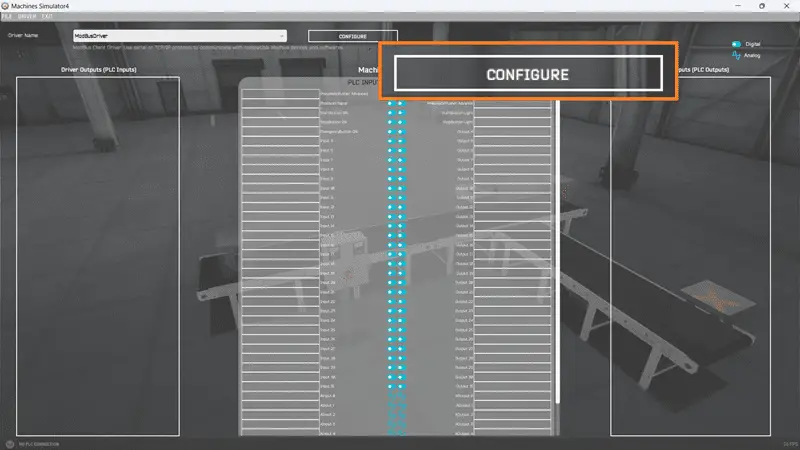
Select the “Configure” button.
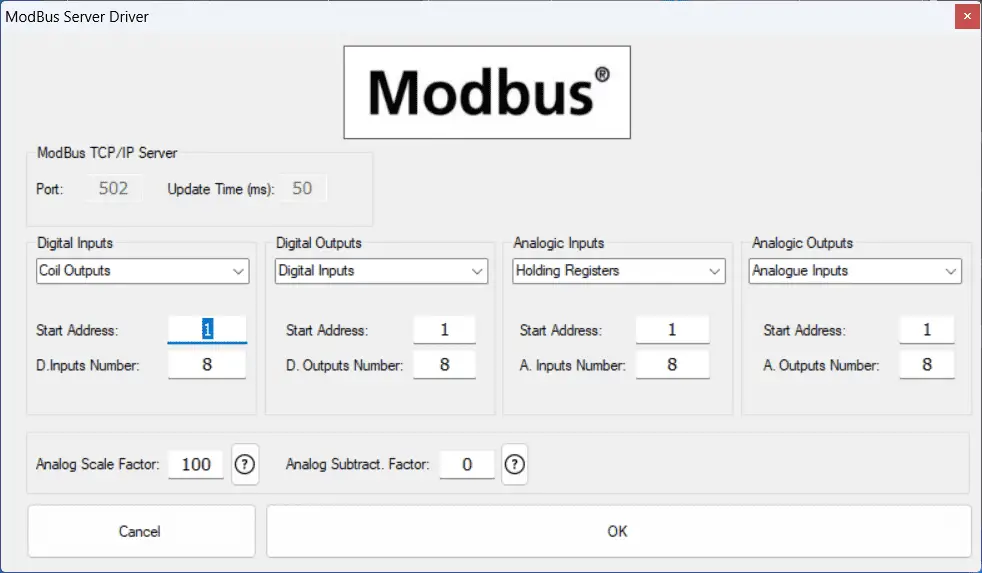
We can now assign the machine Simulator to the four different Modbus memory areas. In our case, the PLC’s coil outputs will be MS’s digital inputs. The PLC digital inputs will be MS’s digital outputs. Although our machine does not use any analog inputs, we can still set this up. Modbus PLC holding registers will be used for the Analog inputs, and the PLC analog input registers will be MS’s analog outputs.
Analog scaling and subtraction factors are used in the machine simulator to represent negative numbers since Modbus analog is strictly a 16-bit word. Select OK.
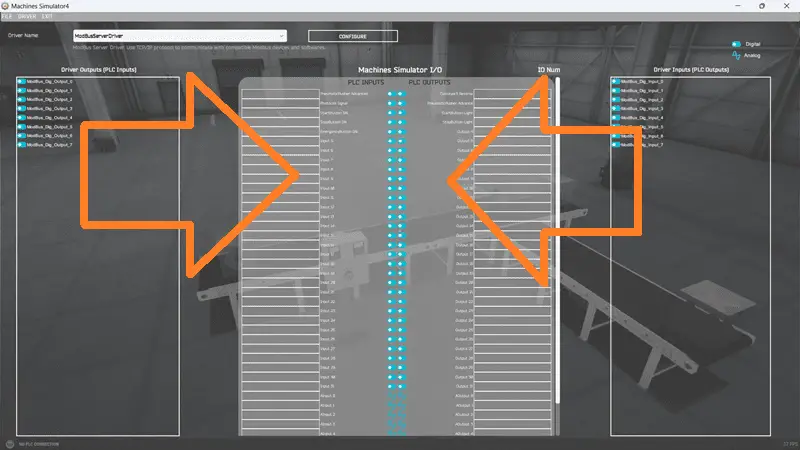
Our PLC inputs and outputs are now displayed. We can now assign the inputs and outputs to our Machine Simulator I/O. This can be done by clicking and dragging the PLC input to the Machine Simulator input and the PLC output to the Machine Simulator output. However, you can select “Automatic Assignment” from the driver menu.
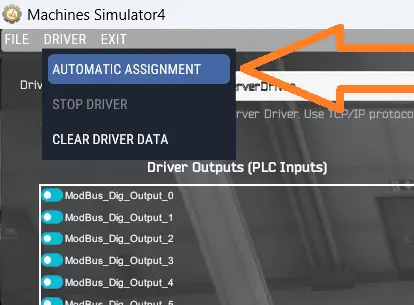
This will automatically assign the inputs and outputs in the order they appear, saving you time. Select automatic assignment.
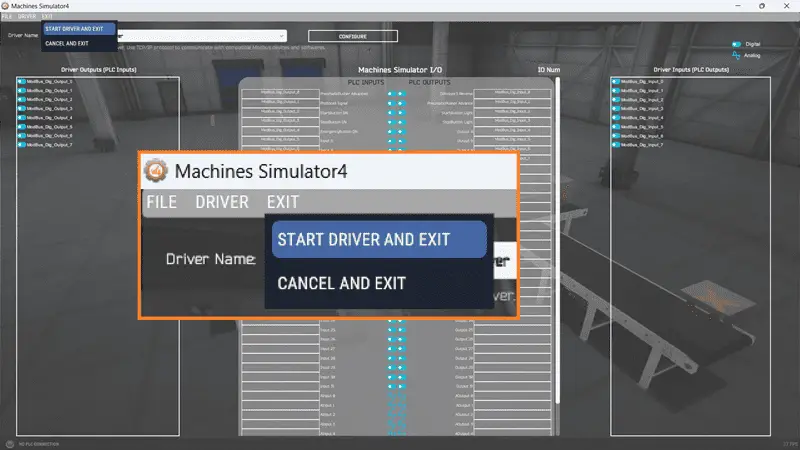
Under the exit menu, select “Start Driver and Exit”.
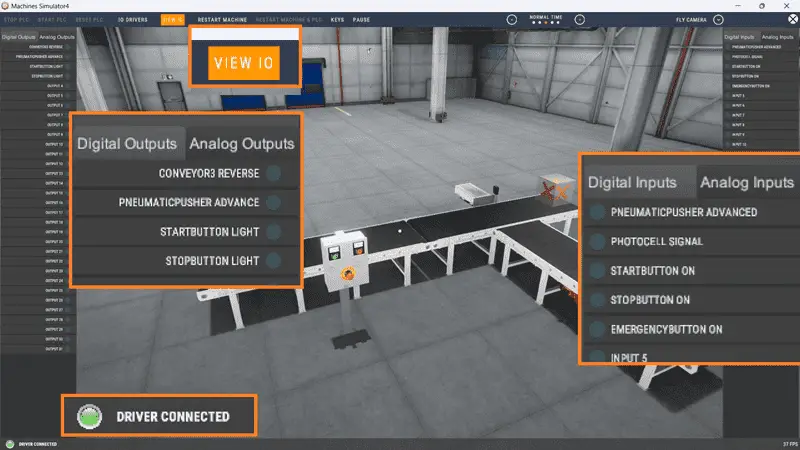
Our Easy Transfer Line is now ready for communication. This is shown by the green “Driver Connected” indication on the bottom left of the screen.
Select “View IO” to show the MS’s input and output status. Since this is a Modbus server setup, we can use multiple Modbus clients to connect to our Machine Simulator.
IP Address of Machine Simulator
The IP address of our MS Easy Transfer Line will be the IP of the local computer running the software.
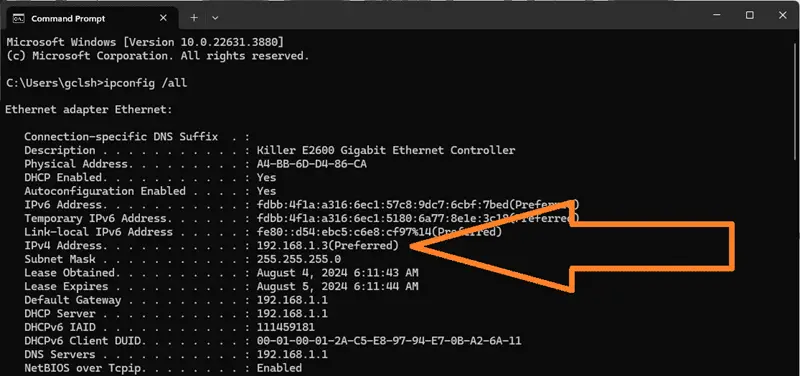
If you are unsure, start a command prompt on your Windows computer. Type the command “ipconfig /all” and press enter.
You will now see the IP address listed. We will need to know this for the Modbus client device.
PLC / HMI Program Development
Now that the Machine Simulator runs with the easy transfer line with Modbus TCP Server, we can focus on the PLC and HMI. We need to determine how each device in the network will talk to each other. The following diagram will explain the communication between the three devices.
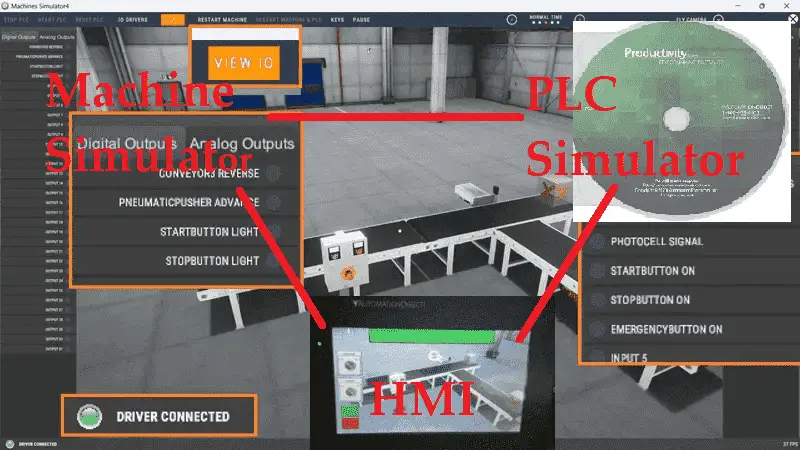
Our PLC simulator will communicate via the Modbus TCP client to the easy transfer line. It will be reading the inputs and writing the outputs. The C-More CM5 HMI will communicate to the easy transfer line and read the inputs via the Modbus TCP client. It will also read and write information to the Productivity PLC simulator.
| Machine Simulator (MS) Description |
(MS) Modbus Server Address | Productivity PLC Address | Read /Write |
C-More HMI | Read /Write |
| Conveyor | 1 | Conveyor | W | ||
| Pneumatic Pusher | 2 | Pneumatic Pusher | W | ||
| Start PB Light | 3 | Start PB Light | W | ||
| Stop PB Light | 4 | Stop PB Light | W | ||
| Pneumatic Cylinder Extended | 100001 | Cylinder Extended | R | Cyl_Ext | R |
| Photocell | 100002 | Photocell Box Detect | R | Photocell | R |
| Start PB | 100003 | Start PB | R | Start_PB | R |
| Stop PB | 100004 | Stop PB | R | Stop_PB | R |
| Emergency Stop | 100005 | Emergency Stop | R | Emergency_Stop | R |
| HMI_Conveyor | W | HMI_Conveyor | W | ||
| HMI_Pne_Pusher | W | HMI_Pne_Pusher | W | ||
| HMI_Start_Light | W | HMI_Start_Light | W | ||
| HMI_Stop_Light | W | HMI_Stop_Light | W | ||
| HMI_Test | W | HMI_Test | W |
Productivity PLC Simuator Communication
Using the Modbus Read and Write instruction in our Productivity Suite Programming Software simulator, we will establish communication with the Easy Transfer Line machine. This will be a Modbus TCP (Ethernet) connection.
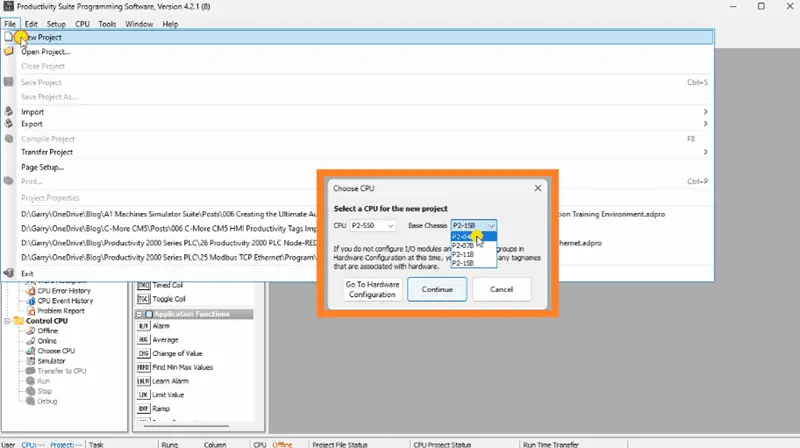
Start a new project by selecting the icon on the main menu or selecting new project under the main menu | File.
The Choose CPU window will now be displayed. Select the productivity controller you want to program and then select Continue.
Our new program will be displayed along with the default New Task program.
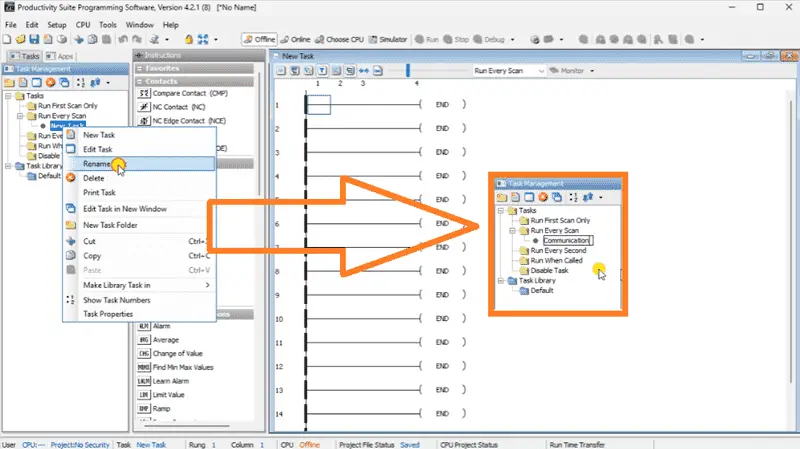
Right-click the New Task under the Run Every Scan heading in the Task Management window. Select Rename Task under the popup window. We will rename this task to Communication.
In the instruction list window under Communication, double-click the Modbus Read instruction.
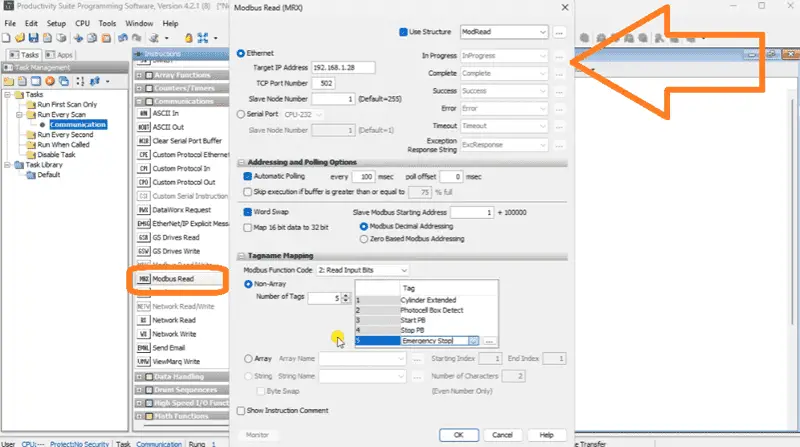
The Modbus Read (MRX) window will now be displayed. We will fill in the parameters for this instruction. The structure name will be “ModRead.” This will set up all of the instruction’s flags and response memory locations.
Ensure that Ethernet is selected and enter the target IP address for our Easy Transfer Line Server from the Machine Simulator. We will leave the TCP Port Number default the same and change the Slave (Server) node number to 1. Communication setup is one of the easiest things to do with the productivity line of PLCs. Select the Automatic Polling option. Leave the default to communicate every 100 msec and the poll offset to 0 msec.
The Slave (Server) Modbus Starting Address will be set for 1. Under the Modbus Function Code, select read input bits. As this function code changes, the offset for the starting address will also change. We can now set the number of inputs to read to 5. In the tag list, please enter the names of the tag inputs we read every 100 msec. We can utilize these tag names in our ladder logic program.
Select OK.
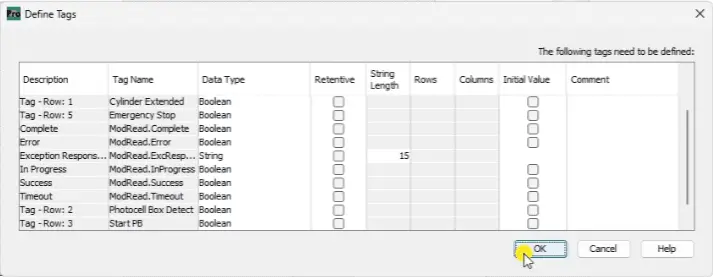
The Define Tags window will be displayed. We can verify all the tags we created for this Modbus Read instruction. Select OK.
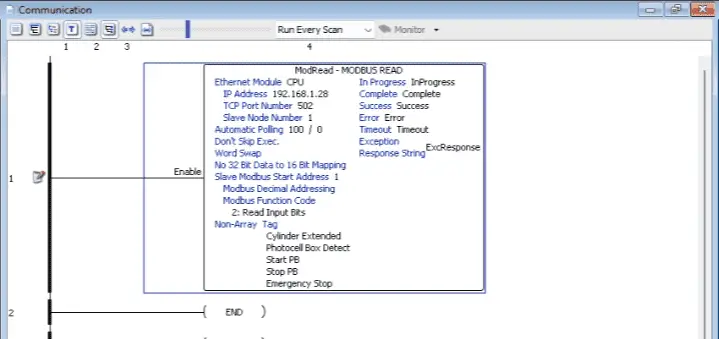
Our Modbus Read instruction will now be placed on our ladder diagram. Note that there are no input conditions for this instruction. This is because it will execute independently every 100 milliseconds.
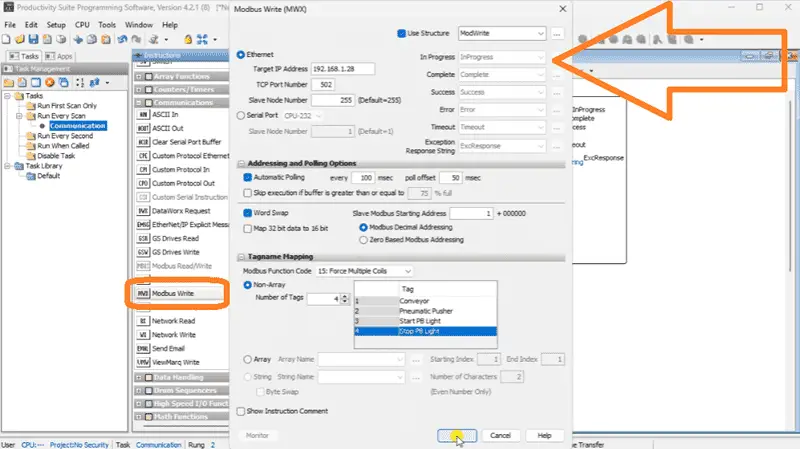
Select Rung 2 on the Communication ladder logic diagram. Double-click on the Modbus Write instruction under the Communication heading in the Instruction window. The Modbus Write (MWX) instruction window will be displayed. Once again, we will fill in the parameters for this instruction. The structure name will be “ModWrite.” This will set up all of the instruction’s flags and response memory locations.
Ensure that Ethernet is selected and enter the target IP address for our Easy Transfer Line Server from the Machine Simulator. We will leave the TCP Port Number default the same and change the Slave (Server) node number to 1. Select the Automatic Polling option. Leave the default to communicate every 100 msec. We will set the poll offset to 50 msec. This ensures that the read and write commands do not interfere with each other upon power-up.
The Slave (Server) Modbus Starting Address will be set for 1. Under the Modbus Function Code, select Force Multiple Coils. As this function code changes, the offset for the starting address will also change. We can now set the number of outputs to read to 4. In the tag list, please enter the names of the tag output we write every 100 msec. We can utilize these tag names in our ladder logic program.
Select OK.
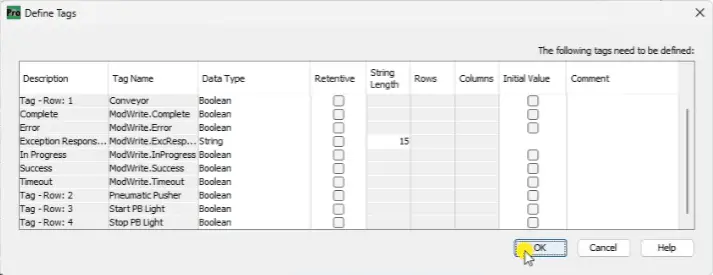
The Define Tags window will be displayed. We can verify all the tags we created for this Modbus Write instruction. Select OK.
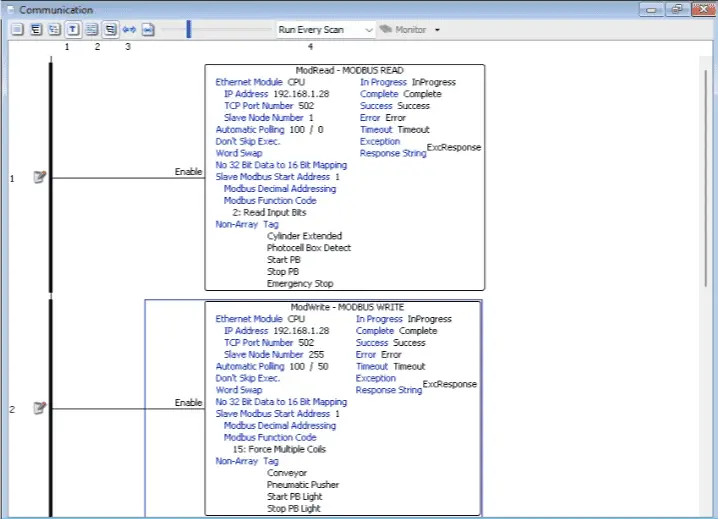
Our Modbus Write instruction will now be placed on our ladder diagram. Note that there are no input conditions for this instruction. This is because it will execute independently every 100 milliseconds with an offset of 50 milliseconds.
Save the program using the icon or under the main menu | File.
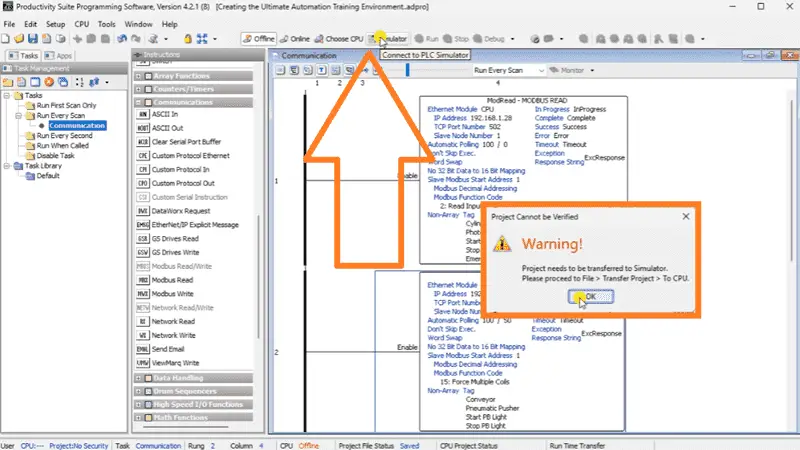
Select the Connect to PLC Simulator icon on the main menu. A warning message indicates that the simulator program needs to be transferred. Select OK.
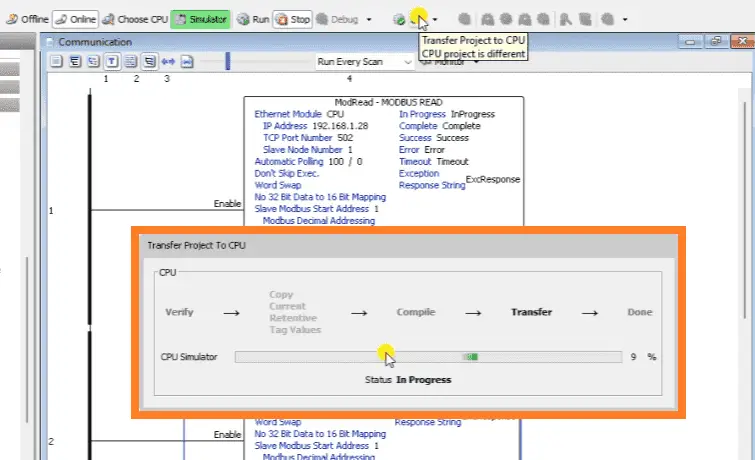
Select the Transfer Project to CPU icon on the main screen. This will transfer our ladder logic program to the simulator.
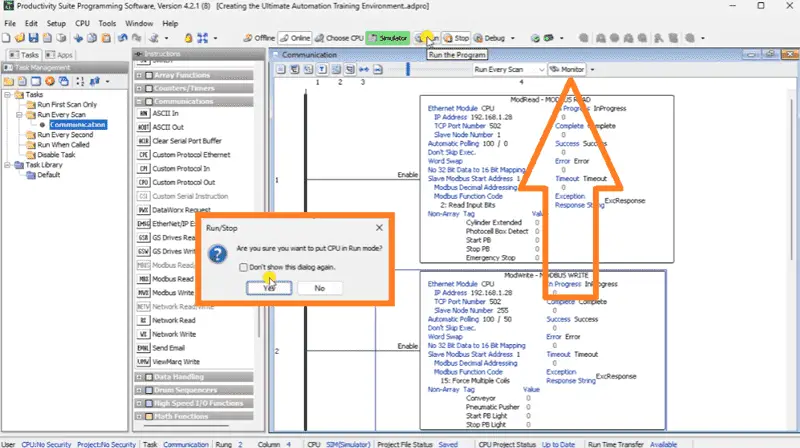
Once this is complete, select the monitor icon on the ladder logic window. We can view the instructions and flag bits as our communication with the Machine Simulator occurs. Place the PLC simulator in run mode by selecting the icon on the main screen. A warning message is displayed. Select Yes.
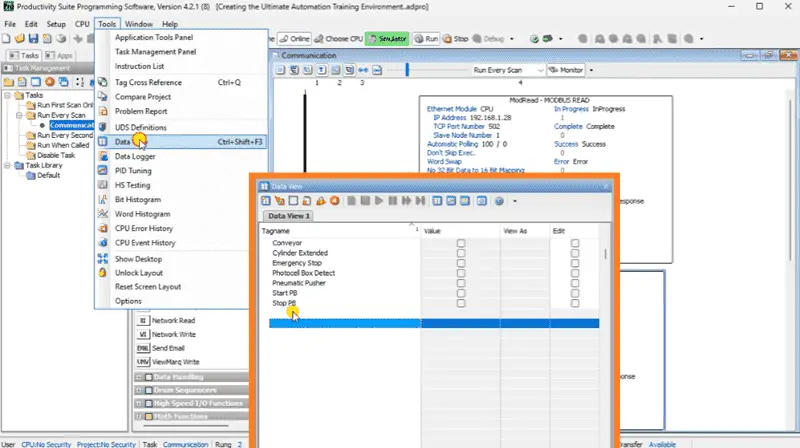
Select Data View under the main menu | Tools. The Ctrl + Shift + F3 key combination can also call up the Data View window. Enter the inputs and outputs we read and write to the Machine Simulator Easy Transfer Line using Modbus TCP.
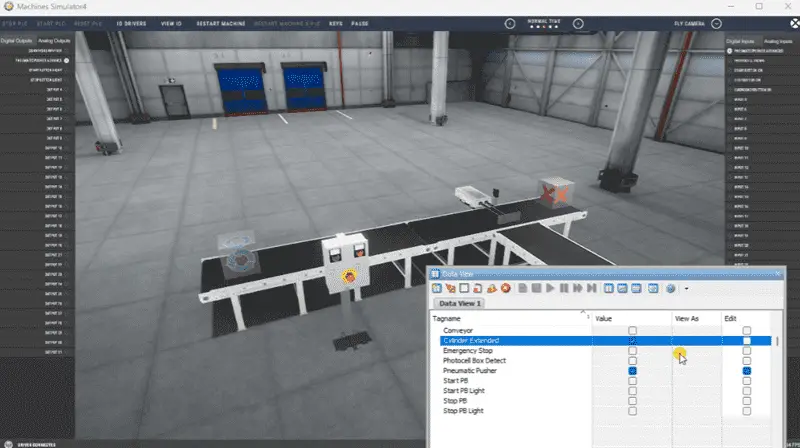
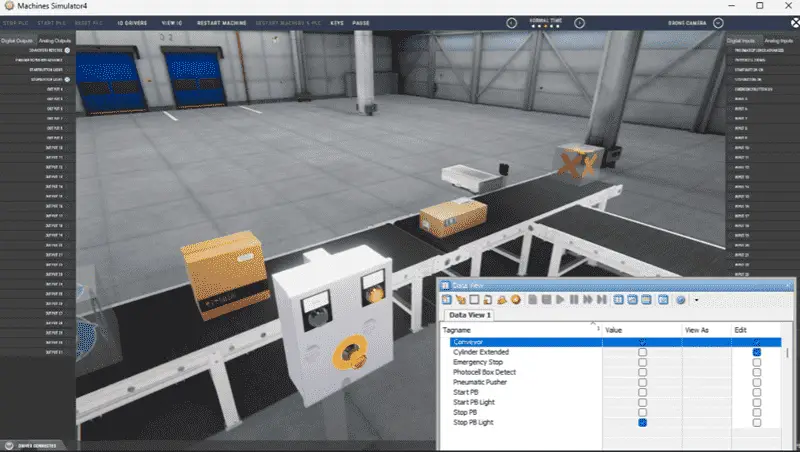
Returning to the Machine Simulator and viewing the Data View window, we can test our communication between the Productivity PLC Simulator and the Machine Simulator.
Creating the Productivity Ladder Logic Code
Under the Task Management window, right-click on the heading Run Every Scan and select New Task. We will write the ladder logic PLC code to control the easy transfer line.
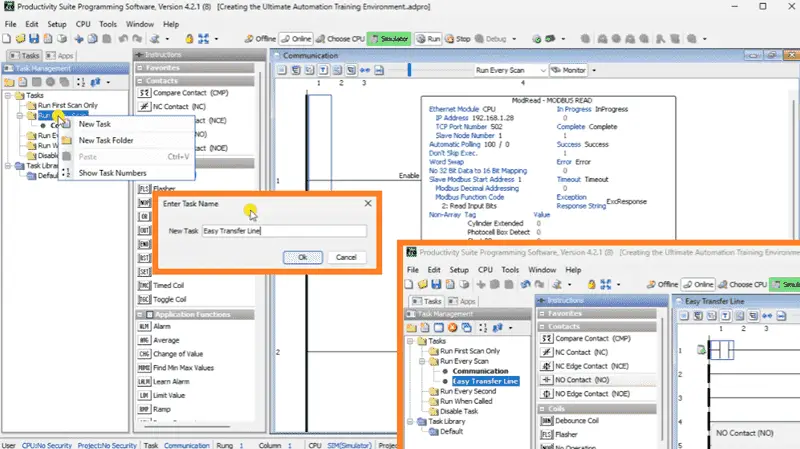
Enter the name “Easy Transfer Line” and select OK. Our new task is under the Run Every Scan heading in the Task Management window.
Using the 5-Steps to PLC program development, we will program our Productivity PLC to control the Easy Transfer Line.
- Define the task
- Define the Inputs and Outputs
- Develop a logical sequence of operation
- Develop the PLC program
- Test the program
To review how this is done, click the link in the description below. We have developed this ladder code before using the Click, Do-More, and XGB PLCs.
Click PLC – Easy Transfer Line Programming – Video
Do-More PLC EasyPLC Easy Transfer Line – Video
LS Electric XGB PLC Easy Transfer Program – Video
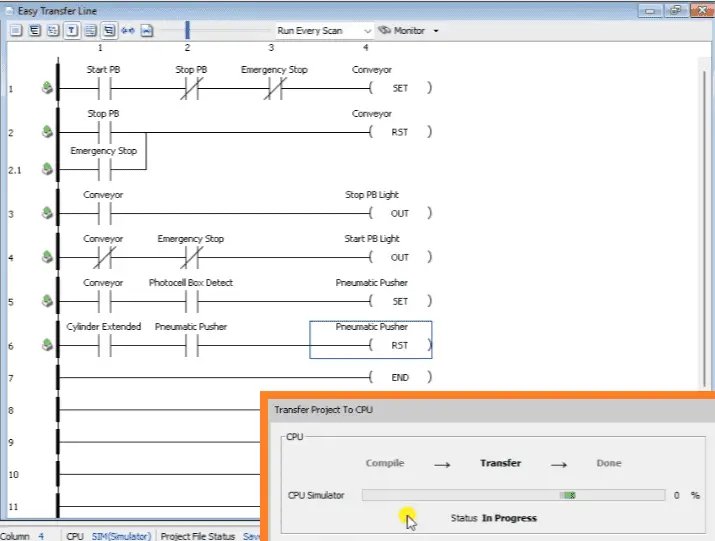
Once your ladder logic code has been entered, save your program.
Select the transfer program icon to transfer the program to the simulator.
Test our Ladder Logic in our Ultimate Training Setup
Call up the Data View window that we entered previously. We can run our Easy Transfer Line in the Machine Simulator and monitor the Inputs, Outputs, and Program.
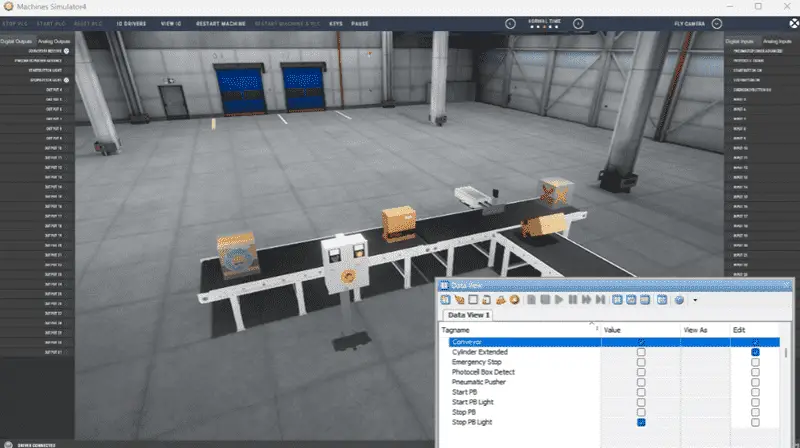
If modifications are required, we can do this online with the PLC Simulator. When using a machine simulator, debugging is done quickly without damaging equipment. You may modify your logic several times before you get everything right! This is all part of the automation learning with this ultimate automation training setup environment.
We called this the Ultimate Training Setup because we can now connect a Human Machine Interface (HMI) or Supervisor Control and Data Acquisition (SCADA) to this environment.
Improve your knowledge by getting the most out of your automation training, software, and hardware. Everyone can now learn how to design and program in a conducive learning atmosphere for real-world challenges in the automation field.
Click here to learn more about the Machine Simulator and how to set up the Modbus Server driver.
Click here to learn more about connecting an HMI to the Machine Simulator.
Download the PLC sample program here.
Watch the video below to see how the Productivity PLC Simulator controls the Easy Transfer Line. This is the first step in creating the ultimate automation training setup.
When using the Machine Simulator Software Suite, debugging is quickly done without damaging equipment. You may modify your logic several times before you get everything right! This is all part of learning. To learn more about developing logic, check out our tutorials on the five steps to PLC program development.
Watch on YouTube: Creating the Ultimate Automation Training Setup Part 1
Machine Simulator (EasyPLC) Software Suite is a complete PLC, HMI, and Machine Simulator Software package. This PLC learning package includes the following:
Easy PLC – PLC Simulation allows programming in Ladder, Grafcet, Logic Blocks, or Script.
HMI System – Easily create a visual human-machine interface (HMI)
Machine Simulator – A virtual 3D world with real-time graphics and physical properties. PLC programs can be tested using EasyPLC or through other interfaces. (Modbus RTU, TCP, etc.)
Machine Simulator Lite – Designed to run on Android Devices.
Machine Simulator VR – Virtual Reality comes to life so you can test, train, or practice your PLC programming.
Purchase your copy of this learning package for less than USD 95 for a single computer install or less than USD 110 to allow different computers.
Receive 10% off the price by typing in ACC in the comment section when you order. http://www.nirtec.com/index.php/purchase-price/
Learn PLC programming the easy way. Invest in yourself today.
If you have any questions or need further information, please get in touch with me.
Thank you,
Garry
If you’re like most of my readers, you’re committed to learning about technology. Numbering systems used in PLCs are not challenging to know and understand. We will walk through the numbering systems used in PLCs. This includes Bits, Decimals, Hexadecimal, ASCII, and Floating Points.
To get this free article, subscribe to my free email newsletter.
Use the information to inform other people how numbering systems work. Sign up now.
The ‘Robust Data Logging for Free’ eBook is also available for free download. The link is included when you subscribe to ACC Automation.

