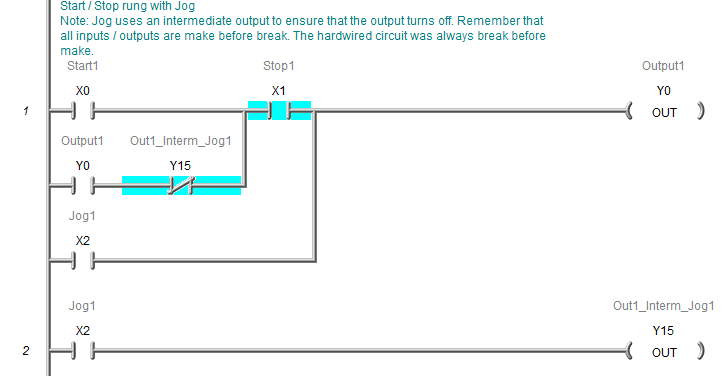
This post is a further follow up from my original ‘Here’s a Quick Way to Understand PLC Inputs and Outputs’. There are basically two different kinds of PLC inputs, Discrete and analog. Discrete inputs are either ‘ON’ or ‘OFF’; 1 or 0. You can think of them as a single switch. Analog inputs have a range to them. They are inputs that usually will sense pressure, temperature, height, weight, etc. They usually have one of the following signals that are inputted into the PLC: 4-20mA, 0-10VDC, 1-5VDC.
Discrete Inputs
The above diagram has two inputs. A normally open (NO) and a normally closed (NC). When we talk about normally open and close, think of the condition of the input if no one touches anything. A normally open contact will not turn on the input to the PLC card in its ‘normal’ state. The normally closed contact will turn on the input to the PLC card in its ‘normal’ state.
Normally Open Input
The NO contact when activated will complete a circuit and turn on the PLC input. Ladder logic will then turn on if you use a normally open (Examine On) input in your program. See the above diagram.
Normally Closed Input
The NC contact when activated will break a circuit and turn off the PLC input. Ladder logic will then turn off if you use a normally open (Examine On) input in your program. See the above diagram.
As you can see with the diagram above this can get tricky to determine the on/off condition of the input. PLC logic can convert any signal by using normally closed (Examine Off) inputs in the program. In the field, I usually look at the PLC input lights, and wiring diagrams to determine the current state of the input. This is before diving into the program to troubleshoot.
An analog input converts a voltage or current level into a digital value that can be stored and processed in the PLC. They use words to determine the signal coming from the device.
Example:
4 – 20 mA current Input – 8-bit resolution
4 mA = 00000000 base 2 = 00 base 16
20 mA = 11111111 base 2 = FF base 16
For a review of numbering systems, follow the link below: What Everybody Ought to Know About PLC (Programmable Logic Controller) Numbering Systems
In the industrial environment noise from variable frequency drives, improper grounding, etc. can interfere with your analog input. The following post will show a quick method to reduce this noise. The Secret Of Getting Rid Of Noise On Your Analog Signal
If you have any questions or need further information please contact me.
Thank you,
Garry
If you’re like most of my readers, you’re committed to learning about technology. Numbering systems used in PLC’s are not difficult to learn and understand. We will walk through the numbering systems used in PLCs. This includes Bits, Decimal, Hexadecimal, ASCII and Floating Point.
To get this free article, subscribe to my free email newsletter.
Use the information to inform other people how numbering systems work. Sign up now.
The ‘Robust Data Logging for Free’ eBook is also available as a free download. The link is included when you subscribe to ACC Automation.
I have been writing PLC programs for over 20 years. I often get asked what is the best way to learn PLC programming. Programming in the way I was taught in college was with the Motorola 6809. (Yes, I know that I am dating myself) This was microprocessor programming, but it was the best way to sometimes explain the methods behind PLC programming. Manufacturers of PLCs had proprietary software that was not even related in their appearance and methods of programming. Today we have a few standards that have changed the look and feel of the programming software packages so each manufacturer is similar. The following is the best recommendation that I have for beginners to start to learn PLC programming today.
The first place to start in order to learn PLC programming is free publication by Kevin Collins. This PDF will teach you PLC programming without just telling you what a PLC is and how it functions. He also includes some test questions along the way in order for you to retain and understand the important points that he is making.
PLC Programming for Industrial Automation
by Kevin Collins (Note: This book is now for sale on Amazon.)
After learning the basics from the above manual, practice. Create programs yourself and test what you have learned. You can accomplish this by using simulators. A lot of the programming software will have simulators. The simulator will mimic the PLC hardware so you can test your programs before installing them in the field. Traditionally I have not been a fan of simulators, but recently Automation Direct has introduced a simulator with their Do-More PLC. It is the Do-More Designer Software. This software simulator includes the entire instruction set (Not Just a Bit Logic) as well as communication protocols. It can be downloaded and installed for free from the above link.
Advanced PLC Programming Instructions
The next step I recommend is then to advance into some of the advanced instructions. An understanding of the numbering systems in the PLC will be a benefit. Math, PID, register manipulation, and conversion instructions are just a few of the advanced programming you can learn. All of this and more instruction information can be obtained from reviewing the documentation from the PLC manual that you are programming. Once again all of these instructions are included in the Do-More Designer Software.
PLC Programming Structure
The program structure is the next topic. A lot of programmers would stop here and can do well with developing software, however, there is much more than you can lean. Sequencers give programmers the methods to change the logic on the fly and allow troubleshooting the system easier. This method of programming can benefit you greatly and reduce the development time of your logic.
PLC Programming – Information Sharing
The last step that I recommend learning is the sharing of information. I am meaning the information that you program through an HMI and/or SCADA package. This refers to the understanding of the ways in which information can be gathered from the PLC and displayed in different ways. Here are a couple of previous articles that have been written on this subject:
As you can see, there is a lot of information available to you to begin and learn PLC programming without spending a dime! Remember that PLCs are similar to computers, (Moore’s Law) they increase in size and ability. Systems are expanding and changing every day. Happy programming.
Do you know of additional tips or methods to share? PLC Beginner’s Guide – There are many different PLC manufacturers with different hardware and software. All of the programmable logic controllers have similar basic features. Here is how I would approach learning about basic PLCs.
If you have any questions or need further information please contact me.
Thank you,
Garry
If you’re like most of my readers, you’re committed to learning about technology. Numbering systems used in PLC’s are not difficult to learn and understand. We will walk through the numbering systems used in PLCs. This includes Bits, Decimal, Hexadecimal, ASCII and Floating Point.
To get this free article, subscribe to my free email newsletter.
Use the information to inform other people how numbering systems work. Sign up now.
The ‘Robust Data Logging for Free’ eBook is also available as a free download. The link is included when you subscribe to ACC Automation.
We will look at how to troubleshoot a plc racing condition.
Two examples are explained in racing conditions in the PLC. The PLC will update only at the end of the program logic. Items set will not happen until the I/O are refreshed. How to trigger events when you want them is discussed.
Your control system does not work. Where do you start? Let’s walk through a series of questions in order to determine where the problem lies.
Troubleshooting a PLC – Starting
Is this a new installation or a previous installation that was running fine? Determine if the system has been running well in the past and has currently stopped working correctly. This is the indication that the problem relies upon the system.
Is there anything that has happened outside of the system? Has there been a lightening strike, blown drives on other systems, etc? This can point to the original cause of the malfunction.
Gather Information for Troubleshooting
What is the system doing now and what should it be doing? Gather all of the information you can from every resource you can.
Supervisors – machine, location, time of the error, other happenings in the plant, etc
Operators – What is it currently doing? What should it be doing? What do you think is wrong?
Operators of the equipment are your key resource in finding, correcting and ensuring the error does not happen again. They know the equipment from an operational point of view which can assist you greatly in troubleshooting.
PLC fatal and non-fatal errors:
Troubleshoot a PLC
If the machine is still running partially then this is an indication of a non-fatal error. Cannot run at all is usually a fatal error.
Take a look at the PLC indicator lights on the CPU. Refer to the operation manual for the PLC for troubleshooting specific lights on the CPU. The following are general tips:
If no lights are on then the possible cause is a power supply. This is usually the most common of errors on a PLC system. Meantime before failure (MTBF) is rated on the lowest rating of components which is usually the power supply.
If the run light is on and an error light flashing this usually indicates internal errors such as batteries, scan time, etc. It is usually not the reason for the lack of operation.
If the run light is on and no other errors are seen on the CPU we can put the PLC program at the bottom of the list of items that could be the cause.
Check the input cards of the PLC. You should see the individual sensors lighting up the inputs. If not then check the power supply to the input card/cards.
Ask the operator what is happening and what is suppose to happen. Try to follow the sequence of events in the PLC to determine either an input or output device not working.
Some items to watch:
The leakage current on two-wire sensors (False triggering the input)
New PLC installation troubleshooting
If this is a new PLC program that you are doing start with a logic flow diagram. This will determine the procedure to start programming.
Every program can be done in several ways. The best method is the most documented one.
Documentation is the mark of a good program.
Some trouble with new programs can be racing conditions. This is usually a case of not understanding how the PLC scans logic. In general, the PLC will scan from left to right, top to bottom. The output bits/words are available to the inputs of the next rung of logic. (Modicon PLC’s will scan differently.) Actual outputs and inputs are not read until the end of the scan of the PLC. Racing conditions happen when the output is set on multiple rungs, but will not get actually set until the end of the scan. Think of it as the last action will always win. So if this happens to move the logic to the end of the program and see if it works. Then go back and see where the output was also set. Cross-reference guides are ideal for this purpose. (Refer to your programming software on how to get cross-references.)
We have discussed just a few troubleshooting techniques. Hopefully, now you know how to start looking for the errors in your system. Let me know how you make out.
Do you know of additional tips or methods to share?
If you have any questions or need further information please contact me.
Thank you,
Garry
If you’re like most of my readers, you’re committed to learning about technology. Numbering systems used in PLC’s are not difficult to learn and understand. We will walk through the numbering systems used in PLCs. This includes Bits, Decimal, Hexadecimal, ASCII and Floating Point.
To get this free article, subscribe to my free email newsletter.
Use the information to inform other people how numbering systems work. Sign up now.
The ‘Robust Data Logging for Free’ eBook is also available as a free download. The link is included when you subscribe to ACC Automation.
The hostlink communication protocol is a method developed by Omron for communication to PLC’s and other equipment. This ASCII based protocol is used over RS232 or RS422/RS485. It is a many to one implementation which means that you can communicate with up to 32 devices back to a master. (1: N) This communication on the industrial floor can control PLC’s, Temperature Controllers, Panel Meters, etc.
Our look at this protocol will include the wiring, setting of RS232 port settings, protocol format and writing a VB6 program to read information from the PLC. I will also point you links to then store this information into a database and share over an intranet/internet. Let’s get started.
Wiring of the communication ports will depend on the equipment purchased. If communicating over 15 meters, it is recommended to switch to RS422 or RS485 connection. However, I have seen RS232 runs of 50 meters without an issue. It will depend on your implementation and electrical noise in the plant.
The above diagram is the basic communication needed for RS232C. Note that the shield of the communication wire is connected only to one side. This ensures that any noise induced in the communication is filtered to one end.
Settings for RS232C communications are set in a number of ways. Older Omron C**K PLC was set through a series of dip switches. Current Omron SMR1/CPM1 PLC’s are set through data memory locations.
Note: Most of the time, you need to cycle the power or switch to program/run mode for the setting to be activated.
I generally tend to leave everything at the default settings: 9600 bps, Even parity, 7 data bits, 1 stop bit. The default host link unit number is 00. (32 max. – 00 – 31)
Protocol Format
Each piece of equipment will have a list of parameters that can be read and written using the HostLink protocol. This can be found in the programming manual of the device. Here are the areas in the CPM1/CPM1A/CPM2A/CPM2C/SRM1(-V2) from the programming manual.
Lets take a look at the command to read the DM area. All of the commands and responses will be in an ASCII format.
The command format begins with a ‘@‘ sign followed by the Node / Unit number that you wish to communicate. The header code is the command in which you wish to execute. (RD) This header code will determine the next series of information. In our case, the next four digits will be the beginning word followed by the next four digits to indicate the number of words. The next part of the command is the FCS (checksum) calculation. The comparison to this at each end will ensure that the command/response is correct. FCS is an 8-bit data converted into two ASCII characters. The 8 bits are a result of an Exclusive OR performed on the data from the beginning to the end of the text in the frame. In our case this would be performed on the following:
"@00RD00000010"
The last part of the command is the terminator. This is an ‘*’ followed by the character for the carriage return. (CHR$(13))
The response format begins with a ‘@’ sign followed by the Node / Unit number that you are communicating to. The header code is next (RD) followed by the End Code. The end code is a two digit ASCII code that indicates the message response/errors when executing the action. A normal code of ’00’ indicates that everything is fine. See the operation manual for the entire list of end codes for your equipment. The next part of the response depends on the header code executed. In our case, it would contain the data requested. The last two parts of the response are the FCS and terminator just like the command format.
The above shows the timing of the command and responses.
Visual Basic VB6 (Example)
Now let’s look at an example of reading the first 10 words from the DM area of an Omron PLC.
The first step is the design the form. You can see that we have our ten DM area words set out to populate with values. We also have a T$ for transmitting. This will show what we are sending to the PLC. The RXD$ will show what the response will be from the PLC.
The MSComm is used to communicate through the serial ports of the computer. The following is the settings for the communication port.
Here is the VB6 code for the program:
When the form loads the Date/Time will get updated and Timer1 is enabled. This timer controls the interval in which the commands get executed. (Set to 1 second)
Private Sub Form_Load()
Label2.Caption = Format(Date, "YYYY/MM/DD") + " " + Format(Time, "HH:MM:SS")
Timer1.Enabled = True
End Sub
The following code will open the communication port, set the command format, send the command through the port, receive the response through the port and display the information. It will then close the communication port.
The following is the subroutine to communicate. Timer2 is the amount of time to wait before expecting an answer to the communication port. Once the command has been sent a maximum of two seconds is waited for a response. If no response nothing is returned. When the response is obtained, the FCS is checked and if correct the information is returned.
communicate:
rxd$ = ""
Buffer = T$ + FCS$ + "*" + Chr$(13)
MSComm1.Output = Buffer
Timer2.Enabled = True
Do
DoEvents
Loop Until Timer2.Enabled = False
If Time > #11:59:50 PM# Then
timeout = #12:00:02 AM#
Else
timeout = DateAdd("s", 2, Time)
End If
MSComm1.InputLen = 0
Do
If timeout <= Time Then GoTo timeoutcom
DoEvents
Loop Until MSComm1.InBufferCount >= charreturn
rxd$ = MSComm1.Input
fcs_rxd$ = Left((Right(rxd$, 4)), 2)
If Left(rxd$, 1) = "@" Then
T$ = Mid(rxd$, 1, (Len(rxd$) - 4))
ElseIf Mid(rxd$, 2, 1) = "@" Then
T$ = Mid(rxd$, 2, (Len(rxd$) - 5))
rxd$ = Mid(rxd$, 2, (Len(rxd$) - 1))
End If
GoSub FCS
If FCS <> fcs_rxd$ Then
rxd$ = ""
End If
clearbuffer$ = MSComm1.Input
Return
This is the FCS (checksum) calculation routine.
FCS:
L = Len(T$)
A = 0
For J = 1 To L
TJ$ = Mid$(T$, J, 1)
A = Asc(TJ$) Xor A
Next J
FCS$ = Hex$(A)
If Len(FCS$) = 1 Then FCS$ = "0" + FCS$
Return
This is the routine that will execute if the response is not received within the time period expected.
If you have any questions, need further information or would like a copy of this program please contact me.
Thank you,
Garry
If you’re like most of my readers, you’re committed to learning about technology. Numbering systems used in PLC’s are not difficult to learn and understand. We will walk through the numbering systems used in PLCs. This includes Bits, Decimal, Hexadecimal, ASCII and Floating Point.
To get this free article, subscribe to my free email newsletter.
Use the information to inform other people how numbering systems work. Sign up now.
The ‘Robust Data Logging for Free’ eBook is also available as a free download. The link is included when you subscribe to ACC Automation.