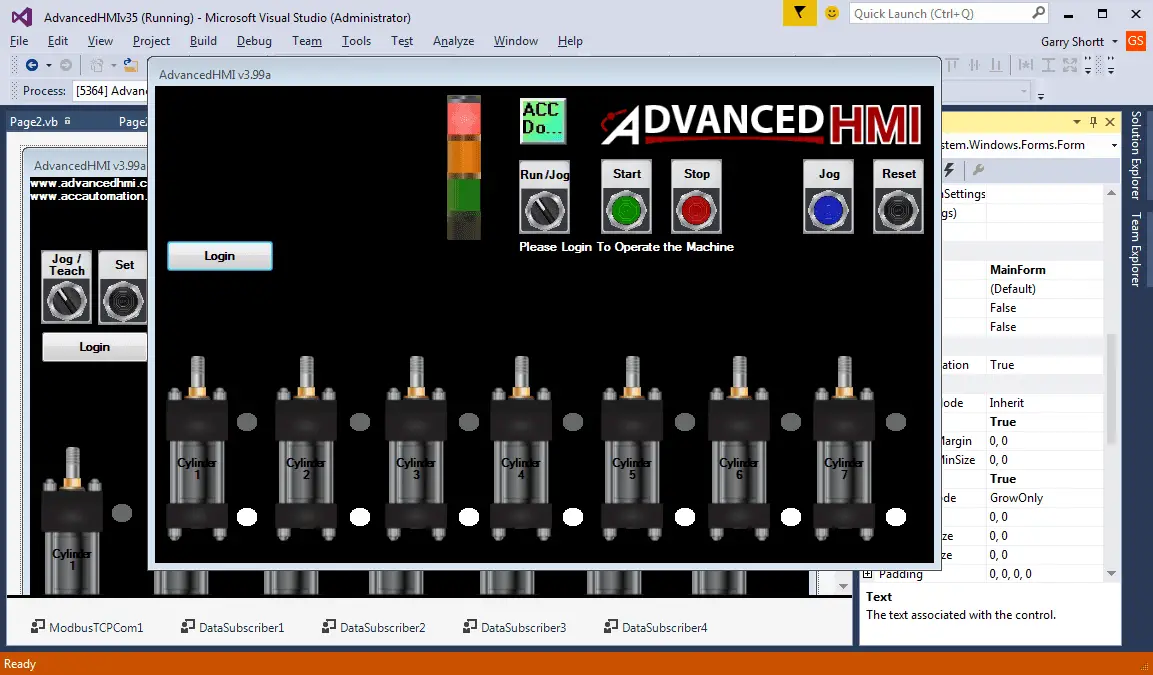
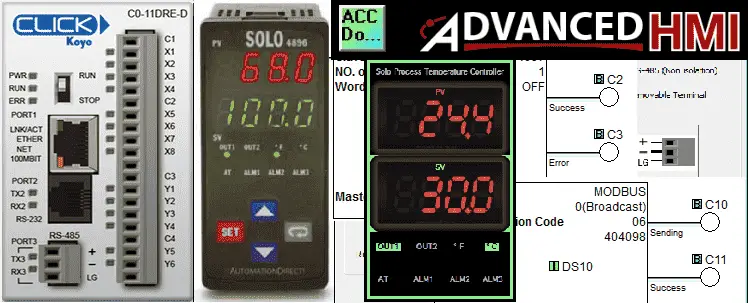
We will now look at the click plc advancedhmi Modbus serial communication. Advanced HMI is a powerful, adaptable HMI/SCADA (Supervisory Control and Data Acquisition) development package that takes advantage of Visual Studio. There is no coding required and you can simply drag and drop items onto the page. The best thing is that the software is free. We will look at using AdvancedHMI with the Click PLC. Our sample Click PLC program will read the present value (PV) and the indicating lights on our Solo Process Temperature Controller. It will then write the set value (SV) to the Solo. This communication will be done using Modbus RTU protocol over an RS485 serial port on the Click. The AdvancedHMI package will communicate Modbus TCP over Ethernet to the Click PLC. We will be able to monitor our PV and set our SV on the Solo via the AdvancedHMI window. Keep on Reading!
Tag Archives: advancedhmi manual
Deploying an AdvancedHMI Project – Installation
Deploying an AdvancedHMI project on the industrial floor sounds like an easy task, but there are a few things that you should consider. The HMI (Human Machine Interface) user interface will run on a computer. The industrial environment is one in which temperature, dust, electrical noise, etc. are always present. This can also be combined with workers wanting to play with the new computer. We will look briefly at the hardware and software items that will make your install more reliable and user-friendly in the field.
Hardware – Deploying an AdvancedHMI Project
The hardware that you deploy in the field should match the environment that you expect it to work in. Computers come in many shapes, sizes, and price points. Here are a few items that you may want to consider.
- Fanless Computer – This will keep the dust-out but the temperature may be a problem.
- Monitor – Location, and type – Do you need a touch screen?
Keyboard and mouse – Washable? - Enclosures – If you are in a wash-down environment then an enclosure is a necessity. Sometimes these enclosures are worth more than the contents in them.
- UPS – The uninterruptable power supply will usually serve two purposes. It will act when power is removed so the computer will be able to shut down correctly. The UPS will usually also act as a power conditioner. Most power has surges on the line and this can be amplified when in the industrial environment. The surge suppressors in the UPS will protect the computer.
- Program backup – Have multiple copies of the software saved in different places. You never know when the unexpected will happen. (Fire / Thief etc.) This includes the backup disks for your operating system as well as the programs (versions) that you are running on the computer. (AdvancedHMI, Visual Studio)
- Documentation of the backup (Hardware / Software) – Ensure that you have documentation of the hardware and software versions that you are using. I would also include where everything was purchased. This way if records are missing we can track this down through the supplier.
Software – Deploying an AdvancedHMI Project
The software that we have on the production floor should be robust. This means that we should know what happens if things go wrong. Backups, as mentioned above, should happen on a regular basis. Memory is inexpensive so backup your files regularly. We usually use a networked computer to automatically back up the production files each day. The following is a list of items that you should pay attention to when deploying a computer on the production environment.
- Turn off windows update – Windows is great at keeping itself up to date. However, this can cause programs to stop working. When dealing with an AdvancedHMI deployment we set windows to ‘Download updates but let me choose whether to install them’. It can take several minutes for windows to update. You want to be sure that the machine being controlled will not be affected.
- Security – Set permissions – When setting up your windows computer for the factory floor, do not give the account that boots up and logs on automatically Administrator Privileges. It should be set up as a Standard User. This will prevent unauthorized software from being loaded onto the system.
Internet Explorer comes standard on any new computer with windows 8.1 or older. No other browser is present out of the box. It is good to set a supervisor password on the internet connection. This will allow you to restrict internet use.
http://www.thewindowsclub.com/password-protect-the-use-of-internet-explorer
On the run prompt type: RunDll32.exe msrating.dll,RatingSetupUI
Go to the General tab to select a supervisor password
- AdvancedHMI – There are a few thing that we can do in the AdvancedHMI project. We will look at the AdvancedHMI project that we did for Creating a HMI Login Screen on AdvancedHMI.
o ControlBox – Remove the ControlBox on the main screen form. This will ensure that the user cannot minimize, maximize or close the application.
o Maximize for screen size – Make the main screen form maximized so it will fill the entire screen.
o Form.TopMost = True – This command will ensure that your application will be on top of all other windows forms.
In this example the calculator has focus, but our windows form will always be on top.
If you have only one form then you can use the Properties settings for the form you always want on top. Multiple pages will have to include some additional programming to ensure that they are on top and visible.
Here is the code for returning to the main form of the program.
Private Sub ReturnToMainButton_Click(ByVal sender As System.Object, ByVal e As System.EventArgs) Handles btnCancel.Click Me.TopMost = False MainForm.Show() MainForm.TopMost = True Me.Hide() End Sub
- Shortcut on the desktop – Place a shortcut to the AdvancedHMI application on the desktop. This will allow someone to quickly start the application if the application unexpectedly closes.
Following the above recommendations will ensure that your computer will perform and last as expected on the factory floor. Your AdvancedHMI project will work reliably and efficiently.
If you would like a copy of the PLC and AdvancedHMI programs, please contact me and I would be happy to send them to you.
Watch on YouTube: Deploying an AdvancedHMI Project
If you have any questions or need further information please contact me.
Thank you,
Garry
Archie Jacobs from Manufacturing Automation, LLC has another tip for disabling the windows error recovery on startup.
On the PC that will run AdvancedHMI, click the start button and type CMD to find the Command Prompt. Right Click on the command prompt and select Run As Administrator
Once the Command Prompt opens, type the following:
bcdedit /set {current} bootstatuspolicy ignoreallfailures
This will prevent problematic startup when the PC is not shut down properly as often happens in the industrial environment.
If you’re like most of my readers, you’re committed to learning about technology. Numbering systems used in PLCs are not difficult to learn and understand. We will walk through the numbering systems used in PLCs. This includes Bits, Decimal, Hexadecimal, ASCII, and Floating Point.
To get this free article, subscribe to my free email newsletter.
Use the information to inform other people how numbering systems work. Sign up now.
The ‘Robust Data Logging for Free’ eBook is also available as a free download. The link is included when you subscribe to ACC Automation.
Creating a HMI Login Screen on AdvancedHMI
We will be creating an HMI (human machine interface) login screen for the cylinder program that we developed previously.
BUILDING A PLC PROGRAM THAT YOU CAN BE PROUD OF – PART 6
Our program had a Run, Jog and Teach mode for the cylinders. Our user will login with a user name and password. Based upon the user level that is set we will control what modes each user will be able to operate. We will also write this user level mode into the PLC.
Sequence of Operation – AdvancedHMI Login Database Screen
The following is the sequence of operation:
Watch on YouTube: Creating an HMI Login Screen on AdvancedHMI Sequence of Operation
Note: All of the programs used are provided free of charge and are an excellent way to learn PLC / HMI programming.
AdvancedHMI Software
AdvancedHMI is a free HMI software package that communicates to a number of different PLC manufacturers. This package uses visual studio and vb.net to program, however, you do not need to be an expert on visual basic to implement this software. We will be using an access database (Access 2010) to store our user information. When the operator logs into the system, they will enter a user name and password. The program will compare this to the information in the database and set the appropriate modes on the HMI.
The first thing that we need to do is to create a database to store user information. We will create a table called ‘tbl_user’. The fields in the database will be as follows:
First_Name – Text Field – 50 characters
Last_Name – Text Field – 50 characters
User_Level – Number – Integer
User_Name – Text Field – 50 characters
Password – Text Field – 50 characters
The user level will be as follows:
0 – Stop and reset the machine only (Not logged in)
1 – Run, stop and reset the machine only
2 – Run, stop, reset and jog the machine
3 – Run, stop, reset, jog and teach the machine
Do-More PLC Modbus Addresses – AdvancedHMI Login Database Screen
Here is a list of addresses that we will be using for our login screen between the HMI and PLC.
Device | Data Addresses | Type | Do-More PLC | Description |
Run/ Jog Selector | 00008 | Input | MC8 | MC8 on is jog mode |
Jog / Teach Selector | 00070 | Input | MC70 | MC70 on is teach mode |
User Level | 40005 | Output | MHR5 | Current user level |
We will add a Login / Logout button on the main page of our control. This will allow the operator to sign in or out of the machine. To ensure that the operator knows that he is logged into the system we will display a message in a label also on the main screen. Here is what our main page now looks like:
VB.net – AdvancedHMI Login Database Screen
The next thing we need to do is to design the form for our login information. This will contain two text boxes for the password and user name. We will also need two buttons; Login and Cancel. Our new form will be called Page2. Here is what it will look like:
When the HMI first powers up and no user has logged in we will ensure that the Jog and Teach functions are reset by writing values directly to the PLC. We will also set the user level to 0.
Private Sub MainForm_Load(sender As Object, e As EventArgs) Handles Me.Load
ModbusTCPCom1.Write(“00008”, 0) ‘Reset Run / Jog Selector PLC
ModbusTCPCom1.Write(“00070”, 0) ‘Reset Jog / Teach Selector PLC
ModbusTCPCom1.Write(“40005”, 0) ‘Set user level to 0
End Sub
Now let’s look at the logic for the button on the main page. If a person is logged into the machine then this button will log them out. This will also change the user level to 0 and write this to the PLC. In our case, MHR5 (400005) will contain the user level code. If no one is logged in then this button will call up our login form (Page2) so information can be entered.
Private Sub Button1_Click(sender As Object, e As EventArgs) Handles Button1.Click
If Button1.Text = “Login” Then
Page2.txtUsername.Text = “”
Page2.txtPassword.Text = “”
Page2.Show()
Else
SelectorSwitch1.Value = False
SelectorSwitch2.Value = False
MomentaryButton1.Enabled = False ‘Start
SelectorSwitch1.Enabled = False ‘Run / Jog Selector
SelectorSwitch2.Enabled = False ‘Jog / Teach Selector
Button1.Text = “Login”
Label6.Text = “Please Login To Operate the Machine”
ModbusTCPCom1.Write(“40005”, 0) ‘Reset user level in PLC
End If
End Sub
Page2 is our login form. Here is the programming logic for the Login Button.
Private Sub btnLogin_Click(sender As Object, e As EventArgs) Handles btnLogin.Click
If txtPassword.Text = “” Or txtUsername.Text = “” Then
MessageBox.Show(“Please complete the required fields…”, “Authentication Error”, MessageBoxButtons.OK, MessageBoxIcon.Error)
Else
‘ Connect to DB
Dim conn As New System.Data.OleDb.OleDbConnection()
conn.ConnectionString = “Provider=Microsoft.ACE.OLEDB.12.0;Data Source= F:\Users\Shortt\Downloads\Creating a HMI Login Screen in AdvancedHMI\HMI\AdvancedHMIBetaV399a\AccDatabase.accdb”
Try
Dim sql As String = “SELECT * FROM tbl_user WHERE User_Name='” & txtUsername.Text & “‘ AND Password = ‘” & txtPassword.Text & “‘”
Dim sqlCom As New System.Data.OleDb.OleDbCommand(sql)
‘Open Database Connection
sqlCom.Connection = conn
conn.Open()
Dim sqlRead As System.Data.OleDb.OleDbDataReader = sqlCom.ExecuteReader()
If sqlRead.Read() Then
Dim FirstName As String
Dim LastName As String
Dim UserLevel As Integer
FirstName = sqlRead(“First_Name”)
LastName = sqlRead(“Last_Name”)
UserLevel = sqlRead(“User_Level”)
MainForm.ModbusTCPCom1.Write(“40005”, UserLevel)
MainForm.Button1.Text = “Logout”
MainForm.Label6.Text = FirstName & ” “ & LastName & ” Level = “ & UserLevel
MainForm.MomentaryButton1.Enabled = True ‘Start
If UserLevel = 3 Then
MainForm.SelectorSwitch1.Enabled = True ‘Run / Jog Selector
MainForm.SelectorSwitch2.Enabled = True ‘Jog / Teach Selector
ElseIf UserLevel = 2 Then
MainForm.SelectorSwitch1.Enabled = True ‘Run / Jog Selector
MainForm.SelectorSwitch2.Enabled = False ‘Jog / Teach Selector
Else
MainForm.SelectorSwitch1.Enabled = False ‘Run / Jog Selector
MainForm.SelectorSwitch2.Enabled = False ‘Jog / Teach Selector
End If
MainForm.Show()
Me.Hide()
Else
‘ If user enter wrong username and password combination show error
MessageBox.Show(“Username and Password do not match..”, “Authentication Failure”, MessageBoxButtons.OK, MessageBoxIcon.Exclamation)
‘Clear all fields
txtPassword.Text = “”
txtUsername.Text = “”
‘Focus on Username field
txtUsername.Focus()
End If
conn.Close()
Catch ex As Exception
MessageBox.Show(“Failed to connect to Database.. System Error Message: “ & ex.Message, “Database Connection Error”, MessageBoxButtons.OK, MessageBoxIcon.Error)
End Try
End If
End Sub
A further explanation of the code above can be found at the following address.
How to create login form in VB.NET
Connecting to our database – AdvancedHMI Login Database
The ConnectionString will vary from machine to machine. To automatically determine the connection string to our database we can do the following:
1 – Click DataBindings in the Properties window. Click F4 if you cannot see the properties window or add it on View – Properties Window.
2 – Under DataBindings, click on Text – Add Project Data Source. This will call up the Data Source Configuration Wizard.
3- Choose Database as your Data Source Type and click Next.
4- Choose Dataset as your Database Model and click Next.
5 – Click on New Connection
6 – Click on Microsoft Access Database File as your Data Source and click Continue
7- The Add Connection window appears. Beside the ‘Database file name:’ click Browse. Locate the database file that we created above.
8 – Click the Test Connection. You should get the test connection succeeded message.
9 – Click OK to close the Add Connection wizard. Expand the “Connection string that you will save in the application”. Copy the connection string given and paste it on conn.ConnectionString.
Note: Copy – Ctrl + C / Paste – Ctrl + V
Here is the programming logic for the Cancel Button.
Private Sub ReturnToMainButton_Click(ByVal sender As System.Object, ByVal e As System.EventArgs) Handles btnCancel.Click
MainForm.Show()
Me.Hide()
End Sub
In this program, we are just writing a user level in PLC memory address MHR05. The control of the PLC can be limited if hardwired selector switches and pushbuttons were in the system. Implementing a login screen is very straightforward and can be part of your overall automation solution.
Download the access database and the Bin directory for the AdvancedHMI login screen.
The cylinder PLC program from Building a PLC Program That You Can Be Proud Of – Part 6 can be downloaded with the following link.
Download the PLC program and the Bin directory for the advanced HMI Screen.
Watch on YouTube: Creating an HMI Login Screen on AdvancedHMI – Explaining the Code
If you have any questions or need further information please contact me.
Thank you,
Garry
If you’re like most of my readers, you’re committed to learning about technology. Numbering systems used in PLC’s are not difficult to learn and understand. We will walk through the numbering systems used in PLCs. This includes Bits, Decimal, Hexadecimal, ASCII and Floating Point.
To get this free article, subscribe to my free email newsletter.
Use the information to inform other people how numbering systems work. Sign up now.
The ‘Robust Data Logging for Free’ eBook is also available as a free download. The link is included when you subscribe to ACC Automation.