
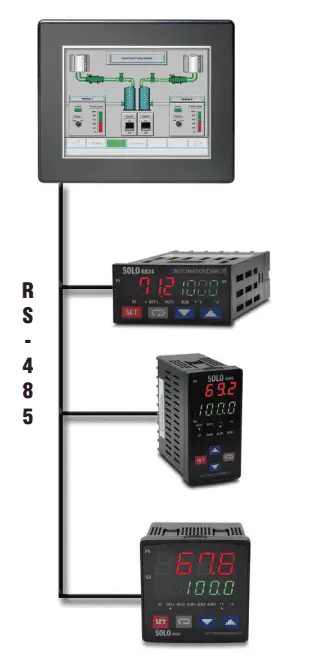
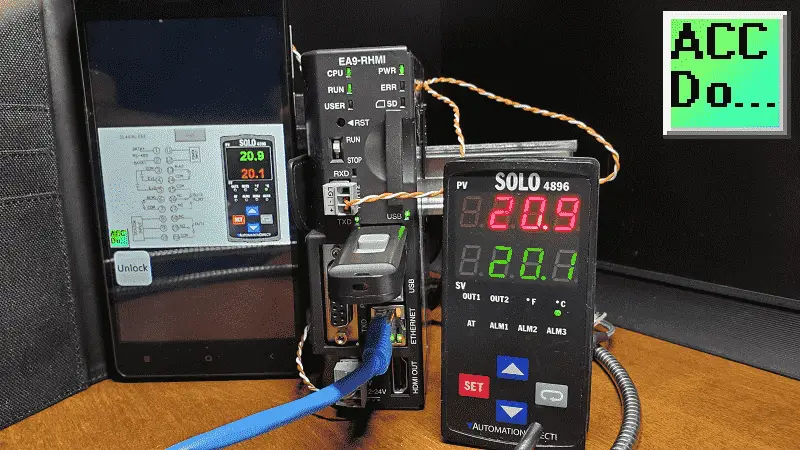
The cmore EA9 HMI can connect to the Solo process temperature controller using the built-in RS485 serial communication port. This will connect up to 32 solo units back to the HMI for display and control.
We will be setting up our headless RHMI c-more EA9 to communicate to the Solo process temperature controller. Using the information that we have discussed previously, we will set up data logging, file transfer protocol (FTP), bitmaps, etc.
We will also set up an object library of the Solo 4896 process temperature controller. This will consist of a bitmap, numeric display, numeric edit, indication lights, and up and down increment. The system will then be controlled using the remote applications discussed last time. Let’s get started.
Previously in this C-More EA9 HMI Panel series, we have done the following:
System Hardware
– Unboxing and Review Video
– Powering the Unit Video
Installing the Software – Video
System Setup Screens – Video
First Program
– Establishing Communication and Updating Firmware Video
– First Program Video
Panel to PLC and PLC to Panel Settings – Video
Common Screen Menu – Video
Simulate Project – Video
Object List Shapes – Video
Object List Buttons – Video
Object List Indicators – Video
Object List Entry – Video
Object List Meters and Graphs – Video
Object List Bitmaps – Video
Object List Recipe – Video
Define Custom Keypad – Video
Object List Alarms – Video
Object List Text – Video
Object List Clock – Video
Barcode Scanner Input – Video
Web Server and Remote Access – Video
Data Logging – Video
FTP File Transfer Protocol – Video
Sending Email – Video
Headless RHMI Panel
– Unboxing Video
– Establish Communication Video
Headless RHMI Setup Screens – Video
Headless RHMI Remote Control
– Windows Remote Access Console Video
– Android Remote Access App Video
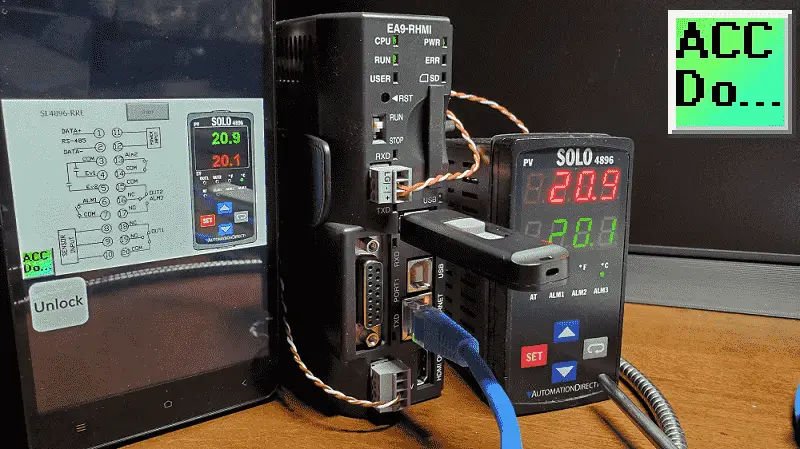
Watch the video below to see the control and monitoring of the Solo process temperature controller from the headless c-more unit.
Stephen Covey in The 7 Habits of Highly Effective People said: “Begin With the End in Mind.” This is especially true when programming an HMI display panel. You must have a picture of what you want to accomplish, before starting. This will save you a lot of time in development.
EA9-RHMI New Project – C-More to Process Temperature Controller
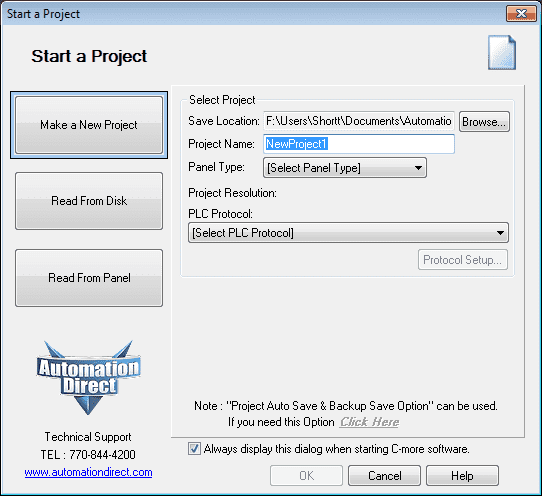
Start a new project. This can be done on the main menu | File | Start Project… Alternatively, you can use the Start Project icon on the main menu.
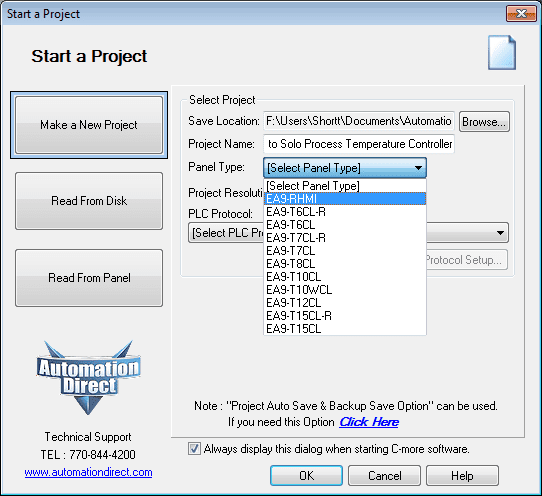
Enter a project name. We will use the C-More EA9 HMI Series Headless RHMI to Solo Process Temperature Controller.
Select the project panel type as EA9-RHMI.

Select the PLC Protocol as AutomationDirect SOLO Temp Controller. This series has so far used the generic Modbus TCP to the Do-More Designer PLC Simulator. The C-More panel drivers for the device will allow you to call up specific parameters in the unit you are controlling. This will make it easier to implement in your control project.
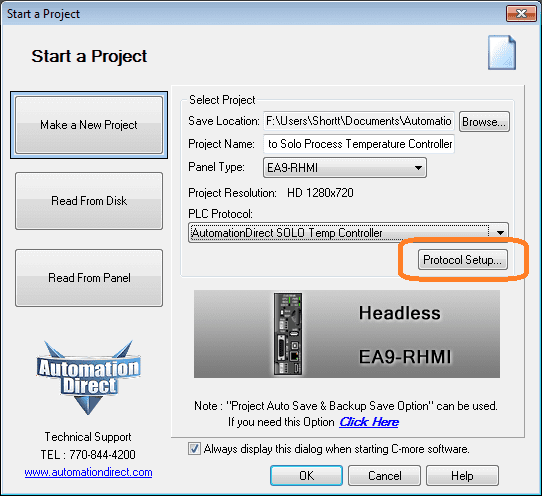
Select the Protocol Setup… button. This will call up the panel manager window.
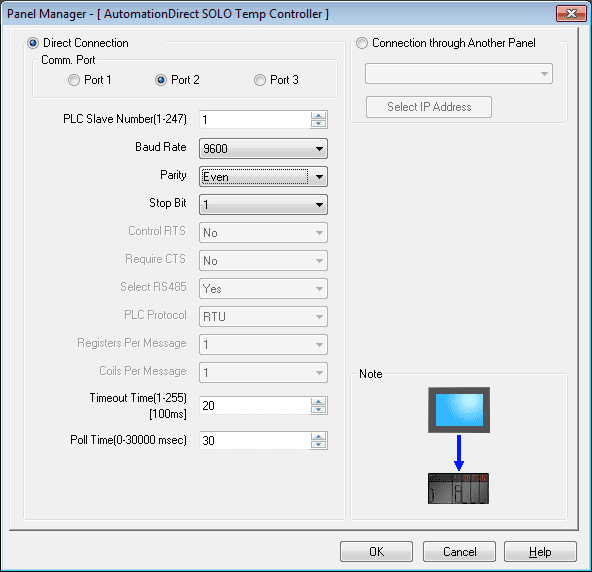
We will select Port 2 under the direct connection and set our parameters. These parameters will match our connected Solo process temperature controller. Unit number 1, 9600 baud, Even parity, and 1 stop bit. The timeout and poll time will be left as the default. Select OK.
We have now set up our initial project.
Project Properties (Panel Manager)
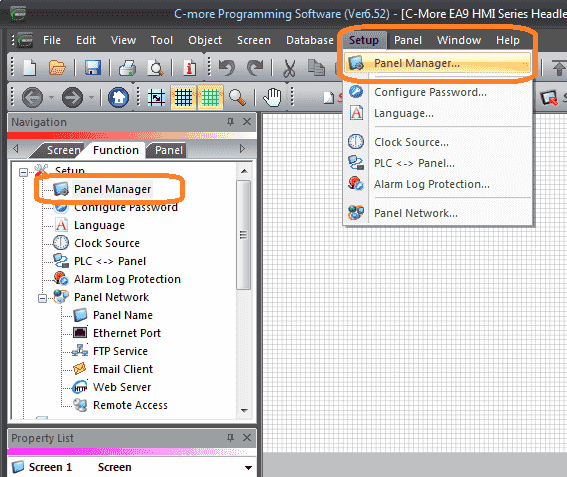
Select panel manager from the main menu | Setup | Panel Manager…
Alternatively, you can select the panel manager under the Setup on the Function tab in the Navigation window.
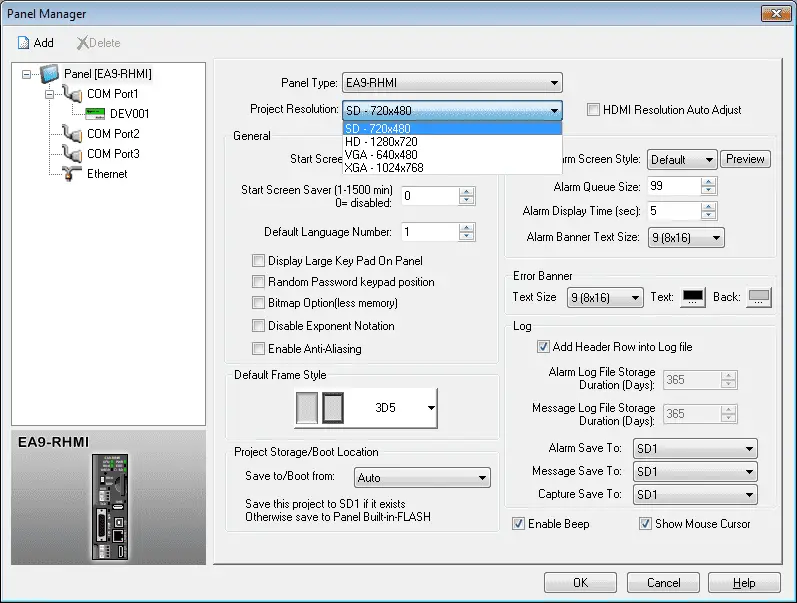
Our project resolution can now be set. We will select SD – 720×480 for this project. High Definition (HD 1280 x 720) is the maximum resolution for the display screen.
Since we will be using remote access for the control, SD will be used to get a better response from the system. This would be a trial and error type of setting depending on the graphics that are programmed on your HMI.
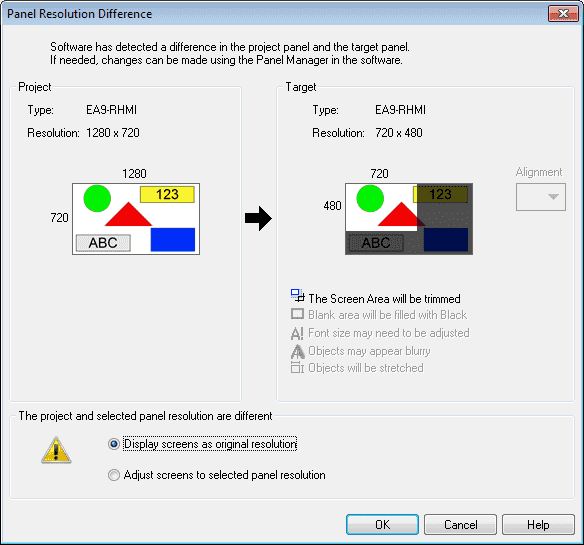
When you change the HMI resolution, it will prompt this Panel Resolution Difference window. Display screens as the original resolution are selected by default. Select OK.
Our project properties are now set for our EA9-RHMI to the Solo process temperature controller project.
Panel Network – C-More to Process Temperature Controller
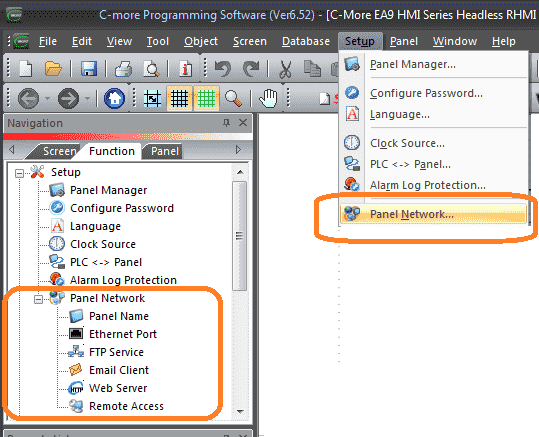
Call up the panel network to set up our HMI in our current system network. Select panel network from the main menu | Setup | Panel Network… You can also select this in the Setup menu of the Function tab on the Navigation window.
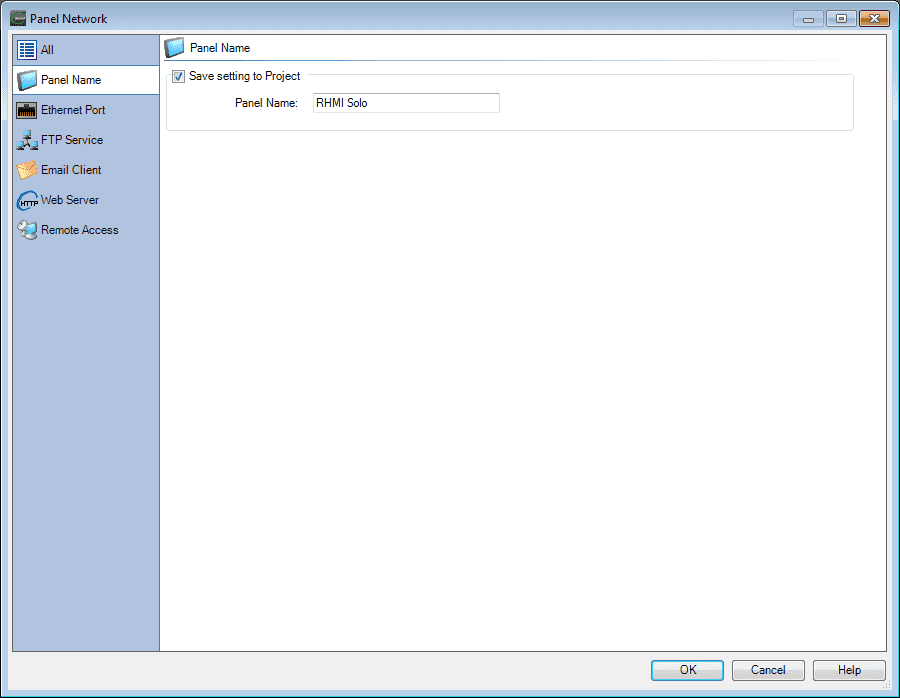
Selecting Panel Name on the left side of the panel network window will allow you to set a panel name. This will be used on our Ethernet network. We will set the name to RHMI Solo. Select the Ethernet Port.
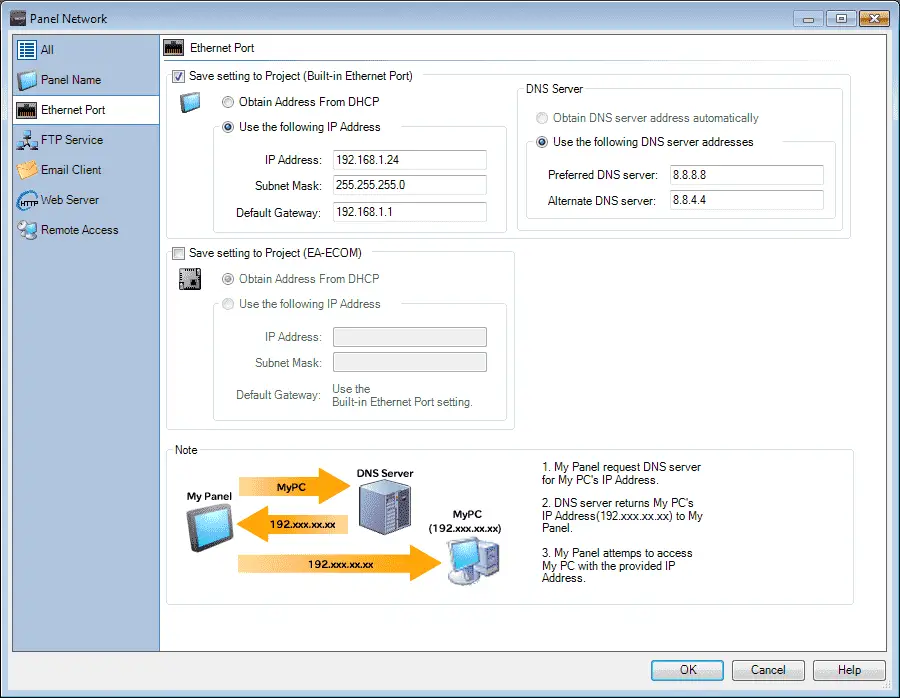
We will set up a static IP address. This is to ensure that remote access and programming for the project can be sure of the correct location. The DNS server and alternative will be set for the Google DNS Server Addresses.
Select the FTP Service.
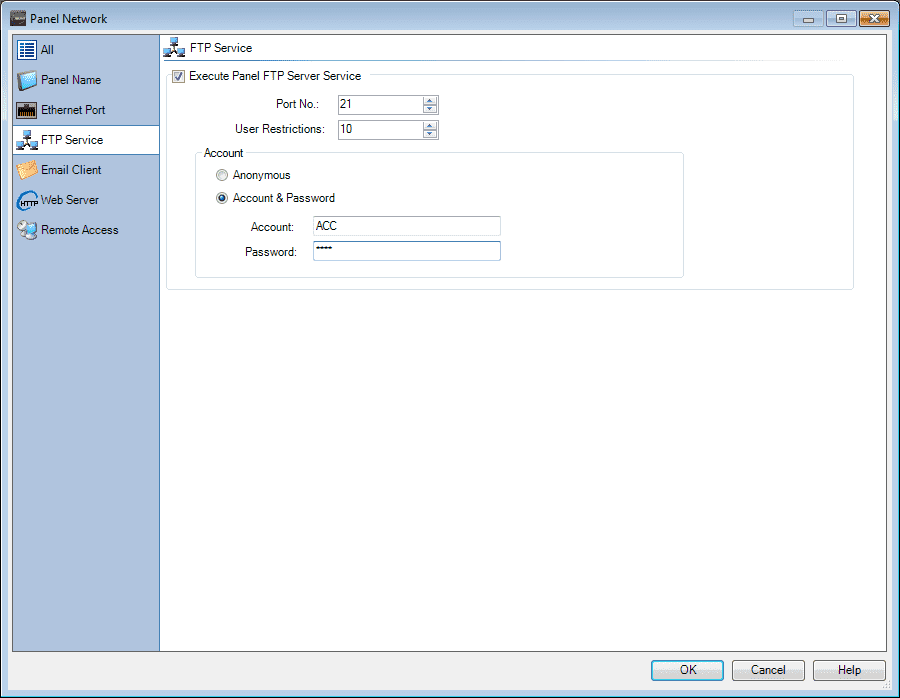
We will enable the FTP server service. The following post will go into detail on how to set this up and retrieve data logs on a server.
FTP File Transfer Protocol – Video
We will not be setting up Email on our current system but here is a link that will go over the detail on setting this up.
Sending Email – Video
Select the Web Server.
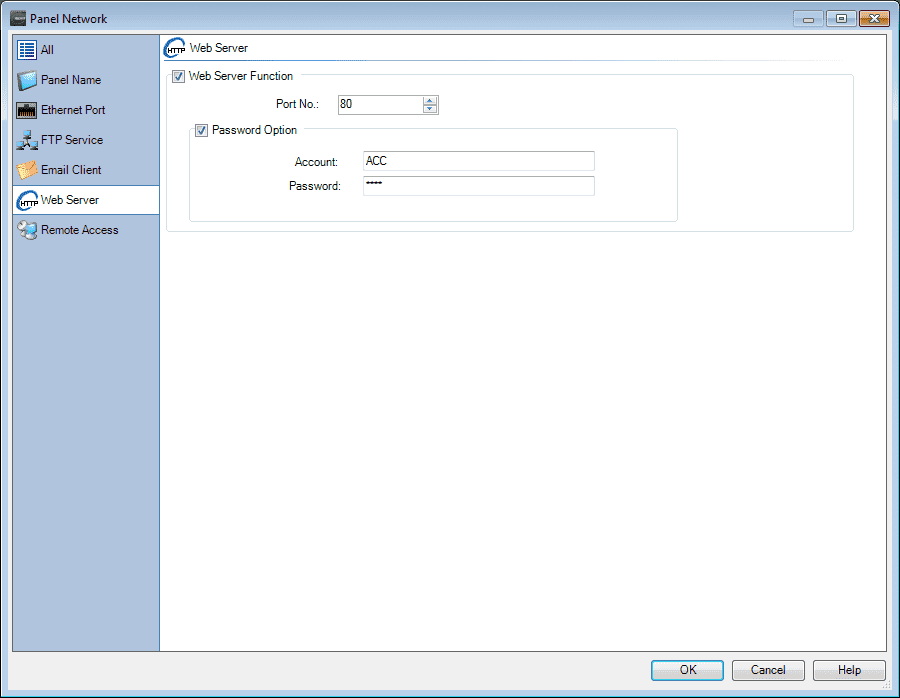
Enabling the webserver function will allow us to download the windows remote access program. Detailed information on the webserver can be found at the following location.
Web Server and Remote Access – Video
Headless RHMI Remote Control
– Windows Remote Access Console Video
– Android Remote Access App Video
Select the Remote Access,
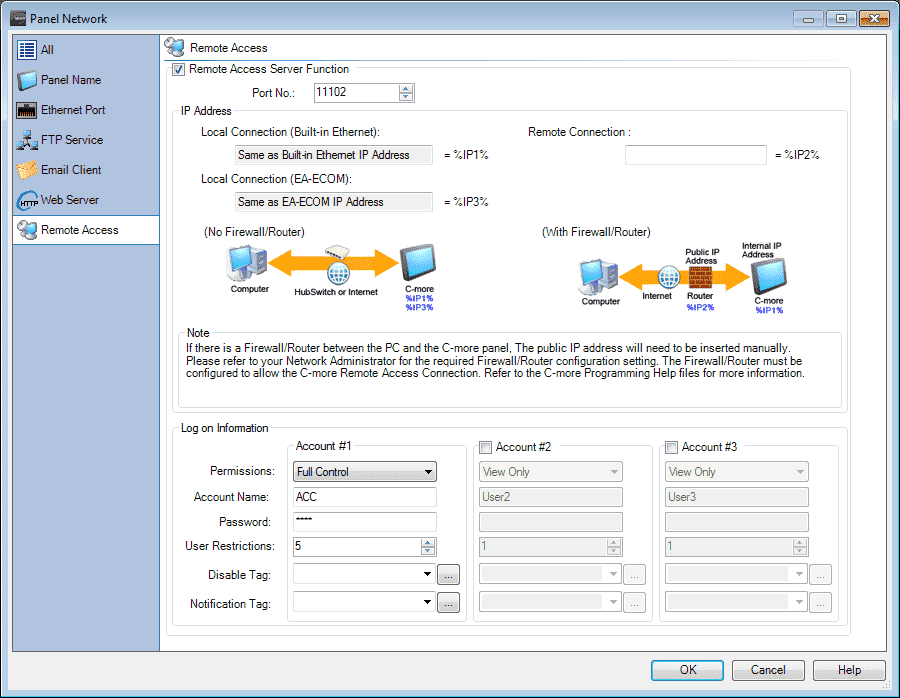
Enable the remote access server function. This will use port number 11102 as the default. We will set this to full control and have an account name of ACC and a password of acca.
Detailed information can be seen in the links above.
Select OK. Our panel network has now been set up.
Creating Screen 1 –C-More to Process Temperature Controller
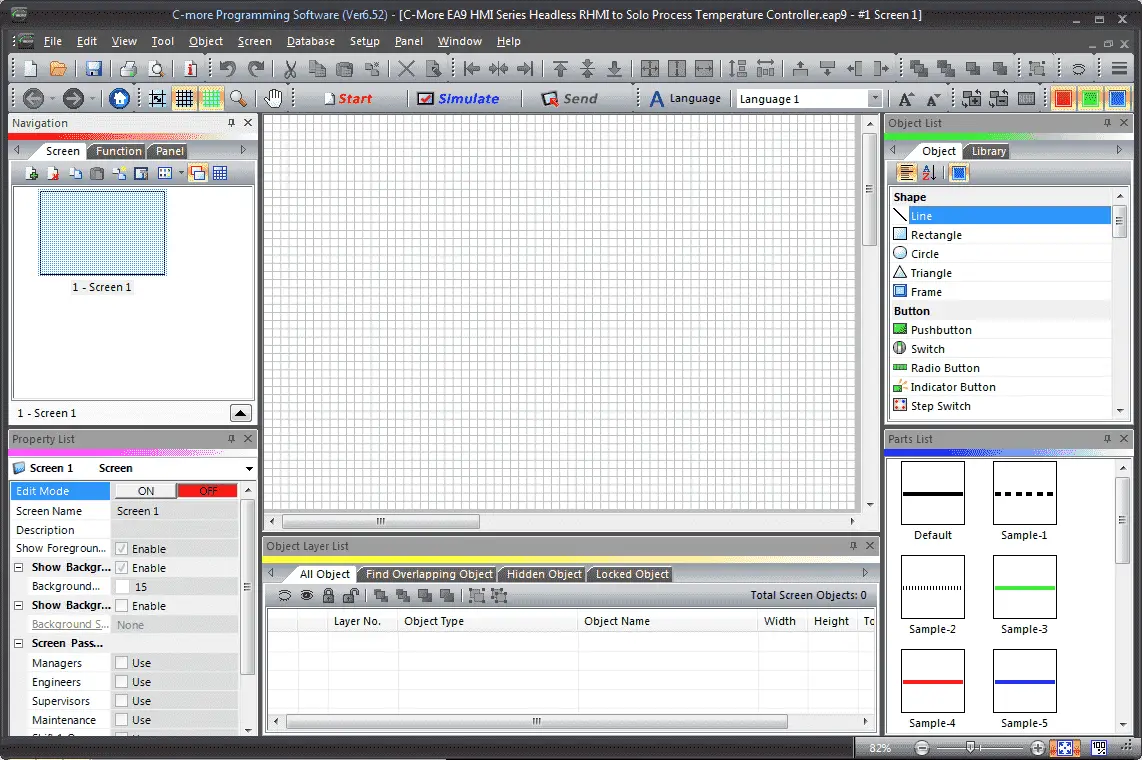
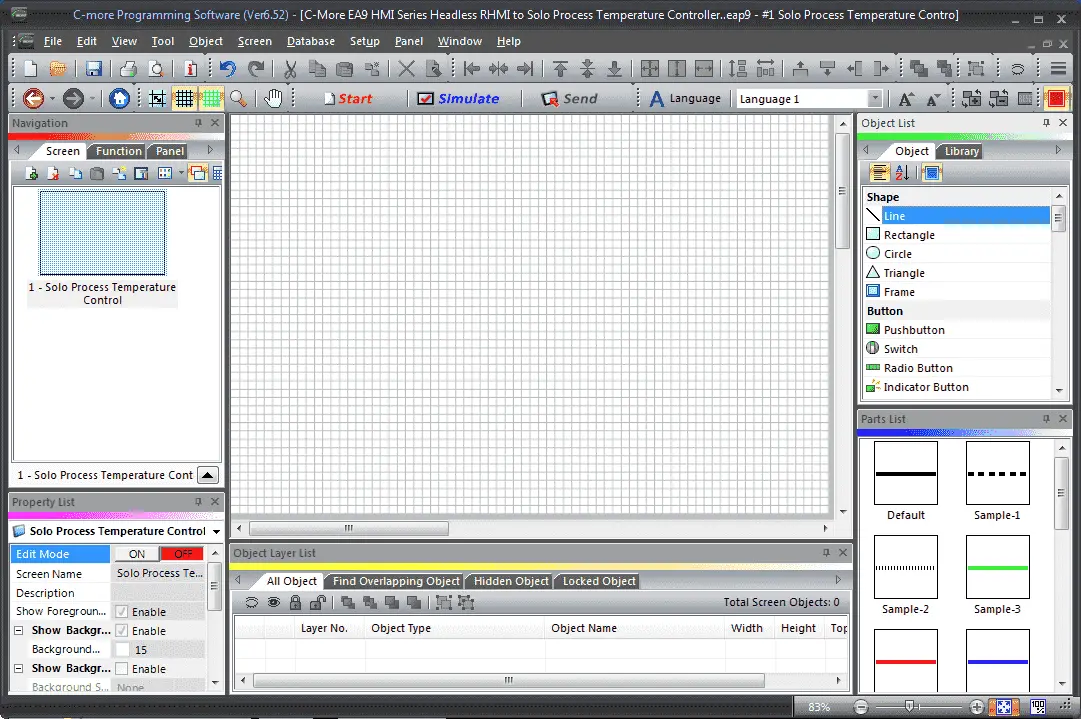
We will now create our first screen.
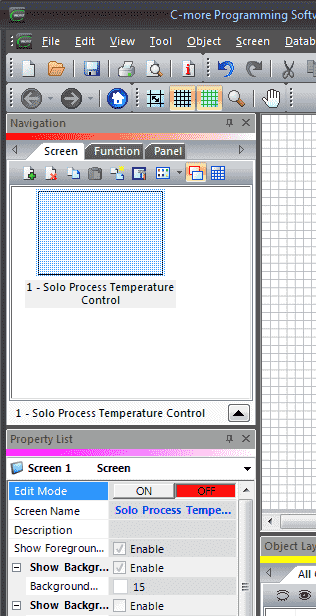
Name the screen as 1 – Solo Process Temperature Control.
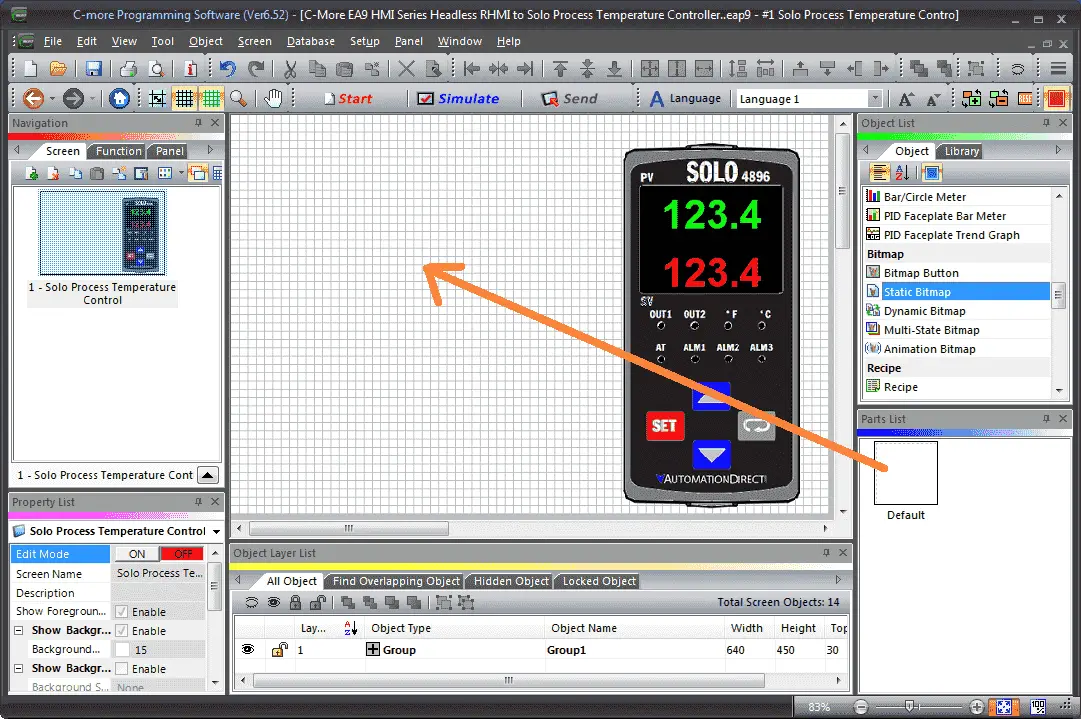
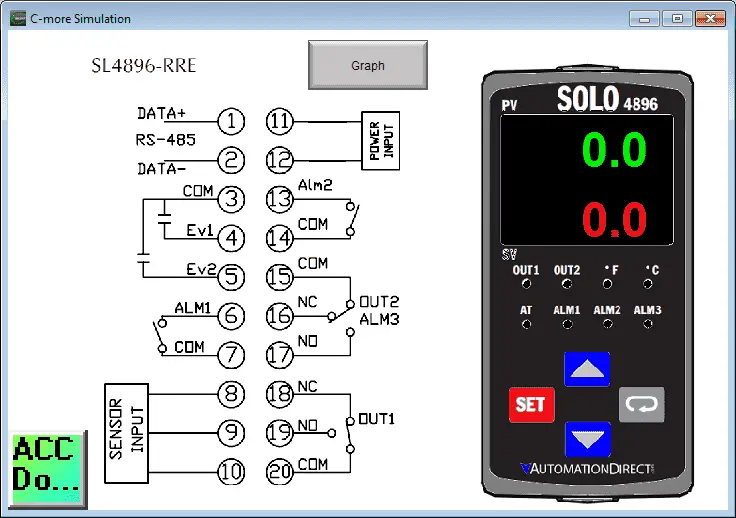
We will not create our user object library file Solo 4896. What this will be is an object that we can create and use over again in many different applications.
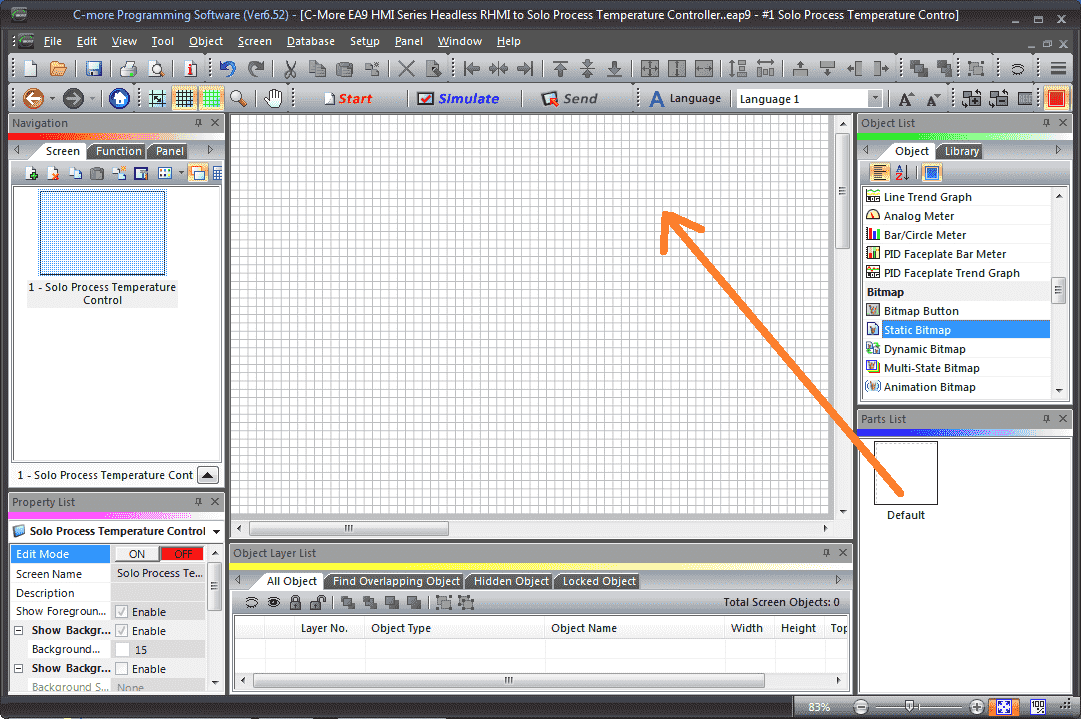
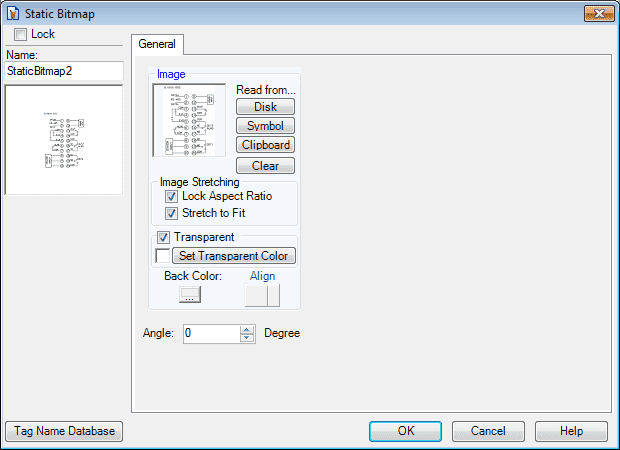
Select the static bitmap object and drag this onto the workspace.
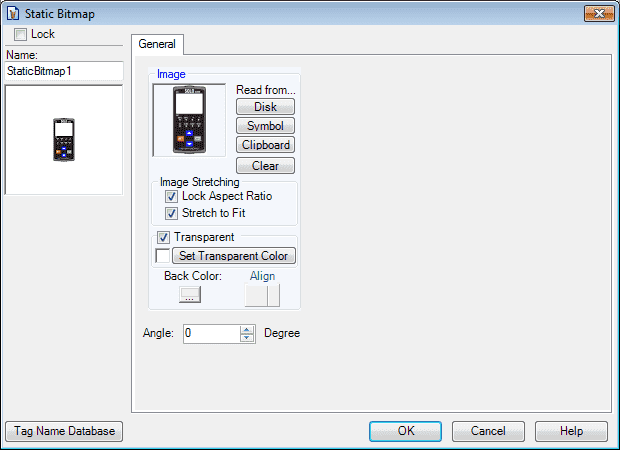
We will select an image of the Solo taken from the product specification guide. Scanning this into a picture editing software like paint, we can colour and set it to the resolution that we want. In our case, we do not want this to be any larger than 720 x 480 pixels. (This is the resolution of our project.)
Note: We have set the transparent colour to white. This means that the objects behind our image will be seen if it is in the white area.
Select OK.
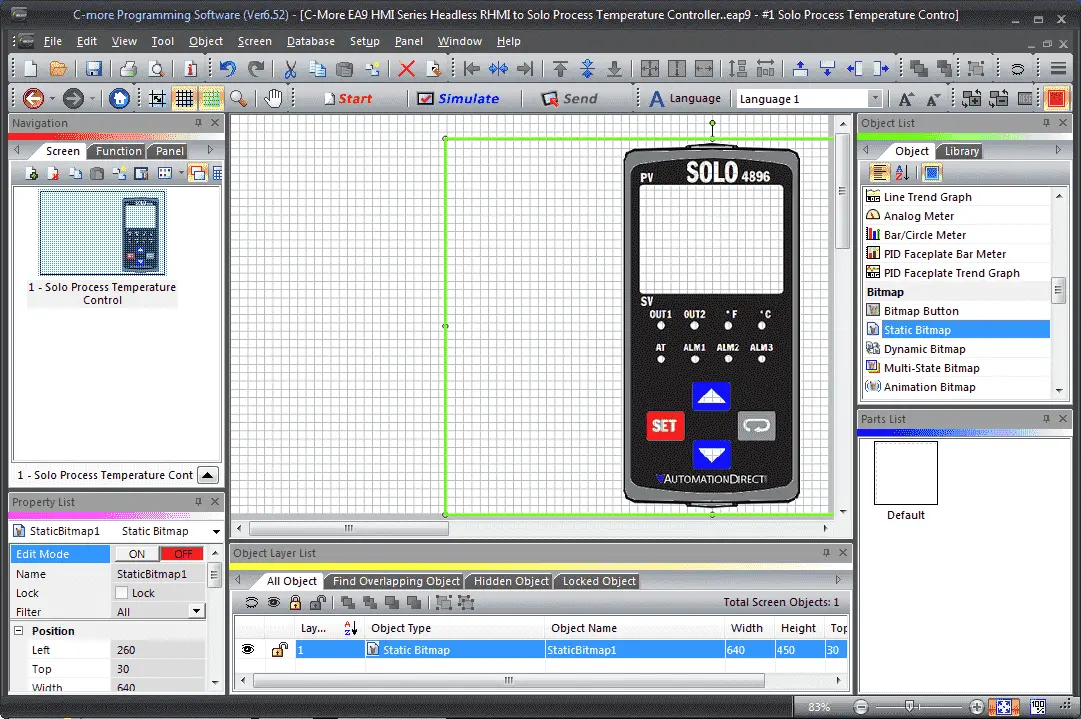
Using the mouse; size and position the image on our screen.
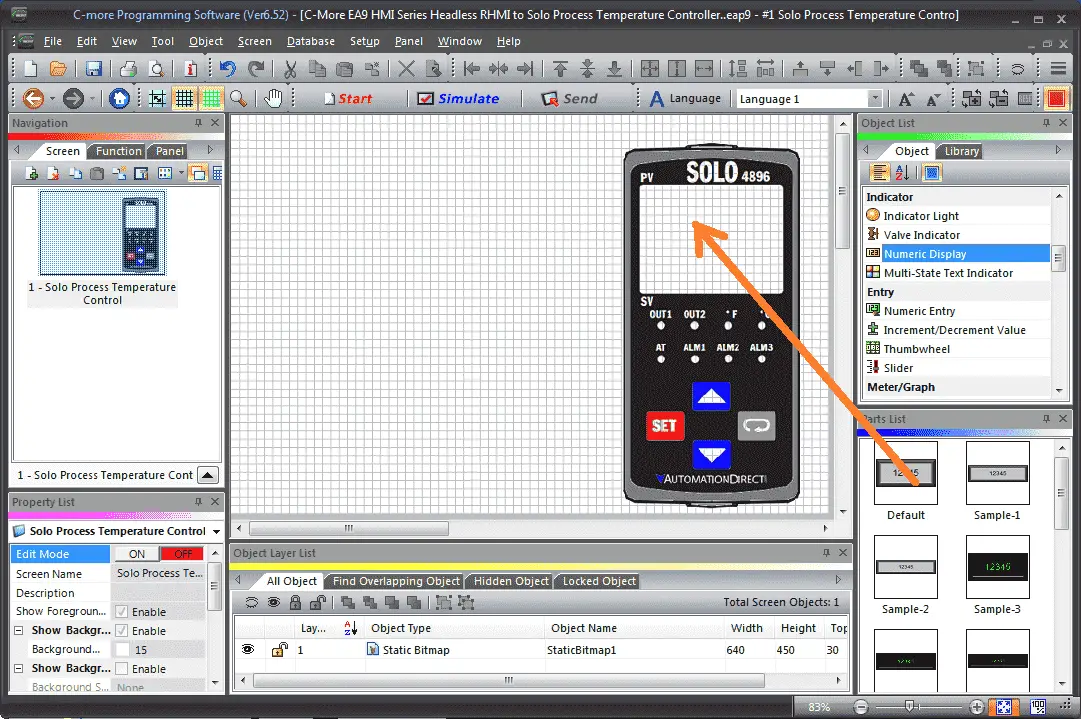
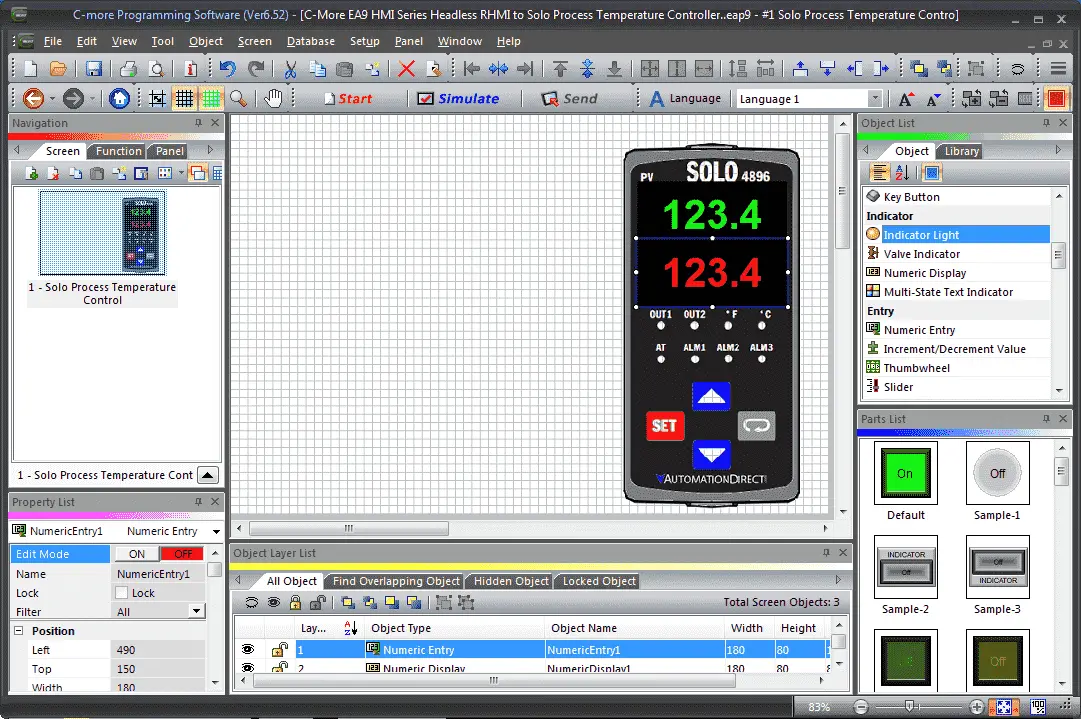
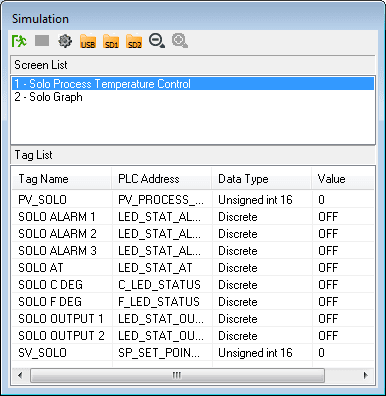
We will now show the present value (PV) of the solo on our screen. Select the numeric display object and drag this onto the workspace.
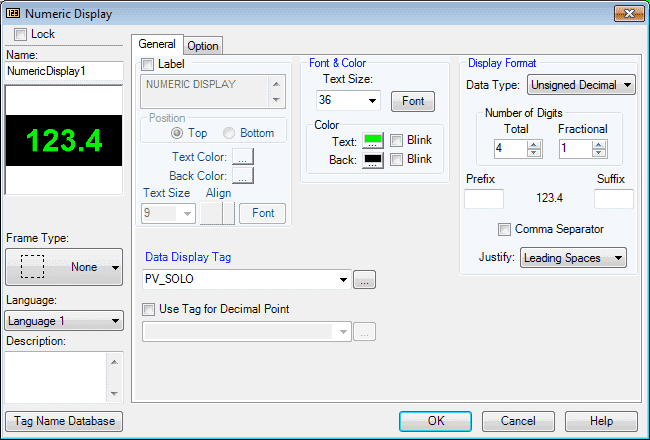
We will change the font and size to simulate the look on the Solo unit. The data display tag will be PV_SOLO. Select OK.
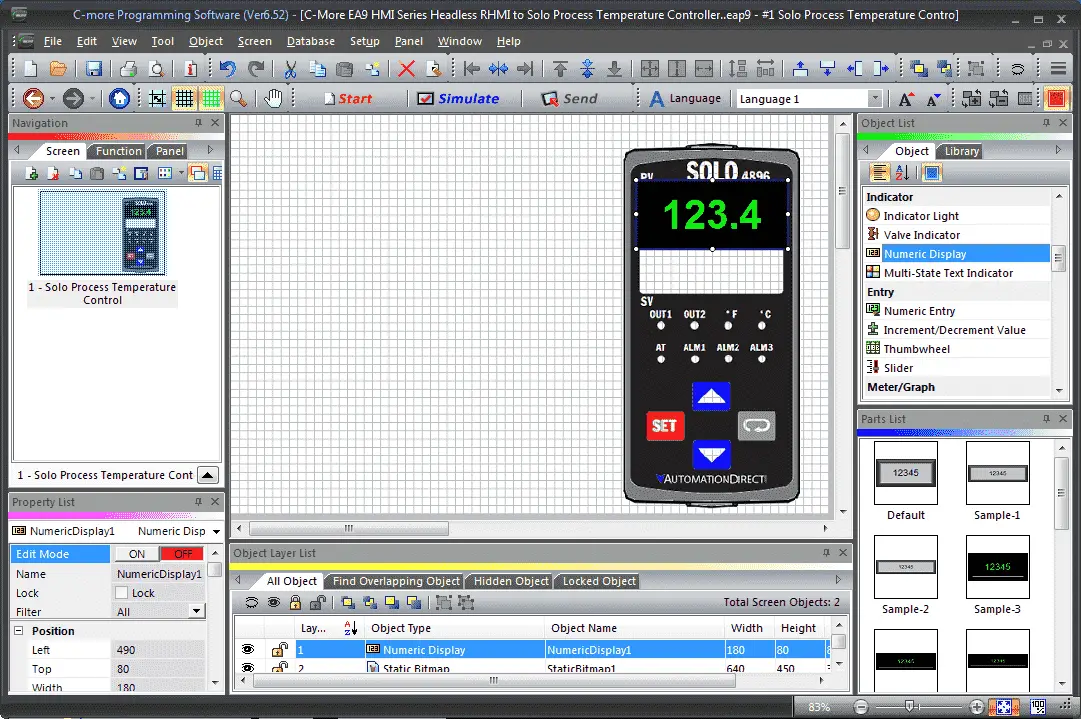
Size and position the object on the screen.

Select the numeric entry object and drag this onto the workspace. This will show the set value (SV) of the solo.
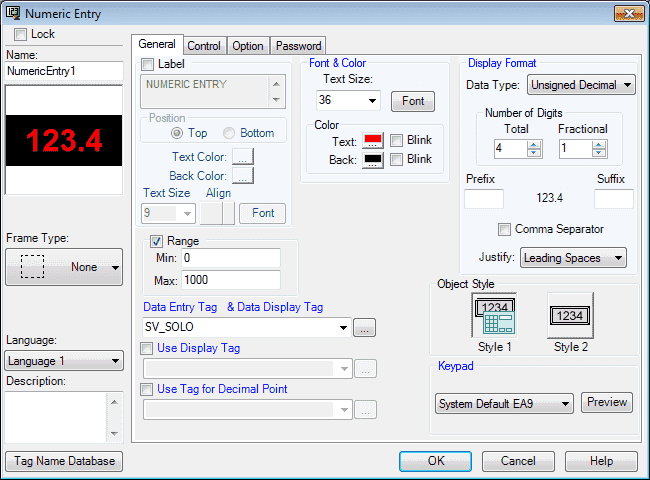
We will change the font and size to simulate the look on the Solo unit. The data display tag will be SV_SOLO. We will use the default system keypad. Select OK.
Size and position the object on the screen.
Note: Some overlapping is OK. We will be fixing this later.
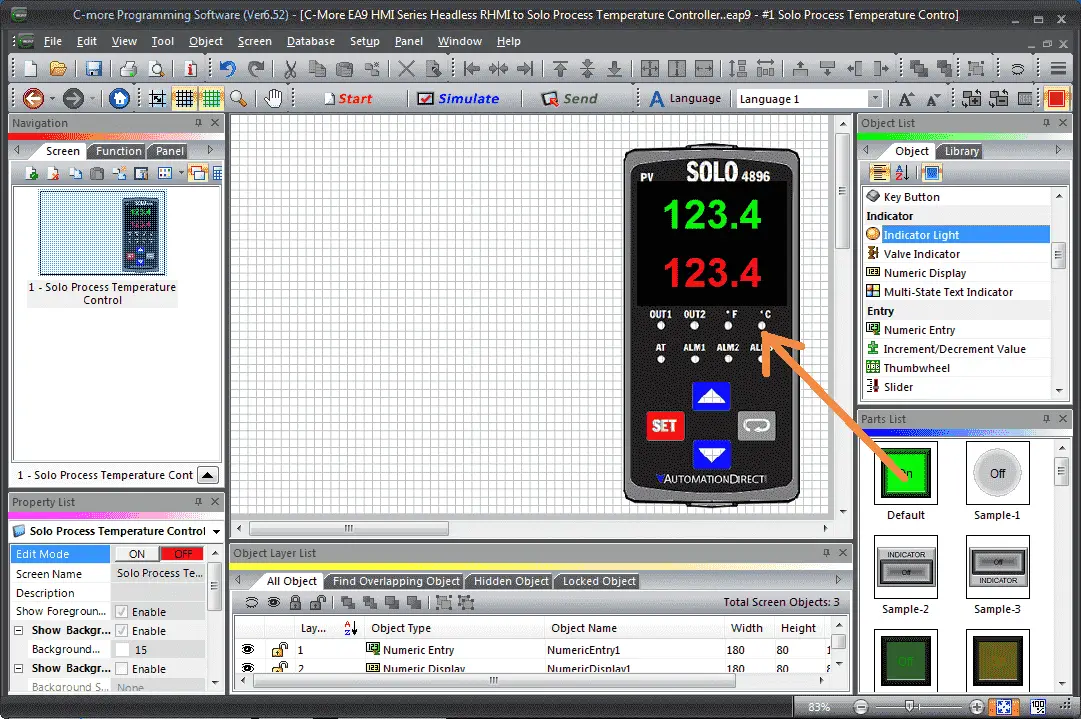
Select the indicator light object. Drag this onto the workspace.
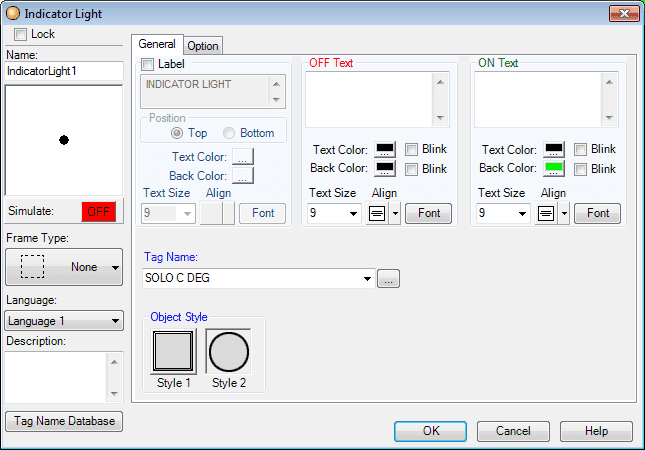
Remove the ON and OFF text. The tag name will be SOLO C DEG. Select OK
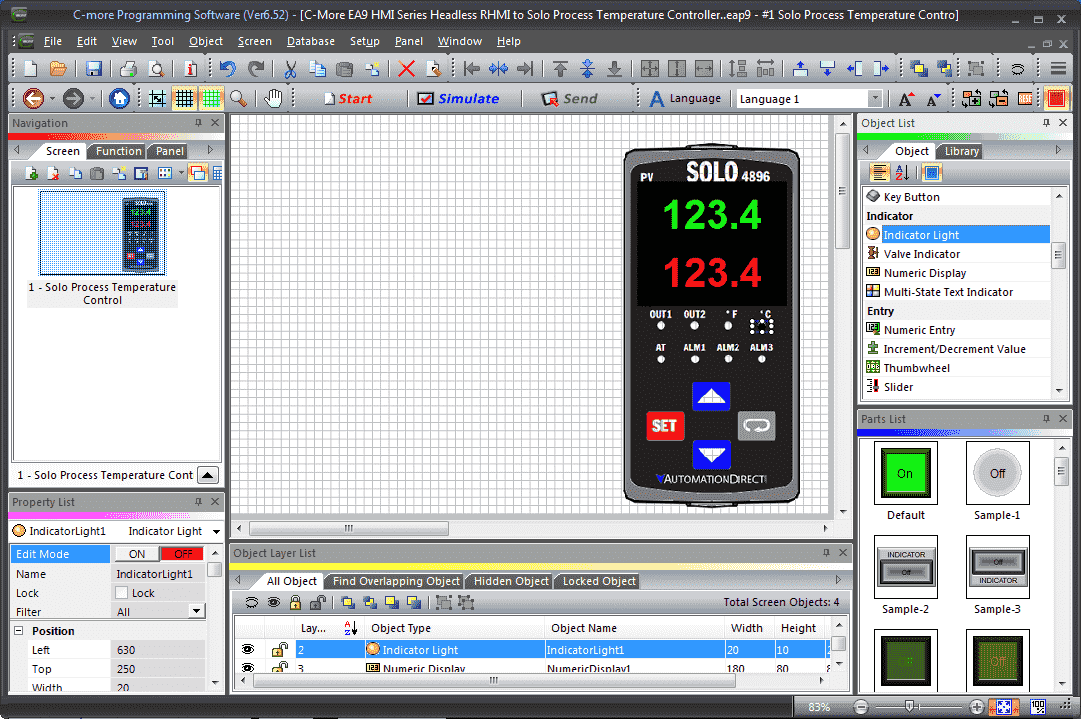
We will place this under the degree C location of our bitmap. Duplicate this for all of the other indicator lights on our Solo 4896.
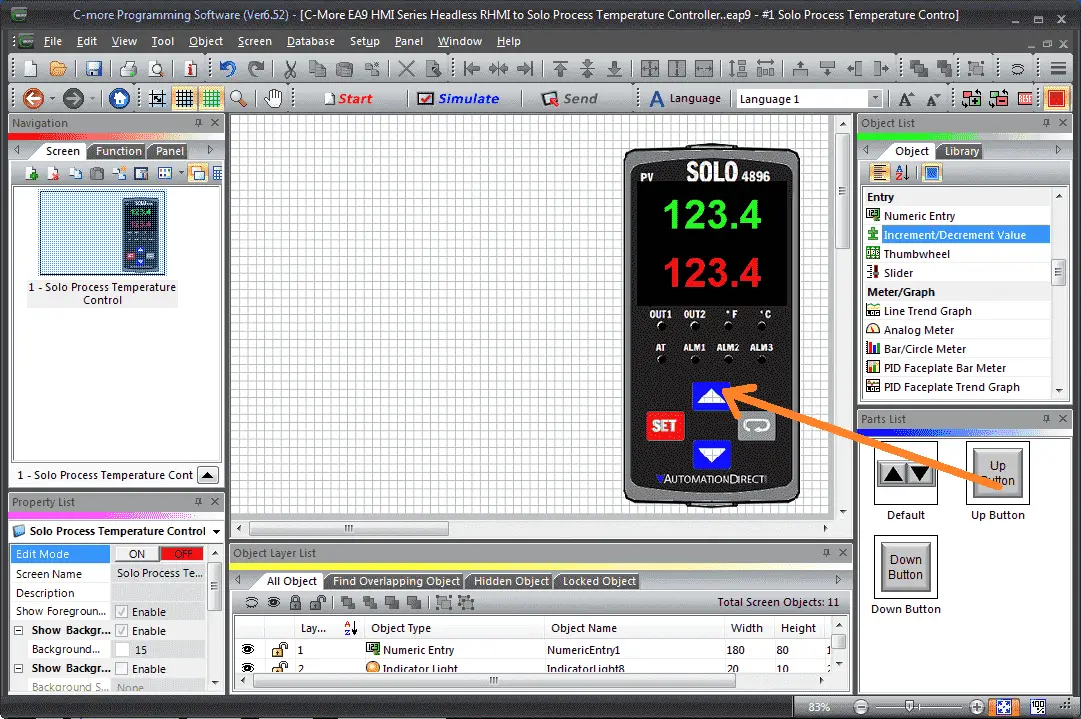
Select the increment / decrement value object. Under the parts list drag the up button onto the workspace.
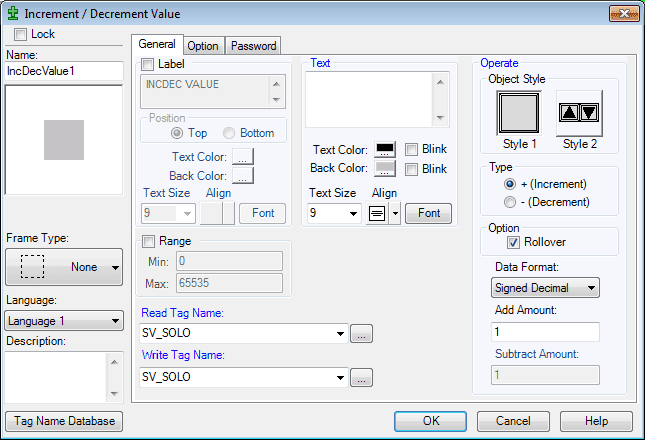
Remove the text and set the SV_SOLO as the tag name for the read and write tags. Select OK.
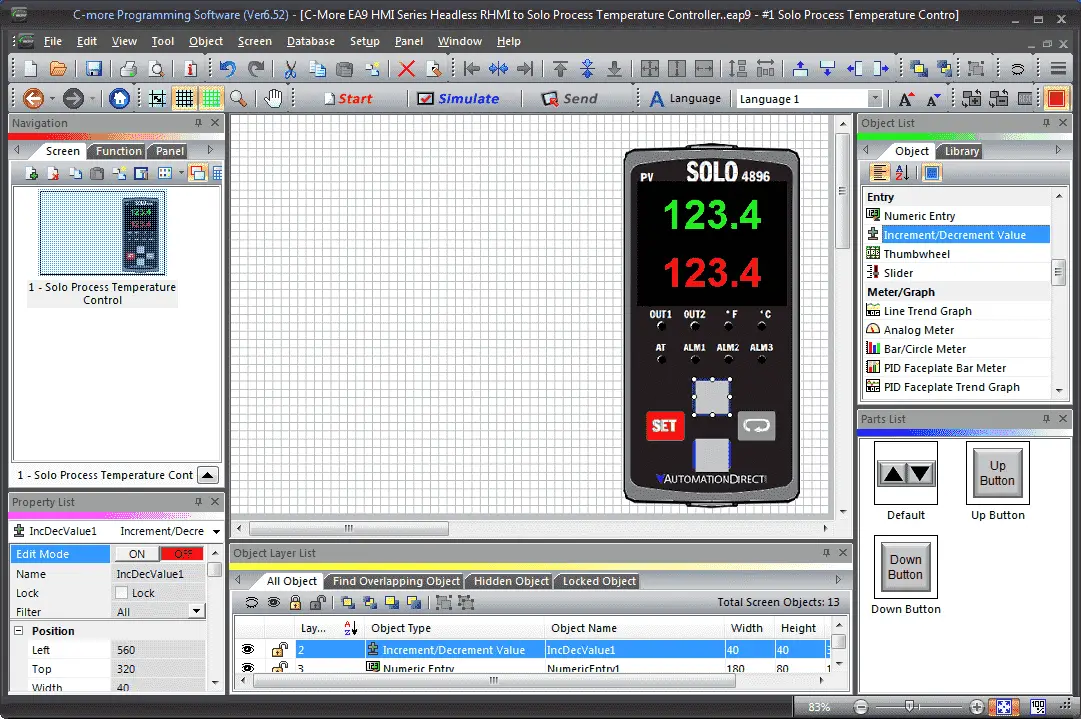
Position this over the up button on our bitmap. Select the down button. Remove the text and set the tags the same as the up button. Position down button this over the down button on our bitmap.
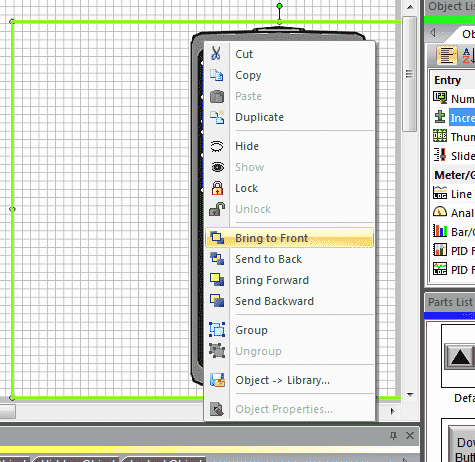
Select Solo bitmap. Right-click and select bring to front. This will allow the bitmap to be seen and the objects to be seen only through the transparent colour selected.
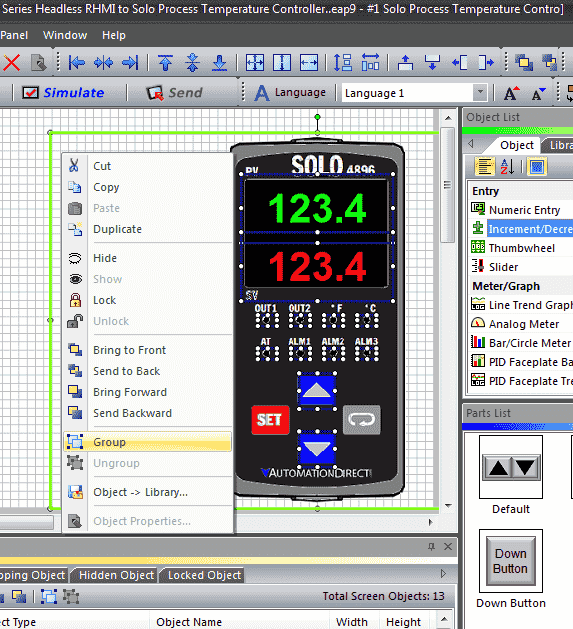
Select all of the objects in our Solo graphic. Right-click and select group. This will create one group with all of our objects in it. We can now move this around our screen and all of the objects will remain in their relative positions.
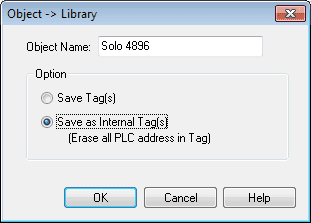
Right-click again on the group and select Object – Library…
Enter the object name of Solo 4896. Select the option of ‘Save as Internal Tag(s)’. Then select OK.
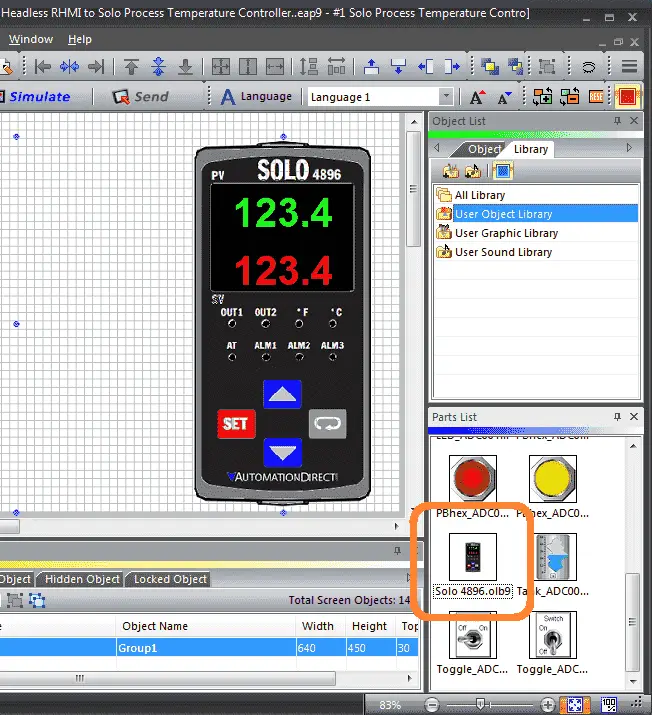
We have now saved our Solo 4896 user object. Select the user object library under the library tab. Scroll down until you see the object that we have just created.
User object library items can be located in the following directory.
C:\Program Files (x86)\AutomationDirect\C-more_EA9_V6\ObjectList
Add another static bitmap to our workspace.
We will call up the wiring diagram of the Solo. Select OK.
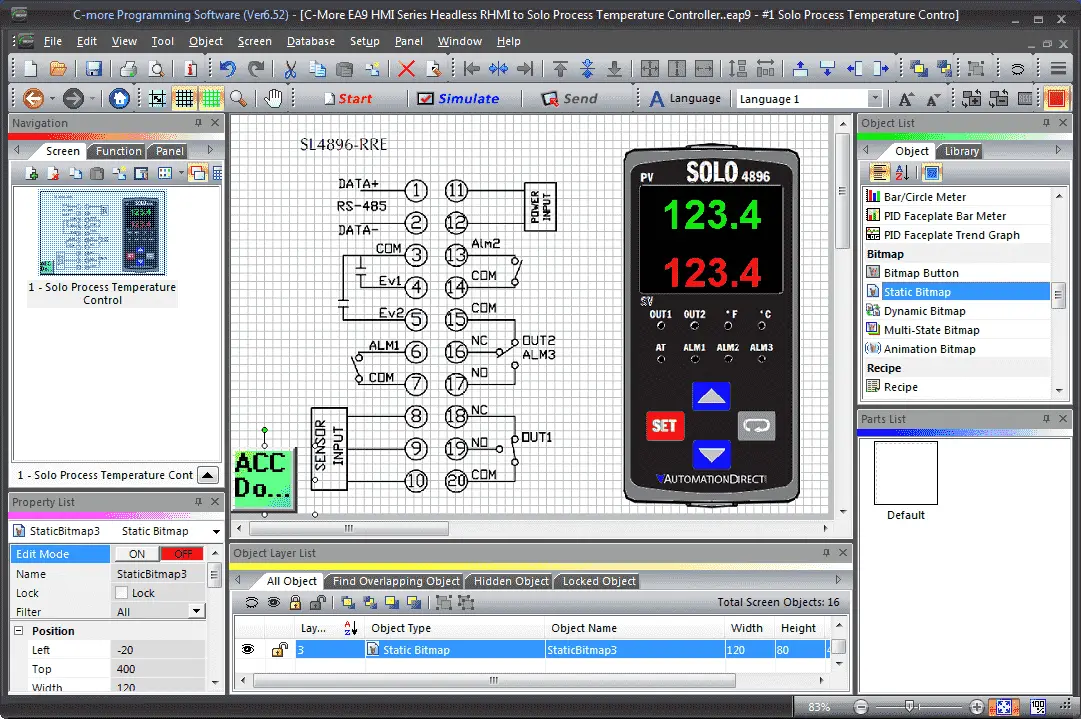
We will also add our ACC Automaton logo to the screen.

Select the screen change pushbutton object and drag it to the worksheet.
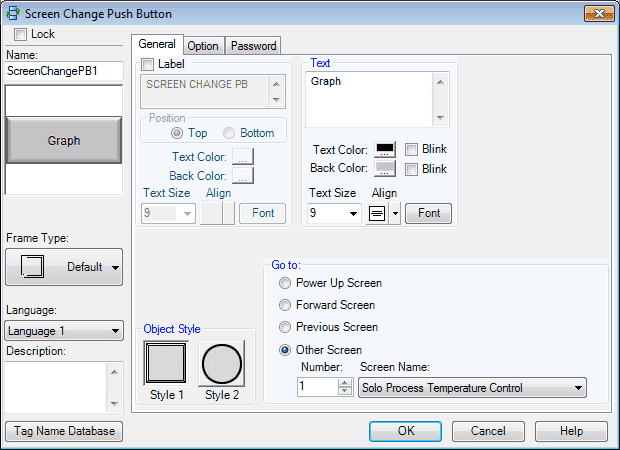
Name this Graph and select screen number 2. Select OK.
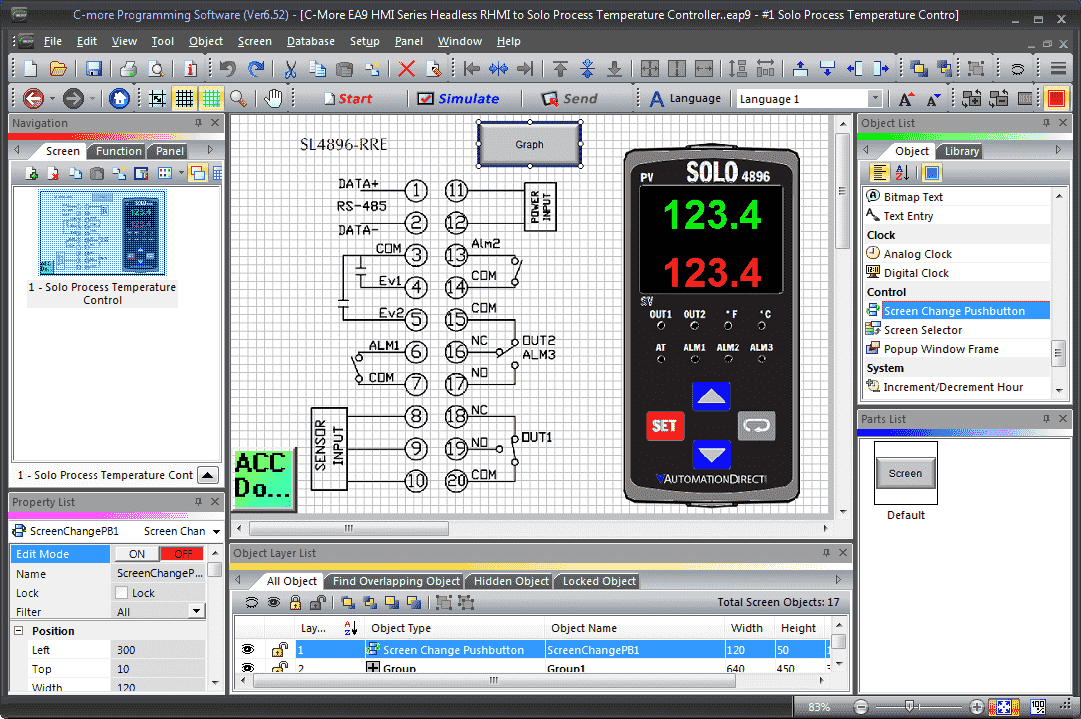
Screen 1 is now complete.
Create Screen 2 – C-More to Process Temperature Controller
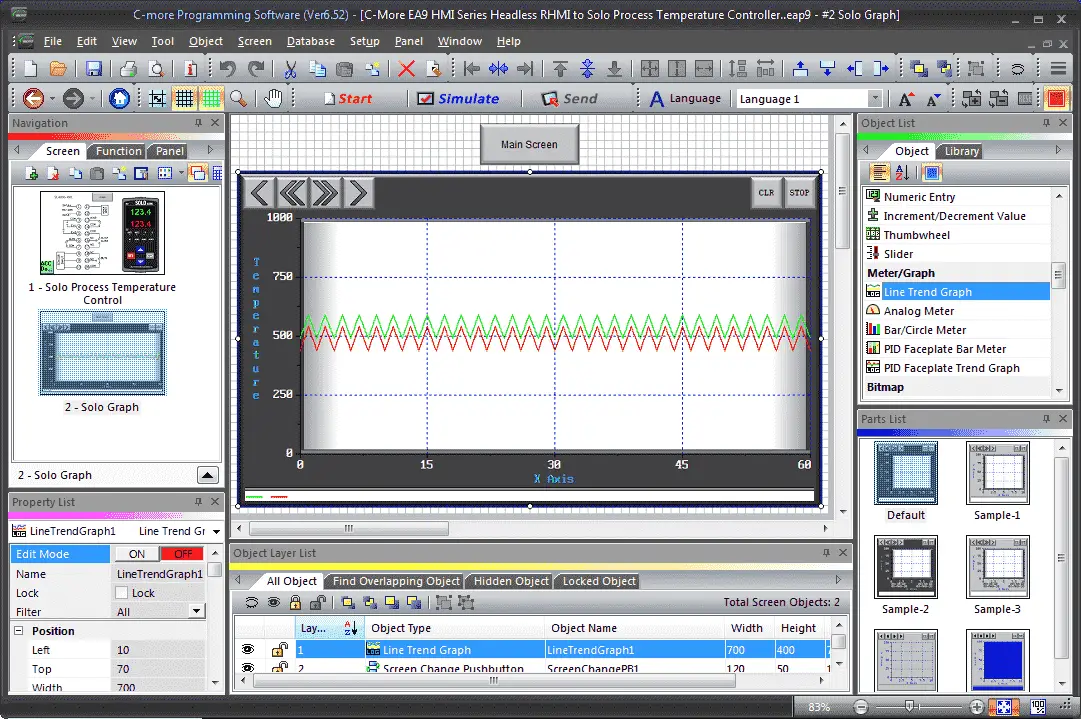
Create screen 2 and call it Solo Graph.
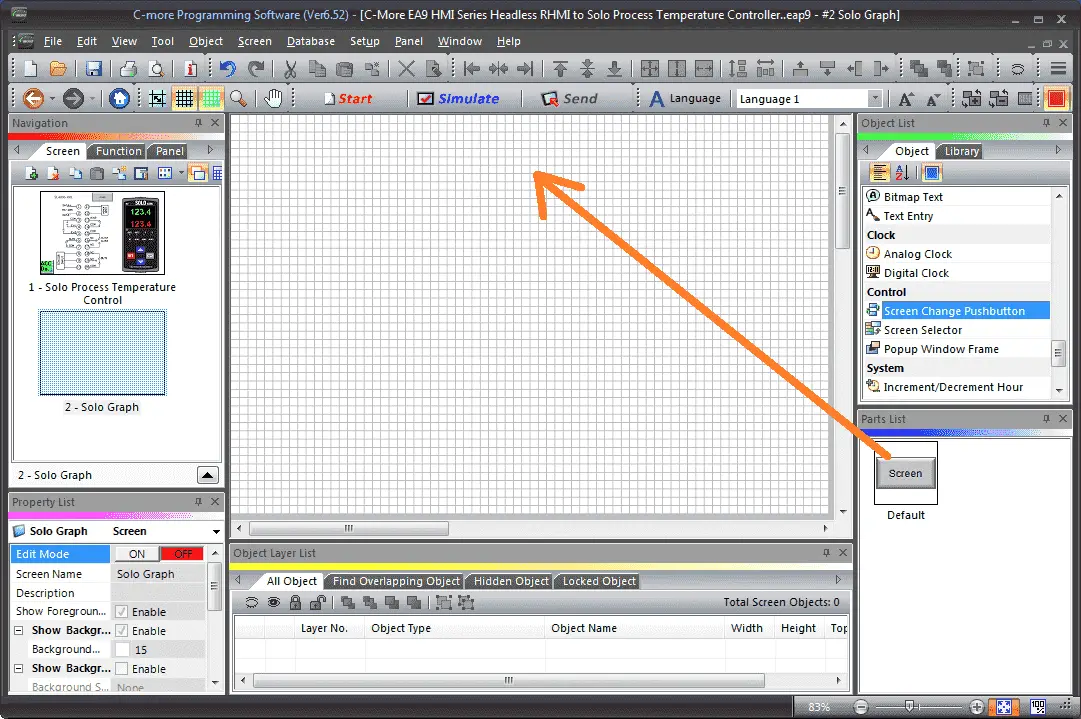
Select the screen change pushbutton object and drag it to the screen 2 worksheet.

Call the pushbutton Main Screen and have it go to Screen 1. (Solo Process Temperature Control) Select OK.
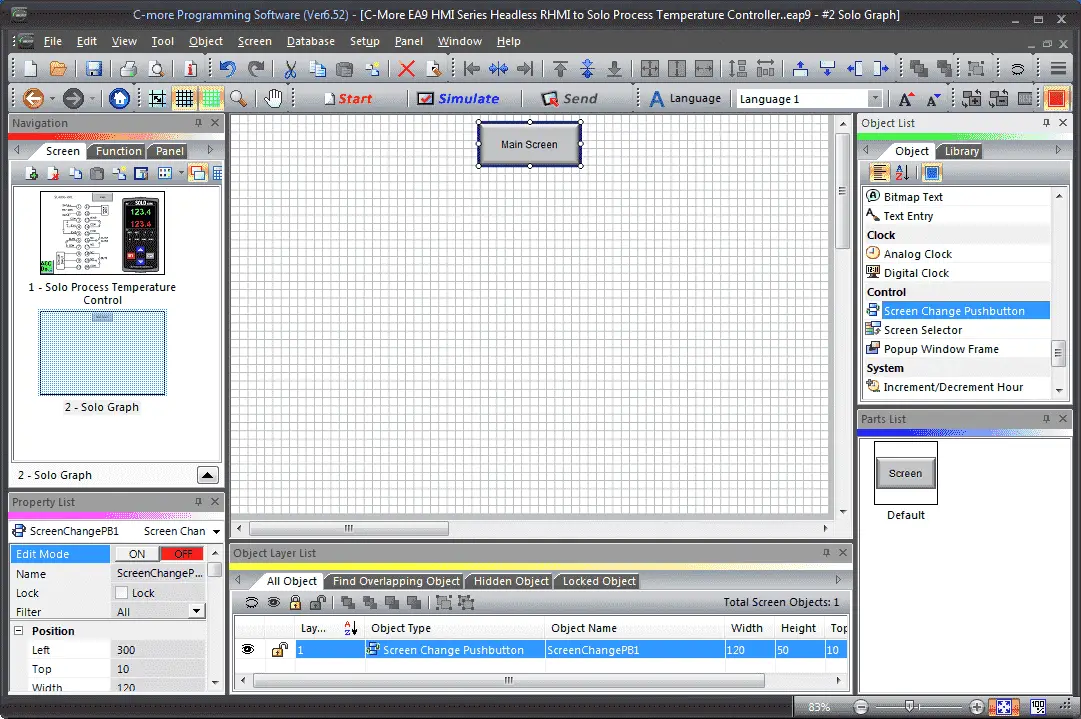
Position our main screen pushbutton on the screen. These two buttons will be our navigation for the screens.
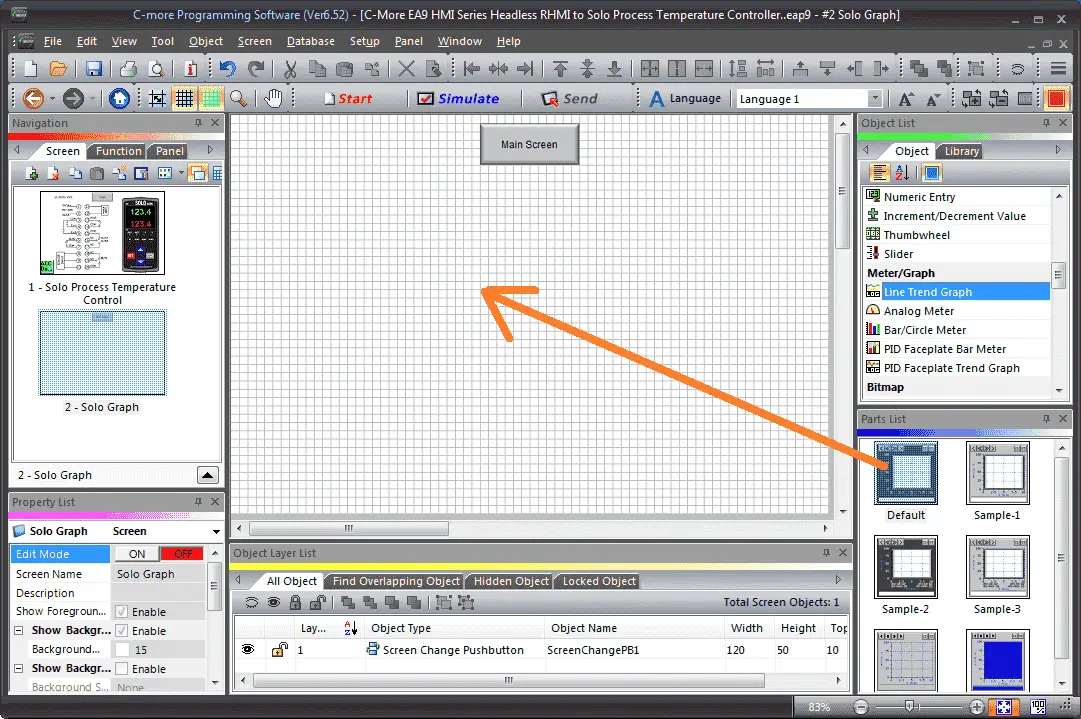
Select the line trend graph under the Meter/Graph heading in the objects. Click and drag the default trend onto the workspace.
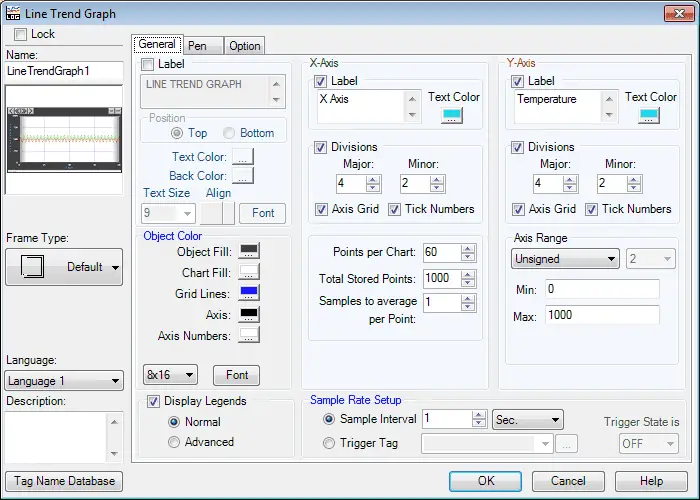
You can edit the way that the graph looks by the general tab settings. We changed the Y-axis to the temperature. Our axis range is 0 to 1000. Select the Pen tab.
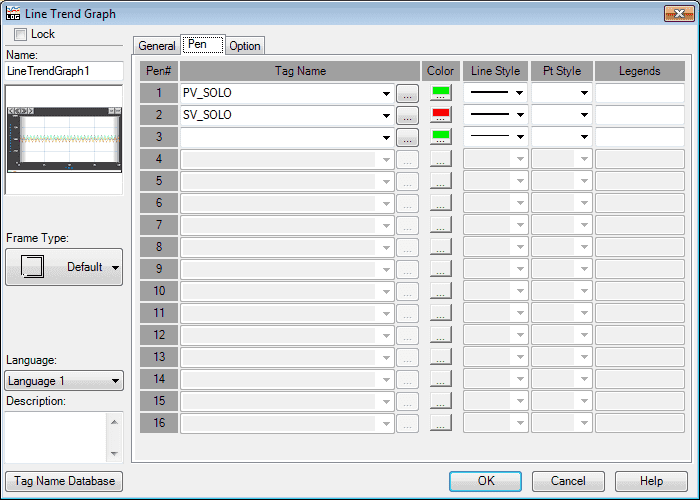
We will be plotting the present value (PV_SOLO) and set value (SV_SOLO) onto the trend graph. Green has been selected as the colour for the PV and red for the SV. Select the options tab.
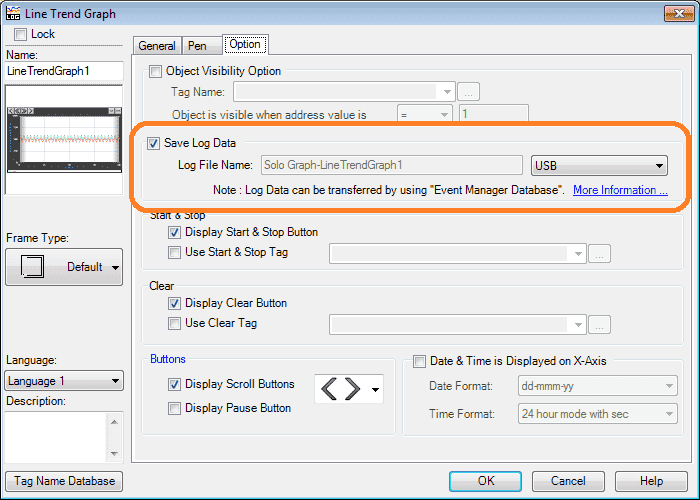
Select the save log data option. We will save this to a USB stick that we will be using on our EA9-RHMI.
Detailed information on data logging can be found at the following location.
Data Logging – Video
Select OK.
We now have our C-more program complete.
Simulate our C-More Program to Solo Process Temperature Controller
Call the simulator by the main menu icon or use the main menu | File | Simulation…
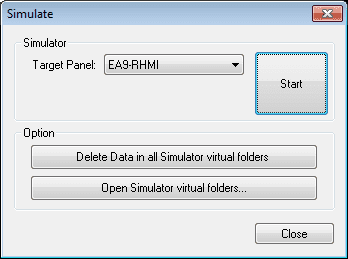
Our target panel (EA9-RHMI) will be displayed under the simulate window. Select the start to start our simulation.
The simulator will open up two windows. These windows will allow us to change pages and test our objects on the screens.
Detailed information on the simulator can be viewed at the following address.
Simulate Project – Video
Watch the video below to see the setup and remote access control for the headless c-more unit communicating to the Solo process temperature controller.
Download the C-More program, bitmaps, and object.
C-More EA9-RHMI Features
C-more EA9 series headless HMI supports HD 1280 x 720 (60Hz) pixel screen
resolution HDMI output, 800MHz CPU, 12-24 VDC powered, includes (2) serial ports, USB 2.0 Type A and B ports and one Ethernet port. Supports (1) SD memory card. Compatible withEA9-PGMSW programming software version 6.50 or later.
• Ethernet 10/100 Base-T port
(program/download & PLC
communication)
• Expansion Module Support
• Use EA-ECOM for second Ethernet Port
• Remote Internet access
• Serial PLC interface (RS-232/422/485)
• One built-in SD memory card slot
• 12–24 VDC powered
• HDMI audio/video out
• 82MB project memory
• Data logging
• 0 to 50°C [32 to 122°F] operating
temperature range
• DIN rail mountable
• UL, cUL & CE agency approvals
• 2-year warranty from date of purchase
C-More EA9 Panels from Automation Direct
https://www.automationdirect.com/adc/overview/catalog/hmi_(human_machine_interface)/c-more_touch_panels_ea9_series
C-More – Graphic Panel (EA9 Series) User Manual and Quick Start Guides
https://cdn.automationdirect.com/static/manuals/ea9userm/ea9userm.html
C-more Headless HMI (EA9-RHMI) Manual and Quick Start Guide
https://cdn.automationdirect.com/static/manuals/ea9rhmim/ea9rhmim.html
EA9-T10CL C-More Specifications
https://cdn.automationdirect.com/static/specs/ea9t10cl.pdf
C-More EA9 Programming Software (Current Version V6.42)
https://support.automationdirect.com/products/cmore.html
This software will enable you to program all of the C-More EA9 HMI units. It includes a simulator for your application.
Next time we will look at the Headless C-More HMI connect to the Solo process temperature controller and Click PLC. We will review the sharing of information using the c-more unit.
Watch on YouTube: C-More EA9 HMI Series Headless RHMI to Solo Process Temperature Controller
If you have any questions or need further information please contact me.
Thank you,
Garry
If you’re like most of my readers, you’re committed to learning about technology. Numbering systems used in PLC’s are not difficult to learn and understand. We will walk through the numbering systems used in PLCs. This includes Bits, Decimal, Hexadecimal, ASCII and Floating Point.
To get this free article, subscribe to my free email newsletter.
Use the information to inform other people how numbering systems work. Sign up now.

The ‘Robust Data Logging for Free’ eBook is also available as a free download. The link is included when you subscribe to ACC Automation.