The PLC productivity series includes a Drum and Sequencer instruction that can be very useful. The Drum instructions function similarly to an electromagnetically-operated drum sequencer. To better understand this concept, consider the mechanics of a music box. A small drum with pegs catches and flicks the chimes in a specific sequence to produce a tune. Similarly, in a PLC, you can have a drum activated either by an event (such as input from a limit switch or button) or by time.
The functionality of sequencers is comparable to that of drum instruction. A sequencer enables users to define each step based on time and/or event, and specific outputs can be configured to activate when entering or exiting the step. However, sequencers can produce up to 16 Boolean, Integer, or Numerical Tags per step in their output. On the other hand, drum instruction outputs are limited to the same 16-bit (Boolean) outcomes.
We have done similar Drum instructions for the BRX Series and Click PLC.
BRX PLC Drum Instruction – Video
Click PLC Drum Instruction – Video
Click PLC Drum Using Event Inputs for Sequencing
We will discuss the drum and sequencer instructions in the Productivity 2000 Series PLC. Simple examples will be given to demonstrate the power of these instructions. Let’s get started.
Previously in this Productivity 2000 series PLC, we have discussed the following:
P2000 Hardware Features – Video
Productivity Suite Software Install – Video
Communication (System Configuration) – Video
First Program – Video
Debug Mode – Video
PLC Program Documentation – Video
PLC CPU Display – Video
PLC Online Programming – Video
PLC Tag Database – Video
Ladder Logic Contacts – Video
Ladder Logic Outputs – Video
Timers – Video
Counter – Video
Productivity 2000 PLC Ladder Logic Math – Video
Data Handling Instructions
Part 1 – Video
Part 2 – Video
Array Functions
Part 1 – Video
Part 2 – Video
Part 3 – Video
P2000 Program Control – Video
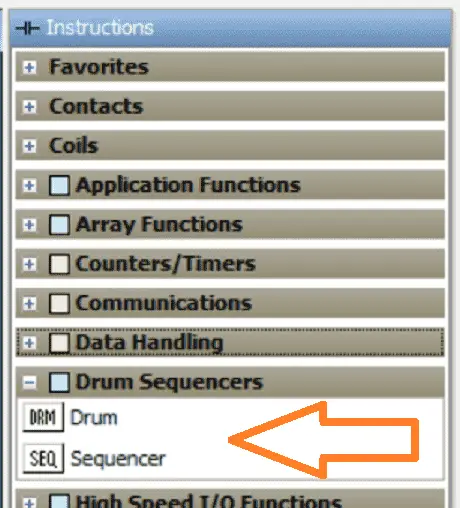
Productivity Drum (DRM) Instruction
The drum instruction will allow you to address simple repetitive processes of up to 200 steps and a maximum of 16 discrete (Boolean) outputs.
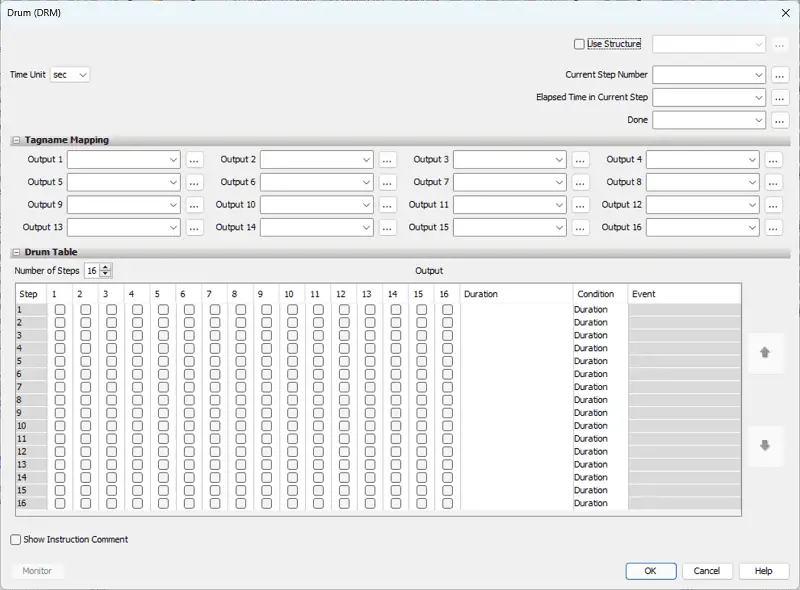
Time Unit – This is the time unit for the instruction. The default is seconds, but we will set this up for milliseconds. (msec)
Structure – We will set this instruction up to use a structure called Drum. This will set up all the parameters we need, like the current step number, elapsed time in the current step, and the done bit.
Tagname Mapping
This is where we will determine the Boolean outputs. In our case, we are using structure so that the outputs will be already determined.
Example: Drum.Output01
Drum Table
The number of steps can be selected up to a maximum of 200. In our case, we will have 45.
This table shows the steps and the corresponding bit status along the top. We can determine the on/off status of each of the bits we control for each step number.
Duration – This is the timed duration of each step. In our case, all of the steps will be set for 200. Since our time base is milliseconds, each step will be 200 msec.
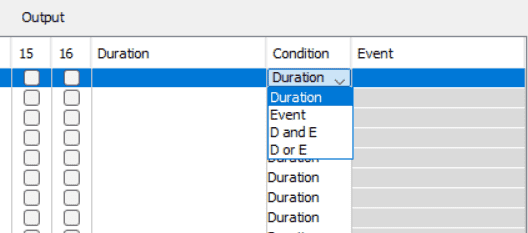
Condition
The condition for each step to advance to the next step can be set individually.
Event – Conditional requirement to complete the step. The result of the event condition will be true or false only. Example: Tag > 5
D and E – Both the duration and event must be done to move to the next step.
D or E – The duration of the time or the event must be true to move to the next step.
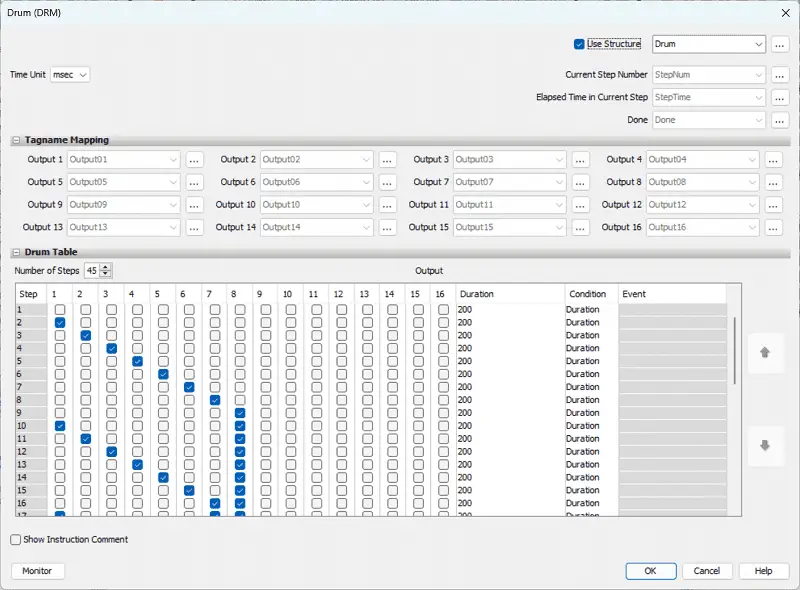
Here is our completed instruction. Click OK.
We can now add our conditions to the instruction.
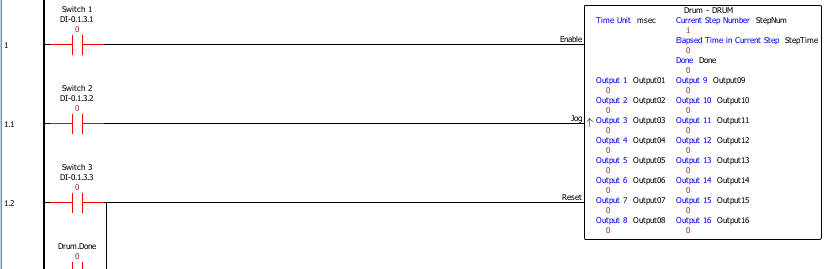
Switch 1 will enable the drum instruction.
Switch 2 will act as my jog, and Switch 3 will reset the drum. The reset will return the drum to the initial step 1.
In the Drum, we have Done Bit to reset the instruction. This will allow the sequence to keep repeating from the beginning again.
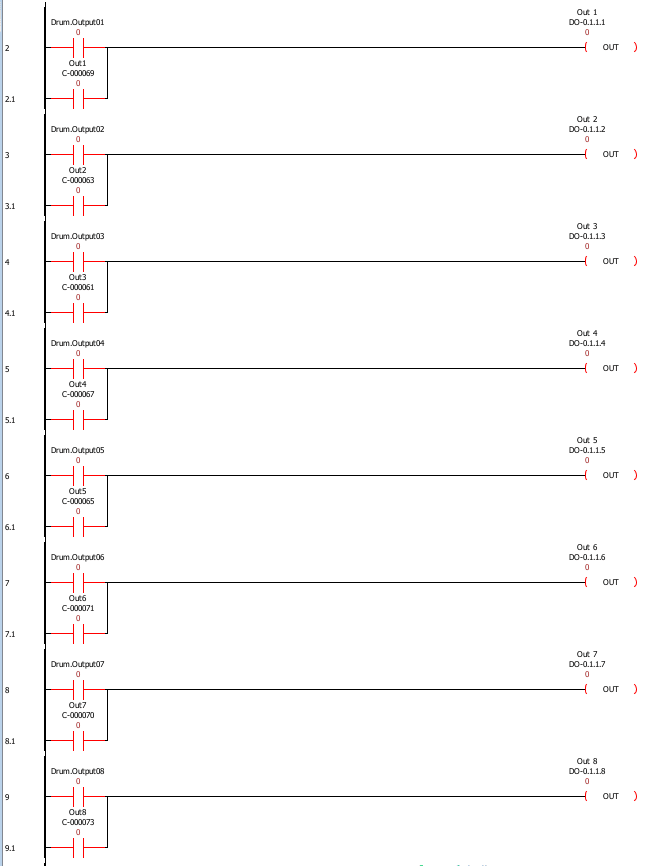
Individual outputs are assigned to the bits we control in the drum instruction. The two inputs for each output are for the Drum and Sequencer instructions. In our logic, either the drum or sequencer outputs can control the physical outputs.
Watch the video below to see this instruction in action.
Productivity Sequencer (SEQ) Instruction
The sequencer instruction will allow you to address complex repetitive processes of up to 200 steps in a single education with a maximum of 16 Boolean, Integer, or Numerical Tags per step.

Time Unit – This is the time unit for the instruction. The default is seconds, but we will set this up for milliseconds. (msec)
Structure – We will set this instruction up to use a structure called Sequencer. This will set up all the parameters we need, like the current step number, cycle number, elapsed time in the current step, and the done bit.
Limit Cycles – This will limit the total number of cycles the Sequencer makes.
Initial Step – This will allow you to specify the starting step number for each cycle.
Disable Lower Number Steps – This will allow the steps below the initial step cycle to be skipped.
Number of Steps – This will specify the total number of steps in the cycle.
A table can be seen above in the picture. The outputs for each step can be seen by hitting the button Show.
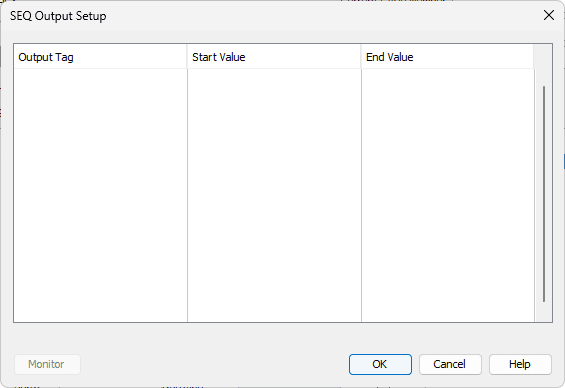
The SEQ Output Setup window will appear. You can enter up to 16 output tags and specify the start and end values. The start value is used going into the step. The end value is used going out of the step.
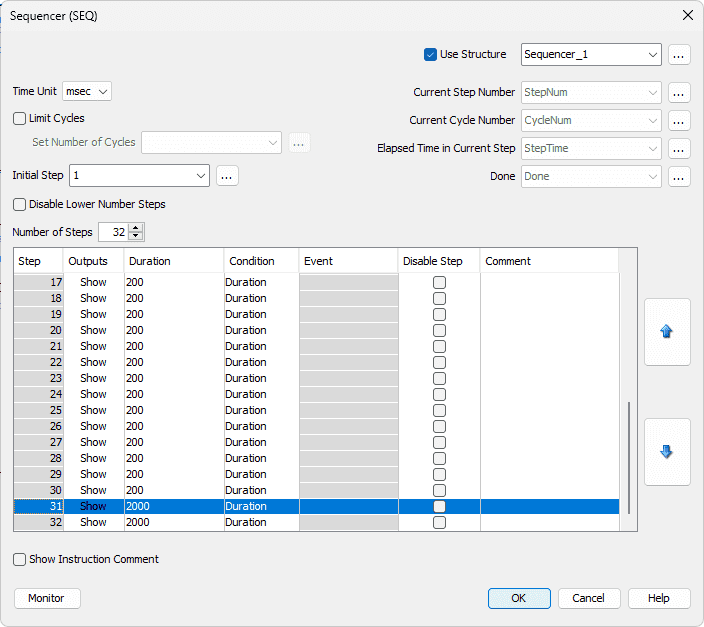
Duration – This is the timed duration of each step.
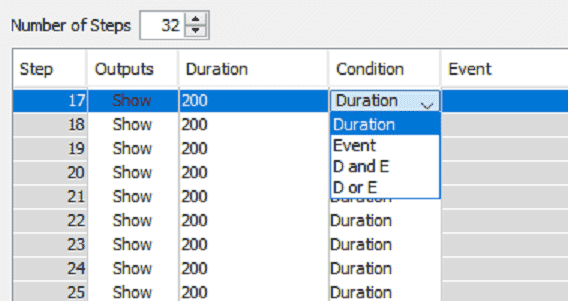
Condition
The condition for each step to advance to the next step can be set individually.
Duration – Minimum time only for each step
Event – Conditional requirement to complete the step. The result of the event condition will be true or false only. Example: Tag > 5
D and E – Both the duration and event must be done to move to the next step.
D or E – The duration of the time or the event must be true to move to the next step.
We can also disable a step in our Sequencer. A comment can be entered for each step to document what we want to happen in the program fully.
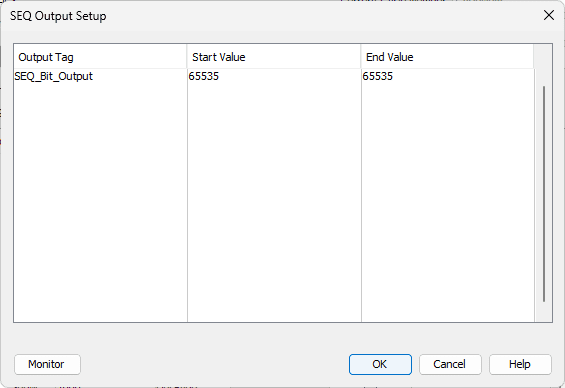
We will set up a tag called SEQ_Bit_Output. This is an unsigned 16-bit register.
Our sequence will be to turn one bit on in the 16 bits and have it rotate to the end and back again. (Similar to Knight Rider KITT lights.) This will take 30 steps to accomplish. Step 31 will have all the bits off, and Step 32 will have all the bits on. We will use Switch 8 to toggle between having all of the lights flashing on and off every 2 seconds and the KITT lights.
Program Instruction
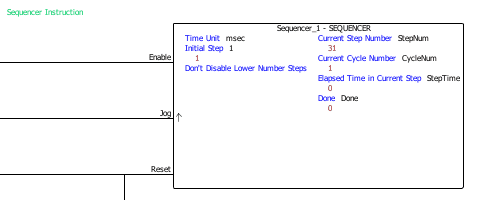
The sequencer instruction will have three inputs; Enable, Jog, and Reset.

Switch 4 will be our enable and Switch 5 will be the jog.
Switch 6 will be reset, or if Switch 8 is not on and the sequencer step number exceeds 30, the Sequencer will reset.

If switch 8 is on, we compare the sequencer step number to 1. If it is equal, we will move the number 31 into our sequencer step number. This will cause all of the lights to turn off.
Note: Step 32 (the last step) will cause all lights to turn on.
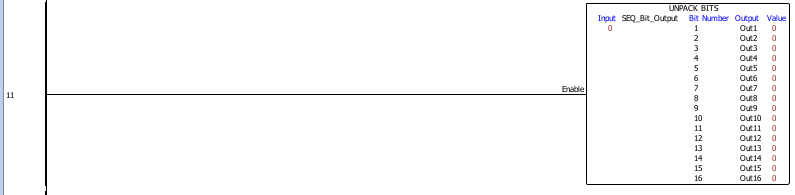
We use the unpack bits instruction to move the bits from our SEQ_Bit_Output tag to our individual 16 outputs.
Our ladder program for our Sequencer is now complete. Watch the video below to see this in operation.
Programming repetitive sequences are quickly done using the Drum and Sequencer instructions in your automation project. Not every controller can do this as quickly as the Automation Direct Productivity Series. This software provides several ways to manipulate your code for the desired result.
Download the PLC program here.
Watch the video below for the drum and sequencer instructions we created running on our Productivity 2000 Series PLC.
Productivity 2000 Series PLC from Automation Direct
Overview Link (Additional Information on the Unit)
Configuration (Configure and purchase a system – BOM)
User Manual and Inserts (Installation and Setup Guides)
Productivity Suite Overview (Features of the fully functional free software package for the Productivity Family of PLC (PAC) controllers)
Productivity Suite Programming Software (Free Download Link)
This software contains all the instructions and helps files for the Productivity Series.
Watch on YouTube: Productivity 2000 PLC Drum Sequencer Instructions
If you have any questions or need further information, please contact me.
Thank you,
Garry
If you’re like most of my readers, you’re committed to learning about technology. Numbering systems used in PLCs are not challenging to learn and understand. We will walk through the numbering systems used in PLCs. This includes Bits, decimals, Hexadecimal, ASCII, and Floating points.
To get this free article, subscribe to my free email newsletter.
Use the information to inform other people how numbering systems work. Sign up now.

The ‘Robust Data Logging for Free’ eBook is also available for free download. The link is included when you subscribe to ACC Automation.